
|
Use a very simple XNA program to learn many of the details regarding the incorporation of the XNA framework into the object-oriented C# programming language. Also learn about constructors, the this keyword, the base keyword, and some of the differences between a Console Application and a Windows Game application.
Published: January 26, 2010
Validated with Amaya
By Richard G. Baldwin
XNA Programming Notes # 0118
|
This tutorial lesson is part of a continuing series dedicated to programming with the XNA Game Studio. I am writing this series of lessons primarily for the benefit of students enrolled in an introductory XNA game programming course that I teach. However, everyone is welcome to study and benefit from the lessons.
An earlier lesson titled Getting Started provided information on how to get started programming with Microsoft's XNA Game Studio. (See Baldwin's XNA programming website in Resources.)
Moving from C# to XNA
All of the lessons prior to this one have been preparing you for this lesson. This is the lesson where we will begin applying what you have learned about C# and OOP to the XNA framework.
My objective
My objective is that you fully understand what you are doing when you write C# programs using the XNA framework. I don't want you to simply be filling in the blanks and hacking something together in hopes that you can find a combination of statements that seems to work. If we can accomplish that, then you will be prepared to go much further into the sophisticated use of the XNA framework on your own after you complete the class.
Fasten your seatbelt
This lesson may be a rough ride from a technical viewpoint, so fasten your seatbelt, arm yourself with a pot of coffee, and let's go.
I recommend that you open another copy of this document in a separate browser window and use the following links to easily find and view the figures and listings while you are reading about them.
I recommend that you also study the other lessons in my extensive collection of online programming tutorials. You will find a consolidated index at www.DickBaldwin.com.
A software framework
XNA is a very sophisticated C# application. It isn't simply a program in the sense of the programs that you have seen in this course up to this point or a word processor or a spread sheet. Instead, it is a software framework designed specifically to make it easier for you to create computer games using the C# programming language.
What is a software framework?
Here is part of what Wikipedia has to say about a software framework:
A software framework, in computer programming, is an abstraction in which common code providing generic functionality can be selectively overridden or specialized by user code providing specific functionality. Frameworks are a special case of software libraries in that they are reusable abstractions of code wrapped in a well-defined API, yet they contain some key distinguishing features that separate them from normal libraries.
Software frameworks have these distinguishing features that separate them from libraries or normal user applications:
In short, a framework is a computer program that helps you to write computer programs. The description given above is a good match for the XNA framework.
New project choices in Visual C#
Up to this point in this series, all of the programs that I have explained have been Visual C# Console Applications.
Assuming that you have Visual C# 2008 and XNA Game Studio 3.1 installed on your computer, if you start Visual C# and select New Project from the File menu, you have a choice of about fourteen different kinds of projects that you can create within Visual C#. One of those choices is to create a Visual C# Console Application.
When you create a Console Application, a project tree is created on your disk containing about seven files in about ten folders. One of those files is a C# source code file named Program.cs. This file, which is the skeleton of a new class named Program is immediately opened in the editor pane in Visual C#.
The skeleton code in the file looks like Listing 1 when it first opens.
Listing 1. Initial contents of the file named Program.cs for a Console Application. using System;
using System.Collections.Generic;
using System.Linq;
using System.Text;
namespace junk1 {
class Program {
static void Main(string[] args) {
}
}
}
|
Build and debug
If you select Build a solution on the Build menu and then select Start Debugging on the Debug menu, the program will run and terminate almost immediately. At that point, the project tree will have expanded to about seventeen files in about eleven folders even though the program hasn't yet done anything useful.
The Main method
As you have learned in earlier lessons, every C# program must have a Main method. Program execution begins and ends in the Main method. When control is in the Main method and it no longer has any code to execute, the program terminates. The Main method in Listing 1 is empty, which explains why the program runs and terminates almost immediately.
The starting point for a Console Application
This is the starting point for creating a Console Application in Visual C#. To cause your program to exhibit some useful behavior, you may add code inside the Main method, add new methods to the Program class, define new classes, instantiate objects, call methods on those objects etc.
Another choice that you have when creating a new project is a Windows Game (3.1) application. Once again, a project tree is created on your disk but it is quite a bit larger than the tree that is created for a console application. For a game project, there are initially about ten files in about 23 folders. (Some of the files are initially empty.)
Source code files
As before, there is a C# source code file named Program.cs along with another C# source code file named Game1.cs. Unlike before, however, the file named Program.cs is not opened in the editor pane of Visual C#. Instead, the file named Game1.cs is opened in the editor pane.
Build and debug
If you build and debug this program at this point, it does not run and terminate immediately like a console application. Instead it runs and displays a game window like the one shown in Figure 1 (except that it is quite a bit larger).
Figure 1 Initial game
window.
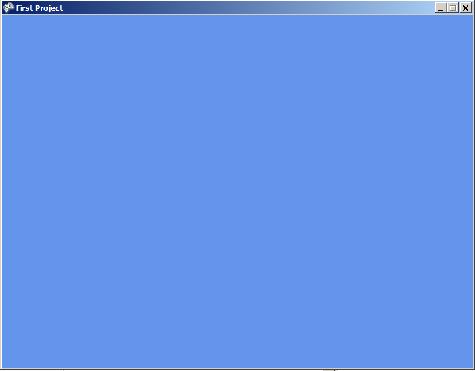
The game window will remain on your computer screen until you terminate the program by clicking the X in the upper-right corner or terminate it in some other way.
The file named Program.cs
The file named Program.cs doesn't automatically open in the editor for one simple reason. The creators of XNA didn't intend for us to modify it. However, it will be very instructive for us to take a look at it anyway. The source code contained in the file named Program.cs, (with some comments removed to reduce the clutter and some explanatory comments added), is shown in Listing 2.
Listing 2. The file named Program.cs for a Windows Game project. using System; namespace junk2 { static class Program { static void Main(string[] args) { using(Game1 game = new Game1()) { game.Run(); }//end using block }//end Main method }//end class Program }//end namespace junk2 |
Instantiate a Game1 object and call the Run method
The code with the cyan highlight in Listing 1:
This code is inside the Main method in the file named Program.cs. The Main method runs when the program is started. The call to the Run method starts the game portion of the program running.
What do we know about the class named Game1?
We don't know anything about the class named Game1 yet, but we will learn about it shortly. Before we get to that, however, I need to explain some unusual syntax in Listing 2.
The using directive
You learned earlier that one of the benefits of the using directive is to eliminate the requirement to always type the namespace (such as System) when referring to a class that belongs to that namespace. That is the purpose of the using directive highlighted in magenta in Listing 2.
However, there is another benefit that derives from the using directive that may be more important.
Memory management
One of the big issues in game programming (or any kind of programming that makes use of graphics files, sound files, or other large resource files) is to make certain that the memory occupied by those resources is freed up as soon as the resource is no longer needed.
Without going into a lot of detail, the syntax highlighted in yellow in Listing 2 will assure that the Dispose method is called to free up all of the memory occupied by the Game1 object when control reaches the bottom curly brace with the yellow highlight.
Don't modify the file named Program.cs
As an XNA game programmer, you shouldn't normally have any reason to modify the contents of the file named Program.cs. We need to leave it alone and modify the file named Game1.cs instead.
The Game1 class
I told you earlier that when you create a new Windows Game project, the file named Game1.cs is opened in the editor pane. Listing 3 shows the contents of that file with all of the using directives and most of the comments removed to reduce the clutter.
Listing 3. Initial contents of the file named Game1.cs. namespace junk2 {
public class Game1 : Microsoft.Xna.Framework.Game {
GraphicsDeviceManager graphics;
SpriteBatch spriteBatch;
public Game1() {
graphics = new GraphicsDeviceManager(this);
Content.RootDirectory = "Content";
}//end constructor
protected override void Initialize() {
base.Initialize();
}//end Initialize method
protected override void LoadContent() {
spriteBatch = new SpriteBatch(GraphicsDevice);
}//end LoadContent method
protected override void UnloadContent() {
}//end UnloadContent
protected override void Update(GameTime gameTime) {
if(GamePad.GetState(PlayerIndex.One).Buttons.Back
== ButtonState.Pressed)
this.Exit();
base.Update(gameTime);
}//end Update method
protected override void Draw(GameTime gameTime) {
GraphicsDevice.Clear(Color.CornflowerBlue);
base.Draw(gameTime);
}//End Draw method
}//End class Game1
}//end namespace
|
I will begin with a simplified explanation of how to create games using XNA.
Game1 extends Game
To begin with, note that the Game1 class extends the Game class. We do not modify the Game class. Instead, we modify the behavior of the Game class by extending it and overriding some of its methods.
Main method calls the Run method
As you saw earlier in Listing 2, the Main method in the file named Program.cs instantiates an object of the Game1 class (shown in Listing 3) and calls the Run method on that object. That starts the program running.
The Run method
The class named Game1 does not define and does not override a method named Run. However, it does inherit a method named Run from the Game class.
Therefore, when the Run method is called on the object of the Game1 class, the version of the Run method that is defined in the superclass named Game is executed.
Override five methods
The skeleton code for the Game1 class in Listing 3 overrides the following five methods inherited from the Game class:
Initialization
The first three methods contain code that is needed to get everything initialized at the start of the game play and to shut down the program at the end of the game play.
The game loop
Once the game is initialized, the Run method, or some method called by the Run method ping-pongs back and forth between calls to the overridden Update method and the overridden Draw method. (Note, however that the two methods don't necessarily take turns executing.)
Override Update for game logic
You override the Update method to create the program logic associated with game play. To accomplish this, you are likely to need to define other methods, define other classes, instantiate objects of other classes, test the keyboard, test the mouse, etc. In other words, at this point you need to know how to program in C#.
Override the Draw method
You override the Draw method to cause the various graphics objects in your game to be rendered in the game window shown in Figure 1.
This lesson includes an explanation of a very simple program that displays a green arrow sprite near the upper-left corner of the game window shown in Figure 1.
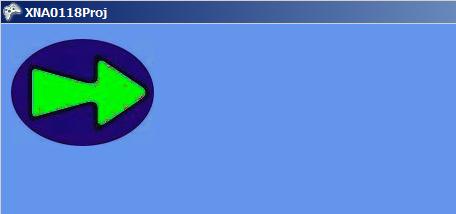
I will create a simple Windows game application that imports the image shown in Figure 2. Note that this is a rectangular image with an (almost) transparent background. (The values of the alpha bytes outside the blue elliptical shape are about 5.)
Figure 2 Raw image with an
(almost) transparent background.

If you would like to replicate my program using this image, you should be able to right-click on the image in Figure 2, download it, and save it on your computer. You can save it under any name you choose but the file name extension should be png.
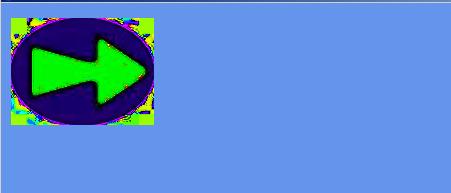
Program output
The program displays the image near the upper-left corner of the game window and honors the transparency of the background as shown in Figure 3. As you will see later, a parameter of type SpriteBlendMode was set to AlphaBlend to honor the (almost) transparent background shown in Figure 3.
Figure 3 Cropped upper-left
corner of the game window with SpriteBlendMode set to AlphaBlend.
If you don't honor the transparent background
Figure 4 shows the result of setting the value of the parameter of type SpriteBlendMode to None. This caused the alpha transparency value to be ignored and allowed the pixels that are almost transparent in Figure 3 to be opaque in Figure 4.
Figure 4 Cropped upper-left
corner of the game window with SpriteBlendMode set to None.
Not a very exciting program
This program isn't very exciting because there is no motion and no sound. The program simply draws the same image in the same position during each iteration of the game loop. Despite that, this program will give us the opportunity to drill down into the technical aspects of several areas of the XNA framework.
Before getting into the details of the code, I'm going to walk you through the steps involved in creating this Windows Game project using XNA.
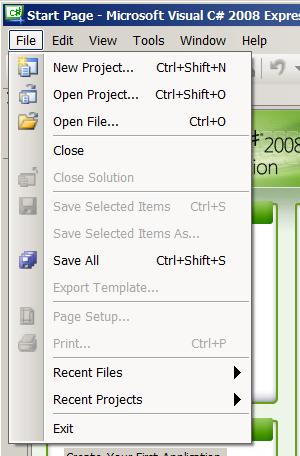
Step 1: Create a new Windows Game project named XNA0118Proj
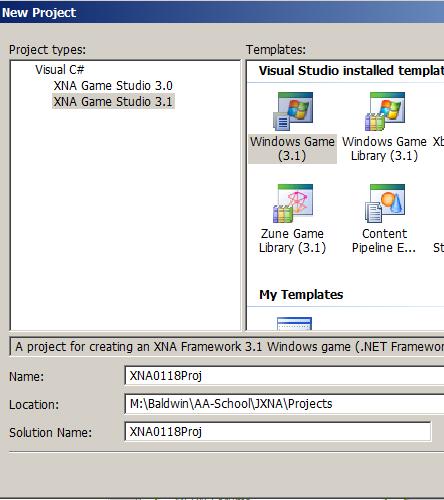
Pull down the Visual C# File menu and select New Project as shown in Figure 5.
Figure 5 Select New Project on the
Visual C# File menu.
Select a Windows Game project
Select XNA Game Studio 3.0 or 3.1 in the left pane of the New Project dialog. Select the Windows Game (3.x) icon and enter the name of your project in the Name field. Enter the storage location in the Location field and click the OK button that is off screen further to the right in Figure 6.
Figure 6 Select a Windows Game
project.
Step 2: Add your image file to the Content folder
If necessary, pull down the View menu and select Solution Explorer and/or Properties Window so that they will be exposed on the right side of the IDE as shown in Figure 7
Figure 7 Solutions explorer and properties window exposed.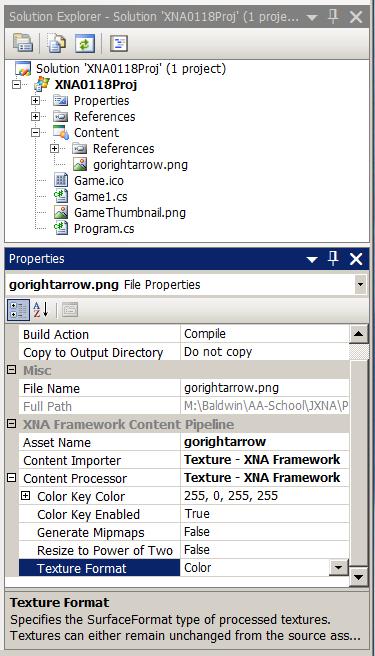
Add your image to the Content folder
Right click on the Content folder in the Solution Explorer. Select Add/Existing Item in the dialog that follows. Browse to the image file that you are going to use and click the Add button. A copy of the image file should appear in the Content folder.
The Asset Name
Click the image file name in the Content folder and the information in the Properties Window should change to describe that file. Note the value of the Asset Name property in the Properties Window. You will need it later. The value of the Asset Name in Figure 7 is "gorightarrow".
Steps 3, 4, and 5: Write code
The next three steps involve writing code to upgrade the skeleton version of the class definition of the Game1 class. I will explain that new code later. For now, the three steps are:
Modify two overridden methods
As you saw in Listing 3, there are five overridden methods in the class definition for the Game1 class that you can modify to customize the class for your game. This program modifies only two of those methods:
I will discuss those two methods along with some other material in this lesson. I will defer a detailed discussion of the other three methods until a future lesson when I write a program that modifies them.
Will discuss in fragments
A complete listing of the modified definition of the Game1 class is provided in Listing 12 near the end of the lesson. I will explain selected code fragments in this lesson.
The beginning of the class definition for the class named Game1 is shown in Listing 4.
Listing 4. Beginning of the class named Game1. namespace XNA0118Proj {
public class Game1 : Microsoft.Xna.Framework.Game {
|
The namespace
This class definition belongs to the XNA0118Proj namespace. This is the name of the folder containing all of the other folders and files in the project tree as shown in the Solution Explorer in Figure 7.
The superclass named Game
The new class named Game1 extends the existing class named Game. You will find the documentation for the class named Game here. (Note that you can select the Classic view in the upper-right corner if you prefer.) The description of this class in the documentation is fairly modest. It says simply
"Provides basic graphics device initialization, game logic, and rendering code."
Overridden methods
As I explained earlier, in order to write a program that runs under the XNA framework, you need to override some or all of five methods that are inherited into the Game1 class from the Game class. Let's see some of what the documentation for the Game class has to say about these methods.
The game loop
According to the documentation for the Game class,
"Update and
Draw are called at different rates depending on whether
IsFixedTimeStep is true or false. If
IsFixedTimeStep is false, Update and
Draw will be called in a continuous loop. If
IsFixedTimeStep is true, Update will be
called at the interval specified in TargetElapsedTime, while
Draw will only be called if an Update is not
due. If Draw is not called, IsRunningSlowly
will be set to true.
For more information on fixed-step and variable-step game loops, see Application Model
Overview."
The big picture
Sifting through all of this detail in an attempt to get a big picture view, we see that we should:
Listing 5 shows the declaration of two instance variables followed by the constructor for the Game1 class. One of the instance variables is used in the constructor and the other is used later in the program.
Listing 5. Constructor for the Game1 class. GraphicsDeviceManager graphics;
SpriteBatch spriteBatch;
public Game1() {
graphics = new GraphicsDeviceManager(this);
Content.RootDirectory = "Content";
}// end constructor
|
What is a constructor?
A constructor is a special method that is executed once and only once during the instantiation of an object.
The first line of cyan code in Listing 2 causes the constructor to be executed. When the constructor completes its task, it returns a reference to the object just constructed. That reference is stored in the local reference variable of type Game1 named game in Listing 2.
A new GraphicsDeviceManager object
The first statement in the constructor in Listing 5 instantiates a new object of the class GraphicsDeviceManager and stores that object's reference in the instance variable named graphics.
However, that documentation isn't very descriptive. Here is some of what Aaron Reed (Learning XNA 3.0 from O'Reilly) has to say on the topic.
"This (GraphicsDeviceManager) is a very important object because it provides you, as a developer, with a way to access the graphics device on your PC, Xbox 360, or Zune. The GraphicsDeviceManager object has a property called GraphicsDevice that represents the actual graphics device on your machine."
He goes on to explain how the GraphicsDevice object acts as a conduit between your XNA program and the physical graphics device on your machine.
Passing this as a parameter
Note the parameter that is passed to the GraphicsDeviceManager constructor in Listing 5. The documentation tells us that the parameter must be of type Game and is the Game that the GraphicsDeviceManager should be associated with.
I don't recall ever having discussed the keyword this earlier in this series of tutorials. According to Jesse Liberty (Programming C# from O'Reilly),
"the keyword this is a variable that references the current instance of a class or struct.
In other words...
Any time that the code in an instance method needs a reference to the object to which the method belongs, this is available as a reference to that object.
In this case, the code in Listing 5 says to instantiate a new GraphicsDeviceManager object and to associate it with this Game object.
The ContentManager
A Game object has a property named Content that references an object of the class ContentManager.
According to the documentation, the ContentManager
"is the run-time component which loads managed objects from the binary files produced by the design time content pipeline. It also manages the lifespan of the loaded objects..."
To make a long story short...
The second statement in the constructor in Listing 5 notifies the ContentManager that the folder named "Content" is the root of a directory tree in which content for the game will be stored. In this program, we only have one item of content and it is the image file that you added to the Content folder earlier.
When the constructor in Listing 5 terminates...
When the constructor terminates, the new Game1 object occupies memory and a reference to the object is stored in the variable named game in Listing 2. The code in the Main method in Listing 2 immediately calls the Run method on the Game1 object's reference.
The Game1 class neither defines nor overrides a method named Run. However, it does inherit a method named Run from the Game class. Therefore, the method named Run that is defined in the Game class is executed.
The Run method of the Game class
Here is what the documentation has to say about this method.
"Call this method to initialize the game, begin running the game loop, and start processing events for the game.
This method calls the game Initialize and BeginRun methods before it begins the game loop and starts processing events for the game."
The BeginRun method
We already know about the Initialize method. Here is what the documentation has to say about the BeginRun method.
"Called after all components are initialized but before the first update in the game loop."
The game loop
At this point, after the Initialize and the LoadContent methods have been called, either the Run method or the BeginRun method, or perhaps some other method that is called by one of them goes into a loop calling the Update method and the Draw method.
The timing and the order in which the two methods are called is determined by the value of IsFixedTimeStep as explained earlier.
But, we're getting ahead of ourselves. We need to slow down and discuss the overridden LoadContent method.
The overridden LoadContent method is shown in its entirety in Listing 6 along with the declaration of two instance variables.
Listing 6. The overridden LoadContent method. //Declare two variables
Texture2D myTexture;
Vector2 spritePosition = new Vector2(10.0f,15.0f);
protected override void LoadContent() {
// Create a new SpriteBatch, which can be used
// to draw textures.
spriteBatch = new SpriteBatch(GraphicsDevice);
//Load the image
myTexture =
Content.Load<Texture2D>("gorightarrow");
}//end LoadContent
|
Two new instance variables
Listing 6 begins by declaring two new instance variables of types Texture2D and Vector2 named myTexture and spritePosition respectively.
The variable named myTexture will be used in the LoadContent method of Listing 6 to store a reference to a Texture2D object created from the image file with the Asset Name of gorightarrow (see Figure 6). It will also be used later in the overridden Draw method where it is the sprite being drawn.
The variable named spritePosition will be used later in the overridden Draw method to specify the location to draw the sprite. I will have more to say about this variable later.
The Texture2D class
Here is some of what the documentation has to say about the Texture2D class.
"Represents a 2D grid of texels.
A texel represents the smallest unit of a texture that can be read
from or written to by the GPU (Graphics Processing Unit). A texel is composed
of 1 to 4 components. Specifically, a texel may be any one of the available
texture formats represented in the SurfaceFormat
enumeration.
A Texture2D resource contains a 2D grid of texels. Each texel
is addressable by a u, v vector. Since it is a texture resource, it may contain
mipmap levels."
You can view a diagram of a texture resource containing a single 3×5 texture with three mipmap levels here. You can read what Wikipedia has to say about mipmaps here. The image used in this program doesn't have any mipmaps.
The SurfaceFormat enumeration
The SurfaceFormat enumeration defines numeric values representing about 50 different types of surface formats such as Rgba32, which is defined as
"(Unsigned format) 32-bit RGBA pixel format with alpha, using 8 bits per channel."
The Texture Format of my image
For example, the Properties Window in Figure 7 shows the image that I used for my program to have a Texture Format property value of Color. The definition of the SurfaceFormat enumeration for Color is
"(Unsigned format) 32-bit ARGB pixel format with alpha, using 8 bits per channel."
Note that this is similar to Rgba32 except that the position of the alpha byte relative to the other three bytes is different.
A new SpriteBatch object
The code in the overridden LoadContent method of Listing 6 begins by instantiating a new SpriteBatch object and saving its reference in the reference variable named spriteBatch. (That variable is declared at the top of Listing 3.)
Note that the statement that instantiates the SpriteBatch object in Listing 6 is already in the skeleton of the Game1 class when it first appears in the edit window of the Visual C# IDE. (See Listing 3.)
The SpriteBatch class
According to the documentation, an object of the SpriteBatch class
"Enables a group of sprites to be drawn using the same settings."
The constructor for an object of the SpriteBatch class requires an incoming parameter that is a reference to the graphicsDevice of the current platform as type GraphicsDevice.
This can be confusing
GraphicsDevice is the name of an XNA class. It is also the name of a property of the Game class that is inherited into the Game1 class. The parameter that is passed to the constructor for the SpriteBatch object in Listing 6 is the inherited property.
The inherited property
The inherited property contains a reference to an object of the class GraphicsDevice, which is apparently populated in conjunction with the instantiation of the GraphicsDeviceManager object in the constructor of Listing 5. However it gets populated, it is a reference to the graphicsDevice on the current platform. This causes the new SpriteBatch object to be aware of the graphicsDevice on the current platform. It will be used in the Draw method later to draw the sprite.
The new code
The new code that I wrote into the LoadContent method of Listing 6 is highlighted in yellow. The Game1 class inherits a property of the Game class named Content. This property contains a reference to the current ContentManager object.
Therefore, the yellow highlighted code in Listing 6 calls the Load method on the current ContentManager object.
Generic methods
Some methods in C# are known as generic methods, and the Load method of the ContentManager class is one of them. The documentation describes the Load method as follows:
"Loads an asset that has been processed by the Content Pipeline."
Required syntax for the Load method
Figure 8 shows the syntax required for calling the Load method. This syntax was taken from the documentation.
Figure 8 The Load method of the
ContentManager class.
public virtual T Load<T> (string assetName)
|
What does <T> mean?
To call this method, you must replace <T> in Figure 8 with the type of asset to be loaded. According to the documentation,
"Model, Effect, SpriteFont, Texture, Texture2D, Texture3D and TextureCube are all supported by default by the standard Content Pipeline processor, but additional types may be loaded by extending the processor."
Calling the Load method of the current ContentManager
Listing 6 calls the Load method, specifying an asset type of Texture2D, for the purpose of loading the content identified in Figure 7 with an Asset Name property value of "gorightarrow".
You will recall that this is the value given to the Asset Name property of the image file named gorightarrow.png when it was added to the Content folder earlier in this lesson.
Populate the variable named myTexture
The value returned from the Load method is assigned to the variable named myTexture in Listing 6. It will be used later in the Draw method to draw the sprite in the game window as shown in Figure 3 and Figure 4.
That completes the definition of the overridden LoadContent method.
The Vector2 structure
Returning to the variable declarations in Listing 6, Vector2 is a structure (similar to a class with no inheritance capability) containing two components of type float named X and Y.
In this program, the structure referred to by spritePosition in Listing 6 is used to encapsulate the coordinates of the upper-left corner of the sprite (10,15) when the sprite is drawn in the game window as shown in Figure 3 and Figure 4.
This variable will also be used later in the overridden Draw method.
That brings us to the Draw method inherited from the Game class, which is identified with a yellow background in Listing 3. According to the documentation, this method is
"Called when the game determines it is time to draw a frame. Override this method with game-specific rendering code.
Update and Draw are called at different rates depending on whether IsFixedTimeStep is true or false.
If IsFixedTimeStep is false, Update and Draw will be called sequentially as often as possible.
If IsFixedTimeStep is true, Update will be called at the interval specified in TargetElapsedTime, while Draw will continue to be called as often as possible. For more information on fixed-step and variable-step game loops, see Application Model Overview."
Because this program doesn't override the Update method, it doesn't matter how often the Draw method is called. Each time it is drawn, the sprite is drawn in the same position as shown in Figure 3 and Figure 4.
What is a sprite?
According to the 2D Graphics Overview,
"Sprites are 2D bitmaps drawn directly on the screen, as opposed to being drawn in 3D space. Sprites are commonly used to display information such as health bars, number of lives, or text such as scores. Some games, especially older games, are composed entirely of sprites."
What is a bitmap?
According to the documentation for the Bitmap class,
"A bitmap consists of the pixel data for a graphics image and its attributes. There are many standard formats for saving a bitmap to a file. GDI+ supports the following file formats: BMP, GIF, EXIG, JPG, PNG and TIFF."
What is GDI+?
According to the documentation,
"Microsoft Windows GDI+ is a class-based API for C/C++ programmers. It enables applications to use graphics and formatted text on both the video display and the printer. Applications based on the Microsoft Win32 API do not access graphics hardware directly. Instead, GDI+ interacts with device drivers on behalf of applications."
What about our image?
Working backwards through the above information, we started with an image file named gorightarrow.png. We manually added the file to the Content folder producing a game asset with an Asset Name of gorightarrow (see Figure 7).
Then we called the Load method in Listing 6 to load the contents of the file into an object of type Texture2D and saved that object's reference in the instance variable named myTexture. At that point in the process, we had converted the contents of our image file into a format that can be thought of as a sprite. The variable named myTexture contains a reference to our sprite.
Beginning of the Game.Draw method
The Game.Draw method begins in Listing 7. I am referring to the method here as Game.Draw to distinguish it from the method named SpriteBatch.Draw, which we will encounter shortly.
Listing 7. Beginning of the Game.Draw method. protected override void Draw(GameTime gameTime) {
GraphicsDevice.Clear(Color.CornflowerBlue);
|
GameTime information
Each time the Game.Draw method is executed, the incoming parameter contains time information encapsulated in an object of type GameTime. According to the documentation, the GameTime object provides a
"Snapshot of the game timing state expressed in values that can be used by variable-step (real time) or fixed-step (game time) games."
We won't be using this information in this lesson, so I won't pursue it further here. However, we will need the information in future lessons when we write code to cause a sprite to be moved and/or animated.
The call to the GraphicsDevice.Clear method
The call to the GraphicsDevice.Clear method in Listing 7 is contained in the skeleton code for the Game1 class as shown in Listing 3.
The GraphicsDevice class provides five overloaded versions of the Clear method. According to the documentation, the version shown in Listing 7
"Clears the viewport to a specified color."
This version of the Clear method requires a single incoming parameter of type Color.
The Color class
The documentation describes an object of the Color class as follows:
"A Color object stores a 32-bit value that represents a color. The color value contains four, 8-bit components: alpha, red, green, and blue. The first 8 bits (the most significant) contain the alpha component, the next 8 bits contain the red component, the next 8 bits contain the green component, and the next 8 bits (the least significant) contain the blue component. The 32-bit value is stored in a variable of type ARGB."
Type ARGB
We learned about the ARGB texture format earlier. Although ARGB is referred to as a type in the above quotation, it is not a class. Rather, it is a type established using a C-style typedef.
Constructors, methods, and constants
The Color class provides four overloaded constructors and about fifteen methods that allow you to perform various operations on a Color object.
One of the constructors allows you to create a Color object that represents the color of your choice by specifying the individual values of the alpha, red, green, and blue color components.
In addition, the class provides about 135 constants that represent different colors, one of which is named CornflowerBlue. This is the background color of the game window shown in Figure 1.
You can create Color objects representing those colors simply by calling out the name of the class and the name of the color as shown by the code with the yellow highlight in Listing 7.
Prepare to draw the sprite
Three statements are required to draw one sprite and twelve statements are required to draw ten sprites with the same settings. The sequence consists of a Begin statement, one or more Draw statements, and an End statement.
The image that we used to create the sprite is shown in raw form in Figure 2. This is a rectangular image with the pixels outside the blue area having an alpha value of about 5.
Honor the alpha values
Listing 8 shows the Begin statement that was used to draw the sprite as shown in Figure 3. In the version, the pixels with a very low alpha value appear to be transparent and allow the CornflowerBlue background to show through.
Listing 8. Prepare to draw the sprite with transparency. //Draw the sprite.
//Enable this version to honor the alpha value of
// the pixels.
spriteBatch.Begin(SpriteBlendMode.AlphaBlend);
|
Ignore the alpha values
Listing 9 shows the Begin statement that was used to draw the sprite as shown in Figure 4. In this version, the alpha values are ignored causing even the pixels with the very low alpha values to be opaque.
Listing 9. Prepare to draw the sprite without transparency. //Use this version to ignore the alpha value of
// the pixels.
spriteBatch.Begin(SpriteBlendMode.None);
|
The Begin method
There are four overloaded versions of the Begin method of the SpriteBatch class. The version used in Listings 8 and 9
"Prepares the graphics device for drawing sprites with specified blending options."
This version of the method requires a single incoming parameter that is a reference to a SpriteBlendMode Enumeration. This enumeration has three values:
Blending is the term used to describe the process of determining the resulting pixel color when one colored pixel is drawn in a location that is already occupied by another colored pixel.
Additive blending
With additive blending, the red, green, and blue color components of the existing pixel color are added to the red, green, and blue color components of the new pixel color to produce the red, green, and blue color components of the resulting color. If the sum of two color components exceeds 255, the result is set to 255.
Alpha blending
With alpha blending, the resulting color is based on the existing color, the new color, and the value of the alpha byte. If the alpha byte has a value of 0, the resulting color is the same as the existing pixel color. This is total transparency.
If the alpha byte has a value of 255, the resulting color is the same as the new pixel color. This is total opacity.
Between these two limits, the two colors are blended using a formula in which the amount of the new pixel color used is proportional to the alpha value ranging from zero percent for an alpha value of 0 to 100 percent for an alpha value of 255..
No blending
When the parameter passed to the Begin method is SpriteBlendMode.None, the alpha value is completely ignored and the color of the old pixel is replaced by the color of the new pixel.
Draw the sprite(s)
You can draw as many sprites as you need following the call to the Begin method.
Each sprite drawn will be drawn according to the parameters passed to the Begin method.
If you need to draw some sprites with different parameters, call the SpriteBatch.End method and start the sequence over with a new call to the SpriteBatch.Begin method and new parameters.
In this case we only have one sprite to draw. Listing 10 calls the SpriteBatch.Draw method to draw that sprite and then calls the SpriteBatch.End method to end the drawing sequence.
Listing 10. Draw the sprite. spriteBatch.Draw(
myTexture,spritePosition,Color.White);
spriteBatch.End();
|
Seven overloaded Draw methods
There are seven overloaded versions of the SpriteBatch.Draw method. According to the documentation, the version used in Listing 10
"Adds a sprite to the batch of sprites to be rendered, specifying the texture, screen position, and color tint. Before any calls to Draw, you must call Begin. Once all calls to Draw are complete, call End."
The code in Listing 10 passes three parameters to the Draw method:
The SpriteBatch.End method
According to the documentation, this method
"Flushes the sprite batch and restores the device state to how it was before Begin was called. Call End after all calls to Draw are complete."
Call Game.Draw on the superclass
When you instantiate an object from a class that extends another class and overrides a method from the superclass, the new object contains both the original version and the overridden version of the method.
Execute both versions of the overridden method.
Often it is desirable or necessary to cause both versions to be executed. The code with the yellow highlight in Listing 11 shows the syntax used to cause an overridden method to call the original version of the method using the keyword base. The keyword base is a reference to that portion of the object that represents the properties, events, and methods of the superclass.
Listing 11. Call Game.Draw on the superclass. base.Draw(gameTime);
}//end Draw method
|
A required statement
The statement shown highlighted in yellow in Listing 11 is already contained in the skeleton code produced by Visual C# (see Listing 3).
The documentation for the Game.Draw method contains the following:
"In classes that derive from Game, it is necessary to make these calls:
We won't worry about the reason why we must do this at this point. We will simply follow the instructions and make the call.
The end of the program
That completes the explanation for this program. Because of the simplicity of the program, we had no need to override the following methods (see Listing 3):
We will develop more complicated programs in future lessons and will have a need to override one of more of these methods. I will explain them at that time.
I encourage you to copy the code from Listing 12. Use that code to create an XNA project. Compile and run the project. Experiment with the code, making changes, and observing the results of your changes. Make certain that you can explain why your changes behave as they do.
In this lesson, I used a very simple XNA program to teach you many of the details regarding the incorporation of the XNA framework into the object-oriented C# programming language. I also taught you about constructors, the this keyword, the base keyword, and some of the differences between a Console Application and a Windows Game application.
A complete listing of the XNA program discussed in this lesson is provided in Listing 12.Listing 12. The Game1 class for the project named XNA0118Proj. using System;
using System.Collections.Generic;
using System.Linq;
using Microsoft.Xna.Framework;
using Microsoft.Xna.Framework.Audio;
using Microsoft.Xna.Framework.Content;
using Microsoft.Xna.Framework.GamerServices;
using Microsoft.Xna.Framework.Graphics;
using Microsoft.Xna.Framework.Input;
using Microsoft.Xna.Framework.Media;
using Microsoft.Xna.Framework.Net;
using Microsoft.Xna.Framework.Storage;
namespace XNA0118Proj {

  public class Game1 : Microsoft.Xna.Framework.Game {
    GraphicsDeviceManager graphics;
    SpriteBatch spriteBatch;

    public Game1() {
      graphics = new GraphicsDeviceManager(this);
      Content.RootDirectory = "Content";
    }// end constructor
protected override void Initialize() {
//No initialization needed
base.Initialize();
}//end Initialize
    //Declare two variables
    Texture2D myTexture;
    Vector2 spritePosition = new Vector2(10.0f,15.0f);

    protected override void LoadContent() {
      // Create a new SpriteBatch, which can be used
      // to draw textures.
      spriteBatch = new SpriteBatch(GraphicsDevice);

      //Load the image
      myTexture =
              Content.Load<Texture2D>("gorightarrow");
    }//end LoadContent
protected override void UnloadContent() {
//No unload code needed.
}//end UnloadContent
protected override void Update(GameTime gameTime) {
// Allows the game to exit
if(GamePad.GetState(PlayerIndex.One).Buttons.Back
== ButtonState.Pressed)
this.Exit();
//No new Update code needed
base.Update(gameTime);
}//end Update
    protected override void Draw(GameTime gameTime) {

      GraphicsDevice.Clear(Color.CornflowerBlue);
// Draw the sprite.
//Enable this version to honor the alpha value of
// background pixels.
//spriteBatch.Begin(SpriteBlendMode.AlphaBlend);
//Use this version to ignore the alpha value of
// background pixels.
spriteBatch.Begin(SpriteBlendMode.None);
      spriteBatch.Draw(
                   myTexture,spritePosition,Color.White);
      spriteBatch.End();
      base.Draw(gameTime);
    }//end Draw method
}//End class
}//End namespace
|
Copyright 2009, Richard G. Baldwin. Reproduction in whole or in part in any form or medium without express written permission from Richard Baldwin is prohibited.
Richard Baldwin is a college professor (at Austin Community College in Austin, TX) and private consultant whose primary focus is object-oriented programming using Java and other OOP languages.
Richard has participated in numerous consulting projects and he frequently provides onsite training at the high-tech companies located in and around Austin, Texas. He is the author of Baldwin's Programming Tutorials, which have gained a worldwide following among experienced and aspiring programmers.
In addition to his programming expertise, Richard has many years of practical experience in Digital Signal Processing (DSP). His first job after he earned his Bachelor's degree was doing DSP in the Seismic Research Department of Texas Instruments. (TI is still a world leader in DSP.) In the following years, he applied his programming and DSP expertise to other interesting areas including sonar and underwater acoustics.
Richard holds an MSEE degree from Southern Methodist University and has many years of experience in the application of computer technology to real-world problems.
-end-