
|
Learn how to move your sprite. Also learn how to use methods of the Debug class.
Published: January 26, 2010
Validated with Amaya
By Richard G. Baldwin
XNA Programming Notes # 0120
|
This tutorial lesson is part of a continuing series dedicated to programming with the XNA Game Studio. I am writing this series of lessons primarily for the benefit of students enrolled in an introductory XNA game programming course that I teach. However, everyone is welcome to study and benefit from the lessons.
An earlier lesson titled Getting Started provided information on how to get started programming with Microsoft's XNA Game Studio. (See Baldwin's XNA programming website in Resources.)
I recommend that you open another copy of this document in a separate browser window and use the following links to easily find and view the figures and listings while you are reading about them.
I recommend that you also study the other lessons in my extensive collection of online programming tutorials. You will find a consolidated index at www.DickBaldwin.com.
The earlier lesson titled The XNA Framework and the Game Class (see Baldwin's XNA Programming website in Resources) used a very simple XNA program to teach many of the details regarding the incorporation of the XNA framework into the object-oriented C# programming language.
Skeleton code
When you create a new Windows Game project using Visual C#, a source code file named Game1.cs is automatically created and opened in the editor window. The file contains skeleton code for a windows game based on XNA. Listing 1 shows the skeleton code contained in the file named Game1.
Listing 1. Skeleton code for a new Windows Game project. namespace junk2 {
public class Game1 : Microsoft.Xna.Framework.Game {
GraphicsDeviceManager graphics;
SpriteBatch spriteBatch;
public Game1() {
graphics = new GraphicsDeviceManager(this);
Content.RootDirectory = "Content";
}//end constructor
protected override void Initialize() {
base.Initialize();
}//end Initialize method
protected override void LoadContent() {
spriteBatch = new SpriteBatch(GraphicsDevice);
}//end LoadContent method
protected override void UnloadContent() {
}//end UnloadContent
protected override void Update(GameTime gameTime) {
if(GamePad.GetState(PlayerIndex.One).Buttons.Back
== ButtonState.Pressed)
this.Exit();
base.Update(gameTime);
}//end Update method
protected override void Draw(GameTime gameTime) {
GraphicsDevice.Clear(Color.CornflowerBlue);
base.Draw(gameTime);
}//End Draw method
}//End class Game1
}//end namespace
|
Override some or all of five methods
To create a new game program, you override some or all of the five methods highlighted in yellow in Listing 1.
The program that I explained in the earlier lesson overrode the LoadContent and Draw methods in such a way as to create a sprite and display it in the upper-left corner of the game window. However, that program did not override the Update method. The sprite did not move and was not animated.
Moving and bouncing sprite
The Update method is used to implement game logic. The Draw method is used to render the current state of the game on the computer screen. In this lesson, I will override the Update method to cause the sprite to move around the game window and bounce off the edges of the game window.
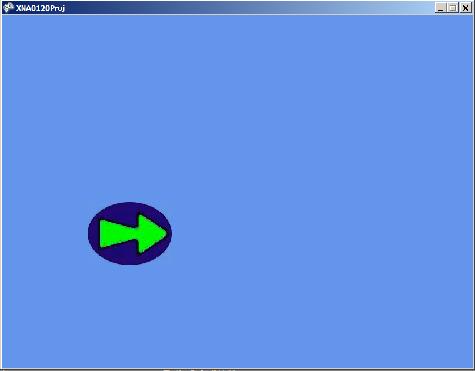
Figure 1 shows a reduced screen shot of the sprite moving in the game window.
Figure 1 Moving and bouncing
sprite.
The Debug class
On a completely unrelated note, I will introduce you to the Debug class and show you how to use the WriteLine method of the Debug class to display information while the program is running.
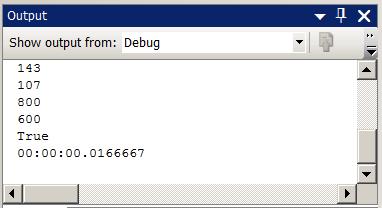
Figure 2 shows a screen shot of the Debug output window in the lower left corner of the Visual C# IDE. I will explain the values that you see in Figure 2 later in this lesson.
Figure 2 Debug output
window.
Will discuss in fragments
I will explain the code in fragments, and I will only explain those fragments that are different from the code that I explained in the earlier lesson titled The XNA Framework and the Game Class. A complete listing of the code for the class named Game1 is provided in Listing 9 near the end of the lesson.
How do you make a sprite move?
Sprite motion in an XNA game is accomplished by changing the current position coordinates of the sprite in the Update method and drawing the sprite in its new position in the Draw method.
The game loop
You learned about the XNA game loop in the earlier lesson.
In order to make the sprite move, we need to override the Update method to cause the sprite's position coordinates to change during each iteration of the game loop. The code to accomplish this begins in Listing 2.
Listing 2. Declare variables that specify the incremental distance to move. //Specify the distance in pixels that the sprite
// will move during each iteration.
int stepsX = 5;
int stepsY = 3;
|
Distance to move
Listing 2 declares and populates two instance variables that specify the incremental distance that the sprite will move each time the Update method is called. The horizontal and vertical incremental distances are 5 pixels and 3 pixels respectively.
How often is the Update method called?
In this program, the computer will do its best to cause the Update method to be called once every 16.67 milliseconds or 60 times per second.
The Update and Draw methods are called at different rates depending on whether the Game property named IsFixedTimeStep is true or false.
If the IsFixedTimeStep property is false...
If the IsFixedTimeStep property is false, the Update and Draw methods will be called in a continuous loop. The repetition rate of the loop will depend on how long it takes the code in the loop to execute. That is not the case in this program because the value of the IsFixedTimeStep property is true, which is the default value.
If the IsFixedTimeStep property is true...
If the IsFixedTimeStep property is true, the Update method will be called at the interval specified in the property named TargetElapsedTime, while the Draw method will only be called if an Update is not due.
In this program, the value of the TargetElapsedTime property is 0.0166667 seconds, which is the default value.
If the Draw method is not called...
If the Draw method is not called (meaning that the computer can't keep up with the demands of the Update method), the property named IsRunningSlowly will be set to true. This property can be tested by the program during development to expose potential timing problems in the game loop.
Beginning of the overridden Update method
The overridden Update method begins in Listing 3.
Listing 3. Beginning of the overridden Update method. protected override void Update(GameTime gameTime) {
// Allows the game to exit
if(GamePad.GetState(PlayerIndex.One).Buttons.Back
== ButtonState.Pressed)
this.Exit();
|
If you compare Listing 3 with Listing 1, you will see that the code in Listing 3 is contained in the skeleton code for the Game1 class that is generated by Visual C#.
Xbox 360 code
The code in Listing 3, which references a method of the GamePad class "Allows retrieval of user interaction with an Xbox 360 Controller." Since we are working on a PC game, we aren't really interested in the code in the body of the Update method in Listing 3. The new code in our program begins in Listing 4.
Test for sprite out of bounds horizontally
The code in Listing 4 tests to determine if the sprite has encountered the right or left sides of the game window. If so, the sign is changed on stepsX to cause the sprite to reverse its horizontal direction of motion.
Listing 4. Test for sprite out of bounds horizontally. if(((spritePosition.X + myTexture.Width) >
Window.ClientBounds.Width) ||
(spritePosition.X < 0)){
stepsX *= -1;//Out of bounds, reverse diection
}//end if
|
Explanation in more detail
The value of Window.ClientBounds.Width is the width of the game window in pixels.
The value of spritePosition.X specifies the current horizontal position of the upper-left corner of the sprite relative to the upper-left corner of the game window.
(Even though the sprite appears to have an elliptical shape in Figure 1, it actually has a rectangular shape with all of the pixels outside the blue elliptical shape being transparent.)
The value of myTexture.Width is the width of the sprite. Therefore, the sum of spritePosition.X and myTexture.Width specifies the current position of the upper-right corner of the sprite.
Test for a collision of the sprite with an edge
Listing 4 tests to determine if the upper-right corner of the sprite has encountered the right edge of the game window or if the upper-left corner of the sprite has encountered the left edge of the game window. If so, the sign of stepsX is changed to cause the direction of motion of the sprite to be reversed. You will see how the change in sign causes a reversal in the direction of motion shortly.
Test for sprite out of bounds vertically
The code in Listing 5 tests to determine if the sprite has encountered the bottom or top edges of the game window. If so, the sign is changed on stepsY to cause the sprite to reverse its vertical direction of motion.
Listing 5. Test for sprite out of bounds vertically. if(((spritePosition.Y + myTexture.Height) >
Window.ClientBounds.Height) ||
(spritePosition.Y < 0)) {
stepsY *= -1;//Out of bounds, reverse direction
}//end if
|
The logic is the same
The logic in Listing 5 is essentially the same as the logic in Listing 4 with the difference being that Listing 5 deals with vertical motion and the top and bottom edges of the game window instead of horizontal motion and the left and right edges of the game window.
Change the current position of the sprite
Listing 6 changes the current position of the sprite by adding the incremental distances, stepX and stepY, to the current horizontal and vertical coordinates of the sprite.
Listing 6. Change the current position of the sprite. spritePosition.X += stepsX;//move horizontal
spritePosition.Y += stepsY;//move vertical
|
Move to the right and down
The incremental distances were initialized with positive values in Listing 2. Adding positive incremental distance values to the current coordinate values causes the position of the sprite to move to the right and down.
Reverse the direction of motion
The logic in Listing 4 and Listing 5 reverses the sign on the incremental distance values when the sprite encounters a left, right, top, or bottom edge of the game window.
Adding a negative incremental distance value to the current horizontal coordinate of the sprite causes it to be moved to the left. Adding a negative incremental distance value to the current vertical coordinate of the sprite causes it to be moved up the screen.
No visible movement at this time
Simply changing the current horizontal and vertical coordinates of the sprite does not produce a visible change in position. The visible change in position happens later in the Draw method when the game window is cleared to a constant color and the sprite is redrawn in the game window in its new position.
No changes in the Draw method
The Draw method in this program was not modified relative to the version in the earlier lesson titled The XNA Framework and the Game Class. You can view the code in the Draw method in Listing 9 near the end of the lesson.
The remainder of the overridden Update method
The remainder of the overridden Update method is shown in Listing 7.
Listing 7. The remainder of the overridden Update method. //The following statement is always required.
base.Update(gameTime);
}//end Update
|
The statement in Listing 7, which calls the Update method of the superclass, is always required in the overridden version. This code is placed in the overridden Update method in the skeleton code that is generated by Visual C# (see Listing 1) when you create a new Windows Game project.
One of the must useful debugging tools for relatively simple programs is the ability to get information displayed while the program is running. First I will introduce you to the Microsoft Support website titled How to trace and debug in Visual C#. You will find a great deal of useful information there.
Next I will introduce you to the Debug class, which "Provides a set of methods and properties that help debug your code." There are some very useful tools there also.
Finally, I will show you some examples of using methods from the Debug class.
Namespace considerations
The Debug class is in the System.Diagnostics namespace. Therefore, you will either need to include that namespace in your "using" list or qualify every reference to the Debug class with the name of the namespace. I chose to include the namespace in my "using" list for this example.
Overridden LoadContent method
Listing 8 shows my overridden LoadContent method. Only the code with the yellow highlight is different from the version of the LoadContent method that I explained in the earlier lesson titled The XNA Framework and the Game Class.
Listing 8. Overridden LoadContent method. protected override void LoadContent() {
//Create a new SpriteBatch, which can be used to
// draw textures.
spriteBatch = new SpriteBatch(GraphicsDevice);
//Load the image
myTexture = Content.Load<Texture2D>(
"gorightarrow");
//Debug code for illustration purposes.
Debug.WriteLine(myTexture.Width);
Debug.WriteLine(myTexture.Height);
Debug.WriteLine(Window.ClientBounds.Width);
Debug.WriteLine(Window.ClientBounds.Height);
Debug.WriteLine(IsFixedTimeStep);
Debug.WriteLine(TargetElapsedTime);
}//end LoadContent
|
Four overloaded WriteLine methods
The Debug class provides four overloaded versions of the WriteLine method, which can be used to display information in the lower-left corner of the Visual C# IDE. These are static methods so they can be called simply by joining the name of the class to the name of the method as shown in Listing 8.
Execute once only
I elected to put the code to illustrate this capability in the LoadContent method so that it would execute once and only once. Had I put it in either the Update method or the Draw method, it would have tried to execute during every iteration of the game loop which would not be satisfactory.
If you need to display information from inside the game loop, you will probably also need to use a counter with some logic to cause the information to be displayed only every nth iteration.
The output
The output from each of the six WriteLine statements in Listing 8 is shown in Figure 2. As you can see, the sprite referred to by myTexture is 143 pixels wide and 107 pixels high. The game window is 800 pixels wide and 600 pixels high. As I mentioned earlier, the value of the IsFixedTimeStep property is True, and the value of the TargetElapsedTime property is 0.0166667 seconds.
I encourage you to copy the code from Listing 9. Use that code to create an XNA project. Compile and run the project. Experiment with the code, making changes, and observing the results of your changes. Make certain that you can explain why your changes behave as they do.
In this lesson, you learned how to make it appear that a sprite is moving by changing the current position coordinates of the sprite in the Update method and drawing the sprite in the new position in the Draw method. This takes place once during each iteration of the game loop.
You also learned how to use the WriteLine method of the Debug class to display information while the program is running.
A complete listing of the XNA program discussed in this lesson is provided in Listing 9.Listing 9. The class named Game1 for the project named XNA0120Proj. /*Project XNA0120Proj
* 12/27/09 R.G.Baldwin
*******************************************************/
using System;
using System.Collections.Generic;
using System.Linq;
using Microsoft.Xna.Framework;
using Microsoft.Xna.Framework.Audio;
using Microsoft.Xna.Framework.Content;
using Microsoft.Xna.Framework.GamerServices;
using Microsoft.Xna.Framework.Graphics;
using Microsoft.Xna.Framework.Input;
using Microsoft.Xna.Framework.Media;
using Microsoft.Xna.Framework.Net;
using Microsoft.Xna.Framework.Storage;
using System.Diagnostics;//to access Debug
namespace XNA0120Proj {
public class Game1 : Microsoft.Xna.Framework.Game {
GraphicsDeviceManager graphics;
SpriteBatch spriteBatch;
public Game1() {
graphics = new GraphicsDeviceManager(this);
Content.RootDirectory = "Content";
}// end constructor
protected override void Initialize() {
//No initialization needed
base.Initialize();
}//end Initialize
//Declare two variables
Texture2D myTexture;
Vector2 spritePosition = new Vector2(10.0f,15.0f);
protected override void LoadContent() {
//Create a new SpriteBatch, which can be used to
// draw textures.
spriteBatch = new SpriteBatch(GraphicsDevice);
//Load the image
myTexture = Content.Load<Texture2D>(
"gorightarrow");
//Debug code for illustration purposes.
Debug.WriteLine(myTexture.Width);
Debug.WriteLine(myTexture.Height);
Debug.WriteLine(Window.ClientBounds.Width);
Debug.WriteLine(Window.ClientBounds.Height);
Debug.WriteLine(IsFixedTimeStep);
Debug.WriteLine(TargetElapsedTime);
}//end LoadContent
protected override void UnloadContent() {
//No unload code needed.
}//end UnloadContent
    //Specify the distance in pixels that the sprite
    // will move during each iteration.
    int stepsX = 5;
    int stepsY = 3;
    protected override void Update(GameTime gameTime) {
      // Allows the game to exit
      if(GamePad.GetState(PlayerIndex.One).Buttons.Back
                                  == ButtonState.Pressed)
        this.Exit();
//New code begins here.
//Test to determine if the sprite moves out of the
// game window on the right or the left.
      if(((spritePosition.X + myTexture.Width) >
                            Window.ClientBounds.Width) ||
                                 (spritePosition.X < 0)){
        stepsX *= -1;//Out of bounds, reverse diection
      }//end if
//Test to determine if the sprite moves out of the
// game window on the bottom or the top.
      if(((spritePosition.Y + myTexture.Height) >
                           Window.ClientBounds.Height) ||
                                (spritePosition.Y < 0)) {
        stepsY *= -1;//Out of bounds, reverse direction
      }//end if
      spritePosition.X += stepsX;//move horizontal
      spritePosition.Y += stepsY;//move vertical
      //The following statement is always required.
      base.Update(gameTime);
    }//end Update
protected override void Draw(GameTime gameTime) {
GraphicsDevice.Clear(Color.CornflowerBlue);
// Draw the sprite.
spriteBatch.Begin(SpriteBlendMode.AlphaBlend);
spriteBatch.Draw(
myTexture,spritePosition,Color.White);
spriteBatch.End();
//This statement is always required.
base.Draw(gameTime);
}//end Draw method
}//End class
}//End namespace
|
Copyright 2009, Richard G. Baldwin. Reproduction in whole or in part in any form or medium without express written permission from Richard Baldwin is prohibited.
Richard Baldwin is a college professor (at Austin Community College in Austin, TX) and private consultant whose primary focus is object-oriented programming using Java and other OOP languages.
Richard has participated in numerous consulting projects and he frequently provides onsite training at the high-tech companies located in and around Austin, Texas. He is the author of Baldwin's Programming Tutorials, which have gained a worldwide following among experienced and aspiring programmers.
In addition to his programming expertise, Richard has many years of practical experience in Digital Signal Processing (DSP). His first job after he earned his Bachelor's degree was doing DSP in the Seismic Research Department of Texas Instruments. (TI is still a world leader in DSP.) In the following years, he applied his programming and DSP expertise to other interesting areas including sonar and underwater acoustics.
Richard holds an MSEE degree from Southern Methodist University and has many years of experience in the application of computer technology to real-world problems.
-end-