
|
Learn how to display a sprite in front of a background image and how to cause the background image to change at runtime. Learn the difference between the position and origin parameters of the SpriteBatch.Draw method. Also learn how to deal with and use color key transparency.
Published: January 27, 2010
Validated with Amaya
By Richard G. Baldwin
XNA Programming Notes # 0124
|
This tutorial lesson is part of a continuing series dedicated to programming with the XNA Game Studio. I am writing this series of lessons primarily for the benefit of students enrolled in an introductory XNA game programming course that I teach. However, everyone is welcome to study and benefit from the lessons.
An earlier lesson titled Getting Started provided information on how to get started programming with Microsoft's XNA Game Studio. (See Baldwin's XNA programming website in Resources.)
I recommend that you open another copy of this document in a separate browser window and use the following links to easily find and view the figures and listings while you are reading about them.
I recommend that you also study the other lessons in my extensive collection of online programming tutorials. You will find a consolidated index at www.DickBaldwin.com.
Layer depth
When you draw two or more sprites using the SpriteBatch.Draw method, you can specify the z-order as the last (layerDepth) parameter to the Draw method. By default, a non-transparent sprite that is drawn with a layerDepth value of 0.0 will hide sprites drawn with greater layerDepth values. The greater the layerDepth value, the further back will be the sprite in the z-order, up to a maximum value of 1.0, which represents the extreme back of the z-order.
Color key transparency
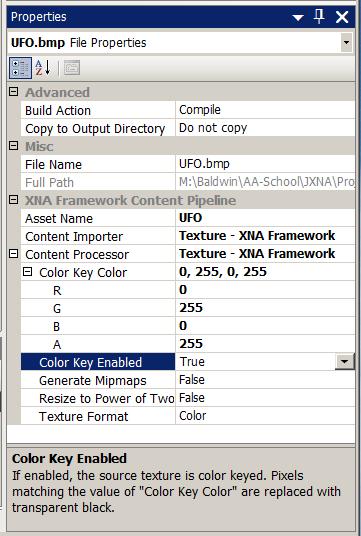
During the design phase of project development, you can cause the program to interpret one specific color as being transparent by setting the Color Key Color property to that color and setting the Color Key Enabled property to true as shown in Figure 1. Although I have never tried to do it, you can also apparently accomplish this at runtime by setting properties of the TextureProcessor class.
Figure 1. Property settings for
green transparency.
Transparent green
Figure 1 shows the property settings required to cause every pixel having a color of pure green (0,255,0) to be replaced with transparent black, regardless of the actual alpha value of the green pixel.
Store your image in a lossless image file
If you use this capability, you must be careful not to store your image in a file that uses lossy compression, such as a JPEG file. If you do, the pure color that went into the file is not likely to be pure when you later extract the image from the file. Instead, you should store your image in a lossless file such as a BMP file or a PNG file.
Be aware of the default values
Even if you don't plan to use this capability, you need to be aware of it. It seems that any time you add an existing image file to the content folder, the Color Key Enabled property will be true by default and the Color Key Color property value will be magenta (255,0,255). If you fail to disable the Colored Key Enabled property, all of your pure magenta pixels will be replaced by transparent black pixels.
In this lesson, I will present and explain an animated sequence in which a UFO flies over an alien planet. You will view the action as if the camera is trained on the UFO while maintaining a constant position relative to the UFO.
As the program runs, the planet gets larger and larger creating the illusion that the UFO is getting closer and closer to the surface of the planet. Finally, the program resets and the sequence repeats.
The UFO image
The UFO image is shown in Figure 2. Note the green background. All of the green pixels in the UFO image will be replaced by transparent black pixels when the program runs. I took advantage of the Color Key transparency feature by setting the properties for the UFO image as shown in Figure 1.
Figure 2. The UFO image.
![]()
The background image
Figure 3 shows a reduced view of the image showing the planet that I used as a background image.
Figure 3. Reduced version of
the alien planet image.
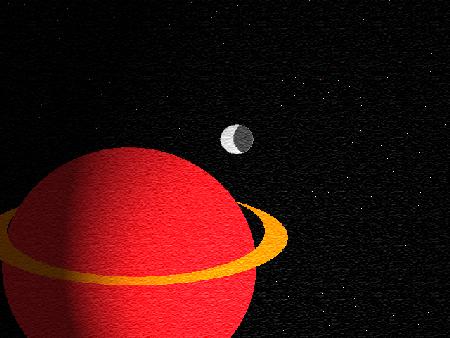
The version that I used in the program was 640 pixels wide and 480 pixels high. However, that is too large to publish in this narrow publication format, so I reduced the image in Figure 3 to 450x338 for publication purposes only. The source code that you will see later is based on an image size of 640x480.
The screen output
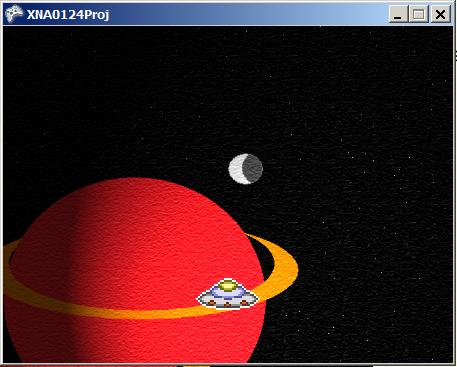
Figures 4 through 12 show nine screen shots taken while the animation was running.
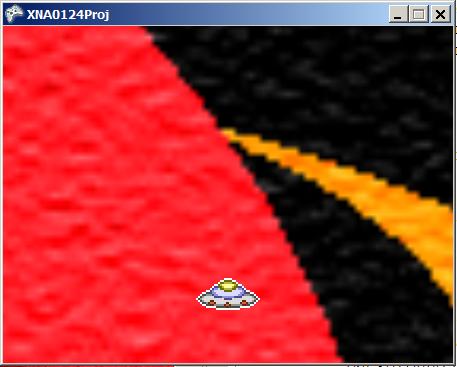
In Figure 4, the UFO is approaching the planet from some distance away. Note that the green portion of the image has become transparent. Also note the size of the planet and its moon for comparison with subsequent screen shots.
Figure 4. The UFO approaching
the planet from some distance away.
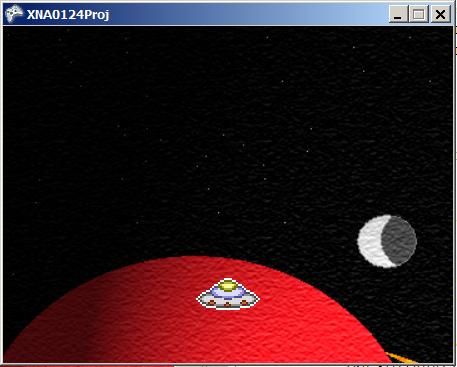
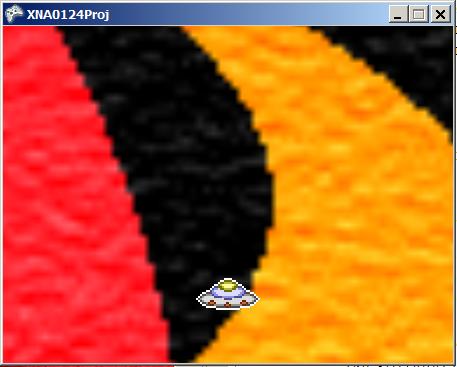
Flying a relatively straight path
In Figures 5 through 7, the UFO continues along a relative straight path flying over the planet and getting closer to the surface of the planet all the time. Note how the planet increases in size from one image to the next, giving the illusion that the UFO is getting closer to the surface of the planet.
The background is moving
Note also that the position of the UFO in the game window is not changing. Instead an illusion of motion is created by causing the background to change. This is a technique that was used for many years in the movies to create the illusion that actors were in a car driving along the highway when in fact, the car was standing still inside a studio.
Figure 5. Flying over the
planet.
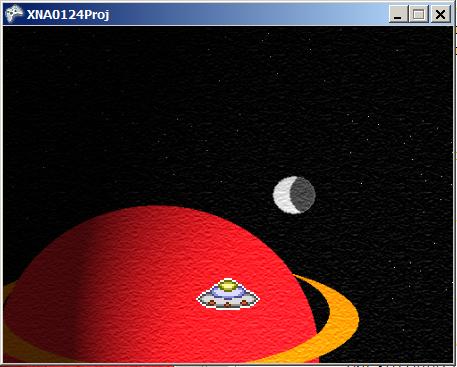
Figure 6. Flying over the
planet.
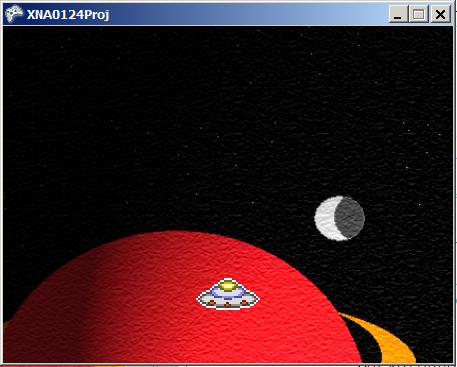
Figure 7. Flying over the
planet.
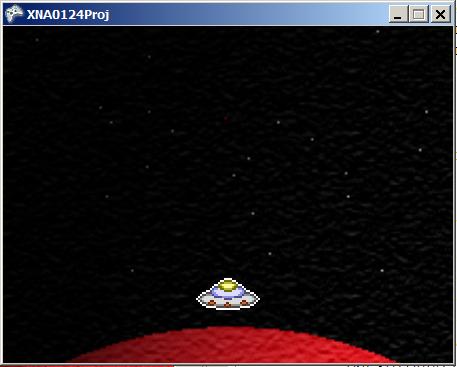
Preparing to change course
In Figure 8, the UFO has gone about as far as it is going to go along the original course. It is preparing to change course and come back towards the camera getting ever closer to the surface of the planet.
Figure 8. Preparing to change
course.
Flying towards the camera
In Figures 9 and 10, the UFO has changed course. It is now flying towards the camera very close to the surface of the planet. You can even see some surface features on the planet (due to the distortion that is produced when a bitmap image is enlarged).
Figure 9. Flying towards the
camera very close to the surface of the planet.
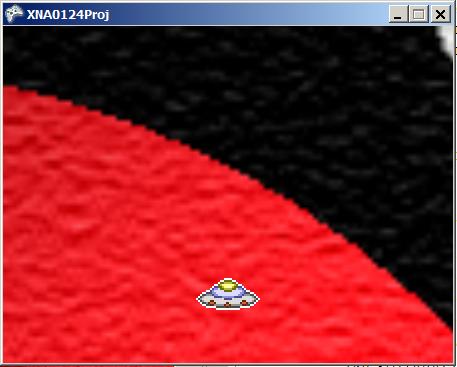
Figure 10. Still flying
towards the camera very close to the surface of the planet.
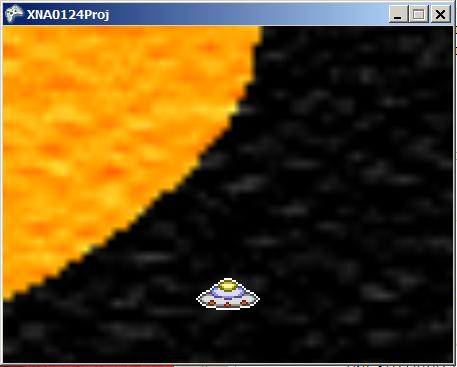
Almost touching the rings
In Figure 11, the UFO is almost touching the rings around the planet.
Figure 11. Almost touching
the rings around the planet.
Heading for home
In Figure 12, the UFO leaves the planet and heads for home. Shortly after this, the program will reset and repeat the animation sequence.
Figure 12. Heading for
home.
Will explain in fragments
As usual, I will explain the code in this program in fragments. A complete listing of the class named Game1 is provided in Listing 11 near the end of the lesson.
The class named Game1 begins in Listing 1.
Listing 1. Beginning of the class named Game1. namespace XNA0124Proj {
public class Game1 : Microsoft.Xna.Framework.Game {
GraphicsDeviceManager graphics;
SpriteBatch spriteBatch;
private Viewport viewport;
private Vector2 ufoPosition;
private float backgroundScale;
private float backgroundBaseScale;
private float dynamicScale = 0.0f;
int msElapsed;//Time since last new frame.
int msPerFrame = 83;//30 updates per second
Texture2D spaceTexture;//background image
Texture2D ufoTexture;//ufo image
Vector2 spaceOrigin;//origin for drawing background
|
Listing 1 contains the declarations of several instance variables that will be used later in the program. I will explain their purpose when they are used later.
The constructor for the class is shown in Listing 2.
Listing 2. The constructor for the class named Game1. public Game1() {//constructor
graphics = new GraphicsDeviceManager(this);
Content.RootDirectory = "Content";
//Set the size of the game window, causing the
// aspect ratio of the game window to match the
// aspect ratio of the background image, which is
// 640 wide by 480 high.
graphics.PreferredBackBufferWidth = 450;
graphics.PreferredBackBufferHeight =
(int)(450.0*480/640);
}//end constructor
|
Setting the size of the game window
The code with the yellow highlight in Listing 2 sets the size of the game window. You have seen code like this before in an earlier lesson. The only thing new here is the expression used to compute the value for the height of the game window.
Maintaining the aspect ratio
The background image shown in Figure 3 is 640 pixels wide by 480 pixels high. When it is initially drawn, it will be scaled to a width of 450 pixels keeping the same width to height ratio (the aspect ratio). The intent is that it will initially just fit inside the game window.
The expression used to compute the new height of the game window in Listing 2 causes the aspect ratio of the game window to match the aspect ratio of the background image.
The overridden LoadContent method begins in Listing 3.
Listing 3. Beginning of the overridden LoadContent method. protected override void LoadContent() {
// Create a new SpriteBatch, which can be used to
// draw textures.
spriteBatch = new SpriteBatch(GraphicsDevice);
//Load the two images.
spaceTexture = Content.Load<Texture2D>("space");
ufoTexture = Content.Load<Texture2D>("ufo");
//Get a referebce to the viewport.
viewport = graphics.GraphicsDevice.Viewport;
|
The new material
The only thing that is new in Listing 3 is the statement that is highlighted in yellow.
Viewport is a property of the GraphicsDevice class and is a Structure named Viewport.
The description in the documentation doesn't make a lot of sense to me. I believe it is safe to say, however, that in this XNA program, the viewport is synonymous with the game window. However, that is not always the case. A game window can contain more than one viewport. See How To: Use Viewports for Split Screen Gaming for an example.
Compute the position of the UFO relative to the game window
The code in Listing 4 computes a position vector which, when applied during the drawing of the UFO, will cause the UFO to occupy a position approximately like that shown in Figure 4.
Listing 4. Compute the position of the UFO relative to the game window. ufoPosition.X = viewport.Width / 2;
ufoPosition.Y = viewport.Height - 70;
|
Why do I say approximately?
I say approximately because one additional adjustment to the position of the UFO will be made later using the origin parameter of the SpriteBatch.Draw method. If that adjustment were not made, the upper left corner of the rectangle that contains the UFO would be placed at the position computed in Listing 4. The origin property will be used to center the UFO on the position that is computed in Listing 4.
Compute the base scale factor for the background image
Listing 5 computes a scale factor which, when applied to the background image during the drawing process, will cause the 640x480 background image to just fit the game window. Recall that the size of the game window was set in the constructor of Listing 2 taking the aspect ratio of the background image into account.
Listing 5. Compute the base scale factor for the background image. backgroundBaseScale = (float)(450.0 / 640.0);
}//end LoadContent
|
Not the only scale factor
The scale factor computed in Listing 5 will be applied to the background image when the program first starts running. However, during most of the running of the program, a different scale factor will be applied to the background image and the scale factor computed in Listing 5 will be only one component of that overall scale factor.
An optical illusion
The application of a scale factor that changes with time to the background image is what causes the planet to grow in size giving the illusion that the UFO is approaching the surface of the planet.
Listing 5 signals the end of the LoadContent method.
The overridden Update method begins in Listing 6.
Listing 6. Beginning of the overridden Update method. protected override void Update(GameTime gameTime) {
//Compute the elapsed time since the last update.
// Draw new data only if this time exceeds the
// desired frame interval given by msPerFrame
msElapsed += gameTime.ElapsedGameTime.Milliseconds;
if(msElapsed > msPerFrame) {
//Reset the elapsed time and draw the frame with
// new data.
msElapsed = 0;
|
Controlling the animation speed
The code in Listing 6 is not new to this lesson. I explained code like this in an earlier lesson.
Briefly, the Update method is called sixty times per second by default (I didn't change the default). That is too fast to produce an animation that looks the way I wanted it to look.
Draw new material every 83 milliseconds
The code in Listing 6 causes the sprites to be drawn sixty times per second, but new material is drawn only once every msPerFrame milliseconds. The value for msPerFrame is set to 83 milliseconds in Listing 1, but as you learned in an earlier lesson, its value could be changed by program code as the program is running.
Therefore, in this program, new material is drawn 30 times per second. Every other frame that is drawn looks exactly like the one before it, but the human eye is not fast enough to be able to detect that.
Apply dynamic scaling to the background image
A different and ever increasing scale factor is applied to the background image each time the body of the if statement in the Update method in Listing 6 is executed.
Two components in the scale factor
This overall scale factor is composed of the fixed backgroundBaseScale factor computed in Listing 5 and a dynamic scale factor named dynamicScale that is computed in Listing 7.
An optical illusion
This is what causes the size of the planet to continue to increase during the animation sequence creating the illusion that the UFO is getting closer to the surface of the planet.
The dynamic portion of the overall scale factor
The value of the dynamic portion of the overall scale factor increases by 0.03 each time this code is executed. Once the dynamic portion reaches a value of 10, it is reset to zero and the animation sequence plays again from the beginning.
This is accomplished by the scaling algorithm shown in Listing 7.
Listing 7. Apply dynamic scaling to the background image. //Reset the animation if the dynamicScale factor
// is greater than 10.
if(dynamicScale > 10) {
dynamicScale = 0.0f;
} else {
//Increase the dynamicScale factor and use it
// to compute a new scale factor that will be
// applied to the background image in the next
// call to the Draw method.
dynamicScale += 0.03f;
backgroundScale =
backgroundBaseScale * (1 + dynamicScale);
}//end if-else on dynamicScale
|
Changing the origin of the background image
The SpriteBatch.Draw method has one parameter named position and another parameter named origin. You can cause the origin to be any point in the image relative to its upper left corner.
Important: The position parameter specifies the position in the game window where the image's origin will be drawn.
If you hold the position parameter constant and vary the origin, the image will appear to slide around within the game window.
Increasing the scale alone is insufficient
Consider the background image shown in Figure 3. Assume that the origin of the image is the upper left corner of the image. Also assume that the image will be drawn with that origin in the upper left corner of the game window.
If we were to scale the image to make it larger, the planet would be pushed down and to the right and would exit the game window near the bottom right corner of the game window. That is not what we are looking for.
Need to stabilize the location of the planet in the game window
To achieve the effect we are looking for, we need to cause the planet to remain in pretty much the same location within the game window as it gets larger. One way to accomplish that is by causing the origin to move down and to the right within the background image as the planet becomes larger. (Obviously that is not the only way to accomplish it.)
That effect is accomplished by the algorithm shown in Listing 8.
Listing 8. Adjust the origin for the background image. //Also use the dynamicScale factor to compute a
// new value for the origin of the background.
// The origin is the point in the image that is
// drawn at the point in the game window that is
// passed as the second (position) parameter in
// the call to the SpriteBatch.Draw method. This
// has the effect of causing the background
// image to slide up and to the left at the same
// time that it is getting larger.
spaceOrigin =
new Vector2((float)(450 * (dynamicScale) / 12),
(float)(338 * (dynamicScale) / 10));
}//end if on msElapsed
base.Update(gameTime);
}//end Update
|
Examples
For example, in Figure 4, the origin of the image (the point drawn in the upper left corner of the game window) was out in space far removed from the planet. By Figure 10 the origin had shifted to the surface of the planet causing a point on the surface of the planet to be drawn in the upper left corner of the game window. By Figure 12, the origin had shifted all the way down and to the right to be on the surface of the ring that surrounds the planet.
The end of the Update method
Listing 8 signals the end of the overridden Update method.
To avoid name confusion...
To avoid confusion, I want to remind you that when programming in XNA, you override the Game.Draw method. Within that method, you make calls to the SpriteBatch.Draw method. These are entirely different methods belonging to different objects even though they have the same name.
No need to clear the game window
The overridden Game.Draw method begins in Listing 9. Unlike the programs in earlier lessons in this series, there is no need to clear the game window to a constant color in this program because the background image of the planet completely fills the game window.
Two main sections of code
In this program, the overridden Game.Draw method consists of two main sections of code. The first section consists of a Begin, Draw, End sequence with alpha blending turned off. This code is used to draw the background image. Alpha blending is turned off to prevent any areas of the background image that may have a low alpha value from appearing to be transparent.
The second section consists of another Begin,Draw,End sequence with alpha blending turned on. This code is used to draw the UFO. Alpha blending is turned on to cause the green areas in the UFO sprite shown in Figure 2 to be transparent and to let the background image show through.
Draw the background image showing the planet
The first major section of code is shown in Listing 9.
Listing 9. Beginning of the overridden Game.Draw method. protected override void Draw(GameTime gameTime) {
// Turn off blending to draw the planet in the
// background.
spriteBatch.Begin(SpriteBlendMode.None);
//Draw the background.
spriteBatch.Draw(spaceTexture,//sprite
Vector2.Zero,//position re window
null,//rectangle
Color.White,//tint
0,//rotation
spaceOrigin,//origin
backgroundScale,//scale
SpriteEffects.None,
1.0f);//layer, near the back
spriteBatch.End();
|
What is new here?
The only things that are new here are the interactions among the position parameter, the origin parameter, and the scale parameter (all highlighted in yellow) that I explained earlier.
It is probably also worth noting that the last parameter has a value of 1.0, which cause this image to be displayed behind every other image.
Draw the UFO
The code in Listing 10 draws the UFO image with alpha blending turned on to cause the green areas of the image to be transparent.
Listing 10. Draw the UFO. // Turn on blending to draw the UFO in the
// foreground.
spriteBatch.Begin(SpriteBlendMode.AlphaBlend);
//Center the UFO at the point in the window
// identified as UFO position. The UFO image is
// 64x33 pixels.
Vector2 origin = new Vector2(32,16);
spriteBatch.Draw(ufoTexture,//sprite
ufoPosition,//position re window
null,//rectangle
Color.White,//tine
0,//rotation
origin,//origin
1,//scale
SpriteEffects.None,
0f);//layer, 0 is in front
spriteBatch.End();
base.Draw(gameTime);
}//end Draw method
}//end class
}//end namespace
|
Center the UFO image on the position
The UFO image is 64 pixels wide and 33 pixels high. The origin is set to the center of the image with coordinates of (32,16) relative to the upper left corner of the image (see the code with the yellow background).
Then the image is drawn with the origin at the ufoPosition, which was computed in Listing 4.
The value of ufoPosition specifies a point that is in the horizontal center of the game window and 70 pixels from the bottom of the game window. Therefore, the center of the UFO is positioned at the horizontal center of the game window and 70 pixels up from the bottom of the game window as shown in Figures 4 through 12.
The UFO does not move
The UFO doesn't move. It stays in one place and the background image is animated behind it.
The front of the z-order stack
The value of the last parameter in Listing 10 is zero. This places the UFO in front of every other image. Of course, in this case, there are only two images: the background image at the back and the UFO image at the front.
The SpriteBatch.Draw method has an origin parameter and a position parameter.
The origin parameter specifies a point somewhere in the image being drawn relative to the upper left corner of the image. The position parameter specifies where that point will be drawn relative to the upper left corner of the game window.
The end of the program
Listing 10 signals the end of the overridden Draw method, the end of the class, and the end of the program.
I encourage you to copy the code from Listing 11. Use that code to create an XNA project. Compile and run the project. Experiment with the code, making changes, and observing the results of your changes. Make certain that you can explain why your changes behave as they do.
You learned about the following major topics in this lesson:
Listing 11. The class named Game1 for the project named XNA0124Proj. /*Project XNA0124Proj
* Illustrates displaying a sprite with color key
* transparency in front of a background image.
* Must modify the color key property value for the ufo
* sprite, changing the key color from the default of
* 255,0,255 (magenta or magic pink) to 0,255,0 (green).
* The scale and the origin of the background image is
* changed over time giving the illusion of a ufo
* flying over a planet.
********************************************************/
using System;
using Microsoft.Xna.Framework;
using Microsoft.Xna.Framework.Graphics;
namespace XNA0124Proj {

  public class Game1 : Microsoft.Xna.Framework.Game {

    GraphicsDeviceManager graphics;
    SpriteBatch spriteBatch;
    private Viewport viewport;
    private Vector2 ufoPosition;
    private float backgroundScale;
    private float backgroundBaseScale;
    private float dynamicScale = 0.0f;
    int msElapsed;//Time since last new frame.
    int msPerFrame = 83;//30 updates per second
    Texture2D spaceTexture;//background image
    Texture2D ufoTexture;//ufo image
    Vector2 spaceOrigin;//origin for drawing background
    public Game1() {//constructor
      graphics = new GraphicsDeviceManager(this);
      Content.RootDirectory = "Content";

      //Set the size of the game window, causing the
      // aspect ratio of the game window to match the
      // aspect ratio of the background image, which is
      // 640 wide by 480 high.
      graphics.PreferredBackBufferWidth = 450;
      graphics.PreferredBackBufferHeight =
                                   (int)(450.0*480/640);
    }//end constructor
//-------------------------------------------------//
protected override void Initialize() {
// No initialization required
base.Initialize();
}//end Initialize
//-------------------------------------------------//
    protected override void LoadContent() {
      // Create a new SpriteBatch, which can be used to
      // draw textures.
      spriteBatch = new SpriteBatch(GraphicsDevice);

      //Load the two images.
      spaceTexture = Content.Load<Texture2D>("space");
      ufoTexture = Content.Load<Texture2D>("ufo");

      //Get a referebce to the viewport.
      viewport = graphics.GraphicsDevice.Viewport;
//Compute the position of the ufo relative to the
// game window.
      ufoPosition.X = viewport.Width / 2;
      ufoPosition.Y = viewport.Height - 70;
//Set the backgroundBaseScale factor such that
// the entire background image will fit in the
// game window. Note that the aspect ratio of the
// game window was set to match the aspect ratio
// of the background image in the constructor.
      backgroundBaseScale = (float)(450.0 / 640.0);
    }//end LoadContent
//-------------------------------------------------//
protected override void UnloadContent() {
// No unload required
}//end UnloadContent
//-------------------------------------------------//
    protected override void Update(GameTime gameTime) {

      //Compute the elapsed time since the last update.
      // Draw new data only if this time exceeds the
      // desired frame interval given by msPerFrame
      msElapsed += gameTime.ElapsedGameTime.Milliseconds;
      if(msElapsed > msPerFrame) {
        //Reset the elapsed time and draw the frame with
        // new data.
        msElapsed = 0;
        //Reset the animation if the dynamicScale factor
        // is greater than 10.
        if(dynamicScale > 10) {
          dynamicScale = 0.0f;
        } else {
          //Increase the dynamicScale factor and use it
          // to compute a new scale factor that will be
          // applied to the background image in the next
          // call to the Draw method.
          dynamicScale += 0.03f;
          backgroundScale =
                backgroundBaseScale * (1 + dynamicScale);
        }//end if-else on dynamicScale
        //Also use the dynamicScale factor to compute a
        // new value for the origin of the background.
        // The origin is the point in the image that is
        // drawn at the point in the game window that is
        // passed as the second (position) parameter in
        // the call to the SpriteBatch.Draw method. This
        // has the effect of causing the background
        // image to slide up and to the left at the same
        // time that it is getting larger.
        spaceOrigin =
          new Vector2((float)(450 * (dynamicScale) / 12),
                     (float)(338 * (dynamicScale) / 10));
      }//end if on msElapsed

      base.Update(gameTime);
    }//end Update
//-------------------------------------------------//
    protected override void Draw(GameTime gameTime) {

      // Turn off blending to draw the planet in the
      // background.
      spriteBatch.Begin(SpriteBlendMode.None);

      //Draw the background.
      spriteBatch.Draw(spaceTexture,//sprite
                       Vector2.Zero,//position re window
                       null,//rectangle
                       Color.White,//tint
                       0,//rotation
                       spaceOrigin,//origin
                       backgroundScale,//scale
                       SpriteEffects.None,
                       1.0f);//layer, near the back

      spriteBatch.End();
      // Turn on blending to draw the UFO in the
      // foreground.
      spriteBatch.Begin(SpriteBlendMode.AlphaBlend);
      //Center the UFO at the point in the window
      // identified as UFO position. The UFO image is
      // 64x33 pixels.
      Vector2 origin = new Vector2(32,16);
      spriteBatch.Draw(ufoTexture,//sprite
                       ufoPosition,//position re window
                       null,//rectangle
                       Color.White,//tine
                       0,//rotation
                       origin,//origin
                       1,//scale
                       SpriteEffects.None,
                       0f);//layer, 0 is in front

      spriteBatch.End();

      base.Draw(gameTime);
    }//end Draw method
  }//end class
}//end namespace
|
Copyright 2009, Richard G. Baldwin. Reproduction in whole or in part in any form or medium without express written permission from Richard Baldwin is prohibited.
Richard Baldwin is a college professor (at Austin Community College in Austin, TX) and private consultant whose primary focus is object-oriented programming using Java and other OOP languages.
Richard has participated in numerous consulting projects and he frequently provides onsite training at the high-tech companies located in and around Austin, Texas. He is the author of Baldwin's Programming Tutorials, which have gained a worldwide following among experienced and aspiring programmers.
In addition to his programming expertise, Richard has many years of practical experience in Digital Signal Processing (DSP). His first job after he earned his Bachelor's degree was doing DSP in the Seismic Research Department of Texas Instruments. (TI is still a world leader in DSP.) In the following years, he applied his programming and DSP expertise to other interesting areas including sonar and underwater acoustics.
Richard holds an MSEE degree from Southern Methodist University and has many years of experience in the application of computer technology to real-world problems.
-end-