Published: September 7, 2008
by Richard G. Baldwin
File: Allegro00150
This lesson is part of a series (see Resources) designed to teach you how to use Allegro to do graphics programming in C++. My purpose in writing the series is to provide lecture and lab material for a course titled Game Development Using C++ that I teach at Austin Community College in Austin, Texas. However, if you have stumbled upon this series and you find it useful, you are welcome to study it.
I recommend that you open another copy of this document in a separate browser window and use the following links to easily find and view the figures and listings while you are reading about them.
I recommend that you also study the other lessons in my extensive collection of online programming tutorials. You will find a consolidated index at www.DickBaldwin.com.
In this lesson, you will learn:
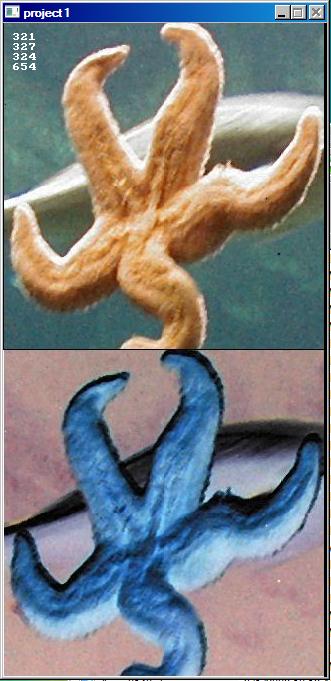
Figure 1. Screen output for program named ImageNegate03.
|
|
This program is similar to the program named ImageNegate01 from an earlier lesson (see Resources). However, that program required the programmer to know the size of the image that was being processed. This program assumes that the programmer does not know the width and height of the image. Instead, those values are discovered by the program after the image is loaded into memory.
Purpose
The purpose of this program is to show you:
An image file of unknown size
A PCX image file of an unknown size is loaded into memory and displayed in the top half of a graphics window as shown in Figure 1. A negated version of the image is displayed in the bottom half of the window.
The width and height of the image and the width and height of the window respectively are displayed in the upper-left corner of the window.
I have determined experimentally that the width of the window MUST be a multiple of 4. I have also determined experimentally that the width must be at least 108 pixels.
Minimum allowable width
This second requirement seems to be a characteristic of Windows Vista (or Windows in general) because it is not possible to manually resize a window to make it narrower than approximately 108 pixels. Also, if you write a Java program to display a frame with a width that is less than about 108 pixels, the frame that is actually displayed is about 108 pixels wide. Note, however that the program doesn't hang up.
Program hangs up
If the two conditions listed above aren't met with Allegro and Dev-C++, the program hangs up on my HP laptop running Windows Vista Home Premium edition. I must log out and then log back in order to continue programming in the same project.
Additional details
In view of the possibility that others may be experiencing the same problems, I will provide additional details. When you successfully compile an Allegro project using Dev-C++, an exe file is created. If you modify the program code and successfully recompile the program, the old exe file is replaced with a new one.
What actually happens when I experience these problems is that under certain runtime failures (not limited to the two described above) Vista refuses to allow the exe file to be deleted or modified until either the system is rebooted or the current user logs out and then logs back in. Since it is impossible to replace the exe file with a new one, it is not possible to modify and recompile the program and an "access denied" message occurs when an attempt is made to recompile the program.
A crude workaround
It is very inconvenient to have to log out and log back in during the debugging of a program when certain runtime failures occur. What I have learned to do when that happens is to:
After awhile, I log out, log back in, and delete all of the old copies of the project.
Another restriction
I have also determined that for PCX or BMP files with a color depth of 16, 24, or 32, you MUST set the video mode and create the onscreen window before you call load_bitmap to load the image file. Otherwise, the colors may not be correct. This is also confirmed by the documentation, which states:
"If the file contains a truecolor image, you must set the video mode or call set_color_conversion() before loading it."
Getting the size of the image
As you will see later, in this program, I call the get_clip_rect function to determine the size of the bitmap image. The requirement described above makes it difficult to set the size of the window based solely on the dimensions of the bitmap's clip rectangle because the clip rectangle can't be obtained until after the image file is loaded.
One solution to the problem
There may be a better solution to this problem than the one that I used in this program, but if so, I haven't discovered it yet. (For example, there may be a solution involving the use of the set_color_conversion function.)
In any event, while my solution is not elegant, it works. My solution in this program is to perform the following sequence of operations:
At that point, I have the information that I need to:
Beginning of the program
As is my custom, I will explain the program code in fragments. A complete listing of the program is provided in Listing 7 near the end of the lesson.
The program begins in Listing 1.
Listing 1. Beginning of the program named ImageNegate03.
#include <allegro.h>
#include <stdio.h>//required to call sprintf

int main(){
  int pixel = 0;//temporary storage for a pixel

  //Temporary storage for red, green, and blue
  int red = 0;
  int green = 0;
  int blue = 0;

  int width = 0;//image width
  int height = 0;//image height
  int windowWidth = 0;//must be a multiple of 4 && >= 108
  int windowHeight = 0;

  //The addresses of the following variables are passed
  // in the call to get_clip_rect, where they are
  // populated with the coordinates of the diagonal
  // corners of the rectangular image.
  int upperLeftX = 0;
  int upperLeftY = 0;
  int lowerRightX = 0;
  int lowerRightY = 0;

  //Typical Allegro setup.
  allegro_init();
  install_keyboard();
  set_color_depth(32);

  //Declare a pointer variable capable of pointing to a
  // bitmap.
  BITMAP *picA = NULL;
  //Load an image file from the current directory.
  picA = load_bitmap("starfish.pcx", NULL);
|
If there is anything in Listing 1 that I haven't explained before, the comments should be self-explanatory.
Get the clip rectangle for the image
Listing 2 calls the function named get_clip_rect to determine the coordinates of the diagonal corners of the current clip rectangle for the image.
Listing 2. Get the clip rectangle for the image.
  //Get the current clip rectangle for the image. This is
  // (one less than) the size of the image in both
  // dimensions.
  get_clip_rect(picA,
                &upperLeftX,
                &upperLeftY,
                &lowerRightX,
                &lowerRightY);

  //Compute the width and the height from the coordinates
  // of the diagonal corners of the clip rectangle.
  width = lowerRightX  + 1;
  height = lowerRightY + 1;
|
When the get_clip_rect function returns, the coordinates of the diagonal corners of the rectangle have been stored in the variables named:
The clip rectangle has not been modified since the image was loaded. Therefore, it should include the entire image. Furthermore, the coordinates of the upper-left corner of the clip rectangle should be 0,0.
Because the coordinates of the upper-left corner are 0,0, the coordinates of the lower right corner should be one less than the width and height of the image respectively.
The final two statements in Listing 2 use the values stored in the variables named lowerRightX and lowerRightY to compute the width and height of the image under the assumption that the coordinates of the upper-left corner are 0,0.
Compute the window dimensions
Listing 3 computes the window dimensions based on the width and height of the bitmap image.
Listing 3. Compute the window dimensions.
  if(width % 4 == 0){
    windowWidth = width;
  }else{
    windowWidth = (width/4)*4 + 4;
  }//end else

  if(windowWidth < 108){
    windowWidth = 108;
  }//end if

  //Make the height sufficient to contain two copies of
  // the image, one above the other.
  windowHeight = 2 * height;
|
Abide by the restrictions
The code in Listing 3 guarantees that the width of the window:
Note that the computation of the width in the else clause in Listing 3 takes advantage of the fact that the remainder is discarded in integer division in C++.
Numeric results in the screen output
If you examine the numeric results displayed in the upper-left corner of Figure 1, you will see that the width of the window (324) is the next integer value greater than the width of the image (321) that is divisible by four. You can also see a very narrow black vertical stripe down the right side of Figure 1 where the image wasn't quite wide enough to completely fill the window.
Get and process a new image
The code in Listing 4:
Listing 4. Get and process a new image.
  destroy_bitmap(picA);
  set_gfx_mode(GFX_AUTODETECT_WINDOWED,
               windowWidth,
               windowHeight,
               0,
               0);
  picA = load_bitmap("starfish.pcx", NULL);

  //Copy the image to the upper-left corner of the
  // onscreen window.
  blit(picA, screen, 0,0,0,0,width,height);
|
By destroying the existing bitmap before setting the video mode, the code in Listing 4 satisfies the requirement described earlier.
Display the numeric information in the window
Listing 5 calls the sprintf function four times in succession to display the four numeric dimension values shown in the upper-left corner of Figure 1.
Listing 5. Display the numeric information in the window.
  //Display the width and height of the bitmap and the
  // window in the upper-left corner of the window.
  char charArray[20];
  sprintf(charArray, "%d", width);
  textout_ex(screen,font,charArray,10,10,
                                 makecol(255,255,255),-1);
  sprintf(charArray, "%d", height);
  textout_ex(screen,font,charArray,10,20,
                                 makecol(255,255,255),-1);
  sprintf(charArray, "%d", windowWidth);
  textout_ex(screen,font,charArray,10,30,
                                 makecol(255,255,255),-1);
  sprintf(charArray, "%d", windowHeight);
  textout_ex(screen,font,charArray,10,40,
                                 makecol(255,255,255),-1);
|
The sprintf function can be used to convert a numeric value to a C-style string, according to a specified format, and to put the individual characters into an array of type char. In this case, the specified format (%d) is a signed decimal integer.
After the numeric value has been converted to a string in each case in Listing 5, the textout_ex function is called to display the string in a specified location in the window. You learned about the textout_ex function in an earlier lesson (see Resources).
Negate and display the image
Listing 6 negates the image and displays the negated image in the lower half of the window as shown in Figure 1.
Listing 6. Negate and display the image.
  //Cycle through the bitmap negating each pixel.
  for(int row = 0;row < height;row++){
    for(int column = 0;column < width;column++){
      pixel = getpixel(picA,column,row);
      red = getr(pixel);
      green = getg(pixel);
      blue = getb(pixel);
      putpixel(picA,column,row,makecol(
                             255-red,255-green,255-blue));
    }//end loop row
  }//end loop on column

  //Copy the modified bitmap to the onscreen window
  // immediately below the original image.
  blit(picA, screen, 0,0,0,height,width,height);

  //Block and wait until the user presses a key.
  readkey();

  //Destroy bitmap to avoid memory leaks.
  destroy_bitmap(picA);

  return 0;//Return 0 to indicate a successful run.
}//end main function
END_OF_MAIN()
|
Press any key to terminate
Listing 6 also terminates the program when the user presses any key.
I have explained code similar to Listing 6 in previous lessons (see Resources) so further explanation of that code in this lesson should not be necessary.
In this lesson, you learned:
Listing 7. Source code for program named ImageNegate03.
/*Project ImageNegate03

This program is similar to ImageNegate01. However, this
version assumes that the programmer does not know the
width and height of the image.

The purpose of this program is to show how to load an
image file into memory, how to determine the size of the
image, how to create a negative of the image, and how to
display both the original and the negative image in an
onscreen window.

A PCX image file of an unknown size is loaded into memory
and displayed in the top half of a graphics window on the
screen. A negated version of the image is displayed in the
bottom half of the window.

The width and height of the image and the width and height
of the window respectively are displayed in the upper-left
corner of the window. For a particular file named
starfish.pcx, the following output is superimposed on the
original image:
321
327
324
654

I have determined experimentally that the width of the
window MUST be a multiple of 4. I have also determined
experimentally that the width must be at least 108 pixels.
This second requirement seems to be a characteristic of
Windows Vista because it is not possible to manually
resize a window to make it narrower than approximately
108 pixels. If these two conditions aren't met, the
program hangs up my Windows Vista Home Premium edition OS
requiring me to log out and then log back in order to
continue programming in Dev-C++.

I have also determined experimentally that for PCX or BMP
files with a color depth of 16, 24, or 32, you MUST create
the onscreen window before you call load_bitmap to load
the image file. Otherwise, the colors may not be correct.
This makes it difficult to set the size of the window
based solely on the dimensions of the clip rectangle of
the image. The clip rectangle can't be obtained until
after the image file is loaded.

There may be a better solution to this problem than mine,
but if so, I haven't discovered it yet.  While my
solution is not elegant, it works. My solution in this
program is to perform the following sequence of
operations:

Load the image file into a bitmap.
Get the height and width of the bitmap.
Destroy the bitmap.
Create the window of the correct size.
Load the image file again into a second bitmap.
Display the image in the top of the window.
Negate the image in the bitmap.
Display the negated image in the bottom of the window.

Pressing any key causes the program to terminate.
*/
#include <allegro.h>
#include <stdio.h>//required to call sprintf

int main(){
  int pixel = 0;//temporary storage for a pixel

  //Temporary storage for red, green, and blue
  int red = 0;
  int green = 0;
  int blue = 0;

  int width = 0;//image width
  int height = 0;//image height
  int windowWidth = 0;//must be a multiple of 4 && >= 108
  int windowHeight = 0;

  //The addresses of the following variables are passed
  // in the call to get_clip_rect, where they are
  // populated with the coordinates of the diagonal
  // corners of the rectangular image.
  int upperLeftX = 0;
  int upperLeftY = 0;
  int lowerRightX = 0;
  int lowerRightY = 0;

  //Typical Allegro setup.
  allegro_init();
  install_keyboard();
  set_color_depth(32);

  //Declare a pointer variable capable of pointing to a
  // bitmap.
  BITMAP *picA = NULL;
  //Load an image file from the current directory.
  picA = load_bitmap("starfish.pcx", NULL);

  //Get the current clip rectangle for the image. This is
  // (one less than) the size of the image in both
  // dimensions.
  get_clip_rect(picA,
                &upperLeftX,
                &upperLeftY,
                &lowerRightX,
                &lowerRightY);

  //Compute the width and the height from the coordinates
  // of the diagonal corners of the clip rectangle.
  width = lowerRightX  + 1;
  height = lowerRightY + 1;

  //Compute the window dimensions based on the width
  // and height of the bitmap. Guarantee that the width
  // is a multiple of 4 large enough to contain the
  // image and is not less than 108 pixels.
  if(width % 4 == 0){
    windowWidth = width;
  }else{
    windowWidth = (width/4)*4 + 4;
  }//end else

  if(windowWidth < 108){
    windowWidth = 108;
  }//end if

  //Make the height sufficient to contain two copies of
  // the image, one above the other.
  windowHeight = 2 * height;

  //Destroy the bitmap, create the display window, and
  // reload the bitmap.
  destroy_bitmap(picA);
  set_gfx_mode(GFX_AUTODETECT_WINDOWED,
               windowWidth,
               windowHeight,
               0,
               0);
  picA = load_bitmap("starfish.pcx", NULL);

  //Copy the image to the upper-left corner of the
  // onscreen window.
  blit(picA, screen, 0,0,0,0,width,height);

  //Display the width and height of the bitmap and the
  // window in the upper-left corner of the window.
  char charArray[20];
  sprintf(charArray, "%d", width);
  textout_ex(screen,font,charArray,10,10,
                                 makecol(255,255,255),-1);
  sprintf(charArray, "%d", height);
  textout_ex(screen,font,charArray,10,20,
                                 makecol(255,255,255),-1);
  sprintf(charArray, "%d", windowWidth);
  textout_ex(screen,font,charArray,10,30,
                                 makecol(255,255,255),-1);
  sprintf(charArray, "%d", windowHeight);
  textout_ex(screen,font,charArray,10,40,
                                 makecol(255,255,255),-1);

  //Cycle through the bitmap negating each pixel.
  for(int row = 0;row < height;row++){
    for(int column = 0;column < width;column++){
      pixel = getpixel(picA,column,row);
      red = getr(pixel);
      green = getg(pixel);
      blue = getb(pixel);
      putpixel(picA,column,row,makecol(
                             255-red,255-green,255-blue));
    }//end loop row
  }//end loop on column

  //Copy the modified bitmap to the onscreen window
  // immediately below the original image.
  blit(picA, screen, 0,0,0,height,width,height);

  //Block and wait until the user presses a key.
  readkey();

  //Destroy bitmap to avoid memory leaks.
  destroy_bitmap(picA);

  return 0;//Return 0 to indicate a successful run.
}//end main function
END_OF_MAIN()
|
Copyright 2008, Richard G. Baldwin. Reproduction in whole or in part in any form or medium without express written permission from Richard Baldwin is prohibited.
Richard has participated in numerous consulting projects and he frequently provides onsite training at the high-tech companies located in and around Austin, Texas. He is the author of Baldwin's Programming Tutorials, which have gained a worldwide following among experienced and aspiring programmers. He has also published articles in JavaPro magazine.
In addition to his programming expertise, Richard has many years of practical experience in Digital Signal Processing (DSP). His first job after he earned his Bachelor's degree was doing DSP in the Seismic Research Department of Texas Instruments. (TI is still a world leader in DSP.) In the following years, he applied his programming and DSP expertise to other interesting areas including sonar and underwater acoustics.
Richard holds an MSEE degree from Southern Methodist University and has many years of experience in the application of computer technology to real-world problems.
-end-