|
|

Programming
with Adobe Flex
XML
- Namespaces
|
|
|
Learn enough about XML namespaces to be
able to handle the namespace requirements of simple Flex projects. Also get
your first taste of creating MXML files for Flex projects.
Published: zz
by Richard G. Baldwin
Flex Programming Notes # 0086
- Preface
- General background
information
- Preview
- Discussion and sample
code
- Resources
- Copyright
- About the author
Preface
General
This tutorial lesson is part of a continuing
series dedicated to programming with Adobe Flex.
Flex is a programming language based on XML.
Therefore, in order to program with Flex, you must first understand XML. The
lessons in this XML series provide a brief introduction to XML.
Viewing
tip
I recommend that you open another copy of
this document in a separate browser window and use the following links to
easily find and view the figures and listings while you are reading about them.
Figures
- Figure 1. The directory tree for the
project named Namespace01.
- Figure 2. Program output at startup.
- Figure 3. Screen output for upgraded Flex
project.
Listings
- Listing 1. Skeleton MXML code for a new
Flex project.
- Listing 2. Upgraded Flex project code.
- Listing 3. Contents of the file named
Label.mxml.
- Listing 4. Contents of the file named
Button.mxml
- Listing 5. Contents of the file named
NameSpace01.mxml.
Supplemental
material
I recommend that you also study the other
lessons in my extensive collection of online programming tutorials. You
will find a consolidated index at www.DickBaldwin.com.
General
background information
XML namespaces make it possible to combine
two or more XML documents into a single XML document and to deal with problems
that arise when the same name is used for an element in two or more of the XML
documents.
Preview
The XML namespaces topic is very broad. I
won't attempt to cover the broad topic of namespaces in this lesson. Instead, I
will illustrate and explain a more restricted use of namespaces by explaining a
Flex project that combines three XML documents with conflicting element names.
Before getting into the detailed code, I
will show you a couple of images that I will be referring back to later.
The project file structure
When you create a Flex project, you create a
directory tree on the disk to contain the files and folders that make up the
project. The tree is rooted in a folder that has the same name as the name that
you give to the project. In this lesson, I will explain a Flex project named
Namespace01.
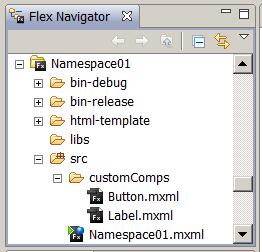
Figure 1 shows the directory tree for this
project. Figure 1 is a snapshot of the Flex Builder 3 Navigator panel.
Figure
1 The directory
tree for the project named Namespace01.
Lots of folders and files
The directory tree contains a relatively
large number of folders and files. Fortunately, most of the folders and files
are generated automatically by Flex Builder 3. As Flex programmers, we are
primarily interested in the folders and files that are children of the folder
named src.
For this project I had to create the
following files and folders:
- The file named Namespace01.mxml
- The folder named customComps
- The file named Button.mxml
- The file named Label.mxml
Create a graphical user
interface (GUI)
If you continue in your study of Flex
programming, you will learn that one of the most important uses of Flex is to
create a graphical user interface (GUI) to provide the user interface for
programs that are written in the ActionScript programming language.
While you may not be familiar with the
jargon term GUI, I know that you are familiar with the use of a GUI. The GUI is
generally considered to consist of the buttons, menus, text fields, etc. that
you interact with when you run a program on a modern desktop or laptop
computer.
Two buttons, three labels,
etc.
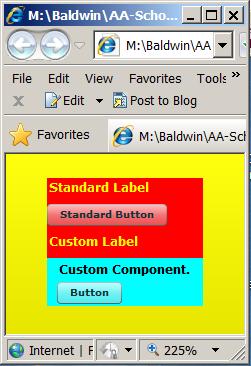
This project creates a GUI with two buttons
and three labels in a VBox
container with a red background as shown in Figure 2.
Figure
2 Program output at
startup.
The buttons are not active
Nothing happens if you click the buttons in
the GUI. The program isn't very interesting from an operational viewpoint. The
thing that is interesting is that I purposely created name conflicts and
resolved them through the use of XML namespaces. I will explain how I did that.
Two standard components
The size of the red VBox container was set to exactly
match the size needed to contain the four components. The yellow label with the
text Standard Label and
the button labeled Standard Button
are standard Flex components. As you will see shortly, they are created by creating
instances of the standard Flex components named Label and Button.
A conflict with the name
Label
The yellow label with the text Custom Label and the cyan rectangle
containing a label and a button are both custom components. The yellow label in
the middle was created by combining the XML file named Namespace01.mxml shown in Figure 1
with the file named Label.mxml,
which is also shown in Figure 1. This created a name conflict because the name
of the file, Label, is
the same as the name of the yellow label at the top of the red VBox.
A conflict with the name
Button
The cyan component containing the button and
the label was created by combining the XML file named Namespace01.mxml shown in Figure 1
with the file named Button.mxml,
which is also shown in Figure 1. This also created a name conflict because the
name of the file, Button,
is the same as the name of the standard button.
Start with a simple
project
Now that you have the big picture in mind,
it's time to drill down a little deeper and take a look at the three XML files
used in this project. However, I'm going to start out with a very simple
project and work my way up to the project that created the output shown in
Figure 2.
Discussion
and sample code
Two ways to create Flex
projects
Flex projects can be created using nothing
more than a text editor and a Flex software development kit (SDK) that is
freely available from the Adobe website. However, to make the development of
Flex projects a little easier, Adobe sells a product named Flex Builder 3 that
includes the SDK along with a visual project editor. The project that I will
explain in this lesson was created using Flex Builder 3.
Skeleton MXML code for a
new Flex project
When you create a new Flex project in Flex
Builder
The XML declaration
The line of code with the yellow highlight is called the XML declaration. It tells what version of
XML is being used and also specifies the encoding scheme for the characters in
the file. An XML declaration should be included at the beginning of every XML
document.
The root element
The text with the magenta highlight is the start tag for the root element in the XML document. (The
root element is always named Application
in a Flex project.) The text with the cyan
highlight is the end tag for the Application
element.
All XML documents have a root element. All
other elements must be nested in the root element.
Attributes of the root
element
The start tag for the root element includes
two attributes:
- xmlns:mx
- layout
The layout attribute
The layout attribute specifies that
components will be positioned on the computer screen using absolute
coordinates. As you will see later, this is not what I want for my project so I
will delete this attribute.
The namespace (xmlns)
attribute
The more interesting attribute is the one
named xmlns. The term xmlns is the required name for a
namespace attribute. While it isn't necessary in general to include a namespace
attribute in the root element, when a namespace attribute is included in the
root element, it becomes the default
namespace for the entire document.
Namespace is always
required for a Flex project
It is always necessary to include the
namespace attribute shown in Listing
To make a long story short, the inclusion of
the default namespace attribute shown in Listing 1 means that all elements with
names that refer to components from the standard Flex library of components
must be prefixed with mx.
A viable Flex project
The code shown in Listing 1 is a viable Flex
project. You can compile it and run it. However, when you do, you won't see any
output other than a blank area with a default gray background in your browser
window. So far, the project doesn't contain any Flex components such as labels
and buttons.
Screen output for upgraded
Flex project
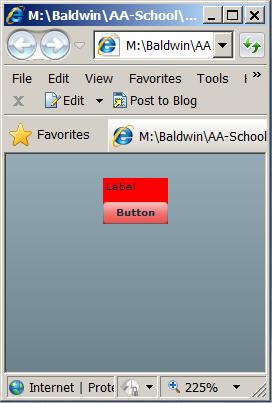
Now I am going to upgrade the project to add
a VBox container with a
red background to the Application
element, and then add a Label
and a Button to the VBox container element. I will also
delete the layout
attribute shown in Listing 1.
If you compile and run this project, you
should see the output shown in Figure 3.
Figure
3 Screen output for
upgraded Flex project.
The modified MXML code
The modified MXML code is shown in Listing
2.
Comments
The lines of text in Listing 2 with the
yellow highlight are comments. You can include comments in an XML document to
help explain the code, record the date, or for whatever purpose a comment may
be appropriate. Comments are ignored by the Flex compiler and have no effect on
the behavior of the program.
The Application element
The start and end tags for the Application element are highlighted
in green. They are the same as in Listing 1 except that I deleted the layout attribute.
The VBox element
The start and end tags for the VBox element are highlighted in cyan. Note that I included an attribute for the
VBox element to cause
the backgroundColor for
the VBox to be red. (I
will leave it as an exercise for the student to research and determine how
"#FF0000" represents the color red.)
The VBox element
You should also note that the name of the VBox element is prefixed with mx, which is the default namespace
for all Flex components.
Finally, you should note that the VBox element is nested inside the
Application element. We say that in this case, VBox is a child of Application.
The physical output on the
screen
Physically, the Application element represents the
browser window with the gray background shown in Figure 3. The VBox component with the red
background is inside of or contained within the Application container in Figure 3.
The nesting structure that you give to the
MXML code carries through to the physical arrangement of the corresponding
components in the resulting GUI.
The Label and Button
elements
The code with the magenta highlight nests a Label element and a Button element inside the VBox element. Once again, this
carries through to the output GUI shown in Figure 3 where the label and the
button are contained in the red VBox
component.
Note that as is the case with all standard
Flex components, the names of the Label
and Button elements are
prefixed with mx.
Properties of the Label
and Button elements
The Label
element has an attribute that sets the text
property to the text that you see in the label in Figure 3. Similarly, the Button element has an attribute that
sets the label property
to the text that you see on the face of the button in Figure 3.
Grouping components in
containers
The Flex VBox component is a container.
Its purpose is to serve as a container for other components. Flex provides
several other container
components in addition to the VBox
component. They are used to group components in the GUI in a way that helps the
user to navigate the GUI.
The Label and Button
elements are empty
The Label
and Button components
are not containers. Therefore, they cannot contain other components in the GUI.
Since there is a direct correspondence between the nesting structure in the
MXML code and the containment structure in the GUI, other elements cannot be
nested in Label or Button elements.
As a result, the Label and Button elements in Listing 2 are empty. They don't contain any other
elements. However, even empty elements can and often do have attributes.
No end tags for Label and
Button elements
Because the Label and Button
elements are empty elements, they don't have end tags. Instead they have a
slash character immediately to the left of the closing angle bracket on the
start tag.
The final upgrade
Now I'm going to upgrade the project once
again to produce the output GUI shown in Figure
Two custom components
The custom components are defined in the
files named Label.mxml
and Button.mxml shown
in Figure 1. I will begin by discussing the MXML code for each of these custom
components.
Listing 3 shows the MXML code for the custom
label.
Won't discuss in detail
Since this lesson is mainly about using
namespaces to resolve name conflicts, and is not about creating custom
components, I'm not going to go into detail at this time about how to create
custom components. Briefly, Listing 3 creates a custom component consisting of
a label with yellow bold text and a font size of 12 points.
This custom component is shown as the label
with the yellow text in the middle of Figure 2. (I will cover the details of
designing and creating custom components in a future lesson.)
Contents of the file named
Button.mxml
Listing 4 shows the MXML code for the custom
button.
This custom component can also be viewed in
Figure 2. Briefly it consists of a button and a label with black text in a
small VBox container
with a cyan background.
Contents of the file named
NameSpace01.mxml
Listing 5 shows the contents of the file
named NameSpace01, which is the main driver for the entire application.
Resolving name conflicts
using namespaces
This code adds two standard components named
Label and Button and two custom components
named Label and Button to a VBox container.
Because the custom components have the same
names as the standard components, a name conflict arises. Listing 5 resolves
the name conflict using namespaces.
The folder named
customComps
As you may recall from Figure 1, the two
files that represent the custom components are in a folder named customComps, which is a child of the
folder named src. Thus,
the folder named customComps
is a sibling of the file named NameSpace01.mxml.
A new namespace attribute
The code with the yellow highlight in
Listing 5 is a new attribute for the Application
element. This attribute establishes a new namespace with the prefix MyComps. The namespace prefix points
to all of the files in the folder named customComps.
The name customComps identifies the folder and the period and
asterisk following the name mean that all of the files in the folder are part
of the new namespace.
Must use the new prefix
In order to include the custom components
defined by these files in the MXML document, elements named after these
components must be prefixed with MyComps.
Using the mx prefix for
standard Flex components
The code with the cyan highlight in Listing
5 uses the standard mx
namespace prefix to add a standard Label
component and a standard Button
component to the VBox
container with a red background. (The start and end tags for the VBox container are highlighted in
green.) Attributes are applied to the mx:Label
element to set the color, size, and weight of the text in the label.
Using the MyComps prefix
for custom components
The code with the magenta highlight uses the
new MyComps namespace
prefix to add a custom Label
component and a custom Button
component to the same VBox
container.
Resolving the name
conflict
Because the elements for standard components
are prefixed with mx
and the elements for custom components are prefixed with MyComps, the compiler is able to
distinguish between them and to resolve the name conflicts.
The final result is the GUI shown in Figure
2.
Resources
- Baldwin's Flex
programming website
- Baldwin's
ActionScript programming website
- 114
Integrating ActionScript and Flex
- 116
Defining Custom MXML Components
- 118
Defining Custom ActionScript Components
- 120
Creating Online Tests using Custom ActionScript Components
- Adobe
Flex 3 Home
- Download
free open-source Adobe Flex 3.4 SDK
- Download Adobe Flex
Builder 3 Professional for students
- Download
Adobe Flash Builder 4 beta
- Download
Adobe Flash Player 9 (or later versions)
- Download Adobe Air
- Download various Adobe
products
- Flex Developer Center
- Flex in a
Week video training
- Adobe
Flex Builder 3 - Getting Started
- Getting
Started with Flex 3 - online O'Reilly book by Jack Herrington and Emily
Kim
- Adobe
Flex 3 Help
- Adobe Flex 3.4
Language Reference
- Building
and Deploying Flex 3 Applications
- Programming
ActionScript 3.0
- ActionScript
language and syntax
- Flex
Quick Start: Getting started
- Flex.org
- Wikipedia on MXML
- ActionScript
3 guides, tutorials, and samples
- Building
custom components in ActionScript
- ActionScript.org
- ActionScript
3: The Language of Flex
- ActionScript
Custom Components
- ActionScript
language and syntax
- Comparing,
including, and importing ActionScript code
- Programming
ActionScript 3.0
- Getting
Started with ActionScript 3.0
- Modular
applications overview
- ActionScript
3 Language Specification
- Beginners
Guide to Getting Started with AS33 (Running the compiler from the
command line.)
- Tips
for learning ActionScript 3.0
- ActionScript
Technology Center
- Adobe Flash Platform
- Adobe
Flash Player
- Adobe
Air
- ActionScript
language references
- Class
property attributes
Copyright
Copyright 2009, Richard G. Baldwin.
Reproduction in whole or in part in any form or medium without express written
permission from Richard Baldwin is prohibited.
About the author
Richard Baldwin is a college professor (at
Richard has participated in numerous
consulting projects and he frequently provides onsite training at the high-tech
companies located in and around
In addition to his programming expertise,
Richard has many years of practical experience in Digital Signal Processing
(DSP). His first job after he earned his Bachelor's degree was doing DSP in the
Seismic Research Department of Texas Instruments. (TI is still a world leader
in DSP.) In the following years, he applied his programming and DSP expertise
to other interesting areas including sonar and underwater acoustics.
Richard holds an MSEE degree from Southern
Methodist University and has many years of experience in the application of
computer technology to real-world problems.
-end-