Learn about memory, variables, literals, pseudocode, sequence, selection, loop, and algorithms. Learn how to write a Scratch program that illustrates the creation and use of variables, case sensitivity, and the ability to detect and respond to mouse and keyboard events.
Published: May 1, 2008
Last Revised: May 16, 2008
By Richard G. Baldwin
Homeschool Programming Notes # 102
This is the second lesson in a series that is designed specifically for teaching computer programming to homeschool students and their parents.
I will begin by providing an overview of computer programming. Then I will provide technical explanations for memory, variables, and literals. Along the way, I will provide some examples in pseudocode and also in Java code.
I will provide a brief illustration of the three fundamental programming operations:
I will explain the meaning of the term algorithm.
A Scratch program
To wrap things up, I will present and explain a Scratch program that is designed to illustrate the creation and use of variables in a computer program. The Scratch program also illustrates case sensitivity in variable names along with the ability to detect and respond to events fired by the keyboard and events fired by the mouse.
Student programming projects
Finally I will present two student programming projects that are designed to:
I recommend that you open another copy of this document in a separate browser window and use the following links to easily find and view the figures and listings while you are reading about them.
I recommend that you also study the other lessons in my extensive collection of online programming tutorials. You will find a consolidated index at www.DickBaldwin.com.
The lessons in this series are designed specifically for homeschool students and their parents (but everyone is welcome to use them). I will assume that neither the students nor their parents know anything about computer programming. As such, I will explain programming concepts and issues beginning at a very fundamental level.
Not especially difficult
Computer programming is not especially difficult. However, it does require an aptitude for solving problems. In fact, a computer program is usually a model for a solution to someone's problem.
One step at a time
If you can learn to program a VCR, you can probably also learn to program a computer. Of course, a computer is more complicated than a VCR, so there is more to learn. The important thing is to take the learning process in deliberate steps making certain that you understand each step before moving on to the next one.
The hard work is often done for us
Fortunately, when we write programs using a high-level programming language such as Scratch, Alice, or Java, much of the hard work is done for us behind the scenes. For example, we don't have to perform the small incremental steps that are required to divide one number by another number.
As programmers, we are more like conductors than musicians. The various parts of the computer represent the musicians. We tell them what to play, and when to play it, and if we do our job well, we produce a solution to someone's problem.
All computers contain memory of one type or another. When we speak of human memory, we are usually speaking of the things that the human remembers. However, when we speak of computer memory, we are usually speaking of physical devices where data is stored for later retrieval. Most modern computers contain memory of a type that is often referred to as RAM (more on RAM later).
|
All data is stored in a computer as numeric values. Computer programs do what they do by executing a series of operations on the numeric data.
The operations generally consist of calculations and comparisons. It is the order and the pattern of those operations that distinguishes one computer program from another.
A physical analogy
We can think of random access memory as being analogous to a metal rack containing a large number of compartments. The compartments are all the same size and are arranged in a regular grid of rows and columns.
Each compartment has a numeric address printed above it. No two compartments have the same numeric address. Each compartment also has a little slot into which you can insert a name or a label for the compartment. No two compartments can have the same name.
Pretend that you are a computer program
Think of yourself as a computer program. You have the ability to create labels for each compartment. You have the ability to write values on little slips of paper and to put them into the compartments. You also have the ability to read the values written on the little slips of paper and to use those values for some purpose. However, there are four rules that you must observe:
Each morning, the owner of the grocery store tells you to insert a name or label in the slot above each compartment and to place a little slip of paper inside each compartment. (In programming jargon, we would refer to this as declaration and initialization.) Each of the names on the compartments represents a type of grocery such as
The price of a can of beans
When you place a new slip of paper in a compartment, you must be careful to remove and destroy the one that was already there. Each slip of paper that you insert into a compartment contains the price for the type of grocery identified by the label on the compartment.
For example, the slip of paper in the compartment labeled beans may contain the value 0.15, meaning that one can of beans costs 15 cents.
The checkout procedure
As each customer comes to your checkout counter during the remainder of the day, you execute the following procedure:
When you have processed all of the grocery items for a particular customer, you would press the TOTAL key on the adding machine, turn the crank, and present the customer with the bill.
A schematic representation of the procedure (algorithm)
We might represent the procedure or algorithm in schematic form as shown in Figure 1.
Figure 1. Pseudocode for a grocery checkout algorithm.
For each customer in the line, do the following: Initialize the accumulated total cost to $0.00 For each grocery item, do the following: Identify the type of grocery item Get the unit price from the corresponding compartment Add the unit price to the accumulated total End loop on grocery items Compute the total Present customer with a bill End loop on customers |
|
In computer jargon, we would refer to the presentation style for the information in Figure 1 as pseudocode.
Common programming activities
This algorithm illustrates the three activities that are commonly believed to be the fundamental activities of any computer program:
A sequence of operations is illustrated by the three items shown in Italics in Figure 1 because they are executed in sequential order.
Selection
The process of identifying the type of grocery item is often referred to as selection. A selection operation is the process of selecting among two or more alternatives.
Loop
The process of repetitively examining each grocery item and processing it is commonly referred to as a loop. In fact, in the early days of programming, this was referred to as a do loop.
An algorithm
As mentioned above, the entire procedure is often referred to as an algorithm.
Modifying stored data
Now assume that sometime during the workday, the owner of the grocery store comes to you and says that she is going to increase the price of a can of beans from 15 cents to 25 cents.
She tells you to write 0.25 on a slip of paper and put it in the compartment labeled beans, being careful to remove and destroy the slip of paper that was previously in that compartment. For the remainder of the day, each time you retrieve the unit price from the compartment, you will get the new price of 0.25. Therefore, the new price for beans will be used in your calculations unless the owner tells you to change it again.
Not a bad analogy
This is a fairly good (but not great) analogy to how random access memory is actually used by a computer program.
Names versus addresses
Although each compartment in the physical memory in the computer has a numeric address, as a programmer using a high-level programming language such as Scratch, Alice, or Java, you usually don't need to be concerned about the numeric addresses of the compartments. (The compartments are often referred to as locations in memory.)
Instead, you can think about the compartments and refer to them in terms of their names. (Names are easier for most people to remember and understand than numeric addresses.) Keep in mind, however, that computer memory locations don't really have names. Deep inside the computer program, the names that you use to identify compartments in memory are cross-referenced to memory addresses. At the lowest level, the program works with memory addresses instead of names.
Execute an algorithm
A computer program always executes some sort of procedure or algorithm. The algorithm may be very simple as in the checkout counter example described above, or it may be very complex as would be the case for a spreadsheet program. As the program executes the algorithm, it uses the random access memory to store and retrieve the data that is needed to execute the algorithm.
Random access versus sequential memory
The reason the memory in most modern computers is called random access memory is that it can be accessed in any order. Some types of memory, such as a magnetic tape, can only be accessed in sequential order. (Yes, I did use computers with magnetic tape memory in my younger days during the sixties and seventies.)
Sequential access means that to get a piece of data (the price of beans, for example) from deep inside the memory, it is necessary to start at the beginning and examine every piece of data until the correct one is found. This is typically a slow process.
Combination random/sequential memory
Other types of memory, such as disks provide a combination of sequential and random access. For example, the data on a disk is stored in tracks that form concentric circles on the disk. The individual tracks can be accessed in random order, but the data within a track must be accessed sequentially starting at a specific point on the track. While faster than magnetic tape, even this process is usually slower than true random access memory.
Sequential memory or combination random/sequential memory isn't very useful for most computer programs at the inner working level because access to each particular piece of data is slow. As a result, most modern computers have random access memory that is used for storage and retrieval of data by programs while they are running and disks that are used for long-term storage and retrieval of data that needs to be saved over longer periods of time.
However, as I explain various programming concepts, I will also show you simple examples of Java programs (with minimal explanations of those programs) to give you a preview of the ultimate goal of the series of tutorials. (Once we reach the point where I am asking you to actually write Java programs, I will provide detailed explanations.) My hope is that you can use this information to form connections between what you are learning in Scratch and Alice and what you will eventually learn using Java.
An actual program
Listing 1 presents a sample Java program that illustrates the use of memory compartments. According to the jargon, the text that you see in Figure 1 is often referred to as program code or source code. Note that this is an actual program and is not pseudocode as in Figure 1.
Listing 1. A sample Java program.
//File Memory01.java
class Memory01{
  public static void main(String[] args){
    int beans;
    beans = 25;
    System.out.println(beans);
  }//end main
}//End Memory01 class
|
Just in case you have Java installed on your computer and you already know how to compile and execute Java programs, you should be able to copy the source code for this program into a file named Memory01.java. Then you should be able to compile and execute it. When you do, the program should display 25 on your computer screen. (However, I don't expect you to have Java installed on your computer yet, and I don't expect you to know how to compile and execute Java programs because we haven't reached that point in the tutorial lessons.)
No boldface allowed
Note that I used boldface to emphasize certain lines of code in Listing 1. I did this to make it easy to refer to those lines in this discussion. However, you must never include boldface in the actual Java source code that you are going to compile.
Variables
Up to this point, I have been using the word compartment to relate storage areas in memory to the little pigeonholes in the physical rack in the grocery store analogy. However, computer programmers don't refer to storage areas in memory as compartments and you shouldn't either. According to common programming jargon, the term variable is synonymous with the term compartment that I have used for illustration purposes so far in this lesson.
The boldface text
The use of variables is illustrated by the boldface text in the Java program shown in Listing 1. (We will ignore the other text in the program at this time and come back to it later when we begin studying Java.)
Declaring a variable
In Scratch, Alice, and Java, it is necessary to declare the name of a variable before you can use it. (That is not the case in some programming languages such as Python.) In Alice and Java, it is also necessary to declare the type of data that will be stored in the variable before your can use it. (In Scratch, variables can only contain data of a numeric type so no type declaration is required.)
When you declare a variable in Alice and Java, a small chunk of computer memory is set aside, given the specified name, and associated with the specified type. For example, the first boldface statement in the Java program in Listing 1 sets aside a small chunk of memory, gives it the name beans, and associates it with the type int.
In programmer jargon, this is referred to as declaring a variable. The process of declaring a variable causes memory to be set aside to contain a value, and causes that chunk of memory to be given a name. That name can be used later to refer to the value stored in that chunk of memory.
The declaration in Listing 1 also specifies that the values stored in the variable must be of type int. Don't worry about what type means at this point. I will discuss the concept of type in detail in future lessons. (For the curious, however, int in Java specifies that the data values will always be integer numeric values in a particular storage format.)
Storing a value in the variable
A value of 25 is stored in the variable named beans in the second boldface statement in Listing 1.
In programmer jargon, this is referred to as assigning a value to a variable. From this point forward, when the code in the program refers to the variable named beans, depending on how the name is used, the reference to the variable will either:
Retrieving a value from the variable
The third line containing boldface text in Listing 1 retrieves the value currently stored in the variable named beans by referring to the variable by name.
This statement also causes that value to be displayed on your computer screen. However, at this point, you should not worry about what causes it to be displayed. You will learn those details in future lessons. Just remember that when used in this manner, the reference to the variable by name retrieves the value stored in the variable.
Don't be concerned about the other details
Don't be concerned at this point about the other details in the program shown in Listing 1. They are there to make it possible for you to compile and execute the program if you elect to do that. You will learn about them in future lessons.
Two ways of thinking
There are at least two ways to think about variables:
In the conceptual view, a variable can be thought of as being analogous to one of the terms in an algebraic formula or expression.
An example
For example, if you work as a manager of a retail store, you might think in terms of the relationship between the cost and the price of a product as shown in Figure 2.
Figure 2. Relationship between cost and price of a product.
price = cost + markup; |
Why the semicolon?
The semicolon is there to make it a valid programming statement in the Java programming language. I will have a lot more to say about the specific syntax of Java programs in future lessons. Fortunately, you won't have to worry about memorizing syntax when you are programming in Scratch and Alice.
Think of the terms as variables
If you were to write a computer program that evaluates the relationship shown in Figure 2, you would probably consider price, cost, and markup all to be variables.
As you already know, every variable has a name and a value. The value of a variable may change as the program executes. (That's why it is called a variable instead of a constant.)
Case sensitivity
The name of a variable is case sensitive in Scratch, Alice, and Java (but the name may not be case sensitive in other programming languages). In other words, the name avariable is not the same as the name aVariable in case sensitive programming languages. If both names were used in the same program, they would refer to two different variables.
Use names to access values
Variables have names like price, cost, and markup. The names of the variables give us easy access to the values of the variables.
Some operations cause the value of a variable to change while other operations simply access the value without changing it.
Evaluating a statement
The evaluation of the statement shown in Figure 2 by a computer program might go something like the following:
Only the value of price is modified
Only the value of the variable named price is modified by the execution of the statement in Figure 2. The values of the variables named cost and markup are not modified by executing the statement.
The physical view of a variable takes us back to the earlier description of how memory is used in a computer program.
In the physical view, a variable is a chunk of memory to which a name (and possibly a type) has been ascribed, and in which a value can be stored. The name of the chunk of memory is the name of the variable. The value stored in the chunk of memory is the value of the variable.
Storing and retrieving
As the program executes, the values stored in those chunks of memory can be replaced by other values. In that way, the values of the variables can change as the program executes.
It is also possible to retrieve the value stored in a chunk of memory without modifying it. In that way, the values of variables can be used to evaluate expressions without modifying those values.
Declaration of a variable
As mentioned earlier, in Scratch, Alice, and Java, it is necessary to declare the name of a variable before you can use it. In Alice and Java, it is also necessary to declare the type of data that will be stored in the variable. A small chunk of computer memory is set aside and given the specified name when the variable is declared. That chunk of memory then becomes the physical manifestation of the variable.
Where does data originate?
The data used by a computer program can originate from a variety of sources. For example, it can be entered from the keyboard. It can be read from a disk file. It can be downloaded from a web site, etc.
Hard-coded data
The data values can also be coded into the program when the program is written. In this case, we would call it a literal or a literal value.
For example, the Java code fragment in Figure 3 declares a variable named pi and then assigns a literal numeric value of 3.14159 to that variable. (Don't worry about the type named double at this point. You will learn all about it in future lessons that deal exclusively with Java.)
Figure 3. An example of literal data.
double pi; pi = 3.14159; |
Do you recognize this value?
You may recognize this as the value of the numeric constant named pi, which is commonly used for doing calculations with circles. However, literals don't have to be famous values. A literal can be any value such as the age of a person.
Calculations with circles
Having executed the two statements in the code fragment in Figure 3, we could then use the value stored in the variable named pi to perform arithmetic such as calculating the area of a circle. (Actually, the value of pi is already defined in the standard Java math library, but it makes a pretty good example for explanation of literals anyway since most people recognize it.)
A value coded into the program...
That is just about all there is to understanding literals. There are some special rules that come into play in certain situations, and I will discuss those rules at the appropriate points in time. For now, just remember that a literal is a value that is coded into the program when the program is written.
Finally, it's time to write and discuss a Scratch program. The examples that I have presented so far in this lesson have been written in Java. The program that I will present and explain in the remainder of this lesson will be written in Scratch, so you should be able to replicate it. Because it is programmed in Scratch, you won't need to be concerned with memorizing the proper syntax for the code.
Hopefully by now you have installed Scratch on your computer and you have worked through all of the tutorials that you can find on Scratch as recommended in the previous lesson (see Resources). If not, you should do that before continuing with this lesson.
The Scratch program named Variable01.sb
This Scratch program illustrates the creation and manipulation of two simple numeric variables. (Apparently only numeric variables are allowed in Scratch.) It also illustrates the case sensitivity of variable names along with the ability to detect and respond to events fired by the keyboard and events fired by the mouse.
A variable named Counter is created, initialized to 0, and displayed in the upper-left corner of the Stage area in the Scratch user interface (see Figure 4). When the user clicks the green flag in the upper-right corner of Figure 4, the value of the variable is set to zero. Each time the user presses the space bar, the value of the variable is increased by 1. Each time the user clicks the mouse in the blank area of the Stage, the value of the variable is decreased by 1.
Another variable named counter (with a lower-case "c") is created, initialized to 0, and displayed below the Counter variable on the Stage. Again, when the user clicks the green flag in the upper-right corner of Figure 4, the value of the variable is set to zero. Each time the user presses the space bar, the value of this variable is increased by 5. Each time the user clicks in the blank area of the Stage, the value of this variable is decreased by 5.
Figure 4. A reduced image of the Scratch user interface for the program named Variable01.
|
|
I understand that you can't read any of the text in Figure 4. The image in Figure 4 is presented solely to provide an overview of the user interface. I will provide additional (readable) images later that show and discuss the separate parts of the user interface.
No sprites
There are a few things that we can deduce by viewing the reduced image in Figure 4. First, note that there are no sprites in this program. The program consists solely of the Stage, shown in white in the upper right, a small program consisting of three modules shown in the middle panel, and two variables shown in the left panel.
The toolbox buttons
If you have worked through the Scratch tutorials, you will recognize that the material in the left panel is always associated with one of the following eight toolbox buttons in the upper left corner:
In other words, when you click on one of the buttons in the upper left, it exposes a set of tools that you can use to write your program.
When one of those eight buttons is clicked, it becomes completely colored and the tools associated with that button are displayed below it. As you can see in Figure 4, the orange button has been selected. Since you can't read the label on that button, I will tell you that the label on the orange button reads Variables.
|
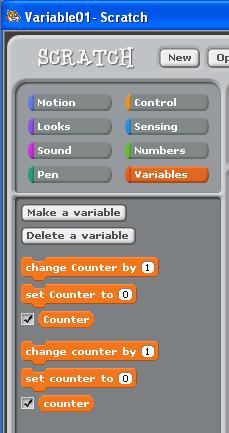
A full-size view of the Variables area of the Scratch user interface
Figure 5 presents a full-size view of the left-most panel in Figure 4 showing the tools that are exposed by the Variables button.
Figure 5. A view of the Variables area of the Scratch user interface.
|
|
Create two variables
Figure 5 shows that this Scratch program contains two variables with the following names:
I purposely spelled the names of the two variables the same and made them differ only by the case of the first letter to illustrate that Scratch is case sensitive insofar as the names of the variables is concerned. Even though these two variable names contain the same letters, they are two different variables because one name begins with an upper case "C" and the other name begins with a lower-case "c".
Two allowable operations for variables
There are two programming blocks above the block containing the name of each variable. As you learned from working through the tutorials, you can drag these blocks into the programming area in the center pane in Figure 4 to actually write the program. Thus, there are two different operations that you can perform on a variable:
Specifying the values
After dragging a programming block from the Variables area into the programming area, you can:
|
Note that if you drag another block and drop it into the white area, it must have the same shape as the white area. The two variable blocks shown in Figure 5 have the same shape as the white areas and are therefore eligible for being dropped into the white areas. This makes it possible to cause the value of one variable to depend on the value of another variable.
Cause the variables to be displayed
Checking the boxes to the left of the variable names in Figure 5 causes them to be displayed in the upper left corner of the large white Stage area shown in Figure 4.
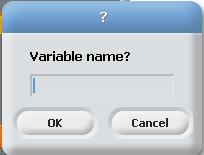
Create a new variable
You create a new variable by clicking the button labeled Make a variable shown in Figure 5. When you click that button, the dialog shown in Figure 6 appears on the screen asking you to provide the name for the new variable.
Figure 6. Dialog for entering a variable name.
|
|
At that point, you simply type in the name for the new variable and click the OK button.
Allowable variable names and lengths
Most programming languages have very specific requirements regarding the allowable characters for variable names. I suspect that this is also true of Scratch, but I haven't found that specification anywhere. You will probably be okay as long as you stick with letters, numbers, the underscore character "_", and the hyphen or minus sign "-". Beyond that, you are on your own.
It appears experimentally that the allowable length of the variable name is longer than you would ever want to use so length doesn't seem to be a limitation.
Meaningful variable names
When using Scratch and all other programming languages, you should strive to use variable names that are meaningful. My preference is to begin variable names with a lower-case letter, use multiple words in the name where appropriate, and separate the words using a format commonly called camel case to cause the eye to separate the words. Here is an example:
aVariableName
Some people prefer the following format:
A_Variable_Name
I prefer the camel case version because it is easier to type, requires fewer characters, and in my opinion, is just as effective.
Writing the program
Generally speaking, programs are written in Scratch by:
There are other steps involved in writing a complex program that I didn't include above, but we will get to them later in this series of tutorial lessons. Hopefully you already know the physical steps in writing a program as a result of working through the online tutorials.
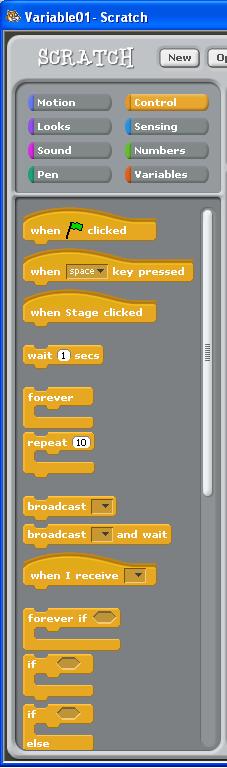
As you can see in Figure 4, this program consists of three modules in the center pane. Each module contains one tan block and two orange blocks. We already know that orange blocks have to do with variables. As you can see from the colors on the left ends of the buttons in Figure 5, tan blocks are related to Control.
Programming blocks in the Control category
Figure 7 shows some of the programming blocks that are available in the Control category. Other programming blocks in this category can be exposed using the vertical slider shown in Figure 7.
Figure 7. Programming blocks in the Control category.
|
|
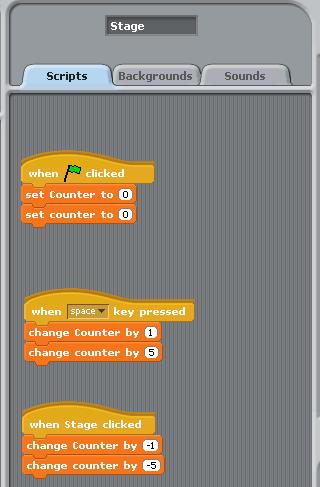
The finished program
Figure 8 shows an enlarged view of the center panel from Figure 4. This image shows the finished program that I created by dragging blocks from the Variables area and the Control area and snapping them together to form the modules. Note that I also entered literal values of 0, 1, 5, -1, and -5 into the white areas in the programming blocks for the variables after dropping them into the programming area.
Figure 8. The finished program.
|
|
Click the green flag
As I mentioned earlier, the program contains three scripts. Each script remains silent until a specific event occurs. As the label on the uppermost block in the top programming module in Figure 8 indicates, the code in the top module in Figure 8 is executed once each time the user clicks the green flag shown in the upper right of Figure 4. This code causes the values stored in each of the variables to be set to zero. This, in turn causes the variable displays in the Stage area to each show a value of 0.
Press the space bar
The code in the middle module is executed once each time the user presses the space bar. One of the orange programming blocks in the middle module causes the value of the variable named Counter to change by +1. The other orange programming block causes the value of the variable named counter to change by +5.
In other words, repetitively pressing the space bar causes the Counter variable to count up by one and causes the counter variable to count up in increments of five.
Click the mouse on the Stage
The code in the bottom module in Figure 8 is executed once each time the user clicks the mouse in the large white Stage area shown in Figure 4. These two blocks are the same as the blocks in the middle module except that the algebraic signs on the two literal values are minus instead of plus. Repetitively clicking the mouse in the Stage area causes the Counter variable to count down by one and causes the counter variable to count down in increments of five.
Event-driven programming
The ability to write programs that cause certain operations to occur in response to events (such as pressing the space bar and clicking the mouse) is often referred to as event-driven programming.
One of the reasons that I like to start students out using Scratch or Alice is because it is easy to write event-driven programs in those two languages. On the other hand, writing event-driven programs is not easy in languages such as Java, C#, and C++. You need quite a lot of programming knowledge to write event-driven programs in those languages. I like to give programming students a taste of event-driven programming early, if for no other reason than the fact that it tends to make programming more interesting.
An online version of this program is available
A copy of this program has been posted online for your review (see Resources for the URL). If you don't find the program using that URL, search the Scratch site for the user named dbal. Note that although the local version and the downloadable version of the program work properly, the online version is apparently unable to distinguish between events fired by the space bar and events fired by the mouse. I believe that this is a bug in the online Scratch viewer.
I encourage you to use the information provided above to write this program. Experiment with the code, making changes, and observing the results of your changes. Make certain that you can explain why your changes behave as they do.
I also encourage you to write the programs described below.
The following projects are designed to:
Begin with the program named Variable01 and modify it to create a new program named Variable02. Modify the original program in such a way that pressing the space bar five times in succession, (after clicking the green flag to set both variables to zero), will cause the displayed values of the variables named Counter and counter to be as shown in the following table:
| Space bar press | Counter value | counter value |
| 1 | 1 | 1 |
| 2 | 2 | 3 |
| 3 | 3 | 6 |
| 4 | 4 | 10 |
| 5 | 5 | 15 |
Having reached that point, clicking the mouse five times in succession in the Stage area will cause the displayed values of the variables named Counter and counter to be as shown in the following table:
| Mouse click | Counter value | counter value |
| 1 | 4 | 19 |
| 2 | 3 | 22 |
| 3 | 2 | 24 |
| 4 | 1 | 25 |
| 5 | 0 | 25 |
See the text here for a hint as to how to write this program.
A copy of this program will be posted online for your review (see Resources for the URL). If you don't find the program using that URL, search the Scratch site for the user named dbal. Note that although the local version and the downloadable version work properly, the online version is apparently unable to distinguish between events fired by the space bar and events fired by the mouse.
You should successfully complete Project 1 before attempting this project. Begin with the program named Variable01 and modify it to create a new program named Variable03. Modify the original program in such a way that pressing the space bar five times in succession, (after clicking the green flag to set both variables to zero), will cause the displayed values of the variables named Counter and counter to be as shown in the following table:
| Space bar press | Counter value | counter value |
| 1 | 1 | 2 |
| 2 | 2 | 6 |
| 3 | 3 | 12 |
| 4 | 4 | 20 |
| 5 | 5 | 30 |
Having reached that point, clicking the mouse five times in succession in the Stage area will cause the displayed values of the variables named Counter and counter to be as shown in the following table:
| Mouse click | Counter value | counter value |
| 1 | 4 | 38 |
| 2 | 3 | 44 |
| 3 | 2 | 48 |
| 4 | 1 | 50 |
| 5 | 0 | 50 |
Hint #1: Compare the values of the variable named counter in Project 2 with the values of the variable named counter in Project 1 to determine what you need to do to successfully write Project 2.
Hint #2: Think green.
A copy of this program will be posted online for your review (see Resources for the URL). If you don't find the program using that URL, search the Scratch site for the user named dbal. Note that although the local version and the downloadable version work properly, the online version is apparently unable to distinguish between events fired by the space bar and events fired by the mouse.
I began by providing an overview of computer programming. Then I provided technical explanations for memory, variables, and literals. Along the way, I provided some examples in pseudocode and also in Java code.
I provided a brief illustration of the three fundamental programming operations:
I explained the meaning of the term algorithm.
I presented and explained a Scratch program that is designed to illustrate the creation and use of variables in a computer program. The Scratch program also illustrates case sensitivity in variable names along with the ability to detect and respond to events fired by the keyboard and events fired by the mouse.
Finally I presented two student programming projects that are designed to:
In the next lesson, I will continue the process of helping you to learn about the following computer programming concepts using Scratch:
Those topics are so important that we will most likely visit them again using Alice, and once again using Java.
Copyright 2008, Richard G. Baldwin. Reproduction in whole or in part in any form or medium without express written permission from Richard Baldwin is prohibited.
Richard has participated in numerous consulting projects and he frequently provides onsite training at the high-tech companies located in and around Austin, Texas. He is the author of Baldwin's Programming Tutorials, which have gained a worldwide following among experienced and aspiring programmers. He has also published articles in JavaPro magazine.
In addition to his programming expertise, Richard has many years of practical experience in Digital Signal Processing (DSP). His first job after he earned his Bachelor's degree was doing DSP in the Seismic Research Department of Texas Instruments. (TI is still a world leader in DSP.) In the following years, he applied his programming and DSP expertise to other interesting areas including sonar and underwater acoustics.
Richard holds an MSEE degree from Southern Methodist University and has many years of experience in the application of computer technology to real-world problems.
-end-