Published: June 29, 2008
By Richard G. Baldwin
Homeschool Programming Notes # 305
This lesson is a supplement to the earlier lesson titled Introduction to Methods (see Resources). Therefore, you should study that earlier lesson before embarking on this lesson.
Introducing Java methods
The earlier lesson introduced you to methods in Java using a very simple program created with a text editor and executed from the command prompt. This lesson shows you how to replicate the behavior of that program by encapsulating that behavior in a Greenfoot scenario using the Greenfoot IDE. For more information on Greenfoot, see An Introduction to Greenfoot -- A Java IDE in Resources.
An additional purpose
An additional purpose of this lesson is to illustrate one of the ways that the Greenfoot IDE can be used for the development and execution of general-purpose Java programs that are not intended to be the types of programs for which Greenfoot is optimized (2D animations, games, and simulations).
Get more for your effort
Although the creation of a Greenfoot scenario with the same behavior as the program in the earlier lesson may be a little more complicated than the version that I explained in the that lesson, you also get more for your effort by implementing the behavior in a Greenfoot scenario. In particular, the version of the program in the earlier program was strictly an application designed for execution from a command prompt. However, you can execute the Greenfoot version from inside the Greenfoot IDE, you can export it to an application in a JAR file for execution from a command prompt, and you can export it into an applet for posting on your favorite web server. You can even publish it on the Greenfoot Gallery website (see Resources) if you choose to do so.
I recommend that you open another copy of this document in a separate browser window and use the following links to easily find and view the figures and listings while you are reading about them.
I recommend that you also study the other lessons in my extensive collection of online programming tutorials. You will find a consolidated index at www.DickBaldwin.com.
I provided a detailed introduction to the Greenfoot IDE in an earlier lesson titled An Introduction to Greenfoot -- A Java IDE (see Resources).
Greenfoot can be considered to be a combination between a framework for creating two-dimensional animations, games, and simulations on one hand and an integrated development environment (IDE) that provides a class browser, access to a standard Java compiler, access to the Java execution engine, interactive execution, single-step execution, a code editor, etc., on the other hand.
While the design of Greenfoot was optimized to make it easy for beginning Java programmers to create 2D animations, games, and simulations, it also exposes the full power of Java and can be used as a general-purpose Java IDE. This lesson illustrates one of the ways that the Greenfoot IDE can be used for the development and execution of general-purpose Java programs that are not intended to produce 2D graphic animations.
In this lesson, I will present and explain a Greenfoot scenario named AppSim01. The behavior of this scenario replicates the behavior of the program named SqRt01 in the earlier lesson. As in the earlier lesson, I will show you how to
In addition, in this lesson, I will show you how to:
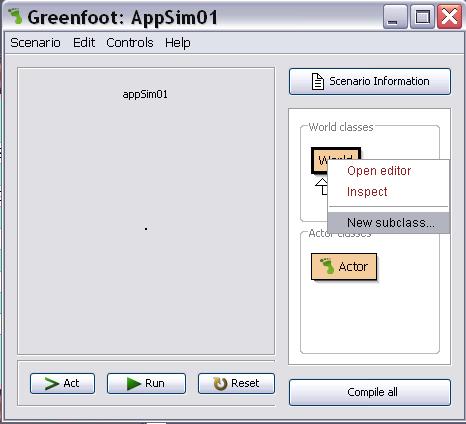
Figure 1. Creating the new class named AppSim01.
|
|
Image created after the fact
The image shown in Figure 1 was actually created after the scenario was fully operational. At the time the class named AppSim01 was created, the small dot in the center left of the GUI and the arrow protruding from behind the context menu didn't exist. In fact, the dot didn't exist until the AppSim01 class was compiled. At the point in time when the AppSim01 class was created, the GUI for the IDE showed only the World class and the Actor class for the new scenario named AppSim01.
Class name and image
Creation of the new AppSim01 class required that I respond to a dialog and specify the name of the class. I could also have specified an image to represent the class, but I elected to accept the default image because the image is of no consequence in this scenario.
Writing the program code for the AppSim01 class
When you create a new class, a box that represents the new class appears in the class diagram in the Greenfoot GUI and skeleton code for the class definition is automatically created. Once the skeleton code for the AppSim01 class was available, I was able to write the code to fully define the class. I selected the Open editor option in the context menu for the AppSim01 class and entered the code shown in Listing 1.
Listing 1. Class definition for the AppSim01 class.
import greenfoot.*;
/*********************************************************
 * The purpose of this scenario is to illustrate one of
 * the ways that the Greenfoot IDE can be used for the
 * development of general-purpose programs that are not
 * intended to produce 2D graphic animations.
 *
 * The behavior of the scenario is defined in the act
 * method.  The code in this method is similar to the code
 * that would be placed in the main method of an actual
 * Java application.
 *
 * As usual, this scenario can be exported to either an
 * application or an applet.
 *
 * Each time the Act button or the Run button is clicked,
 * the act method will be executed once.  As with the main
 * method in an ordinary application, the code in the act
 * method can instantiate objects of other classes, call
 * methods on those objects, etc.
 *
 * @author (Dick Baldwin)
 * @version (06/28/08)
 ********************************************************/
public class AppSim01 extends World{

  /*******************************************************
   * Constructor for objects of class AppSim01.
   ******************************************************/
  public AppSim01(){
      //Create a new world, which appears as a small
      // dot in the GUI for the Greenfoot IDE.
        super(1,1,1);
  }//end constructor

  /*******************************************************
   * This method acts as the controlling method for the
   * entire program. It is somewhat analogous to the
   * main method in an application.
   ******************************************************/
  public void act(){
    double beans;
    beans = 25.5;
    double sqRtBns = Math.sqrt(beans);
    System.out.println(sqRtBns);
    double peas;
    peas = 36.;
    double sqRtPeas = Math.sqrt(peas);
    System.out.println(sqRtPeas);

    //Stop the simulation after one execution of the act
    // method even when the Run button is clicked.
    Greenfoot.stopSimulation();
  }//end method act
}//end class AppSim01
|
Much of the text in Listing 1 consists of comments. I formatted the comments in Italics to make it easier to distinguish comments from executable code.
Adding my code to the skeleton code
When you open the editor for the first time on a new class that you have created in Greenfoot, the skeleton code for the class appears in the editor. The new code that I added to the skeleton consists a modification to the super statement in the skeleton for the constructor (shown in blue boldface) and the addition of the new method named act.
The super statement
The super statement must be included in the constructor for the scenario to compile properly.
The stage in a Greenfoot scenario consists of a rectangular grid of square cells with the coordinate value for the center of the cell in the upper left corner being 0,0. Positive coordinate values go from left to right on the horizontal axis and go from top to bottom on the vertical axis.
The first parameter to the super statement is the number of cells along the horizontal axis. The second parameter is the number of cells along the vertical axis. The third parameter specifies the size of each side of the square cells in pixels.
The modification that I made to the super statement consisted simply of changing the parameters to cause the AppSim01 object to appear as a single dot in the left-center of Figure 1.
The new act method
You may recognize most of the code in the new act method (highlighted in black boldface in Listing 1) as being identical to the code in the earlier lesson titled Introduction to Methods (see Resources). As you will recall, I told you at the beginning of this lesson that I was going to show you how to replicate the behavior of that program by encapsulating that behavior in a Greenfoot scenario using the Greenfoot IDE.
New code in the act method
The last statement in the act method in Listing 1 (shown in red boldface) was not included in the code in the earlier lesson. This statement is peculiar to Greenfoot. By default, when you click the Run button in Figure 1, the act method is executed repeatedly until you stop the execution. The purpose of the final statement in the act method in Listing 1 is to cause the act method to be executed only once when the Run button is clicked. This causes the Act button and the Run button to behave essentially the same. Each time either button is clicked, the act method will be executed once.
The placement of the identical code
The boldface code shown in the act method in Listing 1 was placed in the main method of the program in the earlier lesson. Therefore, each time you execute that program from the command prompt, the boldface code is executed once. Placement of the same code in the act method of the AppSim01 class in this scenario causes the code to be executed once each time either the Act button or the Run button is clicked.
Behavior of the earlier program
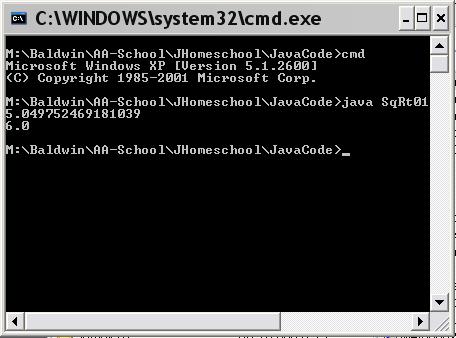
I explained the general behavior of that code in the earlier lesson, so I won't repeat that explanation here. Execution of the earlier program from the command prompt produces the output shown in Figure 3.
Figure 2. Execution of earlier program from command prompt.
|
|
Behavior of the current scenario
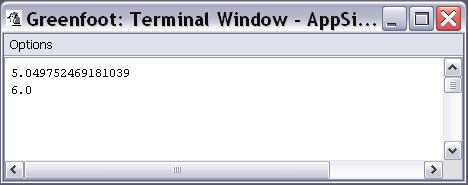
Execution of this scenario by clicking the Act button or the Run button shown in Figure 1 causes the Greenfoot Terminal Window shown in Figure 3 to open and display the same results.
Figure 3. The Greenfoot Terminal Window.
|
|
In other words, when you send output data to the standard output device using the Greenfoot IDE, a special terminal window is opened to display that data.
Replicating the behavior of Java applications
At this point in time, I believe that with a few possible exceptions, you should be able to replicate the behavior of almost any Java application by a scenario written in Greenfoot using the following procedure:
Note that this procedure ignores the Actor class altogether. It simply isn't needed.
When you click the Act button or the Run button on the Greenfoot user interface, your act method will be executed once. Therefore, the code that you place in your new act method should control the entire behavior of your program. (In other words, that code should create objects of other classes, call methods on those objects, etc.)
An obvious exception
One obvious exception to the ability to replicate the behavior of Java applications in Greenfoot has to do with the use of command-line arguments. At this point, I know of no way to cause a Greenfoot scenario to respond to command-line arguments. However, I don't consider that to be a serious drawback because in this age of graphical user interfaces, there isn't a lot of demand for programs that depend on the use of command-line arguments anyway.
Why would you want to do this?
I can think of several reasons why you might want to replicate the behavior of Java applications in Greenfoot scenarios. Here are a couple of those reasons:
Exporting Greenfoot scenarios
You can export a scenario into either an application in a JAR file or an applet consisting of a JAR file and a corresponding HTML file. You can also share your scenarios by publishing them on the Greenfoot Gallery web site (see Resources).
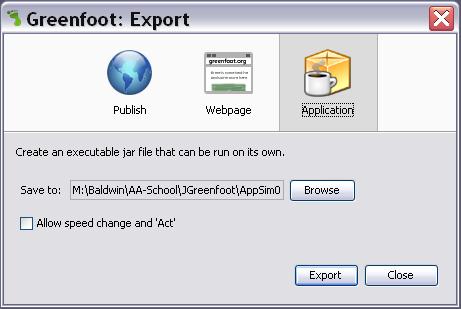
Select the Export option on the Scenario menu to export your scenario. When you do, the dialog shown in Figure 4 will appear.
Figure 4. The Greenfoot export dialog.
|
|
Select an export option
Select one of the three icons across the top of Figure 4 and then follow the instructions to export your scenario:
java -jar AppSim01.jar
Disallow the Act button and the speed slider
In this situation, the existence of both an Act button and a Run button that do essentially the same thing can be confusing to the user. Also, in many cases, the speed slider is not needed. You can eliminate the Act button and the speed slider from the application or applet by clearing the checkbox shown in Figure 4.
Executing the application
Figure 5 shows the result of executing the JAR file from the command prompt for the scenario shown in Figure 1.
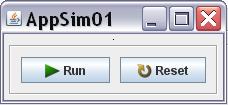
Figure 5. Execution of the AppSim01 scenario as an application.
|
|
Each time the user clicks the Run button in Figure 5, the Act method shown in Listing 1 is executed.
If you compare Figure 5 with the Greenfoot GUI in Figure 1, you will see that the GUI for the application version of the scenario contains only the Run and Reset buttons
If you start the application named AppSim01 from a Windows command prompt and then click the Run button in Figure 5, the output, which will appear on the command-line screen, will be essentially the same as that shown in Figure 2.
Executing the applet locally
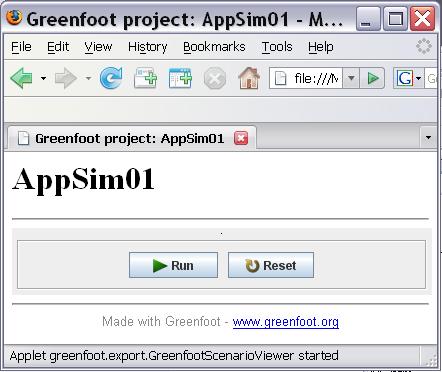
If you open applet version of this scenario in a Java-compatible browser, the running applet should similar to Figure 6. (Figure 6 shows the results for a Firefox browser. The results may look different in a different browser.)
Figure 6. Execution of the AppSim01 scenario as a local applet.
|
|
Viewing standard output from an applet
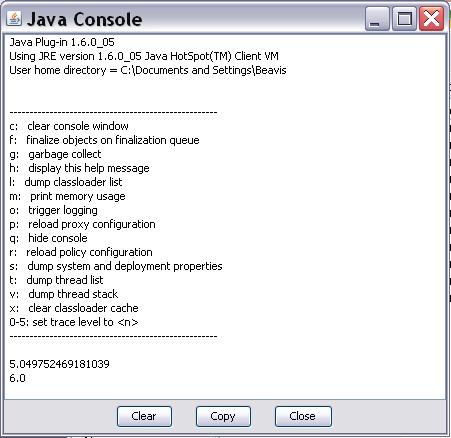
To view standard output from the applet, you must open a Java console. Figure 7 shows the Java console for Firefox after having clicked the Run button in the applet one time.
Figure 7. Firefox Java console running AppSim01.
|
|
The standard output produced by the applet is shown in the last two lines Figure 7.
I invite you to go to Greenfoot Home (see Resources) where you can download and install Greenfoot. As of this writing, Greenfoot version 1.4.1 is the latest release.
Also if you need to do so, go to Sun, download and install the latest version of Java. Remember, Greenfoot requires Java 1.5 or later. As of this writing Java 1.6 is available from Sun.
Then use the code in Listing 1 to create the scenario that I presented in this lesson. Experiment with the code, making changes, and observing the results of your changes. Make certain that you can explain why your changes behave as they do.
Export the scenario both as an application and as an applet and experiment with it as well. If feel a little more adventuresome, publish your scenario on the Greenfoot Gallery website (see Resources).
This lesson illustrates the use of methods with the Greenfoot IDE by replicating the behavior of a program that was presented in an earlier lesson.
In addition, this lesson illustrates one of the ways that the Greenfoot IDE can be used for the development and execution of general-purpose Java programs that are not intended to be the types of programs for which Greenfoot is optimized (2D animations, games, and simulations).
Copyright 2008, Richard G. Baldwin. Reproduction in whole or in part in any form or medium without express written permission from Richard Baldwin is prohibited.
Richard has participated in numerous consulting projects and he frequently provides onsite training at the high-tech companies located in and around Austin, Texas. He is the author of Baldwin's Programming Tutorials, which have gained a worldwide following among experienced and aspiring programmers. He has also published articles in JavaPro magazine.
In addition to his programming expertise, Richard has many years of practical experience in Digital Signal Processing (DSP). His first job after he earned his Bachelor's degree was doing DSP in the Seismic Research Department of Texas Instruments. (TI is still a world leader in DSP.) In the following years, he applied his programming and DSP expertise to other interesting areas including sonar and underwater acoustics.
Richard holds an MSEE degree from Southern Methodist University and has many years of experience in the application of computer technology to real-world problems.
-end-