Learn how to download, install, and test a Java multimedia library developed by Mark Guzdial and Barbara Ericson at Georgia Tech. Also learn how to download, install, and test a lightweight Java IDE named DrJava, which has the ability to interactively evaluate Java code.
Published: November 4, 2008
By Richard G. Baldwin
Java Programming Notes # 340
Have you ever wondered how image processing programs can remove redeye from a photographic image? How does the weather forecaster on television stand in front of a changing weather map? How do they distort the voice of a secret witness in a TV documentary to disguise the identity of the witness? What about inserting cartoon characters in videos of live humans? If you have wondered about multimedia processes such as this, you've come to the right place.
This is the first lesson in a series of lessons designed to teach you how to write Java programs to accomplish these and other multimedia tasks.
In this lesson, you will learn about a Java multimedia library developed by Mark Guzdial and Barbara Ericson at Georgia Institute of Technology. You will also learn about a lightweight Java IDE named DrJava, which has the ability to interactively evaluate Java code. This IDE was developed by the JavaPLT group at Rice University.
You will learn how to download, install, and test the multimedia library and the DrJava IDE, both individually and in combination with one another.
I recommend that you open another copy of this document in a separate browser window and use the following links to easily find and view the figures and listings while you are reading about them.
I recommend that you also study the other lessons in my extensive collection of online programming tutorials. You will find a consolidated index at www.DickBaldwin.com.
If you have read my previous programming tutorials, you will be aware that I usually develop and explain original program code. However, the lessons in this series will depart from that practice. In this series of lessons, I will present and explain many of the classes in a multimedia class library that was developed and released under a Creative Commons Attribution 3.0 United States License (see Resources) by Mark Guzdial and Barbara Ericson at Georgia Institute of Technology. Of course, I will also present some interesting sample programs that use the library.
A textbook
The class library (including source code) was published in conjunction with an excellent textbook titled Introduction to Computing and Programming with Java: A Multimedia Approach (see Resources). Unlike many textbook authors, Guzdial and Ericson did not hide their source code or their class library behind a password. As of the date of this writing, the class library and the source code along with a wealth of other related material is available for free downloading at Media Computation book in Java (see Resources). The library is also included on a CD that is packaged with the textbook.
Won't duplicate the textbook
This series of lessons will not duplicate the material in the textbook. The textbook is written for beginning Java programming students and uses sample multimedia programs, along with the class library, to teach the fundamentals of object-oriented programming using Java. If you don't yet understand the fundamentals of object-oriented programming using Java, you should purchase the textbook and study it before embarking on this series of online lessons.
The material in this series will be much more advanced than the textbook. I will assume that you are already well acquainted with the Java/OOP fundamentals in the textbook. In this series, we examine the class library piece-by-piece and attempt to understand how and why objects instantiated from the classes in the library behave as they do.
The explanations of sample programs in the textbook make heavy use of a free Java IDE named DrJava (see Resources). I will also make some use of that IDE because it provides an interesting interactive Java programming mode. The interactive mode makes it easy to "try things out" without the requirement to write and compile a complete Java application. (The IDE also provides a typical Java text editor, access to the Java compiler and runtime engine, a debugger, etc.)
Even though I will sometimes use DrJava, you should be able to use any Java IDE (for the non-interactive material) to compile and execute my sample programs so long as you set the classpath to include the media library. (I will have more to say about the classpath later.) You should also be able to avoid the use of a Java IDE altogether if you choose to do so. You can create the source code files using a simple text editor, and then compile and execute the sample programs from the command line.
The first step in installing the library is to download the zip file containing the library. The contents of the zip file may change over time, but as of the date of this writing, the zip file, which is named bookClasses10-1-07.zip, contains the directory tree shown in Figure 1.
Figure 1. Contents of zip file containing multimedia library.
|
|
Extract and save the library files
You should extract the contents of the zip file, being careful to preserve the directory structure, and save the contents on your hard drive. (You can also save those contents on a USB drive or a USB memory stick if you want to have a portable capability.)
Remember the location of the class library
You should make sure to remember where you saved the library. You will need that information to create a classpath, which I will explain later. In my case, I saved the library on the following path:
M:\Ericson\bookClasses
You will see how this information is used to construct a classpath later in this lesson.
The documentation files
In this series of lessons, you will interact most directly with the HTML documentation files and the Source, class, and jar files (shown in boldface in Figure 1).
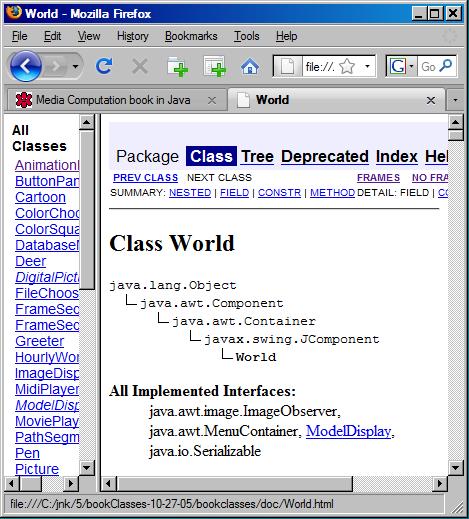
One of the HTML documentation files is named index.html. If you double-click on that file, standard Java documentation for the entire multimedia class library should appear in your browser as shown in Figure 2.
Figure 2. Documentation for the multimedia class library.
|
|
The source, class, and jar files
We will be using the class and jar files to write sample programs and will be examining the source code for some of those class files in detail in this series of lessons.
Images, sounds, movies, etc.
The next step is to download zip files containing the images and sounds used in the book. (I will use some of them in sample programs to illustrate the behavior of classes in the library.) As of the date of this writing, the following two files are available for downloading:
Each zip file is about twelve megabytes in size, so unless you have disk capacity to spare, you might want to wait until we get into the manipulation of movies before downloading the zip file that contains the movies.
Extract and save the media content
Extract the material from one or both zip files, being careful to preserve the directory structure. Save the material on your hard drive, USB drive, or USB memory stick.
Open the directory named mediasources and examine the contents. You should see jpg files, txt files, wav files, and html files.
Once again, remember where you saved this material. You will need that information when you write programs that use the material. In my case, I discarded a directory named students and saved the directory named mediasources on the following path:
M:\Ericson\mediasources
You will see how this information is used later in this lesson.
Now it's time to find out if you have everything (including the Java JDK from Sun) installed correctly.
|
Using your favorite text editor, copy the source code from Listing 3 and save it in a file named Main.java in an empty directory of your choice.
Create a batch file
Then, using your text editor, create a file named RunMain.bat containing contents similar to those shown in Listing 1 and store it in the directory containing Main.java.
Listing 1. Batch file used for testing.
del *.class javac -cp .; M:\Ericson\bookClasses; M:\Ericson\bookClasses\javazoom.jar; M:\Ericson\bookClasses\jmf.jar; M:\Ericson\bookClasses\sound.jar; Main.java java -cp .; M:\Ericson\bookClasses; M:\Ericson\bookClasses\javazoom.jar; M:\Ericson\bookClasses\jmf.jar; M:\Ericson\bookClasses\sound.jar; Main pause |
Two cautions
Note first that I inserted line breaks immediately following each semicolon to make it easier for you to understand what you're looking at in Listing 1. You must remove those line breaks without inserting spaces.
Note also that the classpaths shown in Listing 1 reflect the location of the directory named bookClasses on my system. You will probably need to modify those classpaths to reflect the location of the directory named bookClasses on your system.
No further explanation
At this point, I am going to assume that you know:
Therefore, I won't provide a further explanation of the use of this batch file to compile and execute the Java program shown in Listing 3.
Run the batch file
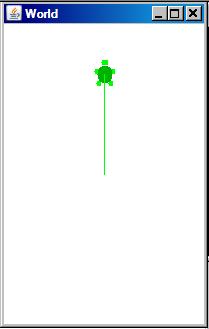
If your system is set up correctly, you should be able to double-click on the batch file, causing the Java program to run, producing the screen output shown in Figure 3.
Figure 3. Output from the first test program.
|
|
The World and Turtle classes
This test program uses the World class and the Turtle class from the multimedia class library to produce the output shown in Figure 3. Because we will be analyzing those two classes in some detail in future lessons, I'm not going to go into much detail at this point. Suffice it to say that the program:
If your output looks like Figure 3, you probably have everything set up correctly.
This test is more comprehensive than the Turtle test described above.
Begin by copying the source code from Listing 4 into a file named Main.java and save it in an empty directory. Modify the following statement in the source code to cause the statement to point to the location of your directory named mediasources instead of mine. (Note the use for forward slashes instead of backward slashes.)
FileChooser.setMediaPath("M:/Ericson/mediasources/");
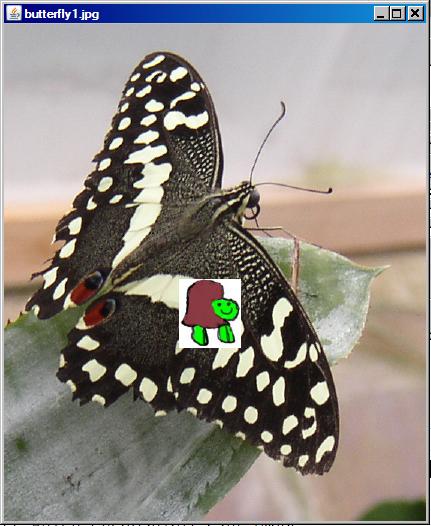
Copy the batch file from the previous test into the same directory as your new source code file and double-click on the batch file. This should cause the program to compile and run, producing the screen output shown in Figure 4.
Figure 4. Output from the second test program.
|
|
Was it successful?
This test program exercises quite a bit more of the class library than the turtle test. If your output matches Figure 4, this will greatly increase the probability that you have everything set up properly.
Once again, I will be explaining the various classes and methods involved in this test program in future lessons, so I won't provide an explanation here. The primary purpose of this lesson is to help you get your system set up so that you will be able to participate in future lessons.
As of the date of this writing, you can download any of the following files to obtain the DrJava IDE:
A Java application
DrJava is a Java application. Even though I am running under Windows Vista, I elected to download the Jar File and to run it as a Java application instead of running it as a Windows App. The file that I downloaded is named drjava-stable-20080904-r4668. Download the jar file and store it anywhere on your disk.
Starting DrJava
I start DrJava running by issuing the following command at a command-line prompt in the directory containing the jar file:
java -jar drjava-stable-20080904-r4668.jar
For ease of use, I put this statement in a batch file in the directory containing the jar file and created a desktop shortcut to the batch file. This allows me to start it running simply by double-clicking the shortcut.
If you choose to take this approach, you may get a later version with a different file name but you should be able to run it essentially the same way that I do making certain that you reference the correct file name.
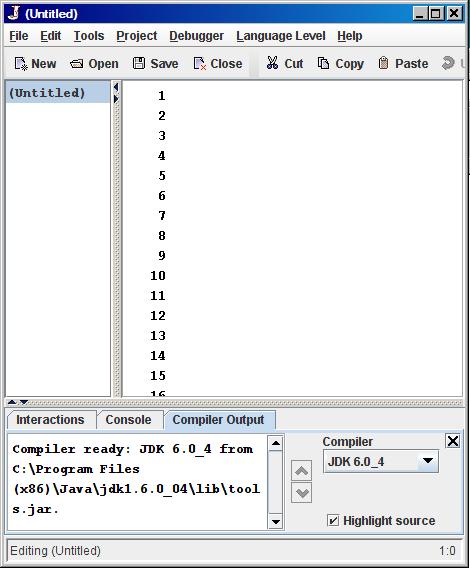
When you start DrJava, the IDE shown in Figure 5 should appear on your screen.
Figure 5. The DrJava IDE.
|
|
Interactive mode
Except for the availability of the interactive mode, this IDE is similar to other lightweight IDEs. The use of the IDE is fairly intuitive. To run in interactive mode, you select the Interactions tab at the bottom left in Figure 5 and enter Java expressions at the prompts. If you don't follow the expression with a semicolon, any (text) output produced by the expression is displayed on the next line following the expression. If you do enter a semicolon, the output is not displayed.
The Reset button at the top clears the interactive memory.
Setting the classpath in DrJava
You can set the classpath in DrJava by selecting the Edit/Preferences menu and then using the Add button to add the following directory and jar files to the classpath:
You will need to replace the ellipses in the above list with your path to the directory named bookClasses.
Interactive Turtle test
Select the Interactions pane at the bottom left of the DrJava IDE shown in Figure 5 and enter the three commands shown in Listing 2.
Listing 2. Testing DrJava interactively with the turtle.
> World mars = new World(200,300); > Turtle joe = new Turtle(mars); > joe.forward(); |
When you enter the first command, the World object shown in Figure 3 should appear without the turtle.
When you enter the second command, the Turtle object should appear in the center of the world.
When you enter the third command, the turtle should move forward by 100 pixels drawing the green line in the process.
Compiled Turtle test
Copy the source code from Listing 3 into the text editor panel in DrJava. Then click the Compile button at the top of the IDE. If there are compile errors, they will appear in the Compiler Output tab at the bottom.
Correct any compile errors and then click the Run button at the top of the IDE. If there are no runtime errors, the world containing the turtle with the vertical green line shown in Figure 3 should appear on the screen.
Select File/Close All to prepare DrJava for a new program. Then copy the source code in Listing 4 into the text edit area of DrJava. Compile and run the program. If there are no errors, the picture shown in Figure 4 should appear on the screen.
If you can perform all of the above tests successfully, that is a very good indication that both the multimedia library and the DrJava IDE are properly installed on your system.
I encourage you to copy the code from Listing 3 and Listing 4, compile the code, and execute it. Experiment with the code, making changes, and observing the results of your changes. Make certain that you can explain why your changes behave as they do.
In this lesson, you learned about a Java multimedia library from Mark Guzdial and Barbara Ericson at Georgia Institute of Technology. You also learned about a lightweight Java IDE named DrJava, which has the ability to interactively evaluate Java code. This IDE was developed by the JavaPLT group at Rice University.
You learned how to download and install the multimedia library and the DrJava IDE.
You learned how to compile and execute Java programs that use the multimedia library from the command line. You learned how to execute one of the programs interactively using the DrJava IDE. You also learned how to compile and execute the programs from within the DrJava IDE.
The primary purpose of this series of lessons is to teach you about the inner workings of the multimedia library. In the next lesson, I will explain the Turtle class from the multimedia library and possibly explain the World class as well.
Listing 3. Source code for the program named StartupTest01.
import java.awt.*;
import javax.swing.JFrame;

/**
 *StartupTest01
 * The purpose of this program is to test such items as
 * the classpath, the media path, etc.
 *
 * 10/10/08 Compiles and runs OK on my laptop computer.
 *
 * Displays a turtle in a world and moves it forward by
 * 100 pixels.
 *
 * Note that the program does not terminate when you
 * click the X button in the frame.
 *
 * Based on a program by Barbara Ericson that is:
 * Copyright Georgia Institute of Technology 2004-2005
 */
public class Main{
  public static void main(String[] args){
    World mars = new World(200,300);
    Turtle joe = new Turtle(mars);
    joe.forward();
  }//end main

}//end class
|
Listing 4. Source code for the program named StartupTest02.
import java.awt.*;
import javax.swing.JFrame;

/**
 *StartupTest02
 * The purpose of this program is to test such items as
 * the classpath, the media path, etc.
 *
 * 10/09/08 Compiles and runs OK on my laptop computer.
 *
 *Copies an image of a small turtle to an image of a
 * butterfly.
 *
 * Uses an object of the Graphics class to do the copy.
 *
 * Based on a program by Barbara Ericson that is:
 * Copyright Georgia Institute of Technology 2004-2005
 */
public class Main extends SimplePicture{
  ///////////////////// constructors /////////////////////
  //This constructor accepts the name of an image file
  // as a parameter.
  public Main(String fileName){
    //Let the parent class handle this fileName
    super(fileName);
  }//end constructor

  ////////////////////// methods /////////////////////////
  public void copy(Main source, int x, int y){
    //Get the graphics object
    Graphics g = this.getGraphics();

    //Copy the image
    g.drawImage(source.getImage(),x,y,null);
  }//end copy

  public static void main(String[] args){
    //Following statement eliminates necessity to manually
    // establish location of media files. Modify this to
    // point to the mediasources folder on your machine.
    FileChooser.setMediaPath("M:/Ericson/mediasources/");

    //Instantiate two objects of this class, each of
    // which encapsulates an image.
    Main p1 = new Main("butterfly1.jpg");
    Main p2 = new Main("turtle.jpg");

    //Copy the turtle onto the butterfly and display using
    // the show format.
    p1.copy(p2,175,255);
    p1.show();

    //Cause program to terminate when the show window is
    // closed
    JFrame frame = p1.getPictureFrame().frame;
    frame.setDefaultCloseOperation(JFrame.EXIT_ON_CLOSE);
  }//end main

}//end class
|
Copyright 2008, Richard G. Baldwin. Reproduction in whole or in part in any form or medium without express written permission from Richard Baldwin is prohibited.
Richard has participated in numerous consulting projects and he frequently provides onsite training at the high-tech companies located in and around Austin, Texas. He is the author of Baldwin's Programming Tutorials, which have gained a worldwide following among experienced and aspiring programmers. He has also published articles in JavaPro magazine.
In addition to his programming expertise, Richard has many years of practical experience in Digital Signal Processing (DSP). His first job after he earned his Bachelor's degree was doing DSP in the Seismic Research Department of Texas Instruments. (TI is still a world leader in DSP.) In the following years, he applied his programming and DSP expertise to other interesting areas including sonar and underwater acoustics.
Richard holds an MSEE degree from Southern Methodist University and has many years of experience in the application of computer technology to real-world problems.
-end-