Learn how to create and use arrays in your Alice programs. In particular, learn how to use the three major options that are available when you drop an array into the edit pane. Learn some rules of thumb for determining the correct procedure for dropping array tiles into the edit pane.
Published: April 14, 2007
Last updated: September 10, 2007
By Richard G. Baldwin
Alice Programming Notes # 180
This tutorial lesson is part of a series designed to teach you how to program using the Alice programming environment under the assumption that you have no prior programming knowledge or experience.
Have some fun
Because Alice is an interactive graphics 3D programming environment, it is not only useful for learning how to program, Alice makes learning to program fun. Therefore, you should be sure to explore the many possibilities for being creative provided by Alice while you are learning to program using these tutorials. And above all have fun in the process of learning.
In the lesson titled "Counter Loops, Nested Loops, and Sentinel Loops" (see Resources) I taught you how to create counting loops using both while loops and for loops. I also taught you how to create nested loops using for loops and how to create a sentinel loop using a while loop.
In this lesson, I will take a change in direction and teach you how to create and use arrays in your Alice programs. Note that arrays can be used as data structures or containers for data of any valid Alice type. I consider the use of arrays for storing data of type Object to be the most complex of all the different types, so I will concentrate on data of that type in this lesson. Once you understand how to work with arrays containing data of type Object, you should have no difficulty working with arrays containing simpler types.
Drag and drop the array tile into the edit pane
Just remember than whenever you need to use the data contained in an array in your program, you drag the array tile down from near the top of the code edit pane and drop it into the edit pane. Then you will be required to work through a series of menus to specify exactly what the operation entails.
Just like with ordinary variables, in some cases you drop the tile on a new line in the edit pane. In other cases, you drop the tile onto a placeholder in an existing expression.
Rules of thumb
Although the following rules of thumb may not hold in all cases, they will usually stand you in good stead.
I recommend that you open another copy of this document in a separate browser window and use the following links to easily find and view the figures and listings while you are reading about them.
Once you have mastered Alice, I recommend that you also study the other lessons in my extensive collection of online programming tutorials. You will find a consolidated index at www.DickBaldwin.com.
What is an array?
An array is a list of variables all of the same type, all of which have the same name.
Stated differently, an array is a collection of values with a common name and identical data types, but each with a unique index associated with it, which is used to uniquely identify it. (For example, an array might be a good choice for storing a list of test scores.)
If the type happens to be Object, the individual objects that are stored in the array can include a variety of different kinds of objects such as penguins, monkeys, lemurs, ladybugs, kangaroos, the camera, the light, the ground, etc. This is because Object is a generic type that includes all objects other than the world.
On the other hand, you cannot mix elements of type Boolean with type Number, etc., because they are different types.
What is an element?
Each variable in the array is commonly called an element.
What is an index?
Each element in the array has a subscript or index that differentiates it from every other element in the array. (Some people call it a subscript while others call it an index.)
The index is positive integer that indicates the position of a particular element relative to the first element in the array. The first element in the array always has an index value of 0.
We access the data value we are searching for in an array by its subscript or index.
Declaring an array
You must declare an array before you can use it. When you declare an array, you create a data structure that contains the list of variables. I will walk you through the process of declaring and populating an array later in this tutorial.
The size of an array
You specify the number of elements (the size) of an array when you declare it. Once created, the size of an array cannot be changed at runtime.
The manner in which you specify the size of an array in Alice is radically different from the way that you accomplish the same thing in other languages such as Java, C++, and C#. (I will also show you how to specify the size of an array later.)
If the size of the array is N, the index values for the elements in the array always extend from 0 to N-1 inclusive.
Accessing an array element
You access an individual element in an array by:
(I will show you how to write the Alice code to access an individual element in the array later.)
Why use an array?
Possibly the most important benefit of using an array lies in the ability to use another variable or an expression that evaluates to a numeric value as the index.
This makes it possible to:
What about using a list?
In addition to the array structure, Alice also has a list structure that can often be used as an alternative to an array. Lists will be the primary topic of a future lesson, in which I will explain the differences between lists and arrays as well as the advantages and disadvantages of each.
Element initialization
When you create a new array of any of the following types you can leave the elements empty and populate them later:
However, all of the other types of arrays must be populated when you create them. If you don't provide a specific value for an element, that element will be automatically populated with a default value. For example, the default value for the elements of an array of type Number is 1.0 and the default value for the elements of an array of type Boolean is true.
Staying within the array bounds
When using arrays, you must be particularly careful to stay within the bounds of the array. If you attempt to access an element at an index value that is equal to or larger than the size of the array, the program will abort with an error at runtime. (Remember the relationship between array size and index values given above.) Thus, if you create and populate an array containing five elements and you attempt to access the sixth element, the program will abort.
Similarly, if you attempt to access an array element using a negative index, the program will abort with an error at runtime.
Attempting to access an array element that is outside the bounds of the array is a serious logic error.
Unfortunately, Alice has what appears to be a major bug that greatly limits the usefulness of arrays. Although there is a workaround for this bug using a list instead of an array, such a workaround isn't very useful when attempting to teach beginning students how to program using arrays.
None of the textbooks that I have reviewed have much if anything to say about
the use of arrays of type Number. They all deal with arrays of type Object. The
drag and drop choices are different for arrays of type Number and arrays of type
Object.
The code in the world shown in Listing 4 works fine until the last statement is
encountered. Then it causes a runtime error. This apparently makes it
impossible to populate an array element using the contents of a variable.
Listing 4. Source code for the program named ArrayErr01.
|
||||||||||||
I will present and explain three different programs in this lesson. The programs are named:
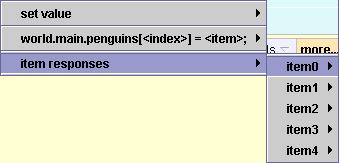
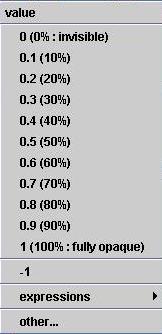
When you drop an array tile into the edit pane, you are given some choices as to what you can do with the array. The actual choices that are available depend on the type of the array and the context into which it is dropped. If you drop the tile for an array of type Object onto a new line in the edit pane, you are given the three choices shown in the menu in the upper left of Figure 10. This program illustrates the selection of the bottom menu item labeled item responses.
This program is similar to a program named Alice0175d that I presented and explained in an earlier lesson titled "Counter Loops, Nested Loops, and Sentinel Loops" (see Resources). I strongly recommend that you study that lesson and that program before continuing with this lesson. This program uses an array to provide an improved and greatly simplified version of that program.
Request for user input
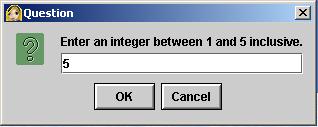
The program named Alice0180a begins by asking the user to enter an integer between 1 and 5 inclusive producing the screen dialog shown in Figure 1.
Figure 1. Request for user input in the program named Alice0180a.
|
|
|
The variable named limit
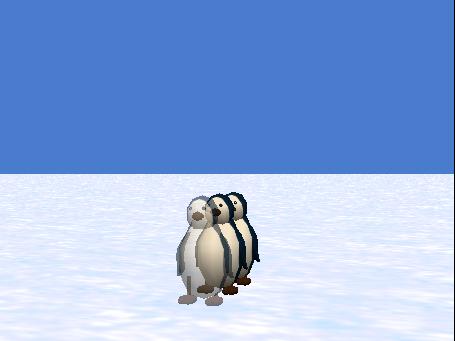
This integer is stored in a variable named limit (see Listing 1), which will be used in the conditional clause of a for loop. The loop will count from zero to one less than the value entered by the user, executing the body of the loop once for each count. The program displays a penguin during each iteration through the body of the loop as shown in Figure 2.
Figure 2. Program named Alice0180a while running.
|
|
A slow fade
In the previous program named Alice0175d, the penguins became visible immediately when they were called upon to do so. In this program, the penguins become visible by transitioning from invisible to visible during an elapsed time of one second. The image in Figure 2 was purposely captured in such a way as to catch the front penguin in the transition stage while it was still partially transparent.
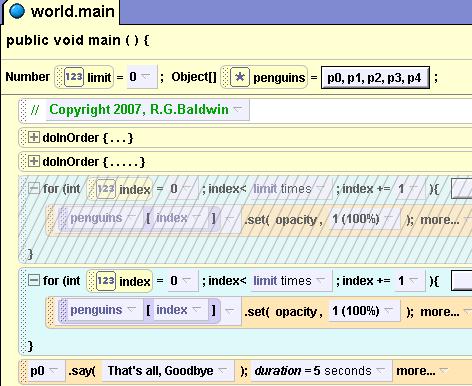
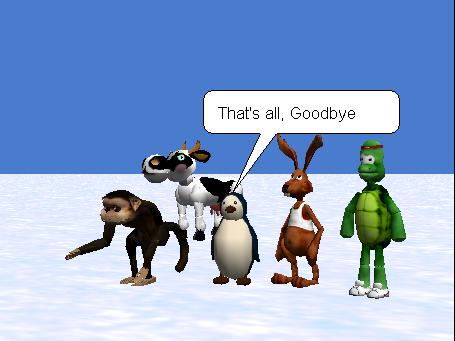
The final screen output
The code following the body of the loop in Listing 1 produces the screen output shown in Figure 3. The number of penguins showing will depend on the value entered by the user in Figure 1.
Figure 3. End of run for program named Alice0180a.
|
|
As I explained earlier, when you drop an array tile of type Object onto a new line in the edit pane, you are given three choices as to what you can do with the array. The three choices are shown in the menu in the upper left of Figure 10. This program (but not Figure 10) illustrates the selection of the middle menu item that begins with world.main.
Storing data in an array using mixed objects
Much of what I wanted to teach you in this lesson is included in the program named Alice0180a. However, one important thing that program doesn't show is the procedure for writing program code to store data into the elements of an array at runtime. The program named Alice0180b shows you how to do that. In addition, this program also illustrates the mixing of different kinds of objects in an array of type Object.
This program uses five statements to store the following kinds of objects in a five-element array of type Object:
Then the program uses code that is essentially the same as the code in the previous program to cause none, one, or more of the objects to become visible, depending on a numeric value entered by the user. Figure 15 shows a screen shot of the five objects after they have all become visible.
Once again, as I explained earlier, when you drop an array of type Object onto a new line in the edit pane, you are given three choices as to what you can do with the array. The three choices are shown in the menu in the upper left of Figure 10. This program illustrates the selection of the top menu item labeled set value.
Manually create two empty arrays
During manual setup, two empty arrays of type Object are created. (See Listing 3.) The first array, named objectsA is given five empty elements. The second array named objectsB is given one empty element.
Populate the five-element array under program control
This program uses the same program code as the previous program to populate the five-element array with the five objects shown in Figure 15. Then the program causes them to become visible just like in the previous program.
Set the value of objectsB and investigate the result
Then the program uses the set value menu item described above to set the value of objectsB to objectsA.
After that, the program executes another for loop to cause the objects in the array named objectsB to move forward by one meter and to be colored orange. The same set of five objects moves and turns orange, illustrating that even though there are two arrays involved, there is only one set of objects. In other words, setting the value of one array to another array doesn't make a copy of the content of the original array. Rather, it simply creates another array whose elements refer to the contents of the elements of the original array.
The source code for this program is presented in Listing 1. You can download an executable version of each of the three programs that I will present and explain in this lesson by following the link in Resources.
Replacing an ugly if-else construct
In the earlier lesson titled "Counter Loops, Nested Loops, and Sentinel Loops" (see Resources), I taught you how to write a program that used a for loop to create a counting loop that counted and displayed up to five penguins. The name of the program was Alice0175d, and it contained a rather ugly and somewhat unwieldy set of nested if-else constructs. I told you at that time that there was an easier way to accomplish the same task by using an array in place of the nested if-else constructs. This program accomplishes essentially the same thing using an array, and this program is much simpler than the earlier program.
One major difference
Aside from the use of the array in place of the nested if-else construct, there is another major difference between the two programs. Five penguin objects are manually created and positioned in the world during the manual setup for both programs. A for loop is used to count up to five penguins and to make them become visible one at a time. The number of penguins that are made visible in both programs is determined by a user input value.
The isShowing property
In the previous program named Alice0175d, the isShowing property was set to false during manual setup to cause the penguins to be initially invisible. The code in the body of the loop set the isShowing property to true as the penguins were counted causing them to become visible.
The opacity property
For reasons that I will explain later, it is not possible to set the isShowing property to true in this program. Therefore, the opacity property was used in place of the isShowing property to make the penguins initially invisible and to cause them to become visible later.
The opacity property was set to 0% during the manual setup to make the penguins initially invisible. The code in the body of a for loop sets the opacity property to 100% as the penguins are counted causing them to become visible.
Transition versus sudden appearance
As in the earlier program, the duration of the operation inside the body of the loop is set to one second so that the penguins will become visible at a rate of one per second. This causes the penguins to slowly transition into view in this program as opposed to suddenly appearing as was the case in the earlier program. Had I wanted to match the behavior of the earlier program exactly, I could have combined a duration parameter value of 0 with a wait statement to produce a one-second delay between the sudden appearances of each successive penguin.
Some minor differences
There are a few other minor differences as well that I will mention as we go along.
Description of the code
I will begin by explaining the behavior of the code shown in Listing 1. Then I will come back and explain how to construct some of the trickier parts of the code.
Two variables
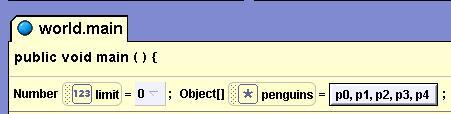
As you can see in Listing 1, this program declares two variables. The variable named limit is used for the same purpose that it was used in the previous program. It is used to capture and save the numeric input value provided by the user. This numeric value is used in the conditional clause of the for loop to determine how many penguins to count and display.
Unlike the previous program, this program declares and initializes an array of type Object with a size of five elements. The square brackets following the word Object in the variables section of Listing 1 identifies this as an array as opposed to an ordinary variable of type Object. (Note that Listing 1 was created using the "Java Style in Color" display preference.)
Some information is missing
Also note that unlike other programming languages such as Java, C++, and C#, there is nothing in the source code in Listing 1 that would tell you explicitly that the size of the array is five elements. In addition, there is nothing in Listing 1 that would tell you that each element in the array was manually populated with a different penguin object.
The doInOrder block
The code in the doInOrder block in Listing 1 accomplishes the following:
The for loop
The for loop contains a single statement. If you compare this statement with the nested if-else construct in the corresponding program named Alice0175d from the earlier lesson, you will see that this is significantly simpler.
The counter variable for the for loop is named index. This variable can take on values of 0, 1, 2, 3, 4, and 5 as the code is executed. When the value of index reaches the user-input value stored in limit, the conditional clause returns false, the body of the loop is skipped, and the statement following the body of the loop is executed.
The new material
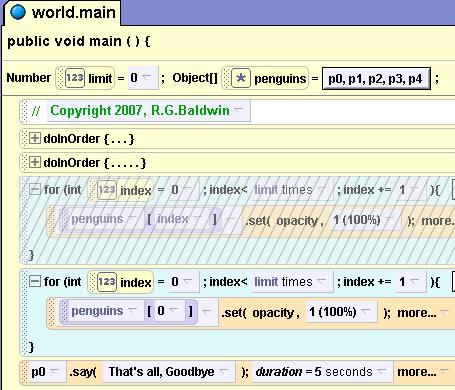
The only thing that is new to this program is the statement shown in the body of the for loop in Listing 1 and repeated in Figure 4.
Figure 4. Array access statement in program named Alice0180a.
(penguins[index]).set(opacity,1(100%));duration=1 second |
|
Only the portion of the statement that is highlighted in boldface in Figure 4 is new to this lesson.
Behavior of the statement
The boldface portion of that statement means simply that the program is to use the value of the counter variable named index as a numeric index to locate a specific element in the array.
Having located the element at that index value, the program is to access the contents of that element, which in this case will be a specific penguin object.
Having gained access to that specific penguin object in the array, the program is to set the opacity property value for that penguin object to 100% with a time duration of one second being required to go from the original opacity value of 0% to the new opacity value of 100%. This will cause the penguin to become visible over a time span of one second.
Writing the program
That's pretty much it insofar as explaining the behavior of the code in Listing 1 is concerned. The trickier part is explaining how to use Alice's drag and drop paradigm to create and populate the array and to construct the single array-access statement in the body of the for loop. This statement is a little more difficult to construct than your typical Alice statement.
How to construct the statement...
I will attempt to walk you through that process one step at a time. For illustration purposes, I will disable the existing for loop and then construct a new one right below it so that you can see and compare the complete version with the various stages of incomplete versions in the screen shots that follow. I will also eliminate the explicit duration parameter shown in Figure 4 and accept the default value of one second for duration in order to make the statement shorter. I need to do that so that the screen shots will fit in this narrow publication format.
Create the world
Create a new world, add five penguins to the world, and rename them p0 through p4 in order to match my version.
Rename the default method main to cause your code to match mine.
Create the variable named limit using procedures that you learned in an earlier lesson.
Create the array
Click the create new variable button in the main tab of the edit pane to begin the process of creating and populating the array. (Note that you can also create an array in the properties tab for any object, the ground, the light, the camera, or the world by clicking the appropriate button in the properties tab and following this same procedure.)
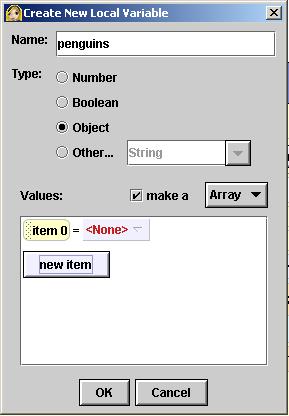
Fill in the popup dialog to the level that you see in Figure 5.
Figure 5. First step in creating and populating the array in program Alice0180a.
|
|
Add an element to the array
Click the new item button to add the first element to the array producing the dialog that you see in Figure 6.
Figure 6. Second step in creating and populating the array in program Alice0180a.
|
|
Populate the first element
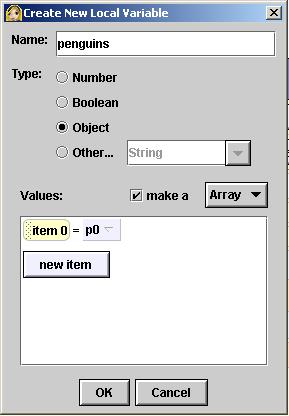
Pull down the menu next to <None> and select p0 followed by the entire p0 producing the dialog shown in Figure 7.
Figure 7. Third step in creating and populating the array in program Alice0180a.
|
|
|
Finish populating the array
Congratulations, you have now created and populated your first array element with a penguin object. Click the new item button again, and repeat this process until you have created five array elements, each one populated with a different penguin object.
Click OK and the array is created and populated
Click the OK button at the bottom of Figure 7 and you will have declared, created, and populated the entire array. At that point, the upper left portion of the edit pane for the main method should look like Figure 8. (The order of the variable and the array may be reversed. If so, that is not a problem.)
Figure 8. Edit pane showing array in program Alice0180a.
|
|
Note that even though the details regarding the size and the contents of the array don't show up in the printed source code shown in Listing 1, they do show up in the edit pane shown in Figure 8.
Creating the code
If you haven't done so already, create the variable named limit of type Number shown in Figure 8. You now have all of the variables that you need to write the program including the array variable.
Write all of the code from Listing 1 except for the for loop. Collect as much code as possible in one or more doInOrder blocks so that you can hide that code by collapsing the block. Collapse all of the trees in the edit pane to conserve as much space in the edit pane a possible.
Create an empty for loop structure
Drag a loop tile up from the bottom of the screen and drop it at the appropriate location within your code in the edit pane, selecting limit from the popup menus. You learned how to do this in an earlier lesson.
The complicated version of the for loop is required
The complicated version of the for loop is required for this program. Later on, you will need to drag the index tile from the loop header and drop it onto a placeholder in the statement being constructed. This is not possible with the simple version of the for loop.
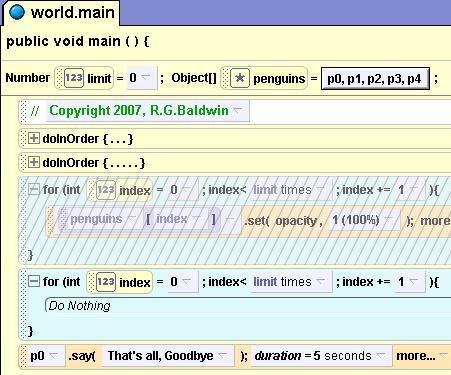
Click the button labeled show complicated version. Except for my disabled loop structure, your edit pane should now look like Figure 9 with the complicated version of the empty for loop. (Note that I purposely cropped the right end of the screen in Figure 9 to force the image to fit in this narrow publication format without a requirement to reduce the image and risk making it unreadable.)
Figure 9. Edit pane with empty for loop in program Alice0180a.
|
|
Construct the array access statement
The time has come to accomplish the first step in the construction of the array-access statement in the body of the for loop in Listing 1. (Watch that first step, it's a big one.)
Begin by dragging the penguins array tile down and dropping it on a new line in the body of the for loop. When you do, you will be required to work through a series of popup menus.
Work through the menus shown in Figures 10 through 12, making the selections highlighted in Figure 10 and Figure 11.
Figure 10. First two array-access menus for program Alice0180a.
|
|
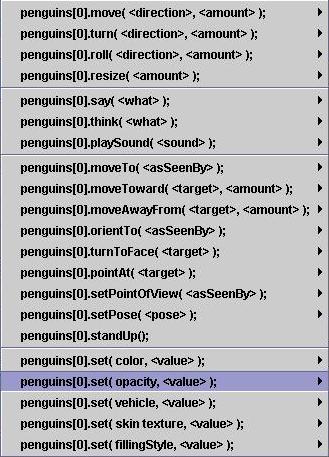
Figure 11. Third array-access menu for program Alice0180a.
|
|
Figure 12. Last array-access menu for program Alice0180a.
|
|
Specify 100% opacity
When you get to the final menu shown in Figure 12, select the 100% opacity item. That will cause the preliminary array-access statement to appear in your edit pane as shown in Figure 13.
Figure 13. Partially complete array-access statement in program Alice0180a.
|
|
Still not exactly what we want
The array access statement shown in Figure 13 still isn't exactly what we want. As shown in Figure 13, the penguin in the element with an index value of 0 will be selected during each iteration through the body of the for loop. You can fix that by dragging the index tile down from the header of the for loop and dropping it on top of the 0, producing the statement shown in Figure 14, which is what we want.
Figure 14. Final array-access statement in program Alice0180a.
|
|
Variable named index
Note that the variable named index now appears between the square brackets in Figure 14. This means that the value of the counter variable named index will be used as the numeric index causing the program to select the next penguin object in the array during each iteration through the body of the loop. Once that penguin object is selected, the code in Figure 14 will cause its opacity property to be set to 100%, causing the penguin to become visible over a default time span of one second.
Availability of methods belonging to the penguin object
Now let's go back and take a look at Figure 11. This figure shows all of the methods that can be called on an individual penguin object when it is extracted from the array. Notably missing is a method to set the isShowing property to true as I did in the program named Alice0175d in the earlier lesson. This is the reason that it was necessary for me to switch from manipulating the isShowing property to manipulating the opaque property for the purpose of controlling the visibility of the penguin objects in this program.
Also missing some primitive methods and all custom methods
Notably missing also are some of the primitive methods that belong to a penguin object, plus all of the custom methods that belong to a penguin object. I consider this to be a major weakness in Alice, and I discuss it in considerable detail in the section titled "Limitations related to the lack of a cast operator" in the document titled "Appendix E, Restrictions and Limitations for Alice 2.0" (see Resources). Please be aware, however, that the material in Appendix E is not written at a level that beginning programming students are likely to understand. That material is written primarily for the benefit of instructors who are preparing lesson plans for a course in Alice programming.
Extracting an element from the array
I sometimes use the terminology extracting a penguin object from the array. By that, I don't mean physically removing the object from the array. Once an array element is populated, it is impossible to remove the contents of the element. If you don't want those contents to be there, you must overwrite those contents with something else.
By extracting the object, I meant extracting a copy of the contents of the element which can be used in the current expression. Unless you store the copy somewhere else, the copy ceases to exist when the expression terminates.
The flip side of the coin
At this point, we have seen the code to extract a copy of an element from an array and use it for some purpose. What we haven't seen is the code to store something in an array element. That is the primary purpose of the next program that I will present and explain.
In addition, this program demonstrates that it is allowable to mix different kinds of objects in an array of type Object.
Store five objects in the array under program control
In the previous program, you manually stored five penguin objects in the five elements of the array during the manual setup phase. This program, on the other hand, uses five statements at runtime to store the following kinds of objects in a five-element array of type Object:
No objects are stored in the array during the manual setup phase for this program.
Cause the objects to become visible
Then the program uses code that is essentially identical to the code in the previous program to cause none, one, or more of the objects to become visible, depending on a numeric value entered by the user.
Source code for the program
The source code for this program is shown in Listing 2. The program begins just like the previous program by requesting that the user enter an integer value between 1 and 5. Then the program populates a five-element array with the five kinds of objects listed above. After that the program uses the value entered by the user to cause none, one, or more of those objects to become visible.
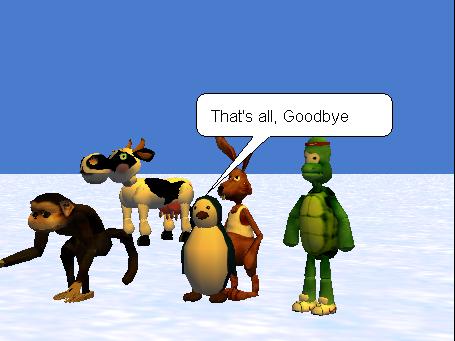
Figure 15 shows a screen shot at the end of the run for a user input value of 5, causing all five objects to become visible.
Figure 15. Final screen shot for the program named Alice0180b.
|
|
Writing this program
Begin by creating a new world and adding the five objects shown in Figure 15 in the world. Then manually set the opaque property on each object to 0%.
The source code
As mentioned earlier, the source code for this program is shown in Listing 2. The only significant new code consists of the five statements following the comment that reads "Add objects to the array."
A different name for the empty array
Note, however, that because we are no longer working exclusively with penguins, I named the array objects when I declared it instead of penguins as in the previous program. Also note that I did not manually populate the array elements. Rather, I allowed all five elements in the array to keep the default indicator <None> for the contents of the element. I did this because I planned to populate the elements at runtime using program code.
Creation of array-access statements
As before, creation of the array-access statements involves dragging the array tile down and dropping it at the appropriate location in the edit pane and then working through a series of menus. In this case, however, the statements are being constructed to store objects into the array elements rather than to extract objects from the array elements, which was the case in the previous program.
An example array-access statement
As an example, the first of the five statements following the comment identified above was constructed by dropping the array tile onto a new line in the edit pane and then selecting the following values on the four popup menus that appeared:
Note that the first menu item identified for selection in the above list is the middle menu item in the upper-left menu in Figure 10.
Following this procedure caused the penguin object to be stored in the first array element at runtime with a numeric index value of 0.
Write the remaining four array-access statements
A similar procedure was used to construct the remaining four statements that were used to populate the five-element array of type Object with the following kinds of objects being stored in the elements with the index values shown:
The remaining code in Listing 2 is essentially the same as the earlier program shown in Listing 1. Therefore, no further explanation should be required.
A fairly complete description of this program was given earlier. Figure 16 shows a screen shot of the output from the program after the five objects have been made visible, moved forward, and colored orange. Compare this screen shot with Figure 15 to see the effect of manipulating the contents of the array named objectsB.
Figure 16. Final screen shot for the program named Alice0180c.
|
|
The source code
The source code for this program is shown in Listing 3. Note that I eliminated the user input from this program simply to reduce the amount of code required for the program. As a result, I caused the variable named limit to be set to a value of 5 when it is declared.
I changed the name of the original five-element array from objects to objectsA so that I could distinguish between two different arrays used in the program. Then I declared a second array of type Object having only one empty element. This array was named objectsB.
Other than the changes described above, this program is essentially the same as the program named Alice0180b down to the comment that reads "Set second array to first array."
Set second array to first array
The statement immediately following that comment applies the set value menu option on objectsB (the top menu option in Figure 10) to set the value of that array to objectsA.
As explained earlier, the effect of this is to populate the array named objectsB with references to the same set of five objects that were originally used to populate the array named objectsA. This procedure does not populate the new array with copies of the objects from the original array as evidenced by the behavior of the program when the second for loop is executed.
Move forward and change color
Immediately after the new array is set to the old array, a for loop is used to:
If the array named objectsB contained copies of the five objects from the array named objectsA, we would see ten objects on the screen. However, as you can see in Figure 16, we still have only five objects. Furthermore, these five objects have moved forward and have been colored orange. This indicates that the elements in the array named objectsB now refer to the same set of five objects as are referred to by the elements in the array named objectsA. (Or maybe the variable named ObjectB now contains a reference to ObjectA.)
I frequently tell my OOP students that it is generally a bad idea to have two or more live references to the same object, but occasionally it is necessary and beneficial.
Executable versions of the programs that I explained in this lesson are available for downloading (see Resources). I encourage you to either download those programs, or to copy the code from Listing 1 through Listing 3 into your Alice development environment and run the programs. Experiment with the programs, making changes, and observing the results of your changes. Above all, have some fun in the process.
In this lesson, I taught you how to create and use arrays in your Alice programs. In particular, I taught you how to use the three major options that are available to you when you drop an array of type Object onto a new line in the edit pane:
Arrays can be used as data structures or containers for data of any valid Alice type. However, I consider the use of arrays for storing data of type Object to be the most complex of all the different types. Therefore, I have concentrated on data of that type in this lesson. Once you understand how to work with arrays containing data of type Object, you should have no difficulty working with arrays containing simpler types.
Whenever you need to use the data contained in an array, you drag the array tile down and drop it into the edit pane. In some cases you drop the tile on a new line in the edit pane. In other cases, you drop the tile onto a placeholder in an existing expression. I provided some rules of thumb for deciding which you need to do depending on your objective.
In future lessons I will teach you about:
So stay tuned. There is a lot of fun ahead.
Create a new program named Alice180LabProjA.
Create and populate an array where each element in the array contains one letter from your name with the letters that comprise your last name being separated from the letters that comprise your first name by a space character.
Place a penguin in the world. Cause the penguin to display your name one character at a time (in a say bubble above his head), adding one character per second to the display.
Then cause the penguin to:
Save your world in a file named Alice180LabProjA.a2w and be prepared to deliver it to your instructor in whatever manner the instructor specifies.
Make certain that your preferences are set to Java Style in Color.
Select Export Code For Printing... on the File menu and save your source code in a file named Alice180LabProjA.html. Also be prepared to deliver this file to your instructor in whatever manner the instructor specifies
View a movie of the lab project
You can download and play a small, low-quality movie of my version of the lab project as it being executed from the Resume button (see Resources). This movie was designed to give you a rough idea of how your program should behave. The movie was purposely recorded in low-quality format in a small window in order to reduce the file size and hence reduce the download time.
Because of the low quality of the movie, the execution of your program should provide smoother animation than the movie. Also, because of the low quality of the movie, the timing in the movie doesn't necessarily match the duration times specified for the lab project.
The movie was terminated early when the penguin began to walk away rather than to waste bandwidth watching the penguin walk and walk.
I attempted to synchronize the beginning of the recording with the beginning of the program execution by starting, then quickly pausing, and then resuming the execution. If you watch closely, when the movie starts running, you will see the mouse pointer click the Resume button, and the movie will show one complete pass through the program.
You should view this movie in its original size. If you allow the media player to enlarge it, the quality will be poor.
General resources
Resources from earlier lessons in the series titled "Learn to Program using Alice"
Downloads
Listing 1. Source code for the program named Alice0180a.
Alice0180a's CodeCreated by: Dick BaldwinworldEvents
Methods
|
|||||||||||||||||||||||||||||||||||||||||||||||||||||||||||||||
Listing 2. Source code for the program named Alice0180b.
Alice0180b's CodeCreated by: Dick BaldwinworldEvents
Methods
|
||||||||||||||||||||||||||||||||||||||||||||||||||||||||||||||||||||||||||||||||||||||
Listing 3. Source code for the program named Alice0180c.
Alice0180c's CodeCreated by: Dick BaldwinworldEvents
Methods
|
||||||||||||||||||||||||||||||||||||||||||||||||||||||||
Copyright 2007, Richard G. Baldwin. Faculty and staff of public and private non-profit educational institutions are granted a license to reproduce and to use this material for purposes consistent with the teaching process. This license does not extend to commercial ventures. Otherwise, reproduction in whole or in part in any form or medium without express written permission from Richard Baldwin is prohibited.
Richard has participated in numerous consulting projects and he frequently provides onsite training at the high-tech companies located in and around Austin, Texas. He is the author of Baldwin's Programming Tutorials, which have gained a worldwide following among experienced and aspiring programmers. He has also published articles in JavaPro magazine.
In addition to his programming expertise, Richard has many years of practical experience in Digital Signal Processing (DSP). His first job after he earned his Bachelor's degree was doing DSP in the Seismic Research Department of Texas Instruments. (TI is still a world leader in DSP.) In the following years, he applied his programming and DSP expertise to other interesting areas including sonar and underwater acoustics.
Richard holds an MSEE degree from Southern Methodist University and has many years of experience in the application of computer technology to real-world problems.
-end-