Published: September 20, 2008
by Richard G. Baldwin
File: Allegro00165
This lesson is part of a series (see Resources) designed to teach you how to use Allegro to do graphics programming in C++. My purpose in writing the series is to provide lecture and lab material for a course titled Game Development Using C++ that I teach at Austin Community College in Austin, Texas. However, if you have stumbled upon this series and you find it useful, you are welcome to study it.
I recommend that you open another copy of this document in a separate browser window and use the following links to easily find and view the figures and listings while you are reading about them.
I recommend that you also study the other lessons in my extensive collection of online programming tutorials. You will find a consolidated index at www.DickBaldwin.com.
Transparency
In game programming, such as when creating animations, it is often important to be able to draw one image on top of another image and to cause portions of the top image to be transparent.
There are at least two ways to achieve transparency with Allegro. One approach, which uses either the masked_blit function or the draw_sprite function will be explained in this lesson. This approach produces total transparency on a pixel-by-pixel basis.
A second approach, which uses an alpha channel to provide variable degrees of transparency (sometimes called blending), will be explained in a future lesson.
When the masked_blit function is used to copy one bitmap onto another, all pixels in the top bitmap with a color of exactly 255,0,255 become transparent. This allows the corresponding pixels in the bottom bitmap to show through unimpeded. The color specified by 255,0,255 is often referred to as magic pink.
|
Extremely sensitive to changes in color
This technique for achieving transparency is very sensitive to extremely small changes in color, particularly for a color depth of 32 bits. For example, compressing an image containing magic pink pixels into a jpeg file and later extracting the image from that file will cause many pixels that originally had a color of magic pink to have a slightly different color. Those pixels will no longer be interpreted as transparent pixels by the masked_blit function.
Will explain two different programs
The first program that I will explain in this lesson uses the masked_blit function. I will also explain a portion of a second program that is identical to the first program except that it uses the draw_sprite function in place of the masked_blit function. As a practical matter, for the purposes of this program, the two functions provide identical results. However, the draw_sprite function requires fewer parameters, resulting in easier use but less flexible positioning.
The program named Alice (see Resources) was used to create a jpeg image of a fish with a background color of magic pink. A program named Lview (see Resources) was used to convert the jpeg image to a pcx file with a size of 120x90 pixels to make it compatible with Allegro.
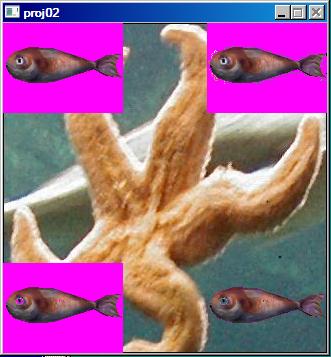
Screen output
Four copies of the fish image were drawn into the corners of an image of a starfish as shown in Figure 1.
Figure 1. Screen output from program Transparency01.
|
|
The blit function was used to copy the fish image into the upper-left corner. As expected, none of the pink pixels became transparent because the blit function does not honor transparent pixels.
Copy using the masked_blit function
The masked_blit function was used to copy the fish image into the upper-right corner of Figure 1. Although the background of the fish image was originally created with magic pink pixels, somewhere along the way (probably during jpeg compression and decompression), the color of most of the background pixels had been changed slightly and they were no longer exactly magic pink.
|
No visible difference in the background color
Thus, even though there is little or no visible difference between the background colors in the top two images of the fish in Figure 1, only a few of the pixels became transparent in the upper-right image when a color depth of 32 was used.
Correcting the problem
To correct this problem, the image was scanned using nested for loops and all pixels with a color close to magic pink were converted to exactly magic pink.
|
Displaying the corrected image with blit
The blit function was used to display the corrected image in the lower-left corner. There was little or no discernable difference between the new background color in the lower-left image and the original background color in the upper-left image.
Displaying the corrected image with masked_blit
Then the masked-blit function was used to display the corrected image in the lower-right corner. Except for a few pixels at the edge of the fish's body, all of the background pixels (and much of the fish's eyeball) became transparent.
As usual, I will explain this program in fragments. A complete listing of the program is provided in Listing 8 near the end of the lesson.
The program begins with the first fragment shown in Listing 1.
Listing 1. Beginning of the program named Transparency01.
#include <allegro.h> #include <math.h> //Declare a pointer variable named starBuffer that can be // used to point to a BITMAP. This will be the main // memory buffer containing a large image of a starfish. BITMAP *starBuffer = NULL; //Declare another pointer variable named fishBuffer that // can also be used to point to a BITMAP. This memory // buffer will be used to save a small image of a fish // with a background that is intended to be transparent. BITMAP *fishBuffer = NULL; //Note that the sizes of both images were known before the // program was written. int starWidth = 324;//Width of starfish image int starHeight = 330;//Height of starfish image int fishWidth = 120;//Width of fish image int fishHeight = 90;//Height of fish image |
The embedded comments should be sufficient to explain the code in Listing 1.
Beginning of the main function
The main function begins in Listing 2.
Listing 2. Beginning of the main function.
int main(){

  allegro_init();
  install_keyboard();
  set_color_depth(32);//Edit and set to 15, 16, and 32
  set_gfx_mode(
        GFX_AUTODETECT_WINDOWED,starWidth,starHeight,0,0);

  //Load image files from the current directory.
  starBuffer = load_bitmap("starfish324x330.pcx", NULL);
  fishBuffer = load_bitmap("fish120x90.pcx",NULL);
|
I have explained code similar to the code in Listing 2 in previous lessons (see Resources), so I won't repeat the explanation here.
Copy fish image with the blit function
Listing 3 begins by calling the blit function to copy the fish image with the pink background into the upper-left corner of Figure 1. There is nothing in this code that you haven't seen in previous lessons (see Resources).
Listing 3. Copy fish image with blit and masked_blit functions.
  //Copy the fish image to the upper-left corner without
  // transparency.
  blit(fishBuffer,starBuffer,
       0,0,
       0,0,
       fishWidth,fishHeight);

  //Copy the fish image to the upper-right corner with
  // transparency.
  masked_blit(fishBuffer,starBuffer,
              0,0,
              204,0,
              fishWidth,fishHeight);
|
Copy fish image with the masked_blit function
Then Listing 3 calls the masked_blit function to copy the fish image to the upper-right corner of Figure 1. As explained earlier, this will cause all pixels having a color of exactly magic pink to be totally transparent allowing the starfish image to show through.
Most pixels are not transparent
As you can see, however, most of the pink pixels in the upper-right image of the fish in Figure 1 are not transparent, even though the image was originally created with a background made up only of magic pink pixels.
|
Most pixels are not magic pink
A pixel-by-pixel analysis of the fish image revealed that the actual colors of the pink pixels ranged from values like 252,2,250 near the fish's body to values like 255,0,254 further from the fish's body. These colors are not magic pink. Therefore, they don't become transparent when drawn by the masked_blit function.
Although I can't be certain, I suspect that the changes in the color occurred in the compression of the image into a jpeg file by the Alice software and the decompression of the image into a pcx file by the LView software.
Must restore pixels to correct color
This leaves us with a requirement to restore those pixels to the correct color value of magic pink; a task that may be more difficult than it first appears.
There are probably several ways to do this. I will use an approach based on the distance between the locations of two color values interpreted as points in 3D space.
A point in 3D space
You can think of each color value as describing a point in 3D space where the axes are red, green, and blue. A point at the origin (0,0,0) in this space represents black. A point at the location 255,255,255 represents white. All other points within a cube having an edge on each axis, one corner at the origin, and one corner at 255,255,255 represent different colors. Points outside that cube are not valid color values.
The length of a 3D vector
Without attempting to prove it, I will simply tell you that the length of a vector connecting any two points in this 3D space can be computed as the square root of the sum of the squares of the differences between the respective red, green, and blue values that define the two points.
The closeness of two points in 3D color space
If any two pixels are exactly the same color, the two points that represent them occupy the same location in 3D color space. If they are not the same color, they are represented by two points at different locations in 3D color space.
One measure of the "closeness" of the two colors is the length of the vector that begins at one of the points in 3D space and ends at the other point in 3D space. (The longest possible vector is the one that extends from black to white.)
|
Computing the closeness of two colors
I will use an approach that computes the length of the vector from the 3D point that represents each pixel to the point that represents the magic pink color.
I will compare that length to a specified threshold. If the length is less than the specified threshold, I will modify the color values to move the point such that it coincides with the point representing magic pink. Otherwise, I will leave the color of the pixel unchanged.
Not without its problems
This is not a perfect solution to the problem. As I explained earlier, the fish's eyeball contains numerous pink pixels. While these pixels are not the same shade of pink as the pink defined by magic pink, in the 3D vector sense, they are closer to magic pink than some of the pixels in the background very close to the fish's body.
I can prevent the fish's eyeball from becoming transparent by using a very low threshold value, but when I do that, some of the background pixels close to the fish's body also fail to become transparent as well. This results in the appearance of pink fuzz on the fish's body.
Correct background color to magic pink
Listing 4 uses a pair of nested for loops to examine every pixel, changing the color of every pixel that is "close to" magic pink to be exactly magic pink.
Listing 4. Correct background color to magic pink.
  //Scan the image of the fish and make all pixels that
  // are close to 255,0,255 exactly 255,0,255
  double base = sqrt(255*255 + 255*255);
  double color = 0;
  int pixel = 0;
  int red = 0;
  int green = 0;
  int blue = 0;

  for(int row = 0;row < fishHeight;row++){
    for(int column = 0;column < fishWidth;column++){
      pixel = getpixel(fishBuffer,column,row);
      red = getr(pixel);
      green = getg(pixel);
      blue = getb(pixel);
      color = sqrt(red*red + green*green + blue*blue);
      //Compare the actual color with the desired color.
      if(abs((int)color - (int)base) < 75){
        putpixel(fishBuffer,column,row,
                                      makecol(255,0,255));
      }//end if
    }//end loop on row
  }//end loop on column
|
Now that you know the rationale behind the code in Listing 4, you should have no difficulty understanding that code.
Experimentation
If you change the threshold value from 75 to 10 in Listing 4 and then compile and run the program, the fish's eyeball will no longer be transparent. However, there will be a lot of pink fuzz growing on the fish's body.
A threshold value of 20 results in a mostly non-transparent eyeball and a small amount of fuzz. A threshold value of 35 produces a partially transparent eyeball and very little pink fuzz.
The point is that the best value for the threshold is not an easy thing to know without some experimentation. It will depend entirely on the image being processed.
Use blit to copy fish image to lower-left corner
Listing 5 begins by calling the blit function to copy the corrected image to the lower-left corner of Figure 1. The purpose is to show that it is not possible to visually distinguish between the original pink color in the upper left image and the magic pink color in the lower-left corner.
Listing 5. Copy fish image to the bottom two images.
  //Copy the fish image to the lower-left corner without
  // transparency.
  blit(fishBuffer,starBuffer,
       0,0,
       0,240,
       fishWidth,fishHeight);

  //Copy the fish image to the lower-right corner with
  // transparency.
  masked_blit(fishBuffer,starBuffer,
       0,0,
       204,240,
       fishWidth,fishHeight);
|
Use masked_blit to copy fish image to lower-right corner
Listing 5 calls the masked_blit function to copy the fish image with the magic pink background (and eyeballs) to the lower-right corner of Figure 1. As desired, the background becomes transparent allowing the starfish image to show through the background. If you look carefully, you will also see the starfish background showing through the fish's eyeball.
Copy bitmap to the screen
Listing 6 copies the composite bitmap containing the starfish image and the four versions of the fish image to the screen. You have seen code similar to this in numerous previous lessons.
Listing 6. Copy bitmap to the screen.
  //Copy the composite image to the screen.
  blit(starBuffer,screen,
       0,0,
       0,0,
       starWidth,starHeight);

  //Block and wait until the user presses a key.
  readkey();

  //Destroy bitmaps.
  destroy_bitmap(starBuffer);
  destroy_bitmap(fishBuffer);

  return 0;
}//end main
END_OF_MAIN();
|
Terminate on keypress
Listing 6 also destroys the two memory bitmaps and terminates the program when the user presses any key.
This program is identical to the previous program except that it uses the draw_sprite function in place of the masked_blit function to copy the fish image with the magic pink pixels onto the starfish image. I am going to show and discuss only one code fragment from this program. You can view a complete listing of this program in Listing 9 near the end of the lesson.
Calling the draw_sprite function
Listing 7 calls the draw_sprite function to copy the fish image with the correct magic pink pixels to the lower-right corner of the starfish image as shown in Figure 1.
Listing 7. Calling the draw_sprite function.
draw_sprite(starBuffer,fishBuffer,204,240); |
Two major operational differences
The call to the draw_sprite function in Listing 7 serves the same purpose as the call to the masked_blit function in Listing 5. For this program, the results are exactly the same. However, there are two major operational differences in how the two functions are used:
The first difference listed above can easily lead to logical programming errors as you switch back and forth between the two functions, since you might reasonably expect them to be the same insofar as the order of source and destination bitmaps is concerned.
The second difference listed above makes it somewhat easier to use the draw_sprite function when it will do the job because only four parameters are required as opposed to the eight parameters required for the masked_blit function.
In this lesson, you learned how to use the masked_blit function and the draw_sprite function to draw an image onto a background image such that magic pink (255,0,255) pixels allow the background image to show through. In other words, those pixels are totally transparent.
You learned that saving an image with magic pink pixels in a compressed jpeg image file and later decompressing the image can lead to very small color errors that can change magic pink pixels to colors that are very close to magic pink but are not exactly magic pink. The masked_blit and the draw_sprite functions don't allow for small deviations in the required magic pink color.
Finally, you learned one (imperfect) way to transform pixels whose color is "close to" magic pink to be exactly magic pink.
Listing 8. Source code for program named Transparency01.
/*Project Transparency01

When the masked_blit function is used to copy one bitmap
onto another, all pixels with a color of 255,0,255 (pink)
become transparent. However, this technique for achieving
transparency is very sensitive to extremely small changes
in color, particularly for a color depth of 32.

Alice was used to create a large jpeg image of a fish with
a background color of 255,0,255.

The Lview program was used to convert the image to a pcx
file with a size of 120x90.

Four copies of the fish image were copied into the corners
of an image of a starfish.

The blit function was used to copy the fish image to the
upper-left corner. As expected, none of the pink pixels
became transparent.

The masked_blit function was used to copy the fish into
the upper-right corner. Although the fish background was
originally created to have the correct color for
transparency, somewhere along the way, the color of most
of the pixels had been changed slightly and they were no
longer exactly 255,0,255. Thus, only a few of the pixels
became transparent in the upper-right image when a color
depth of 32 was used. Most of the pixels became
transparent for color depths of 15 and 16, but there were
still quite a few pixels at the edge of the fish's body
that did not become transparent. The fish appeared to have
a sort of pink glow surrounding it.

The image was scanned using nested for loops and all
pixels with a color close to 255,0,255 were converted to
exactly 255,0,255.

The blit function was used to display this image in the
lower-left corner. There was no discernable difference
between the new background color and the original
background color in the upper-left corner.

The masked-blit function was used to display this image in
the lower-right corner. Except for a few pixels at the
edge of the fish's body, all of the background pixels
became transparent.
*/

#include <allegro.h>
#include <math.h>

//Declare a pointer variable named starBuffer that can be
// used to point to a BITMAP. This will be the main
// memory buffer containing a large image of a starfish.
BITMAP *starBuffer = NULL;

//Declare another pointer variable named fishBuffer that
// can also be used to point to a BITMAP. This memory
// buffer will be used to save a small image of a fish
// with a background that is intended to be transparent.
BITMAP *fishBuffer = NULL;

//Note that the sizes of both images were known before the
// program was written.
int starWidth = 324;//Width of starfish image
int starHeight = 330;//Height of starfish image
int fishWidth = 120;//Width of fish image
int fishHeight = 90;//Height of fish image
//------------------------------------------------------//

int main(){

  allegro_init();
  install_keyboard();
  set_color_depth(32);//Edit and set to 15, 16, and 32
  set_gfx_mode(
        GFX_AUTODETECT_WINDOWED,starWidth,starHeight,0,0);

  //Load image files from the current directory.
  starBuffer = load_bitmap("starfish324x330.pcx", NULL);
  fishBuffer = load_bitmap("fish120x90.pcx",NULL);

  //Copy the fish image to the upper-left corner without
  // transparency.
  blit(fishBuffer,starBuffer,
       0,0,
       0,0,
       fishWidth,fishHeight);

  //Copy the fish image to the upper-right corner with
  // transparency.
  masked_blit(fishBuffer,starBuffer,
              0,0,
              204,0,
              fishWidth,fishHeight);

  //Scan the image of the fish and make all pixels that
  // are close to 255,0,255 exactly 255,0,255
  double base = sqrt(255*255 + 255*255);
  double color = 0;
  int pixel = 0;
  int red = 0;
  int green = 0;
  int blue = 0;

  for(int row = 0;row < fishHeight;row++){
    for(int column = 0;column < fishWidth;column++){
      pixel = getpixel(fishBuffer,column,row);
      red = getr(pixel);
      green = getg(pixel);
      blue = getb(pixel);
      color = sqrt(red*red + green*green + blue*blue);
      //Compare the actual color with the desired color.
      if(abs((int)color - (int)base) < 75){
        putpixel(fishBuffer,column,row,
                                      makecol(255,0,255));
      }//end if
    }//end loop on row
  }//end loop on column

  //Copy the fish image to the lower-left corner without
  // transparency.
  blit(fishBuffer,starBuffer,
       0,0,
       0,240,
       fishWidth,fishHeight);

  //Copy the fish image to the lower-right corner with
  // transparency.
  masked_blit(fishBuffer,starBuffer,
       0,0,
       204,240,
       fishWidth,fishHeight);

  //Copy the composite image to the screen.
  blit(starBuffer,screen,
       0,0,
       0,0,
       starWidth,starHeight);

  //Block and wait until the user presses a key.
	readkey();

	//Destroy bitmaps.
	destroy_bitmap(starBuffer);
	destroy_bitmap(fishBuffer);

  return 0;
}//end main
END_OF_MAIN();
|
Listing 9. Source code for program named Transparency02.
/*Project Transparency02
This program is identical to Transparency01 except that
this program uses draw_sprite in place of masked_blit.

When the draw_sprite function is used to copy one bitmap
onto another, all pixels with a color of 255,0,255 (pink)
become transparent. However, this technique for achieving
transparency is very sensitive to extremely small changes
in color, particularly for a color depth of 32.

Alice was used to create a large jpeg image of a fish with
a background color of 255,0,255.

The Lview program was used to convert the image to a pcx
file with a size of 120x90.

Four copies of the fish image were copied into the corners
of an image of a starfish.

The blit function was used to copy the fish image to the
upper-left corner. As expected, none of the pink pixels
became transparent.

The draw_sprite function was used to copy the fish into
the upper-right corner. Although the fish background was
originally created to have the correct color for
transparency, somewhere along the way, the color of most
of the pixels had been changed slightly and they were no
longer exactly 255,0,255. Thus, only a few of the pixels
became transparent in the upper-right image when a color
depth of 32 was used. Most of the pixels became
transparent for color depths of 15 and 16, but there were
still quite a few pixels at the edge of the fish's body
that did not become transparent. The fish appeared to have
a sort of pink glow surrounding it.

The image was scanned using nested for loops and all
pixels with a color close to 255,0,255 were converted to
exactly 255,0,255.

The blit function was used to display this image in the
lower-left corner. There was no discernable difference
between the new background color and the original
background color in the upper-left corner.

The masked-blit function was used to display this image in
the lower-right corner. Except for a few pixels at the
edge of the fish's body, all of the background pixels
became transparent.
*/

#include <allegro.h>
#include <math.h>

//Declare a pointer variable named starBuffer that can be
// used to point to a BITMAP. This will be the main
// memory buffer containing a large image of a starfish.
BITMAP *starBuffer = NULL;

//Declare another pointer variable named fishBuffer that
// can also be used to point to a BITMAP. This memory
// buffer will be used to save a small image of a fish
// with a background that is intended to be transparent.
BITMAP *fishBuffer = NULL;

//Note that the sizes of both images were known before the
// program was written.
int starWidth = 324;//Width of starfish image
int starHeight = 330;//Height of starfish image
int fishWidth = 120;//Width of fish image
int fishHeight = 90;//Height of fish image
//------------------------------------------------------//

int main(){

  allegro_init();
  install_keyboard();
  set_color_depth(32);//Edit and set to 15, 16, and 32
  set_gfx_mode(
        GFX_AUTODETECT_WINDOWED,starWidth,starHeight,0,0);

  //Load image files from the current directory.
  starBuffer = load_bitmap("starfish324x330.pcx", NULL);
  fishBuffer = load_bitmap("fish120x90.pcx",NULL);

  //Copy the fish image to the upper-left corner without
  // transparency.
  blit(fishBuffer,starBuffer,
       0,0,
       0,0,
       fishWidth,fishHeight);

  //Copy the fish image to the upper-right corner with
  // transparency. Note that the specification of the
  // source and destination buffers is reversed relative
  // to the blit function.
  draw_sprite(starBuffer,fishBuffer,204,0);


  //Scan the image of the fish and make all pixels that
  // are close to 255,0,255 exactly 255,0,255
  double base = sqrt(255*255 + 255*255);
  double color = 0;
  int pixel = 0;
  int red = 0;
  int green = 0;
  int blue = 0;

  for(int row = 0;row < fishHeight;row++){
    for(int column = 0;column < fishWidth;column++){
      pixel = getpixel(fishBuffer,column,row);
      red = getr(pixel);
      green = getg(pixel);
      blue = getb(pixel);
      color = sqrt(red*red + green*green + blue*blue);
      //Compare the actual color with the desired color.
      if(abs((int)color - (int)base) < 75){
        putpixel(fishBuffer,column,row,
                                      makecol(255,0,255));
      }//end if
    }//end loop on row
  }//end loop on column

  //Copy the fish image to the lower-left corner without
  // transparency.
  blit(fishBuffer,starBuffer,
       0,0,
       0,240,
       fishWidth,fishHeight);

  //Copy the fish image to the lower-right corner with
  // transparency.
  draw_sprite(starBuffer,fishBuffer,204,240);

  //Copy the composite image to the screen.
  blit(starBuffer,screen,
       0,0,
       0,0,
       starWidth,starHeight);

  //Block and wait until the user presses a key.
	readkey();

	//Destroy bitmaps.
	destroy_bitmap(starBuffer);
	destroy_bitmap(fishBuffer);

  return 0;
}//end main
END_OF_MAIN();
|
Copyright 2008, Richard G. Baldwin. Reproduction in whole or in part in any form or medium without express written permission from Richard Baldwin is prohibited.
Richard has participated in numerous consulting projects and he frequently provides onsite training at the high-tech companies located in and around Austin, Texas. He is the author of Baldwin's Programming Tutorials, which have gained a worldwide following among experienced and aspiring programmers. He has also published articles in JavaPro magazine.
In addition to his programming expertise, Richard has many years of practical experience in Digital Signal Processing (DSP). His first job after he earned his Bachelor's degree was doing DSP in the Seismic Research Department of Texas Instruments. (TI is still a world leader in DSP.) In the following years, he applied his programming and DSP expertise to other interesting areas including sonar and underwater acoustics.
Richard holds an MSEE degree from Southern Methodist University and has many years of experience in the application of computer technology to real-world problems.
-end-