
|
|
Published:
April 9, 2010
by Richard G. Baldwin
Flex Programming Notes # 103
This lesson is one in a series of tutorial lessons dedicated to programming with Adobe Flex. The main purpose of this lesson is to supplement the earlier lesson titled The Default Application Container with new information about Flash Builder 4.
Adobe released a new product named Flash Builder 4 in March of 2010 and immediately removed all, or at least most of the references to Flex Builder 3 from their website. Those references that were not removed were converted to references to Flash Builder 4. For example, the link (see Resources) that previously opened an Adobe page for free downloading of Flex Builder 3 (for educational use) now opens a page for free downloading of Flash Builder 4 for educational use.
What is Flash Builder 4?
Flash Builder 4 is an apparently upgraded version of Flex Builder 3 with a new name. Flex Builder 3 was based on Flex 3, while Flash Builder 4 is based on Flex 4.
There are significant differences between the two. That may be a good thing for professional users, but it is not helpful to educators like myself when a product that is being used by students is immediately discontinued and made (almost) obsolete in the middle of a semester.
Fortunately, Flex Builder 3 (and now Flash Player 4) is only one of several different ways to create applications that will run in the Flash Player.
The Flex 4 SDK and Flash Player 10
In conjunction with the release of Flash Builder 4, Adobe also released a new version (version 4) of the free open-source Flex SDK and a new version (version 10) of the Flash Player.
Flex Builder 3 was based on Flex 3 and required Flash Player 9 (or later) for execution of the swf files produced by compiling a Flex application.
Flash Builder 4 is based on Flex 4 and requires Flash Player 10 (or later) for execution of the resulting swf files.
Flash Builder 4 supports Flex 3
Fortunately, Flash Builder 4 still supports Flex 3 for backward compatibility. I will show you later in this tutorial how to use Flash Builder 4 with Flex 3.
Should you use Flex 4?
If you are using Flex to create RIAs in a professional capacity, you should probably learn to use Flex 4. It appears to provide a number of features that are not available in Flex 3.
Not in my classes - not yet anyway
However, for purposes of teaching my XML Fundamentals course and my ActionScript OOP course, Flex 4 is an overkill. Neither the new features nor the added complexity are particularly useful
Will continue to use Flex 3
Therefore, I will continue using Flex 3 for a few more semesters and let others find and report all of the bugs in Flex 4.
Unfortunately, since Flex Builder 3 is no longer available, my students will have to use other approaches for creating Flex 3 applications.
I recommend that you open another copy of this document in a separate browser window and use the following links to easily find and view the figures and listings while you are reading about them.
I recommend that you also study the other lessons in my extensive collection of online programming tutorials. You will find a consolidated index at www.DickBaldwin.com.
You learned how to create a Flex project named AppBackground01 using Flex Builder 3 in the earlier lesson titled The Default Application Container. As I mentioned earlier, however, it appears that Flex Builder 3 is no longer available from the Adobe website.
Therefore, in this lesson, I will explain how to create the same Flex project in three different ways. However, in this lesson, I will shorten the name of the project by changing the project name to test.
Run the program
Before continuing, I suggest that you run the program to familiarize yourself with the screen output.
Different ways to create Flex 3 applications
Here is a list of four different ways that you can create Flex 3 applications:
It is very easy to use the free open-source Flex 3.x SDK to compile an mxml document and create a swf file that can be run stand-alone in the Flash Player. It is more difficult to deploy that swf file on a server.
Compiling an mxml file from the command line
The main claim to fame for XML is that XML files are plain text files. An mxml file is an XML file. Therefore, you can create an mxml file containing mxml code, (such as that shown in Listing 1), using any plain text editor.
(The code shown in Listing 1 is the same as the code used in the Flex application in the earlier lesson titled The Default Application Container.)
Listing 1. Flex application
named test.mxml.
<?xml version="1.0" encoding="utf-8"?>

<mx:Application xmlns:mx="http://www.adobe.com/2006/mxml"

  backgroundColor="#FF0000"
  backgroundGradientColors="[#00FF00, #0000FF]"
  backgroundAlpha="1.0">

</mx:Application>
|
A test program
Assume that you have created such a file named test.mxml and that you have stored the file in the following folder on a Windows system:
C:\jnk\1\test.mxmlDownload the zip file containing the Flex 3.x SDK (see Resources) and extract the contents of the zip file into a folder of your choosing. That folder will then contain the following file:
...\bin\mxmlc.exe
Compile the test program
If you open a command-line window in the bin folder and execute the following command on the command line, the mxml file will be compiled and a file named test.swf will be created in the same folder as the mxml file:
mxmlc c:\jnk\1\test.mxmlIf you have a stand-alone Flash Player (version 9 or later) on your system, you can open the file named test.swf in that player.
Testing your installation
You should have no difficulty using this approach to modify the backgroundAlpha values in the mxml code shown in Listing 1 and produce swf files that produce the following four outputs when run in a stand-alone Flash Player version 9 or later.
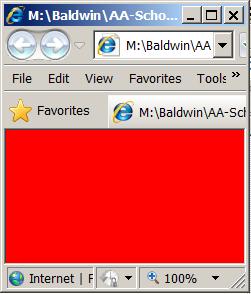
Figure 1. Test program output for alpha values of 0.0, 0.33, 0.66, and 1.0.
 |
 |
 |
 |
Four runs with different alpha values
For this example, the mxml code shown in Listing 1 was modified, compiled, and run four times in succession by substituting four different values of backgroundAlpha into the code. The results are shown in Figure 1
Four output images
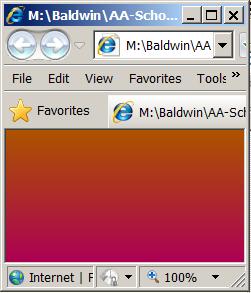
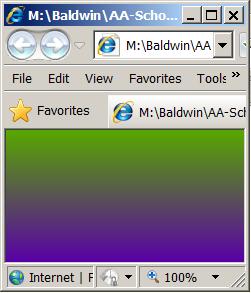
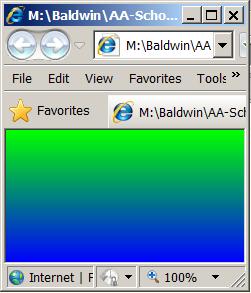
The four images shown in Figure 1, going from left to right, top to bottom, represent alpha values of 0.0, 0.33, 0.66, and 1.0 respectively.
An alpha value of 0.0
For an alpha value of 0.0, the output color is pure red as shown by the top-left image in Figure 1. In this case, the gradient color scheme is totally transparent.
An alpha value of 1.0
For an alpha value of 1.0, the output colors range from pure green at the top to pure blue at the bottom as shown in the bottom-right image in Figure 1. In this case, the gradient color scheme is totally opaque and the red background color doesn't show through at all.
(The image in the bottom-right corner of Figure 1 corresponds to what you should see if you run the online version of this application as described earlier.)
Alpha values of 0.33 and 0.66
For alpha values of 0.33 and 0.66, the output is a blend of the red background and the green/blue gradient as shown by the top-right and bottom-left images in Figure 1.
Deploying the swf file
If you don't have a stand-alone Flash Player on your system, or if you need to make the swf file accessible from a web site, you will need to deploy the swf file in order to cause it to run in a Flash Player browser plug-in.
The simplest case
In the simplest case, this will require you to create a JavaScript file and an html file. Templates for those two files are provided in the Flex SDK folder with the following names and locations:
...\flex_sdk_3.5\templates\no-player-detection\AC_OETags.js
...\flex_sdk_3.5\templates\no-player-detection\index.template.html
I will leave it as an exercise for the student to read the online deployment instructions (see Application Deployment in Resources) and learn how to deploy the swf file.
If you prefer not to work at the command-line level, another option is to download and use the free FlashDevelop IDE (see Resources).
Works with the Flex SDK
The FlashDevelop program works in conjunction with the free open-source Flex SDK to make it easier to create, compile, and deploy Flex applications than is the case when working from the command line.
See the Getting Started website
After installing the FlashDevelop program, you should open the Getting Started website (see Resources) where you will find instructions for configuring the program and getting it ready for use.
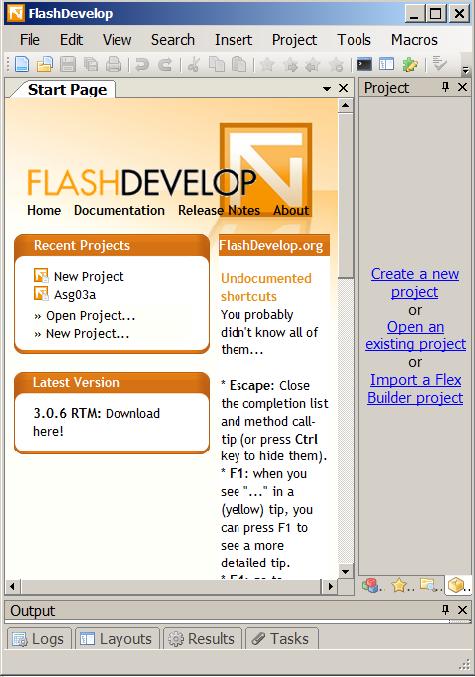
The FlashDevelop IDE at startup
When you first start the FlashDevelop program running, you will see an integrated development environment (IDE) that looks something like Figure 2.
Figure 2. The FlashDevelop IDE at startup.
Create a new project
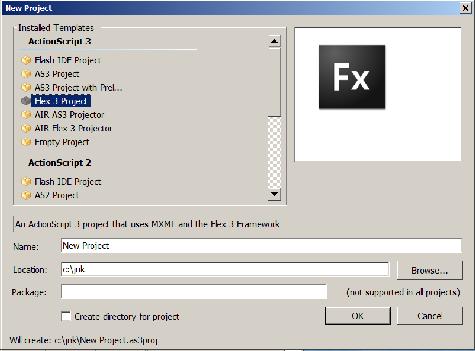
Selecting the Create a new project link on the right side of Figure 2 will open a dialog that looks much like the one shown (in reduced form) in Figure 3.
Figure 3. The new project dialog.
The text is difficult to read
Because of the reduced size, the text in Figure 3 is difficult to read. The highlighted item in the list in the upper left reads "Flex 3 Project."
Select Flex 3 Project
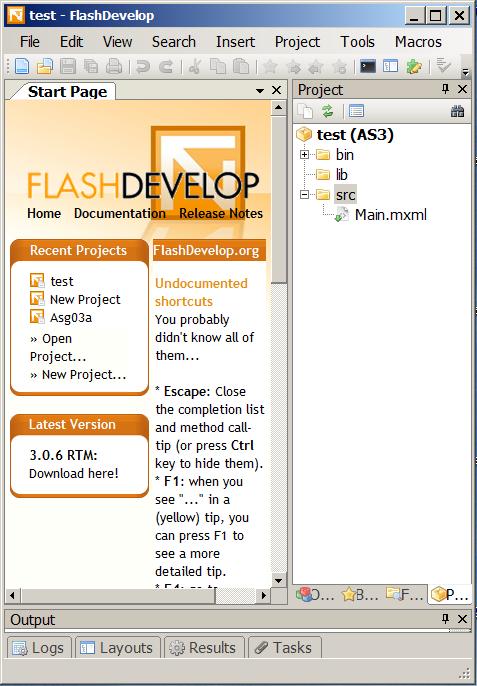
Then enter the name and location of the new project in the text fields near the bottom of Figure 3, and click the OK button. The IDE will change to look something like Figure 4.
Figure 4. The FlashDevelop IDE for a new project named test.
The project tree
Note in particular the tree structure shown on the right side of Figure 4 that is rooted in test (AS3). This tree structure replicates the tree structure that is created in the folder that was earlier specified as the location for the project.
Re-opening the project later
However, that folder also contains a file named test.as3proj that is not shown in Figure 4. You can double-click this file later to reopen the project in FlashDevelop.
Double-click the mxml file
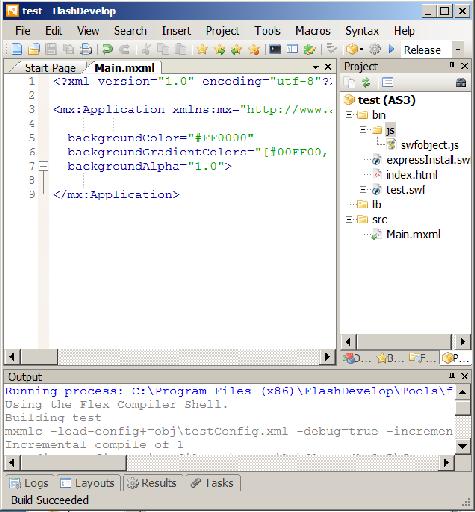
The next step is to double-click the file shown in Figure 4 named Main.mxml. This will open that file in a text editor as shown in Figure 5.
Figure 5. FlashDevelop text editor showing skeleton code for a Flex 3
project.
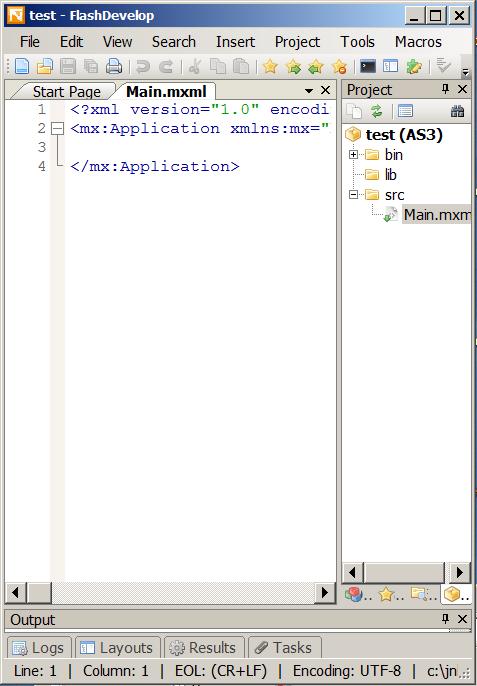
Skeleton code
At this point, the text editor shown in Figure 5 contains the skeleton code for a Flex 3 project that you saw in Listing 1 of the earlier lesson titled The Default Application Container.
Modify and compile the program
Replace the skeleton code shown in Figure 5 with the code shown in Listing 1 above.
Then select Build Project on the Project menu.
Note the panel at the bottom of the IDE
You can drag and open a panel at the bottom of the IDE, if necessary, to expose the compiler output text.
Quite a lot of text will appear in that panel.
If everything goes well, the last line of text in that panel will end with the words "Build succeeded".
Test the program
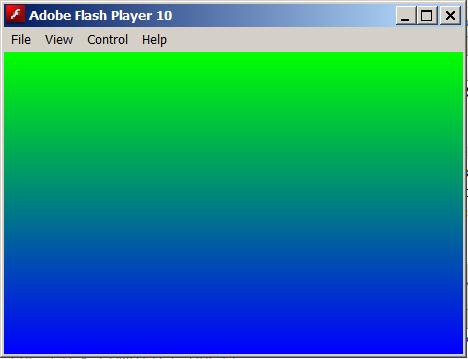
Select Test Movie on the Project menu. If all goes well, The Flash Player should open and display something very similar to Figure 6.
Figure 6. Test program output displayed in the Flash Player.
Create a Release Build
If you like what you see at this point, select Release in the pull-down list shown near the upper-right corner of Figure 7 and build the project again.
This will modify the contents of the folder named bin shown in Figure 4. This new version of the folder named bin can be deployed on a server.
(It may also be acceptable to zip this folder and send it to your instructor to satisfy the requirements of a lab project depending on his or her requirements for lab projects.)
Figure 7. FlashDevelop showing the Debug/Release pull-down list.
Executing the Flex project
The folder named bin contains a file named index.html as well as a swf file. You can open that html file in a browser to play the Flash movie provided that the Flash Player plug-in, version 9 or later, has been installed in the browser.
The swf file can be opened directly in a stand-alone Flash player, version 9 or later.
What is the difference between the Debug and Release builds?
While it is also possible to get an output that can be run in the Flash Player in Debug mode (the opposite of Release mode), the output produced in Release mode is normally smaller and more compact.
Pros and cons of the FlashDevelop program
By now, you have probably concluded that the FlashDevelop program makes it easier to develop and deploy Flex programs than is the case for the developing such programs from the command line.
Deployment made simple
In addition to providing a nice text editor, the program also handles the tedious task of creating the files necessary to deploy the application and creates a folder named bin containing all of the necessary files.
The downside
The primary downside of FlashDevelop (relative to Flex Builder 3 or Flash Builder 4), is that the FlashDevelop program does not provide the drag-and-drop visual design mode for GUI components that is provided by the two builder programs.
May or may not be important
Whether or not that is important will depend on the intended use of the IDE.
For example, students in my XML Fundamentals course may consider that to be a serious shortcoming because most of the lab projects in that course involve layouts for GUI components.
On the other hand, students in my ActionScript OOP programming course shouldn't have much need for the drag-and-drop feature of the builder programs. That course concentrates more on programming theory and less on drag-and-drop GUI construction.
Since Flex Builder 3 is apparently no longer available for download from the Adobe website, those students who need the drag-and-drop feature have little choice other than to use Flash Builder 4 in conjunction with Flex 3.x. Therefore, I will tell you what I have learned through experimentation with Flash Builder 4.
Two different versions
To begin with, Flash Builder 4 can be downloaded in at least two versions. One version is a stand-alone program. The other version is a plug-in for Eclipse. I am running the plug-in version, so some of the screen shots that follow may be different from what you would see with the stand-alone version.
Similar to Flex Builder 3
Many aspects of Flash Builder 4 are very similar to Flex Builder 3, which you learned about in earlier lessons. Therefore, I will concentrate on the differences that I have identified.
Switch to the Flash perspective
When you start Flash Builder 4 for the first time, you may be given an opportunity to "Switch to the Flash Perspective." If so, you should make the switch. Otherwise, things probably won't go well at all. (Once I learned that I needed to make the switch, I never saw that option again.)
Create a new Flex project
To create a new Flex project, pull down the File menu and select New ->Flex Project.
Specify Flex 3.5
When the New Flex Project dialog appears, be sure to select Web and specify Flex 3.5 as shown in Figure 8.
Figure 8. The New Flex Project dialog in Flash Builder 4.
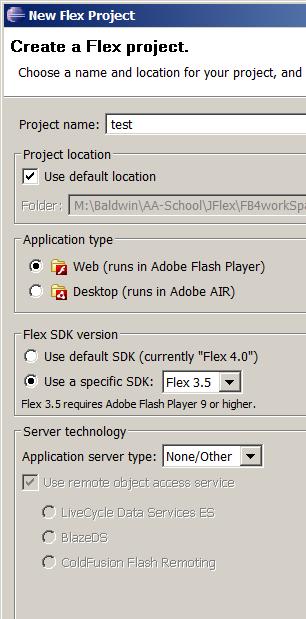
The Application server type
Unless you know a good reason to do otherwise, you should accept the default server type of None/Other as shown in Figure 8.
Click the Finish button
After you provide the required information in the New Flex Project dialog, click the Finish button at the bottom of the dialog. (Because of the way that I cropped the image, the Finish button is not shown in Figure 8.)
Open the text editor
If necessary, select the Source tab at the top of the main panel to open the text editor in the main panel as shown in Figure 9. This is essentially the same as Flex Builder 3. (The alternative is the Display tab, which I discuss below.) Enter your mxml code in the text editor.
The Display tab
If you need to do drag-and-drop component layout, select the Design tab at the top of the main panel. This will cause the lower-left panel to become a component panel and will cause the lower-right panel to become a property panel in a manner similar to Flex Builder 3.
Build your project
Once you are satisfied with your component layout and your mxml source code, select Build Project on the Project menu.
Run your project
Then select Run on the Run menu. This may cause a dialog titled Run As to appear on the screen. (I don't recall seeing this dialog in Flex Builder 3.) If the dialog does appear, select Web Application and click the OK button.
This should cause the application to open and run in your default browser provided that the browser has the Flash Player plug-in, version 9 or later, installed.
Create a Release Build
If you are happy with what you see at this point, select Export Release Build... on the Project menu. This will open another dialog titled Export Release Build which will probably contain the correct information. Click the Finish button on this dialog to cause the release build to be exported.
The bin-release folder
Clicking the Finish button causes the folder named bin-release (shown in the project tree in Figure 9) to be created and populated.
Figure 9. Contents of the project tree for the test program with Flash
Builder 4.
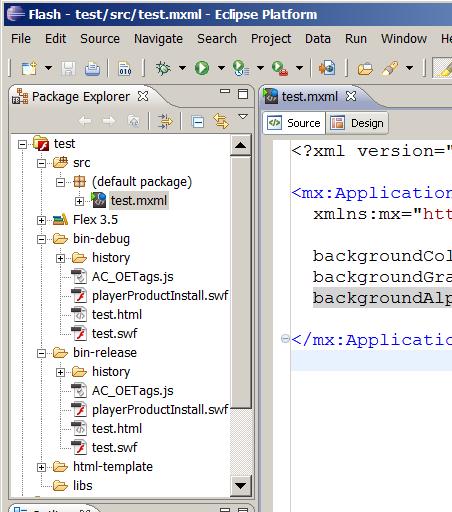
Deploying the project
The bin-release folder contains everything necessary to deploy the project on a server. Opening the file named test.html in that folder will cause the Flash program to be played in a Flash Player browser plug-in. In addition, the file named test.swf can be played in a stand-alone Flash player.
The bin-debug folder
The bin-debug folder that you see in Figure 9 also contains files named test.html and test.swf. They can be opened in a browser and in a stand-alone Flash player to produce essentially the same results.
A smaller movie file
However, the test.swf file in the bin-release folder will often be much smaller and more compact than the test.swf file in the bin-debug folder, resulting in shorter download times from the server.
I encourage you to run the online version of the program. Then copy the code from Listing 1. Use that code to create Flex projects for all three approaches. Compile and run the projects. Experiment with the code, making changes, and observing the results of your changes. Make certain that you can explain why your changes behave as they do.
In this lesson, you learned how to continue using Flex 3 even after the release of Flash Builder 4 and the disappearance of Flex Builder 3.
Copyright 2009, Richard G. Baldwin. Reproduction in whole or in part in any form or medium without express written permission from Richard Baldwin is prohibited.
Richard has participated in numerous consulting projects and he frequently provides onsite training at the high-tech companies located in and around Austin, Texas. He is the author of Baldwin's Programming Tutorials, which have gained a worldwide following among experienced and aspiring programmers. He has also published articles in JavaPro magazine.
In addition to his programming expertise, Richard has many years of practical experience in Digital Signal Processing (DSP). His first job after he earned his Bachelor's degree was doing DSP in the Seismic Research Department of Texas Instruments. (TI is still a world leader in DSP.) In the following years, he applied his programming and DSP expertise to other interesting areas including sonar and underwater acoustics.
Richard holds an MSEE degree from Southern Methodist University and has many years of experience in the application of computer technology to real-world problems.
-end-