
|
|
Published: October 19, 2009
Updated: December 14, 2009
Validated with Amaya
by Richard G. Baldwin
Flex Programming Notes # 0112
This tutorial lesson is part of a continuing series dedicated to programming with Adobe Flex.
An earlier lesson titled The Default Application Container provided information on how to get started programming with Adobe's Flex Builder 3. (See Baldwin's Flex programming website.)
What you will learn
In this lesson, you will learn how to nest divided boxes in a Panel object, how to use the TextArea class to display non-editable text, and how to use the ColorPicker class to allow the user to assign colors to components.
I recommend that you open another copy of this document in a separate browser window and use the following links to easily find and view the figures and listings while you are reading about them.
I recommend that you also study the other lessons in my extensive collection of online programming tutorials. You will find a consolidated index at www.DickBaldwin.com.
This lesson will be primarily concerned with the following classes:
An application named DividedBoxes01
In this lesson, I will present and explain an application named DividedBoxes01 that illustrates the use of the following classes:
The application displays the title and three verses of a poem in four TextArea objects that are placed in two VDividedBox objects (see Figure 1). The two VDividedBox objects are nested in a single HDividedBox object. I recommend that you run the online version of this program before continuing with this lesson.
Program output at startup
Figure 1 shows the output that should appear in your browser when the application first starts running. Because of the use of a gradient background, you will probably need to manually resize your browser window to that shown in Figure 1 to cause your output colors to match those shown in Figure 1.
Figure 1. Program output at startup.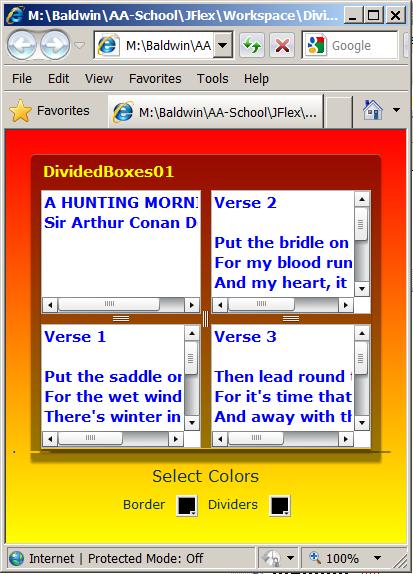
Two ColorPicker objects
As the labels indicate, you can use the two ColorPicker objects at the bottom to assign new colors to the border of the Panel object and the dividers that separate the panes in the divided boxes. For example, if you click on the color picker for the Border, you should see something like that shown in Figure 2.
Figure 2. An open color picker on the Border.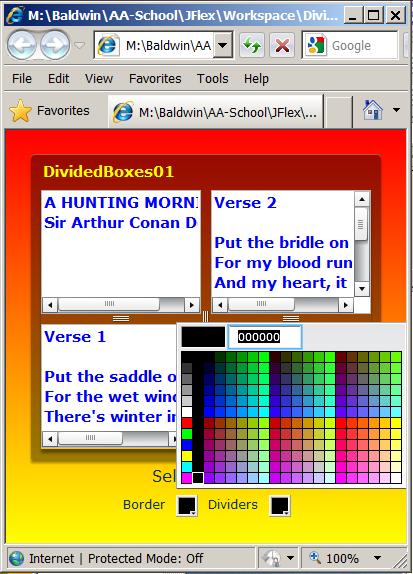
Select the pure green swatch
Selecting the pure green swatch causes the output to change to that shown in Figure 3.
Figure 3. Border color changed to green.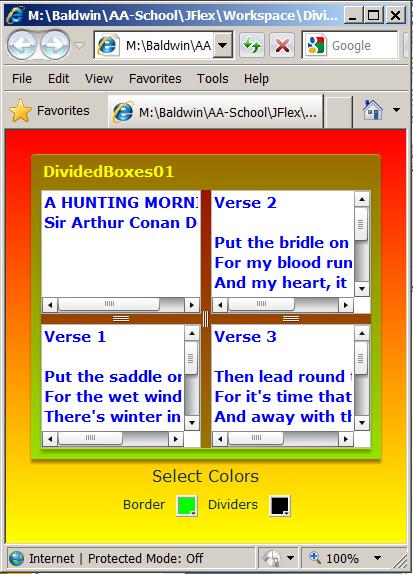
It doesn't look like pure green to me!
The default alpha value for the border on the Panel object is 0.4. Therefore, the actual color of the border in Figure 3 is a mixture of green and the gradient background colors.
Set the color of the dividers to pure green
Setting the color of the dividers to pure green causes the color of the dividers to match the color of the border as shown in Figure 4.
Figure 4. Make the dividers match the border.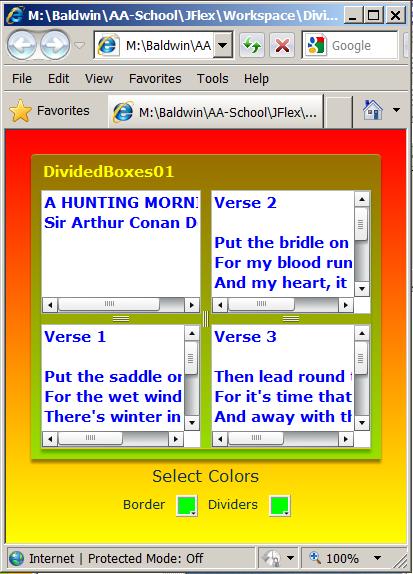
Set the color of the dividers to blue
Setting the color of the dividers to some other color, such as blue for example, causes the dividers to take on a different color as shown in Figure 5.
Figure 5. Divider colors set to blue.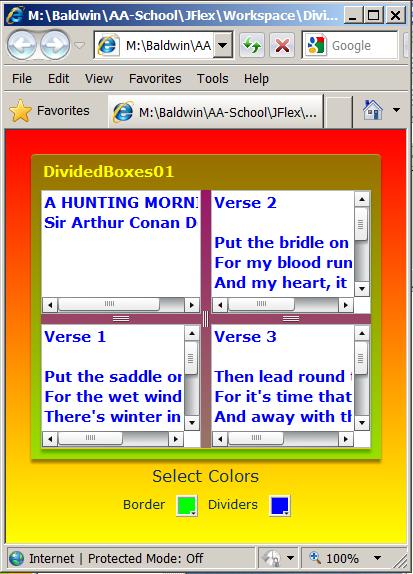
Dragging the dividers
That's enough about colors. Let's take a look at our ability to drag the dividers to expose the title, author, and verses of the poem.
As you can see in the above images, this user interface contains four panes with draggable dividers separating them. None of the panes are sufficiently large to allow for reading the material contained in the pane without using the scroll bars. In some cases scroll bars work well, and in other cases they don't work so well.
The title and the author of the poem
The upper-left pane contains the title of a poem named A Hunting Morning by Sir Arthur Conan Doyle.
The pane in Figure 5 is not sufficiently wide to allow for reading either the full name of the poem or the full name of the author.
Expose the title and author
The vertical divider has been dragged sufficiently far to the right to expose the full name of the poem and its author in Figure 6.
Figure 6. The title and author fully exposed.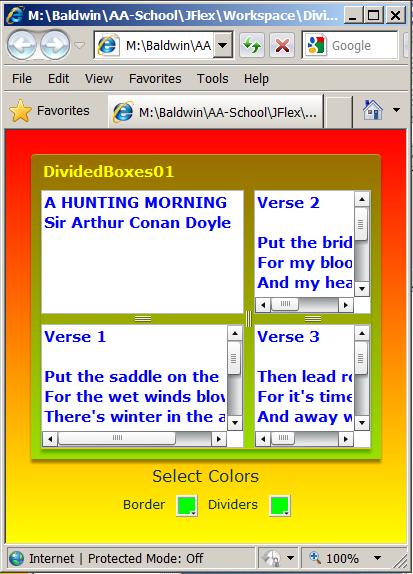
One verse in each pane
The poem has three verses. Each verse of the poem is displayed in a different pane, with the first verse being displayed in the lower-left pane. The complete verse has not been exposed in any of the images that you have seen so far.
Expose Verse 1
The leftmost horizontal divider has been dragged sufficiently far up and the vertical divider has been dragged sufficiently far to the right to expose the entire verse with no requirement for the use of scroll bars to read the verse in Figure 7.
Figure 7. Verse 1 fully exposed.
Other verses fully exposed
Figure 8 and Figure 9 show similar results for the second and third verses.
Figure 8. Verse 2 fully exposed.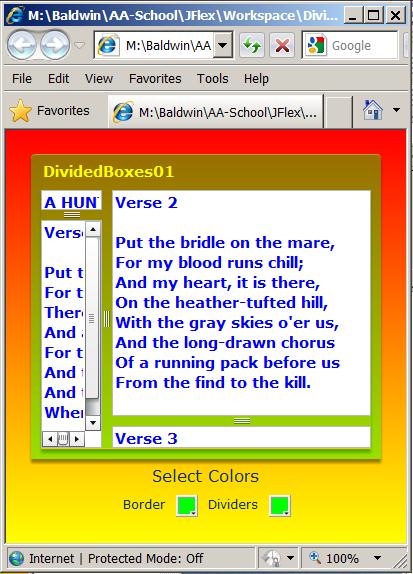
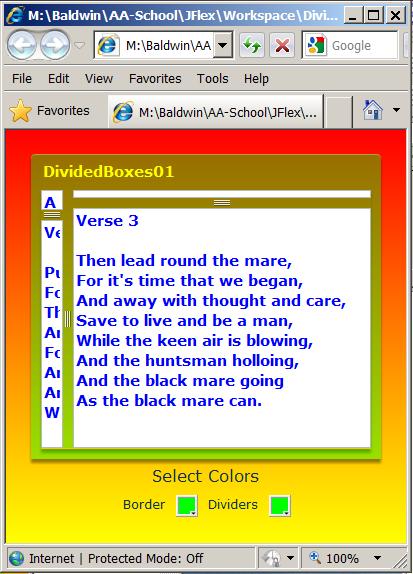
Verse 3, which is contained in the bottom-right pane, is fully exposed in Figure 9.
Figure 9. Verse 3 fully exposed.
Will explain in fragments
I will explain this Flex application in fragments. A complete listing of the XML code is provided in Listing 7 near the end of the lesson.
Beginning of the XML code
The XML code for the application begins in Listing 1. In addition to creating the Application container element and setting its background gradient colors, Listing 1 also defines the beginning tag for a Panel element.
Listing 1. Beginning of XML code for
DividedBoxes01.
<?xml version="1.0" encoding="utf-8"?>

<mx:Application xmlns:mx="http://www.adobe.com/2006/mxml"
    backgroundGradientColors="[#FF0000,#FFFF00]">

    <mx:Panel width="350" height="305"
        title="DividedBoxes01"
        borderColor="{cp01.selectedColor}"
        color="#FFFF00"
        fontWeight="bold"
        fontSize="15"
        backgroundAlpha="0.0">
|
The visual manifestation of a Panel object
The visual manifestation of the Panel object is the structure in Figure 9 containing the title bar, the caption, a border, and a content area for its children.
Setting the border color
Of particular interest is the syntax of the attribute named borderColor in Listing 1. However, I will defer a discussion of that syntax until later when I explain the use of a ColorPicker object.
The backgroundAlpha value
Perhaps the only other attribute in Listing 1 that needs to be mentioned is backgroundAlpha. This is the alpha value for the content area of the Panel exclusive of the title bar and the border, which have their own alpha value. The backgroundAlpha is set to 0.0 in Listing 1 causing the content area to be totally transparent. This allows the gradient colors of the Application to show through. You can see those colors (mixed with pure green) showing through the dividers in Figure 9.
The borderAlpha value
There is another important property of the Panel named borderAlpha that is not set in Listing 1 because the default value is accepted instead.
The default value of borderAlpha is 0.4. Therefore, when the color of the border is set to pure green, as is the case in Figure 9, the gradient background partially shows through causing the border to be brown at the top and yellow-green at the bottom.
|
Overall containment structure
The Panel contains a single HDividedBox object with two children. Each child is a VDividedBox.
Each of these children also has two children of type TextArea. The children of a VDividedBox are laid out vertically and separated by draggable dividers.
The four children of the vertical divided boxes
The four children of the vertical divided boxes are all objects of the class named TextArea. One of the text areas is populated with the name of the poem and the name of the author (see Figure 6). Each of the other three text areas is populated with one verse from the poem (see Figure 7, Figure 8, and Figure 9).
The containment structure in XML code
Listing 2 shows the hierarchical containment structure down to and including the text that defines the name of the poem and the name of the author.
Listing 2. The containment structure in
XML code.
        <mx:HDividedBox
            backgroundColor="{cp02.selectedColor}"
            backgroundAlpha="0.4">

            <mx:VDividedBox
                backgroundAlpha="0.0">

                <mx:TextArea width="100%"
                    height="124"
                    wordWrap="false"
                    color="#0000FF"
                    editable="false">

    	    	        <mx:htmlText>
<![CDATA[A HUNTING MORNING
Sir Arthur Conan Doyle
]]>
    	    	        </mx:htmlText>
                </mx:TextArea>
|
A few of the attributes in Listing 2 are worth mentioning.
The backgroundColor of the HDividedBox
For example, the backgroundColor of the HDividedBox is determined by the selected value of the rightmost ColorPicker object at the bottom of Figure 1. This color determines the color of the vertical divider because that part of the background is visible between the two VDividedBox objects.
The backgroundAlpha value of the HDividedBox
The backgroundAlpha value of the HDividedBox is set to 0.4 to cause it to match the default borderAlpha value of the panel. This causes the color of the vertical divider to match the border of the Panel when both ColorPicker objects are set to the same color value.
The backgroundAlpha value of the VDividedBox
The backgroundAlpha value of the VDividedBox is set to 0.0 to make it totally transparent. This causes the color of the horizontal dividers to match the color of the vertical divider at the point where they intersect. Rather than trying to explain it, I will leave it as an exercise for the student to understand why this is true.
Attributes of the TextArea element
By now, you should have no difficulty understanding the values assigned to all of the attributes of the TextArea element.
The htmlText property
The TextArea class has a text property and an htmlText property, either of which could be used in this application. I elected to use the htmlText property as shown in Listing 2.
An XML CDATA block
The syntax involving the htmlText property is unusual and involves the use of an XML CDATA block. I will simply refer you to a good XML textbook for an explanation of the CDATA block. Suffice it to say that in this and many other cases, a CDATA block can be used to insert large amounts of text into an XML document without the requirement to replace characters such as >, <, and the apostrophe with entities such as >, <, '.
Listing 2 contains everything necessary to populate the upper-left pane in Figure 6 with the name of the poem and the name of the author.
Populate the lower-left pane with Verse 1
Listing 3 contains everything necessary to populate the lower left pane in Figure 7 with the first verse from the poem.
Listing 3. Populate the lower-left pane
with Verse 1.
                <mx:TextArea width="100%"
                    height="124"
                    wordWrap="false"
                    color="#0000FF"
                    editable="false">

                    <mx:htmlText>
<![CDATA[Verse 1

Put the saddle on the mare,
For the wet winds blow;
There's winter in the air,
And autumn all below.
For the red leaves are flying
And the red bracken dying,
And the red fox lying
Where the oziers grow.
]]>
                    </mx:htmlText>
                </mx:TextArea>
            </mx:VDividedBox>
|
Listing 3 also contains the end tag for the VDividedBox element that populates the left half of the HDividedBox.
Define and populate the rightmost VDividedBox
Listing 4 contains everything necessary to define and populate the rightmost VDividedBox that is contained in the HDividedBox.
Listing 4. Define and populate the
rightmost VDividedBox.
            <mx:VDividedBox
                backgroundAlpha="0.0">

                <mx:TextArea width="100%"
                    height="124"
                    wordWrap="false"
                    color="#0000FF"
                    editable="false">

                    <mx:htmlText>
<![CDATA[Verse 2

Put the bridle on the mare,
For my blood runs chill;
And my heart, it is there,
On the heather-tufted hill,
With the gray skies o'er us,
And the long-drawn chorus
Of a running pack before us
From the find to the kill.
]]>
                    </mx:htmlText>
                </mx:TextArea>

                <mx:TextArea width="100%"
                    height="124"
                    wordWrap="false"
                    color="#0000FF"
                    editable="false">

                    <mx:htmlText>
<![CDATA[Verse 3

Then lead round the mare,
For it's time that we began,
And away with thought and care,
Save to live and be a man,
While the keen air is blowing,
And the huntsman holloing,
And the black mare going
As the black mare can.
]]>
                    </mx:htmlText>
                </mx:TextArea>
            </mx:VDividedBox>
        </mx:HDividedBox>

    </mx:Panel>
|
The text areas and the CDATA blocks
The two text areas and their respective CDATA blocks in Listing 4 make it possible to display Verse 2 in Figure 8 and Verse 3 in Figure 9.
The end of the Panel element
Listing 4 also contains the end tag for theHDividedBox element that began in Listing 2 and thePanel element that began in Listing 1. Therefore, Listings 1 through 4 contain everything necessary to display everything above the "Select Colors" label at the bottom of Figure 9.
XML code for the "Select Colors" label
The XML code for the "Select Colors" label is shown in Listing 5.
Listing 5. XML code for the Select
Colors
    <mx:Label text="Select Colors"
        fontSize="16"/>
|
If you look back at Figure 9, you will see two Label objects and two ColorPicker objects in a horizontal row below the "Select Colors" label. These four objects are contained in an HBox object.
The HBox element
The HBox element and the four elements that it contains are shown in Listing 6.
Listing 6. The HBox element and its
ColorPicker children.
    <mx:HBox fontSize="12">

        <mx:Label text="Border"/>
        <mx:ColorPicker id="cp01"/>
        <mx:Label text="Dividers"/>
        <mx:ColorPicker id="cp02"/>
    </mx:HBox>
</mx:Application>
|
The id attributes
The most important aspects of the ColorPicker elements in Listing 6 are the values of the id attributes:
Accessing the ColorPicker values
Referring back to the yellow highlight in Listing 1, we see that the color assigned to the borderColor attribute for the Panel element is the selected color from the ColorPicker object identified as cp01.
Similarly, referring back to Listing 2, we see that the color assigned to the backgroundColor attribute for the HDividedBox element is the selected color from the ColorPicker object identified as cp02.
These colors are selected by the user who first clicks on the ColorPicker button and then clicks on a particular color when the swatches of available colors are exposed as shown in Figure 2. (Colors can also be selected using code but that is not done in this application.)
The end of the application
Listing 6 also signals the end of the Application element and hence the end of the application.
I encourage you to run the online version of this program. Then copy the code from Listing 7. Use that code to create a Flex project. Compile and run the project. Experiment with the code, making changes, and observing the results of your changes. Make certain that you can explain why your changes behave as they do.
In this lesson, you have learned how to nest divided boxes in a Panel object, how to use the TextArea class to display non-editable text, and how to use the ColorPicker class to allow the user to assign colors to components.
Listing 7. Complete listing for
DividedBoxes01.
<?xml version="1.0" encoding="utf-8"?>

<!--
DividedBoxes01
Illustrates:
  Nesting of divided boxes.
  Use of ColorPicker to set colors.
  Use of TextArea in non-editable mode to display
    htmlText without word wrap.
-->
<mx:Application xmlns:mx="http://www.adobe.com/2006/mxml"
    backgroundGradientColors="[#FF0000,#FFFF00]">

    <mx:Panel width="350" height="305"
        title="DividedBoxes01"
        borderColor="{cp01.selectedColor}"
        color="#FFFF00"
        fontWeight="bold"
        fontSize="15"
        backgroundAlpha="0.0">

        <mx:HDividedBox
            backgroundColor="{cp02.selectedColor}"
            backgroundAlpha="0.4">

            <mx:VDividedBox
                backgroundAlpha="0.0">

                <mx:TextArea width="100%"
                    height="124"
                    wordWrap="false"
                    color="#0000FF"
                    editable="false">

    	    	        <mx:htmlText>
<![CDATA[A HUNTING MORNING
Sir Arthur Conan Doyle
]]>
    	    	        </mx:htmlText>
                </mx:TextArea>

                <mx:TextArea width="100%"
                    height="124"
                    wordWrap="false"
                    color="#0000FF"
                    editable="false">

                    <mx:htmlText>
<![CDATA[Verse 1

Put the saddle on the mare,
For the wet winds blow;
There's winter in the air,
And autumn all below.
For the red leaves are flying
And the red bracken dying,
And the red fox lying
Where the oziers grow.
]]>
                    </mx:htmlText>
                </mx:TextArea>
            </mx:VDividedBox>

            <mx:VDividedBox
                backgroundAlpha="0.0">

                <mx:TextArea width="100%"
                    height="124"
                    wordWrap="false"
                    color="#0000FF"
                    editable="false">

                    <mx:htmlText>
<![CDATA[Verse 2

Put the bridle on the mare,
For my blood runs chill;
And my heart, it is there,
On the heather-tufted hill,
With the gray skies o'er us,
And the long-drawn chorus
Of a running pack before us
From the find to the kill.
]]>
                    </mx:htmlText>
                </mx:TextArea>

                <mx:TextArea width="100%"
                    height="124"
                    wordWrap="false"
                    color="#0000FF"
                    editable="false">

                    <mx:htmlText>
<![CDATA[Verse 3

Then lead round the mare,
For it's time that we began,
And away with thought and care,
Save to live and be a man,
While the keen air is blowing,
And the huntsman holloing,
And the black mare going
As the black mare can.
]]>
                    </mx:htmlText>
                </mx:TextArea>
            </mx:VDividedBox>
        </mx:HDividedBox>

    </mx:Panel>

    <mx:Label text="Select Colors"
        fontSize="16"/>

    <mx:HBox fontSize="12">

        <mx:Label text="Border"/>
        <mx:ColorPicker id="cp01"/>
        <mx:Label text="Dividers"/>
        <mx:ColorPicker id="cp02"/>
    </mx:HBox>
</mx:Application>
|
Copyright 2009, Richard G. Baldwin. Reproduction in whole or in part in any form or medium without express written permission from Richard Baldwin is prohibited.
Richard has participated in numerous consulting projects and he frequently provides onsite training at the high-tech companies located in and around Austin, Texas. He is the author of Baldwin's Programming Tutorials, which have gained a worldwide following among experienced and aspiring programmers. He has also published articles in JavaPro magazine.
In addition to his programming expertise, Richard has many years of practical experience in Digital Signal Processing (DSP). His first job after he earned his Bachelor's degree was doing DSP in the Seismic Research Department of Texas Instruments. (TI is still a world leader in DSP.) In the following years, he applied his programming and DSP expertise to other interesting areas including sonar and underwater acoustics.
Richard holds an MSEE degree from Southern Methodist University and has many years of experience in the application of computer technology to real-world problems.
-end-