
|
|
Learn how to create a Rich Internet Application consisting of an online test using Flex and custom ActionScript components.
Published: November 5, 2009
Updated: December 14, 2009
Validated with Amaya
by Richard G. Baldwin
Flex Programming Notes # 0120
This tutorial lesson is part of a continuing series dedicated to programming with Adobe Flex.
An earlier lesson titled The Default Application Container provided information on how to get started programming with Adobe's Flex Builder 3. (See Baldwin's Flex programming website.)
What you will learn
In an earlier lesson, titled Defining Custom ActionScript Components you learned how to define and use custom ActionScript components. In this lesson, you will learn how to create a Rich Internet Application consisting of an online test using Flex and custom ActionScript components.
Disclaimer
My primary purpose in publishing this Flex application is to present and explain an example of a Rich Internet Application using Flex and ActionScript. The online test capability embodied in this application is intended to be used for practice tests and self-assessment tests only.
Do not use this application in any scenario where the results of the tests may be used to compute a student's grade. There are many issues, such as security and privacy that must be taken into account when using software that directly affects a student's grade. Those issues were not taken into account in the development of this application.
If you elect to use this application in a scenario that directly affects a student's grade, you do so at your own risk and I won't be responsible for any damages that you or your student may incur.
I recommend that you open another copy of this document in a separate browser window and use the following links to easily find and view the figures and listings while you are reading about them.
I recommend that you also study the other lessons in my extensive collection of online programming tutorials. You will find a consolidated index at www.DickBaldwin.com.
Project file structure
In this lesson, I will present and explain a Flex project named TestGenerator01. Figure 1 shows a screen shot of the project file structure that was captured from the Navigator panel in the Flex Builder 3 IDE.
Figure 1. Project file structure for TestGenerator01.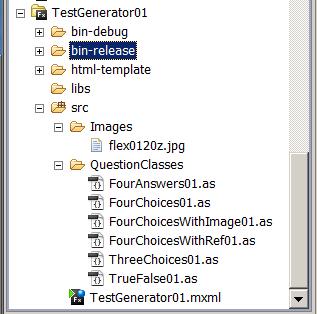
As you can see from Figure 1, this is a relatively complex project involving one MXML file, six ActionScript class files, and one image file.
Up to this point, most of the applications in this series of lessons have been somewhat trivial. Those applications were designed to illustrate programming concepts as opposed to producing a useful application.
In this lesson, I will explain a fairly significant application. In particular, I will show you how to define custom ActionScript components that can be used to create self-grading online tests.
I will also show you how to create an MXML file using MXML templates to create an online test that incorporates the custom ActionScript classes described above.
Running the flex application named TestGenerator01
I encourage you to run the online version before continuing with this lesson.
Program output at startup
Figure 2 shows the program output at startup.
Figure 2. Program output at startup.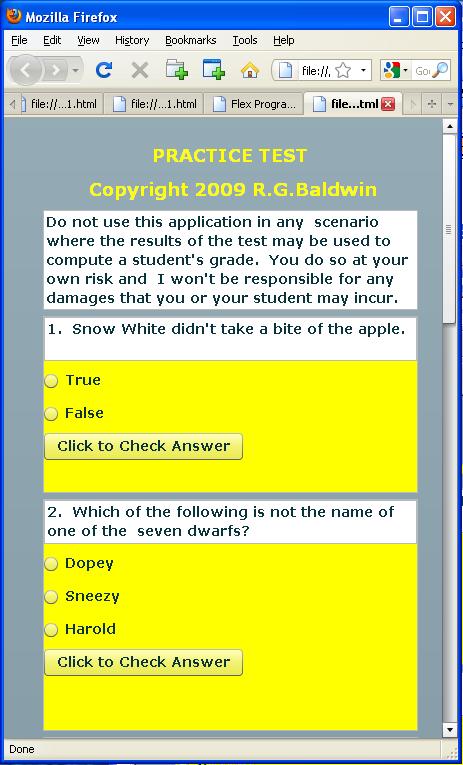
The TestGenerator01 application
As the name of the application implies, this application is designed to make it relatively easy for teachers like myself to create self-grading online practice tests for our students.
Figure 2 shows the first two questions from a sample test.
Output after answering some questions
Figure 3 shows the results of a student having selected answers for the first two questions and having clicked the button after each selection to have the answer checked.
Figure 3. Output after answering some questions.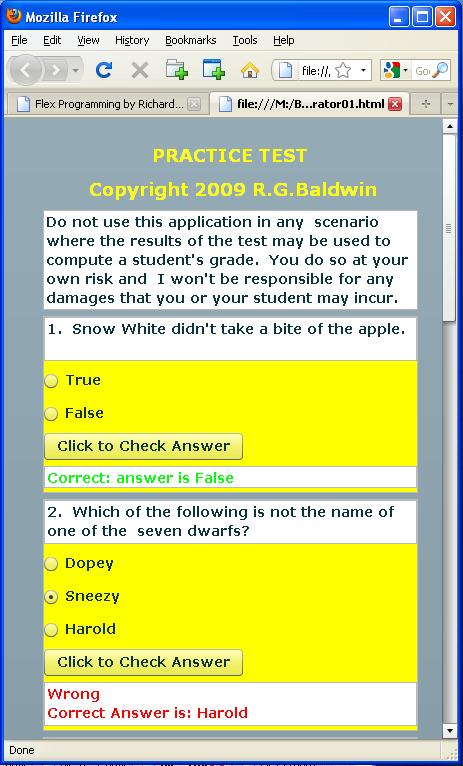
Did the student select the correct answer?
As you can see from the report in Figure 3, the student selected the correct answer for the first question and selected the wrong answer for the second question. The correct answer is provided in the report in all cases.
MXML templates and class files
I will provide MXML templates and corresponding class files for six different styles of questions. A brief description of each style follows along with the name of the file that contains the class definition for that style. I will explain each template and each class definition in detail later in the lesson.
These six styles are provided to illustrate the programming concepts involved in the design of the required custom classes. Once you understand the concepts, you should be able to design classes for many other styles of questions.
I will explain the code in the MXML file and in each of the ActionScript files in fragments. Complete listings of all the files are provided in Listing 33 through Listing 39 near the end of the lesson.
As I discuss this code, I will be switching back and forth between MXML code and ActionScript code. In order to reduce the confusion, I will display the MXML code with this background color and will display the ActionScript code with this background color.
This Flex application is driven by a file named TestGenerator01.mxml.
Beginning of the file named TestGenerator01.mxml
The main application file begins in Listing 1. A complete listing of the application file is provided in Listing 33 near the end of the lesson.
Listing 1. Beginning of
TestGenerator01.mxml.
<?xml version="1.0" encoding="utf-8"?>

<!--TestGenerator01
    This application illustrates the creation of online
    tests using custom ActionScript components.-->

<mx:Application
    xmlns:mx="http://www.adobe.com/2006/mxml"
    xmlns:questionClasses="QuestionClasses.*">

    <mx:Label text="PRACTICE TEST"/>
    <mx:Label text=" Copyright 2009 R.G.Baldwin" />
    <mx:TextArea text="Do not use this application in any
scenario where the results of the test may be used to
compute a student's grade.  You do so at your own risk and
 I won't be responsible for any damages that you or your
student may incur."
    width="375"
    height="100"
    editable="false" />
<!--Don't modify anything above here.-->
|
The questionClasses namespace
The most interesting thing about Listing 1 is the definition of the questionClasses namespace, which points to the folder named QuestionClasses in Figure 1.
This namespace is applied to all of the class files from which the question objects shown in Figure 2 through Figure 10 are instantiated.
MXML template for a True/False question
Listing 2 shows the MXML template for a True/False question such as Question 1 in Figure 3. (This is the template for Question 1.)
Listing 2. MXML template for a True/False
question.
<!--The following is a template for a True/False question. Set answer to "1" for true and "0" for false.--> <questionClasses:TrueFalse01 question= "1. Snow White didn't take a bite of the apple." answer="0"/> |
The template is highlighted in three different colors in Listing 2. The remaining contents of Listing 2 are usage instructions provided in comment form.
The simplest template
This is the simplest of all the templates in this lesson and consists of the following parts:
Mapping from MXML to objects
An MXML element name corresponds to the name of a class from which an object will be instantiated and placed in the container. In Listing 2, the container is the default Application container and the class is named TrueFalse01.
Am MXML attribute name correspond to the name of a property or the name of a style belonging to the object instantiated from the class identified by the element name. In Listing 2, the properties are named question and answer.
MXML attribute values correspond to the values being assigned to the corresponding properties. The values are enclosed in quotation marks in Listing 2.
Beginning of the class file named TrueFalse01
The class file begins with the code fragment in Listing 3. (A complete listing of the class file is provided in Listing 34 near the end of the lesson.)
Listing 3. Beginning of the class file
named TrueFalse01.
package QuestionClasses{
    import flash.events.*;

    import mx.containers.VBox;
    import mx.controls.Button;
    import mx.controls.RadioButton;
    import mx.controls.TextArea;
    import mx.events.FlexEvent;
|
Nothing new here
There is nothing in Listing 3 that is new to this lesson. Listing 3 simply contains a package declaration and a list of import directives that you have learned about in earlier lessons.
Beginning of the class definition for TrueFalse01
The class definition begins in earnest in Listing 4.
Listing 4. Beginning of the class
definition for TrueFalse01.
    public class TrueFalse01 extends VBox{

        private var theQuestion:TextArea;
        private var trueButton:RadioButton;
        private var falseButton:RadioButton;
        private var checkButton:Button;
        private var result:TextArea;

        private var theAnswer:String;
        private var theQuestionNumber:String;

        //Increase the following value to 925 to cause the
        // width of the question area to be full screen
        // width on a 1024x768 screen.
        private var vboxWidth:int = 375;
|
Extends the VBox class
This class extends the VBox class. Therefore, an instance of this class is a VBox object and behaves according to the rules of a VBox object. Among other things, this means that an object of the class is a container that will arrange the objects that it contains vertically with left justification.
Instance variable declarations
Listing 4 declares a large number of private instance variables. Some of them will be used to store property values. Others are working variables that need to be accessible by all of the methods belonging to the object.
Controlling the width of the VBox
I purposely forced the width of the VBox to be narrow enough to fit in this narrow publication format as shown in Figure 2. If you use this class definition in an actual online test, you should probably increase the width of the VBox as described in Listing 4.
Implicit setter methods for question and answer properties
You learned about implicit setter methods that are used to set property values in earlier lessons in this series. Listing 5 defines the implicit setter methods for the properties named question and answer.
Listing 5. Implicit
setter methods for question and answer properties.
public function set question(textIn:String):void{ theQuestion.text = textIn; }//end implicit setter public function set answer(answerIn:String):void{ theAnswer = answerIn; }//end implicit setter |
These two properties correspond to the two attributes having the same names in Listing 2.
Store incoming value in text of TextArea object
The setter method named question stores its incoming value in the text property of a standard TextArea object. This object is referred to by the variable named theQuestion in Listing 4.
A white rectangular area
This TextArea object corresponds to the white rectangular area containing Question 1 in Figure 2. As you can see, storing the incoming value in the text property of the object causes the text in the text area in Figure 2 to match the value of the question attribute in the MXML template in Listing 2.
The property named answer
The setter method named answer in Listing 5 stores its incoming value in one of the variables declared in Listing 4. That value will be retrieved and used later to determine if the person taking the test has selected the correct answer to the question.
Beginning of the constructor
The constructor for the class named TrueFalse01 begins in Listing 6.
Listing 6. Beginning of the constructor.
        public function TrueFalse01(){//constructor

            width=vboxWidth;
            setStyle("borderStyle","solid");
            setStyle("backgroundColor",0xffff00);

            theQuestion = new TextArea();
            theQuestion.editable = false;
            theQuestion.width=vboxWidth - 2;
            addChild(theQuestion);
|
Set the width of the VBox container
The constructor begins by setting one property and two styles belonging to the VBox container. The width property is set using the value of vboxWidth defined in Listing 4, probably by way of an implicit setter named width belonging to the VBox object.
Set the styles
The two styles (borderStyle and backgroundColor) are set by calling explicit setter methods on the VBox object. (Explicit setters, also called accessors, are methods having names that typically begin with the word set. They represent a different way to set properties belonging to an object. You must call the explicit setter named setStyle to set the value of a style in ActionScript.
Listing 6 causes the VBox container for the custom component to have a solid border and a yellow background color as shown in Figure 2.
A new TextArea object
After setting the width and two styles on the VBox object, Listing 6:
The first object added to the VBox
Because this text area is the first object added to the VBox container, it appears as the white rectangular area at the top of the first yellow object in Figure 2. As mentioned earlier, the setter named question sets the text contents of the text area to the value of the question attribute in Listing 2.
Instantiate and configure two RadioButton objects
Listing 7 instantiates the True and False radio buttons shown in Figure 2.
Listing 7. Instantiate and configure two
RadioButton objects.
            trueButton = new RadioButton();
            trueButton.label="True";
            trueButton.groupName="radioButtonGroup";
            addChild(trueButton);

            falseButton = new RadioButton();
            falseButton.label="False";
            falseButton.groupName="radioButtonGroup";
            addChild(falseButton);
|
Assigned to the same button group
The two radio buttons are assigned to the same group so that they will be mutually exclusive. Putting them in the same group means that only one of them can be selected at any given time.
Listing 7 adds the two radio buttons to the container immediately below the white text area containing Question 1 in Figure 2.
Add and configure a Button object to check the answer
Listing 8 instantiates a Button object and adds it to the container immediately below the two radio buttons in Figure 2. This is the button with the label Click to Check Answer.
Listing 8. Add and configure a Button
object to check the answer.
            checkButton = new Button();
            checkButton.label = "Click to Check Answer";
            checkButton.addEventListener(MouseEvent.CLICK,
                                    checkButtonHandler);
            addChild(checkButton);
|
Register an event handler
A click event handler method named checkButtonHandler is registered on this button.
As you will see later, this event handler determines if the student has selected a radio button that matches the correct answer to the question posed in the text area above the radio buttons. Then the event handler posts the result of that determination in another text area below the button as shown in Figure 3.
Result area is initially hidden
The text area where the results are reported is initially hidden as shown in Figure 2 but becomes visible when the student clicks the button to check the answer. If the student has selected the correct radio button, the report is presented in green as shown in Figure 3. If the student has selected the wrong button, the report is presented in red (also shown in Figure 3).
Add the text area for reporting of results
The code in Listing 9 instantiates the TextArea object shown at the bottom of the object for Question 1 in Figure 3 and adds it to the VBox immediately below the Click to Check Answer button.
Listing 9. Add the text area for reporting
of results.
            result = new TextArea();
            result.editable = false;
            result.width=vboxWidth - 2;
            result.height=22;
            result.visible=false;
            addChild(result);
|
As mentioned above, the visible property of this text area is set to false when it is instantiated causing it to be invisible until the student clicks the button to check the answer.
Put the constructor on hold
At this point, I am going to put the discussion of the constructor on hold and explain the method named checkButtonHandler, which is executed each time the student clicks the button labeled Click to Check Answer.
Beginning of the method named checkButtonHandler
The method named checkButtonHandler begins in Listing 10.
Listing 10. Beginning of the method named
checkButtonHandler.
        private function checkButtonHandler(
                                event:MouseEvent):void{
            result.visible=true;

            var correctAnswer:String;

            if(theAnswer == "0"){
                correctAnswer = "False";
            }else{
                correctAnswer = "True";
            }//end else
|
Make the text area visible
The method begins by setting the visible property of the text area at the bottom of the Question 1 object in Figure 3 to true. This causes the text area to become visible as shown by the white rectangle at the bottom of that object in Figure 3.
Establish the correct answer
Then the method establishes the correct answer based on the value provided by the author of the question as the answer attribute in Listing 2. If the value of the answer property is "0", the correct answer is False. Otherwise, the correct answer is True.
Compare with selected radio button and report
Listing 11 compares the correct answer with the selected radio button to determine if the student has selected the correct radio button.
Listing 11. Compare with selected radio
button and report.
            if((correctAnswer=="True"
                                && trueButton.selected) ||
               (correctAnswer=="False"
                                && falseButton.selected)){

                result.setStyle("color",0x00ff00);
                result.text = "Correct: answer is "
                                        + correctAnswer;
            }else{
                result.setStyle("color",0xff0000);
                result.text = "Wrong: Correct answer is "
                                        + correctAnswer;
            }//end else
        }//end checkButtonHandler
|
If the correct radio button was selected before the check button was clicked, the results are reported in green text as shown in Figure 3. Otherwise, the results are reported in red text.
Compute the required height for the VBox container.
One of our objectives is to cause the height of the VBox container to be automatically set to a height that will accommodate all of the components that are added to the container. However, the code to accomplish that can't simply be put in the constructor.
If the code to compute the height is put in the constructor, that code might be executed before all of the child components have been fully constructed, at which point the heights of those components won't yet be known. Instead, it is necessary to defer the computation of the height of the VBox until the VBox and all of its child components have been fully constructed.
Register a creationComplete listener on the VBox
Listing 12 registers an event handler on the VBox object that will be executed when this object "has finished its construction, property processing, measuring, layout, and drawing."
Listing 12. Register a creationComplete
listener on the VBox.
            this.addEventListener(
                mx.events.FlexEvent.CREATION_COMPLETE,
                completeHandler);

        }//end constructor
|
The event handler method named completeHandler will compute and set the height of the VBox based on the sum of the heights of the child components.
The completeHandler method of the TrueFalse01 class
The completeHandler method is shown in its entirety in Listing 13.
Listing 13. The completeHandler method of
the TrueFalse01 class.
        private function completeHandler(
                        event:mx.events.FlexEvent):void{
            this.height =
                theQuestion.height
                + trueButton.height
                + falseButton.height
                + checkButton.height
                + result.height
                + 30;//six spaces per compnent
        }//end complete handler

    }//end class TrueFalse01
}//end package
|
This method computes and sets the height of the VBox container to the sum of the heights of its child components plus six pixels per component to account for the space between components. The result of computing and applying this height is shown for Question 1 in Figure 3.
The end of the class
Listing 12 signals the end of the constructor and Listing 13 signals the end of the class named TrueFalse01.
Where do we go from here?
By now you should have a pretty good idea what this lesson is all about. The previous paragraphs have explained the MXML template and the ActionScript class from which Question 1 in Figure 3 was constructed.
The remainder of the lesson will be dedicated to explaining the remaining five templates and classes from which the remaining five question styles are constructed.
As you may have guessed, there is a lot of similarity between templates and classes for the different styles of questions. Therefore, I will concentrate on the differences and will highlight the code that is new to each new template and class.
The next two classes that I will discuss are so similar that I will lump them together for discussion purposes. I will explain the source code for the class named FourChoices01, which is simply an expanded version of the class named ThreeChoices01. Complete listings of the two classes are provided in Listing 35 and Listing 36 near the end of the lesson.
Multiple-choice questions with three and four choice
The visual representations of objects instantiated from these two classes are shown in Figure 4.
Figure 4. Multiple-choice questions with three and four choices.
"Old-fashioned" multiple-choice questions
These are "old-fashioned" multiple-choice questions where the student is required to select only one of either three or four choices. As before, when the student clicks the button labeled Click to Check Answer, the student's choice is evaluated and the result is shown in either red or green text below the button.
The MXML templates
MXML templates for these two question styles are shown in Listing 14. The first template in listing 14, (highlighted in yellow), is for three choices. The template highlighted in cyan is for four choices.
Listing 14. MXML templates for
multiple-choice questions with three and four choices.
<!--The following is a template for a multiple-choice question with three choices. Set answer to "0" for the first choice, "1" for the second choice, and "2" for the third choice.--> <questionClasses:ThreeChoices01 question= "2. Which of the following is not the name of one of the seven dwarfs?" choice0="Dopey" choice1="Sneezy" choice2="Harold" answer="2" /> <!--The following is a template for a multiple-choice question with four choices. Set answer to "0" for the first choice, "1" for the second choice, "2" for the third choice and "3" for the fourth choice.--> <questionClasses:FourChoices01 question= "3. Which of the following is not the name of one of the seven dwarfs?" choice0="Dopey" choice1="Sneezy" choice2="Happy" choice3="Harold" answer="3" /> |
Very similar templates
As you can see, the template for four choices is like the template for three choices except that it contains information for four choices instead of just three.
A zero-based system
The instructions for these two templates should be pretty clear. However, the one thing that may be worth pointing out is that the value of the answer attribute is specified in a zero-based counting system.
For example, the value of the answer attribute for the first choice in Figure 4 (Dopey) is "0" and the value of the attribute for the fourth choice (Harold in Question 3, Figure 4) is "3". This probably won't seem unusual to people with a programming background but it may seem strange to others.
Beginning of the class named FourChoices01
The class named FourChoices01 begins in Listing 15. As usual, I will explain this class in fragments. A complete listing of the class is provided in Listing 36 near the end of the lesson.
Listing 15. Beginning of the class named
FourChoices01.
//FourChoices01.as
//This file contains a class definition used to
// instantiate multiple-choice question objects for
// questions having four choices.
// Copyright 2009 R.G.Baldwin
package QuestionClasses{
    import flash.events.*;
    import mx.containers.VBox;
    import mx.controls.Button;
    import mx.controls.Label;
    import mx.controls.RadioButton;
    import mx.controls.TextArea;
    import mx.events.FlexEvent;

    public class FourChoices01 extends VBox{
        private var theQuestion:TextArea;
        private var choice00:RadioButton;
        private var choice01:RadioButton;
        private var choice02:RadioButton;
        private var choice03:RadioButton;
        private var checkButton:Button;
        private var result:TextArea;

        private var theAnswer:String;//numeric string
        private var correctAnswer:String;//actual string

        //Increase the following value to 925 to cause the
        // width of the question area to be full screen
        // width on a 1024x768 screen.
        private var vboxWidth:int = 375;
|
Very similar to the previous class
Even though this class declares a few more variables, this file begins in a way that is very similar to the ActionScript file for TrueFalse01.as discussed earlier. (See Listing 3 and Listing 4.)
Implicit setter methods for FourChoices01
The implicit setter methods for this class are shown in Listing 16.
Listing 16. Implicit setter methods for
FourChoices01.
public function set question(textIn:String):void{ theQuestion.text = textIn; }//end implicit setter public function set answer(answerIn:String):void{ theAnswer = answerIn; }//end implicit setter public function set choice0(choice:String):void{ choice00.label=choice; }//end implicit setter public function set choice1(choice:String):void{ choice01.label=choice; }//end implicit setter public function set choice2(choice:String):void{ choice02.label=choice; }//end implicit setter public function set choice3(choice:String):void{ choice03.label=choice; }//end implicit setter |
More implicit setter methods than before
As you may have surmised from the template in Listing 14, more implicit setter methods are required for this class than for the class named TrueFalse01 (see Listing 5). This is because the author of the test must provide a label for each of the four choices. (Compare the setter method names in Listing 16 with the attribute names in Listing 14.) However, there is nothing new or different about the implicit setter methods in Listing 16.
The constructor for FourChoices01
The constructor for this class is shown in its entirety in Listing 17.
Listing 17. The constructor for
FourChoices01.
        public function FourChoices01(){//constructor

            width=vboxWidth;
            setStyle("borderStyle","solid");
            setStyle("backgroundColor",0xffff00);

            theQuestion = new TextArea();
            theQuestion.editable = false;
            theQuestion.width=vboxWidth - 2;
            addChild(theQuestion);

            choice00 = new RadioButton();
            choice00.groupName="radioButtonGroup";
            addChild(choice00);

            choice01 = new RadioButton();
            choice01.groupName="radioButtonGroup";
            addChild(choice01);

            choice02 = new RadioButton();
            choice02.groupName="radioButtonGroup";
            addChild(choice02);

            choice03 = new RadioButton();
            choice03.groupName="radioButtonGroup";
            addChild(choice03);

            checkButton = new Button();
            checkButton.label = "Click to Check Answer";
            checkButton.addEventListener(MouseEvent.CLICK,
                                    checkButtonHandler);
            addChild(checkButton);

            result = new TextArea();
            result.editable = false;
            result.width=vboxWidth - 2;
            result.visible=false;
            addChild(result);

            //Register an event listener that will be
            // executed when this object has been fully
            // constructed. It will set the height of
            // the VBox based on the sum of the heights
            // of the components.
            this.addEventListener(
                mx.events.FlexEvent.CREATION_COMPLETE,
                completeHandler);

        }//end constructor
|
Differences relative to TrueFalse01
The main differences between this constructor and the constructor for the class named TrueFalse01 discussed earlier are:
Otherwise, the two constructors are essentially the same, including the registration of a click event handler named checkButtonHandler on the button shown in Figure 4 and the registration of a creationComplete event handler named completeHandler on the VBox container.
Beginning of the method named checkButtonHandler
This event handler method begins in Listing 18.
Listing 18. Beginning of the method named
checkButtonHandler.
        private function checkButtonHandler(
                                event:MouseEvent):void{
            result.visible=true;
            if(theAnswer == "0"){
                correctAnswer = choice00.label;
            }else if(theAnswer == "1"){
                correctAnswer = choice01.label;
            }else if(theAnswer == "2"){
                correctAnswer = choice02.label;
            }else{
                correctAnswer = choice03.label;
            }//end else
|
The main purpose of the code in Listing 18 is to establish the correct answer and store it in the variable named correctAnswer declared in Listing 15.
Similar to previously-discussed code
The code in Listing 18 is essentially the same as the code in Listing 10 discussed earlier except that:
Compare correct answer with selected radio button and report
Listing 19 compares the selected radio button with the answer specified by the question's author in the MXML code in Listing 14 to determine if the student has selected the correct answer.
Listing 19. Compare with selected radio
button and report.
            if((theAnswer=="0" && choice00.selected) ||
               (theAnswer=="1" && choice01.selected) ||
               (theAnswer=="2" && choice02.selected) ||
               (theAnswer=="3" && choice03.selected)){

                result.setStyle("color",0x00ff00);
                result.text =
                            "Correct\nCorrect Answer is: "
                                         + correctAnswer;
            }else{
                result.setStyle("color",0xff0000);
                result.text = "Wrong\nCorrect Answer is: "
                                         + correctAnswer;
            }//end else
        }//end checkButtonHandler
|
Report the results of the comparison
Listing 19 also reports the results of the comparison in the text box below the button as shown in Figure 4. If the student selected the correct radio button, the report is presented in green text. Otherwise, it is presented in red text.
The completeHandler method for FourChoices01
The method named completeHandler is shown in its entirety in Listing 20.
Listing 20. The completeHandler method
for FourChoices01.
        private function completeHandler(
                        event:mx.events.FlexEvent):void{
            //Set the height equal to the sum of the
            // heights of the components plus six
            // pixels per component to account for the
            // space between components.
            this.height =
                theQuestion.height
                + choice00.height
                + choice01.height
                + choice02.height
                + choice03.height
                + checkButton.height
                + result.height
                + 42;//six spaces per compnent
        }//end complete handler

    }//end class FourChoices01
}//end package
|
Executed when the VBox has completed construction
As was the case for the class named TrueFalse01, this method is executed when the VBox that contains the user interface for the multiple-choice question "has finished its construction, property processing, measuring, layout, and drawing."
Set the height of the VBox container
The purpose of the method is to set the height of the VBox container based on the individual heights of the components contained in the container.
The code in Listing 20 is essentially the same as the previously discussed code in Listing 13 except that there are more components whose heights must be added to compute the required height of the VBox.
The end of the class
Listing 20 signals the end of the class named FourChoices01.
The visual manifestation of an object instantiated from this class is shown in Figure 5. An object of this class is a question style that provides a multiple-choice question with four mutually exclusive choices and a reference to a URL of the author's choice.
Figure 5. Multiple choice question with four choices and a reference.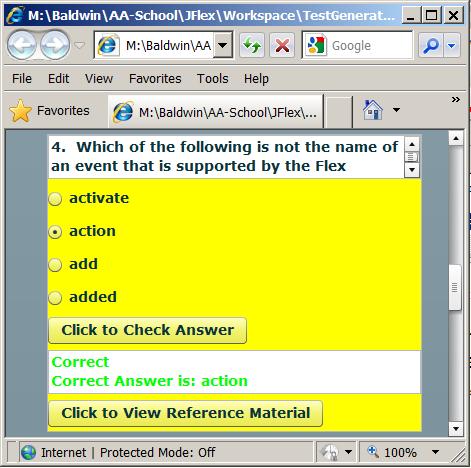
Open the reference in another window
When the bottom button in Figure 5 is clicked, the reference that is linked to the button opens up in a new browser window as shown in Figure 6.
Figure 6. Reference item opened in a new browser window.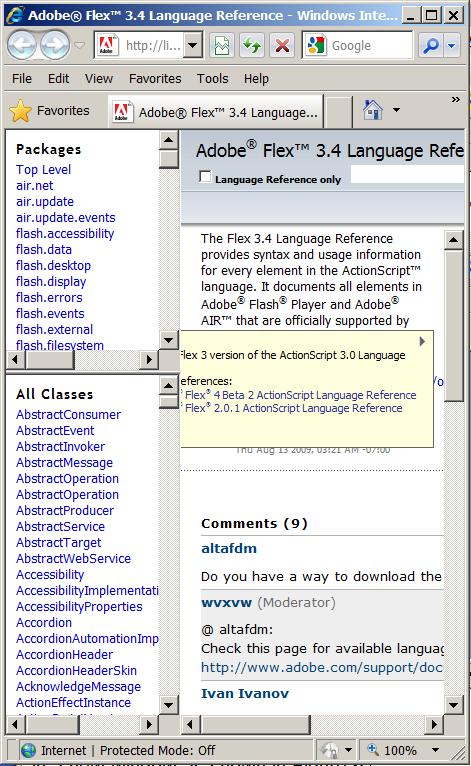
Can link to a variety of other media
The example that I will present in this lesson links the button at the bottom of Figure 5 to a web page on the Adobe help site as shown in Figure 6. However, the button can be linked to any media that is acceptable as a URL by the parameterized constructor for the URLRequest class. (Note that some security restrictions may apply.)
Could link to an image file
For example, the button could be linked to an image file causing the image to be opened in a new browser window when the button is clicked. An example of linking to an image is shown in Figure 7.
Figure 7. Result of linking the Reference button to an image file.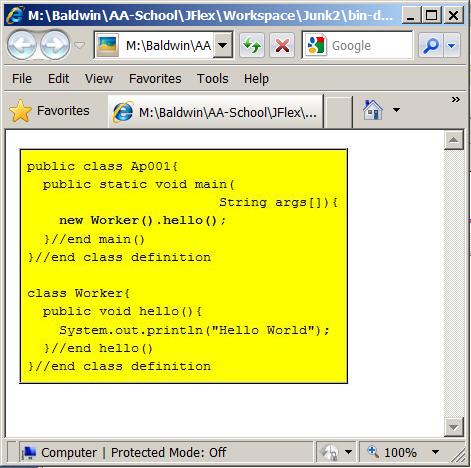
Although I didn't show the code for doing this, Figure 7 was produced by linking the button at the bottom of Figure 5 to the image file named flex0120z.jpg located in the Images folder in Figure 1. All that is required to accomplish this is to set the value of the referenceURL attribute in the template to "Images/flex0120z.jpg".
The MXML template for the FourChoicesWithRef01 class
Listing 21 shows the MXML template that can be used with the FourChoicesWithRef01 class to produce a question object like that shown in Figure 5.
Listing 21. The MXML template for the
FourChoicesWithRef01 class.
<!--The following is a template for a multiple-choice
question with four choices and a URL reference to
study material for the correct answer. Set answer
to "0" for the first choice, "1" for the second
choice, "2" for the third choice and "3" for the
fourth choice. Set referenceURL to the address of
a web page containing reference material for the
question.-->

<questionClasses:FourChoicesWithRef01
question=
"4.  Which of the following is not the name of an event
that is supported by the Flex CheckBox component?"
choice0="activate"
choice1="action"
choice2="add"
choice3="added"
answer="1"
referenceURL=
"http://livedocs.adobe.com/flex/3/langref/index.html"
/>
|
Similar to previous template
If you compare the template in Listing 21 with the template highlighted in cyan in Listing 14, you will see that it differs only with respect to the addition of the referenceURL attribute at the bottom.
As I mentioned earlier, you can set the value of the referenceURL attribute to any string value that is acceptable as a URL by the parameterized constructor for the URLRequest class. In this case, the specified value of the referenceURL attribute in Listing 21 links the button at the bottom of Figure 5 to a specific page on the Adobe website.
Very similar to the FourChoices01 class
The class definition for the class named FourChoicesWithRef01 is very similar to the previously-discussed class named FourChoices01. Therefore, I am going to concentrate only on the differences between the two.
Abbreviated class definition for FourChoicesWithRef01
Listing 22 shows an ActionScript listing for this class where only the code that is different from FourChoices01 is shown. The remaining code has been deleted for brevity. You will find a complete listing of this class in Listing 37 near the end of the lesson.
Listing 22. Abbreviated class definition
for FourChoicesWithRef01.
package QuestionClasses{

//Code deleted for brevity.

    import flash.net.URLRequest;
    import flash.net.navigateToURL;
//Code deleted for brevity.

    public class FourChoicesWithRef01 extends VBox{
//Code deleted for brevity.

        private var refButton:Button;
        private var theReferenceURL:String;
//Code deleted for brevity.

        public function set referenceURL(
                                    refURL:String):void{
            theReferenceURL = refURL;
        }//end implicit setter

        public function FourChoicesWithRef01(){
//Code deleted for brevity.

            refButton = new Button();
            refButton.label =
                    "Click to View Reference Material";
            refButton.addEventListener(MouseEvent.CLICK,
                                    refButtonHandler);
            addChild(refButton);
//Code deleted for brevity.

        }//end constructor
//Code deleted for brevity.

        private function refButtonHandler(
                                event:MouseEvent):void{
            var request:URLRequest =
                        new URLRequest(theReferenceURL);
            try{
                navigateToURL(request);
            }catch (e:Error){
                Alert.show(e as String,"Error", Alert.OK);
            }//end catch block
        }//end refButtonHandler
//Code deleted for brevity.

    }//end class FourChoicesWithRef01
}//end package
|
Material shown in Listing 22
Scanning Listing 22 from top to bottom, we see:
What is different here?
The only thing that is different in Listing 22 is some of the code in the method named refButtonHandler.
Connecting to the reference URL
As you can see in Listing 22, all that is necessary to connect to the referenced URL is to:
The navigateToURL function
Note that the navigateToURL function is a global (or at least quasi-global) function in the flash.net package. Therefore, it was necessary for me to import the function in Listing 22. According to the documentation, this function "Opens or replaces a window in the application that contains the Flash Player container (usually a browser)."
An exception handler
The remaining code in the refButtonHandler method is intended to alert the user if the connection attempt fails. I will leave it as an exercise for the student to investigate the show method of the Alert class on her own.
The end of the class named FourChoicesWithRef01
Listing 22 signals the end of the class.
The visual manifestation of an object instantiated from this class (when it first appears on the screen) is shown as Question 5 at the top of Figure 8. An object of this class is a question style that provides a multiple-choice question with four mutually exclusive choices and an image embedded in the question. (The image in Figure 8 is the Java source code inside the box.)
Figure 8. Question with image before resizing.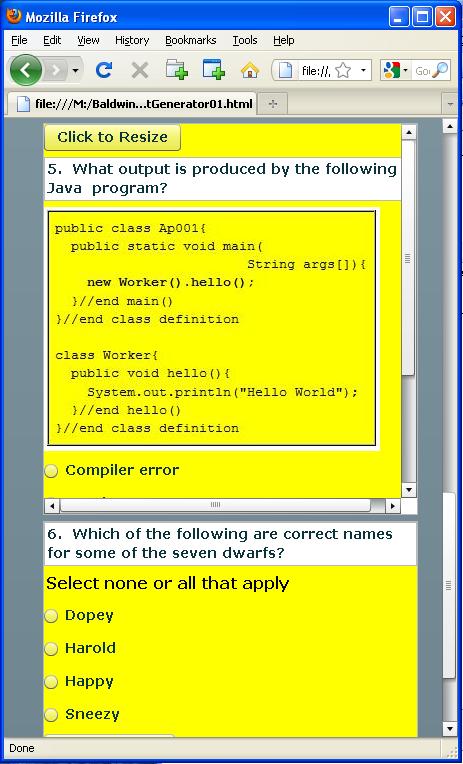
Image size is an issue
Embedding images into the presentation of the question presents some interesting challenges due to size considerations. Two things are at play here.
Automatic scroll bars
Note the scroll bars on Question 5 in Figure 8. The vertical scroll bar was created automatically because the total height of all the components (including the image) was greater than the height of the VBox container. When the vertical scroll bar appeared, it consumed part of the available width causing the remaining width to be less than the width of the text area containing the question. This in turn caused a horizontal scroll bar to appear.
Scroll bars may not be the best solution
Obviously, the scroll bars can be used to view the entire question object, but that may not be the best approach for someone who is taking a test. As a result, I elected to construct the question object with a default size and to provide a resize button by which the student can cause the question object to be resized to accommodate the image along with all of the other components.
Question with image after resizing
The resize button is shown at the top of Figure 8 with the label Click to Resize. Figure 9 shows Question 5 and part of Question 6 after the student clicks the resize button and also clicks the button labeled Click to Check Answer.
Figure 9. Question with image after resizing.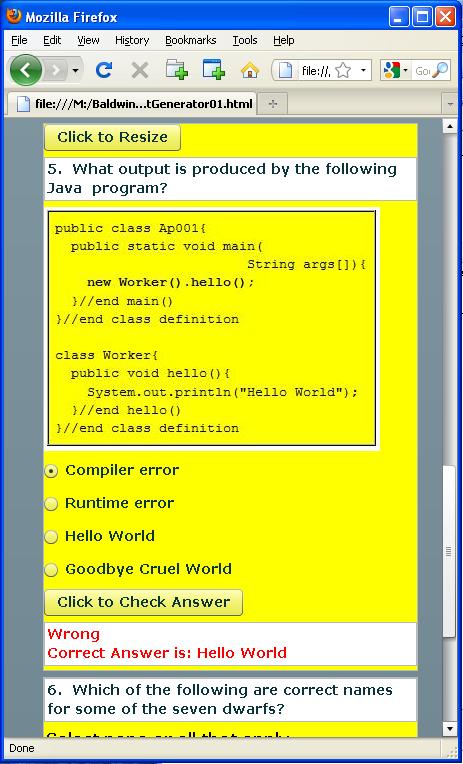
Everything fits
As you can see in Figure 9, the height of the VBox container has been increased, the scroll bars are gone from the question object, and all of the components in the question object are clearly visible.
Also adjusts the width
Although it is not shown in Figure 9, if the width of the image is greater than the current width of the VBox container, the width of the container will also be increased to accommodate the width of the image.
The MXML template for the FourChoicesWithImage01 class
Listing 23 shows the MXML template that can be used with the FourChoicesWithImage01 class to produce a question object like that shown in Figure 8 and Figure 9.
Listing 23. The MXML template for the
FourChoicesWithImage01 class.
<!--The following is a template for a multiple-choice question with four choices and an image. Images of types JPEG, PNG, and GIF are supported. Put the image file in a folder named Images that is a child of the folder named src. Set imageName to the name of the image file. Set answer to "0" for the first choice, "1" for the second choice, "2" for the third choice and "3" for the fourth choice.--> <questionClasses:FourChoicesWithImage01 question= "5. What output is produced by the following Java program?"imageName="flex0120z.jpg"choice0="Compiler error" choice1="Runtime error" choice2="Hello World" choice3="Goodbye Cruel World" answer="2" /> |
Similar to previous template
As before, if you compare the template in Listing 23 with the template highlighted in cyan in Listing 14, you will see that it differs only with respect to the addition of the imageName attribute shown highlighted in cyan in Listing 23.
As indicated in the instructions in Listing 23, the image file of type JPEG (jpg), PNG, or GIF should be placed in the folder named Images as shown in Figure 1. Then the value of the imageName attribute should be set to the name of the image file without regard for the path to the file. (The path to the Images folder is handled in the class definition.)
Very similar to the FourChoices01 class
The class definition for the class named FourChoicesWithImage01 is very similar to the previously-discussed class named FourChoices01. Therefore, as I did before, I am going to discuss only the differences between the two classes.
Abbreviated class definition for FourChoicesWithImage01
Listing 24 shows an ActionScript listing for this class where only the code that is different from the FourChoices01 class is shown. The remaining code has been deleted for brevity. You will find a complete listing of the FourChoicesWithImage01 class in Listing 38 near the end of the lesson.
Listing 24. Abbreviated class definition
for FourChoicesWithImage01.
package QuestionClasses{
//Code deleted for brevity.

    import mx.controls.Image;
//Code deleted for brevity.

    public class FourChoicesWithImage01 extends VBox{
        private var resizeButton:Button;
        private var theImage:Image;
        private var theImageName:String;
//Code deleted for brevity.

        public function set imageName(image:String):void{
            theImageName = image;
        }//end implicit setter


        //Begin constructor
        public function FourChoicesWithImage01(){

//Code deleted for brevity.

            resizeButton = new Button();
            resizeButton.label = "Click to Resize";
            resizeButton.addEventListener(
                                    MouseEvent.CLICK,
                                    resizeButtonHandler);
            addChild(resizeButton);
//Code deleted for brevity.

            theImage = new Image();
            addChild(theImage);
//Code deleted for brevity.

            //Register an event listener that will be
            // executed when this object has been fully
            // constructed.
            this.addEventListener(
                mx.events.FlexEvent.CREATION_COMPLETE,
                completeHandler);

        }//end constructor
//Code deleted for brevity.

        private function completeHandler(
                        event:mx.events.FlexEvent):void{
            //Put code in here that suffers from timing
            // problems during the construction process.
            // This mainly involves code that refers to
            // instance variable values that are set by
            // an implicit setter, such as theImageName.
            // If you don't delay the execution of such
            // code, it often executes while the instance
            // variable still contains null.
            theImage.source = "Images/" + theImageName;

            //Set the height equal to the sum of the
            // heights of the components plus six
            // pixels per component to account for the
            // space between components plus 100 pixels
            // to partially account for the height of
            // the image. This can be changed later by
            // clicking the resize button.
            this.height =
                resizeButton.height
                + theQuestion.height
                + choice00.height
                + choice01.height
                + choice02.height
                + choice03.height
                + checkButton.height
                + result.height
                + 142;//six spaces per compnent

        }//end complete handler

        private function resizeButtonHandler(
                                event:MouseEvent):void{

            //Set the height equal to the sum of the
            // heights of the components plus six
            // pixels per component to account for the
            // space between components. If the image
            // width is greater than the width of the
            // VBox, change the width of the VBox and
            // the TextArea containing the question to
            // match the width of the image.
            this.height =
                resizeButton.height
                + theQuestion.height
                + theImage.height
                + choice00.height
                + choice01.height
                + choice02.height
                + choice03.height
                + checkButton.height
                + result.height
                + 54;//six spaces per compnent

            if(theImage.width > vboxWidth){
                this.width = theImage.width;
                theQuestion.width = theImage.width;
            }//end if

        }//end resizeButtonHandler

    }//end class FourChoicesWithImage01
}//end package
|
Scanning Listing 24 from top to bottom, we see:
What is new here?
All of what you see in Listing 24 is different from the class named FourChoices01 but much of it is not new to the discussion of this class. I will explain only those things about Listing 24 that are new to the discussion of this class. I have highlighted those items in the above list.
The implicit setter method named imageName
There is nothing really new about this implicit setter, but the circumstances surrounding its use are problematic. The name of the image file is provided by the value of the attribute named imageName in the MXML template in Listing 23, causing it to be passed as a parameter to the implicit setter. The setter stores the incoming name of the image file in the instance variable named theImageName. This can lead to a timing problem.
A timing problem
The problem is that the name of the image file may not have been stored in the instance variable by the time the Image object is instantiated a little further down in the constructor. In that case, the instance variable will contain null and an attempt to connect the Image object to the image file will fail. Therefore, in this case, it is advisable to avoid connecting the Image object to the image file when the Image object is instantiated. Instead, it is better to defer making that connection until the VBox object fires a creationComplete. event.
The completeHandler method
As you learned earlier, the completeHandler method is executed when the VBox container fires its creationComplete. event. By this point in time, the attribute value from Listing 23 should have been stored in the instance variable named theImageName.
Set the source property of the Image object
For purposes of this discussion, the most important statement in the completeHandler method in Listing 24 is the statement highlighted in magenta. This statement assigns the name of the image file (including the path to the Images folder) to the source property of the Image object. This causes the actual image to be extracted from the file and displayed in the browser window.
Image size may not be available
However, some time may be required for the image to actually load and for its size to be established. Therefore, some time must pass before the size of the image can be used to establish the required size for the VBox to contain the image and all of the other components.
II elected to set the height of the VBox to a default value that assumes an image height of 100 pixels and to allow the student to click the resize button to set the correct size of the VBox later. The code near the end of the completeHandler method sets the default height of the VBox.
The resizeButtonHandler method
The resizeButtonHandler method in Listing 24 is executed when the student clicks the resize button at the top of Figure 8. It is assumed that by the time the student clicks the resize button, the image will have been loaded and displayed. Hence, the height and width properties of the Image object will contain the correct size.
The code in the resizeButtonHandler method uses the height of the image to adjust the height of the VBox so that it will accommodate the image and all of the other components.
Then the method checks to determine if the width of the image is greater than the current width of the VBox. If so, it also adjusts the width of the VBox so that it will accommodate the width of the image.
The end of the class
Listing 24 also signals the end of the class named FourChoicesWithImage01.
The visual manifestation of an object instantiated from this class is shown in Figure 10. An object of this class is a question style that is completely different from all of the other question styles in this lesson. In particular, all of the other question styles require the student to select one and only one answer. This question style allows the student to select none, one, or more of the answers that apply to the question.
Figure 10. Question style for multiple answers.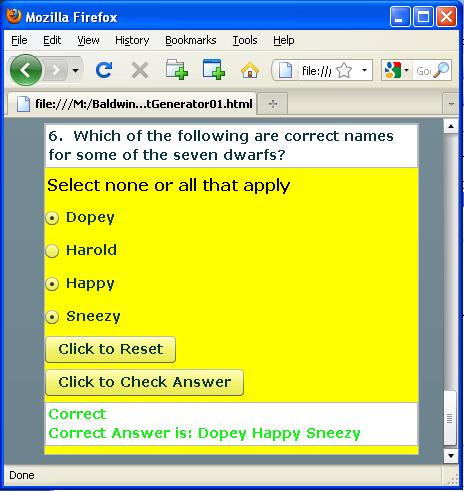
The MXML template for the class named FourAnswers01
Listing 23 shows the MXML template that can be used with the FourAnswers01 class to produce a question object like that shown in Figure 10.
Listing 25. The MXML template for the
class named FourAnswers01.
<!--The following is a template for a multiple-choice
question with four choices where it is possible for
a combination of none, one, or more than one of the
choices to be the correct answer.
List the correct choices from 0 through 3 in quotation
marks separated by commas in the value of the answer
attribute.-->

<questionClasses:FourAnswers01
question=
"6.  Which of the following are correct names for some
of the seven dwarfs?"
choice0="Dopey"
choice1="Harold"
choice2="Happy"
choice3="Sneezy"
answer="0,2,3"
/>
|
One major difference
Insofar as the MXML template is concerned, this question is no more complex than the others. The one difference is that it may be necessary to provide multiple answers as a comma-separated list of answer numbers as the value of the answer attribute.
If only one answer applies, no comma is required (but the inclusion of a comma in the list won't cause a problem).
If none of the answers apply, the value of the answer attribute should be set to a pair of quotation marks with nothing in between.
Grading criteria
The answer provided by the student will be deemed incorrect unless all of the answers in the list and only the answers in the list are selected by the student in the user interface of Figure 10. (Note that the sample template shown in Listing 25 matches the user interface display shown in Figure 10.)
More complicated than the other classes
Many aspects of this class are similar to the class named FourChoices01. However, in some respects, the programming logic for this class is more complicated than the programming logic for the other classes that I have discussed.
As I have done for the past several classes, I will present and explain an abbreviated version of the class definition. In this case, however, I will break the event handler methods out into separate listings and explain them in somewhat more detail.
Partial abbreviated class definition for FourAnswers01
Listing 26 shows an abbreviated version of the class definition without the event handler methods. (The event handler methods will begin in Listing 27.) A complete listing of the source code for the class named FourAnswers01 is provided in Listing 39 near the end of the lesson.
Listing 26. Partial abbreviated class
definition for FourAnswers01.
package QuestionClasses{
//Import directives deleted for brevity.

    public class FourAnswers01 extends VBox{

        private var resetButton:Button;
        private var instruction:Label;
//Variable declarations deleted for brevity.

//Implicit setter methods deleted for brevity.

        public function FourAnswers01(){//constructor

//Code deleted for brevity.

            instruction = new Label();
            instruction.text =
                        "Select none or all that apply";
            addChild(instruction);

            //Note that the buttons are not part of the
            // same button group. Therefore, it is
            // possible to select more than one at a
            // time.
            choice00 = new RadioButton();
            choice00.groupName="00";
            addChild(choice00);

            choice01 = new RadioButton();
            choice01.groupName="01";
            addChild(choice01);

            choice02 = new RadioButton();
            choice02.groupName="02";
            addChild(choice02);

            choice03 = new RadioButton();
            choice03.groupName="03";
            addChild(choice03);

            resetButton = new Button();
            resetButton.label = "Click to Reset";
            resetButton.addEventListener(MouseEvent.CLICK,
                                    resetButtonHandler);
            addChild(resetButton);

//Code deleted for brevity.

        }//end constructor

//Event handlers moved to Listing 27 and beyond.
|
Material shown in Listing 26
Scanning Listing 26 from top to bottom, we see:
Event handler method named resetButtonHandler
The event handler method named resetButtonHandler is registered on the button shown in Figure 10 with the label "Click to Reset".
Listing 27. Event handler method named
resetButtonHandler.
        private function resetButtonHandler(
                                event:MouseEvent):void{
            choice00.selected = false;
            choice01.selected = false;
            choice02.selected = false;
            choice03.selected = false;
        }//end resetButtonHandler
|
The purpose of this event handler is to clear all four of the radio buttons to the unselected state in order to allow the student to change her mind and start over if she has already selected one or more radio buttons. The code in Listing 27 is straightforward and simply sets the selected property of each radio button to false.
Event handler method named completeHandler
Although it isn't shown in Listing 26, the event handler method named completeHandler is executed when the VBox container fires a creationComplete event. That event handler is shown in its entirety in Listing 28.
Listing 28. Event handler method named
completeHandler.
        private function completeHandler(
                        event:mx.events.FlexEvent):void{

            //Set the appearance of the instruction.
            instruction.setStyle("color",0x000000);
            instruction.setStyle("fontSize",16);

            //Set the height equal to the sum of the
            // heights of the components plus six
            // pixels per component to account for the
            // space between components.
            this.height =
                theQuestion.height
                + instruction.height
                + choice00.height
                + choice01.height
                + choice02.height
                + choice03.height
                + resetButton.height
                + checkButton.height
                + result.height
                + 54;//six spaces per compnent
        }//end complete handler
|
Adjust the height of the VBox object
As has been the case in earlier classes, the code in Listing 28 computes and adjusts the overall height of the VBox container on the basis of the individual heights of the components contained in the VBox. However, that is not new and is the not the reason that I am discussing the event handler here.
Need to set the instruction style
The MXML file shown in Listing 33 contains an mx:Style element (near the bottom) that sets the style of objects of type Label to bold and yellow with a font size of 18 point. This is what causes the yellow text at the top of Figure 2 to be displayed in that style. Because that style is set in the MXML file, it is applied to all Label objects in the entire application unless those Label objects provide style settings that override that style.
This class waits until the construction of the VBox is complete and then executes the two statements highlighted in yellow in Listing 28 to override the style that is specified in the MXML file. This produces an instruction label with the style shown in Figure 10.
The event handler named checkButtonHandler
The event handler named checkButtonHandler is registered on the button shown in Figure 10 with the label "Click to Check Answer". As has been the case in the other classes discussed in this lesson, the purpose of the event handler is to determine if the student has selected the radio button(s) that correctly answer the question.
More difficult than before
Accomplishing that task in this class is more difficult than has been the case in the previous classes. In those classes, it was assumed that there was always one and only one correct answer. That was fairly easy to deal with. In this class, it is assumed that the correct answer may involve selecting none, one, or more of the four radio buttons shown in Figure 10.
Typographical errors
Another issue that arises in this class is the increased probability that the author of the question will make a typographical error when specifying the correct answer as the value of the answer attribute in Listing 25.
For example, the author may leave out a comma, may insert an extra comma, may insert a space, may specify the radio buttons in something other than ascending order, etc. The code in this event handler attempts to guard against such typographical errors.
Interpreting the answer attribute value
The code is designed to properly interpret the value of the answer attribute so long as it contains some combination of none, some, or all of the characters "0", "1", "2", and "3" in any order, regardless of other extraneous characters (such as space characters) that may have been inserted. (Since I can't test the code against all possible typographical errors, only time will tell if I was successful at achieving that goal.)
Several different approaches are available
There are a variety of ways to write the code to accomplish the task assigned to this event handler. The approach that I elected may not be the most elegant, but hopefully it won't be too difficult to understand.
Beginning of the event handler named checkButtonHandler
The method named checkButtonHandler begins in Listing 29.
Listing 29. Beginning of the event
handler named checkButtonHandler.
        private function checkButtonHandler(
                                event:MouseEvent):void{

            //Create an array of Boolean values that
            // matches the currently selected set of
            // radio buttons.
    	    var buttonArray:Array = [choice00.selected,
    	                             choice01.selected,
    	                             choice02.selected,
    	                             choice03.selected];

    	    //Create an array of Boolean values that will
    	    // be used to store information about the
    	    // correct answer.
    	    var answerArray:Array = [false,false,
    	                             false,false];
|
Create a pair of four-element arrays
Listing 29 creates a pair of four-element arrays capable of storing data of type Boolean. The array referred to by buttonArray is populated with the current state of the four radio buttons shown in Figure 10.
The array referred to by answerArray will be populated based on the values provided by the author of the question for the answer attribute in Listing 25.
Compare the contents of the two arrays
Eventually, the contents of the two arrays will be tested for a match to determine if the student has selected the correct radio buttons.
Whether correct or not, the event handler will also construct and display a string containing the correct answer as shown in green at the bottom of Figure 10.
Parse the value from the MXML answer attribute
This class uses an implicit setter method to store the value of the answer attribute in Listing 25 in an instance variable of type String named theAnswer. Listing 30 parses that string eliminating all characters other than "0", "1", "2", and "3".
Listing 30. Parse the value from the MXML
answer attribute.
    	    for(var cnt:int = 0;cnt < theAnswer.length;
    	                                         cnt++){
    	    	if((theAnswer.charCodeAt(cnt) >= 48) &&
    	            (theAnswer.charCodeAt(cnt) <= 51)){

    	    	    answerArray[
    	    	       theAnswer.charCodeAt(cnt) - 48]
    	    	                                   = true;
    	    	}//end if
    	    }//end for loop
|
Discard unwanted characters
Listing 30 calls the charCodeAt method of the String class to get the Unicode value for each character in the string. The numeric Unicode values for the characters "0" through "3" are 48 through 51. This knowledge is used to discard all characters whose Unicode value is outside the range 48 through 51.
Set Boolean values in answerArray
Listing 30 uses the characters that are not discarded in the parsing process to set true Boolean values in the answerArray elements for those elements whose index matches the implied numeric value of the numeric characters.
The implied numeric value
The characters "0" through "3" are converted to the numeric values 0 through 3 by subtracting the constant 48 from the Unicode value of the character. Those values are used as indices to store a true value in each element in the array referred to byanswerArray whose index matches the implied value of one of the characters in the range from "0" through "3".
At this point, the array referred to by answerArray contains true and false values that match the value of the answer attribute in Listing 25.
Construct a string containing the correct answer
Listing 31 uses the information in the array referred to by answerArray to select labels from the radio buttons to construct a string containing the correct answer as shown in green at the bottom of Figure 10.
Listing 31. Construct a string containing
the correct answer.
            result.visible=true;

            correctAnswer = "";
            if(answerArray[0] == true){
                correctAnswer = correctAnswer +
                                    choice00.label + " ";
            }//end if
            if(answerArray[1] == true){
                correctAnswer = correctAnswer +
                                    choice01.label + " ";
            }//end if
            if(answerArray[2] == true){
                correctAnswer = correctAnswer +
                                    choice02.label + " ";
            }//end if
            if(answerArray[3] == true){
                correctAnswer = correctAnswer +
                                    choice03.label + " ";
            }//end if
|
Compare student selections with the correct answer
Listing 32 compares the contents of the two arrays that were created in Listing 29 to determine if they match on an element by element basis.
Listing 32. Compare student selection
with the correct selection.
            //Compare selected radio buttons with the
            // answer to determine if the given answer
            // is correct.
            if(answerArray[0] == buttonArray[0]
                && answerArray[1] == buttonArray[1]
                && answerArray[2] == buttonArray[2]
                && answerArray[3] == buttonArray[3]){

                result.setStyle("color",0x00ff00);
                result.text =
                            "Correct\nCorrect Answer is: "
                                         + correctAnswer;
            }else{
                result.setStyle("color",0xff0000);
                result.text = "Wrong\nCorrect Answer is: "
                                         + correctAnswer;
            }//end else

        }//end checkButtonHandler

    }//end class FourAnswers01
}//end package
|
If the array contents match...
If the contents of all four corresponding elements in the two arrays are equal, the color is set to green and a Correct message is displayed along with the correct answer in the text area at the bottom of Figure 10.
If they don't match...
Otherwise, the color is set to red and a Wrong message is displayed along with the correct answer in the same text area.
The end of the class
Listing 32 signals the end of the class named FourAnswers01, which is the final class to be discussed in this lesson.
I encourage you to run the online version of this program. Then copy the code from Listing 33 through Listing 39. Use that code to create a Flex project. Compile and run the project. Experiment with the code, making changes, and observing the results of your changes. Make certain that you can explain why your changes behave as they do.
In this lesson, you learned how to create a Rich Internet Application consisting of an online test using Flex and custom ActionScript components.
Listing 33. MXML code for
TestGenerator01.
<?xml version="1.0" encoding="utf-8"?>

<!--TestGenerator01
    This application illustrates the creation of online
    tests using custom ActionScript components.-->

<mx:Application
    xmlns:mx="http://www.adobe.com/2006/mxml"
    xmlns:questionClasses="QuestionClasses.*">
    <mx:Label text="PRACTICE TEST"/>
    <mx:Label text=" Copyright 2009 R.G.Baldwin" />
    <mx:TextArea text="Do not use this application in any
scenario where the results of the test may be used to
compute a student's grade.  You do so at your own risk and
 I won't be responsible for any damages that you or your
student may incur."
    width="375"
    height="100"
    editable="false" />
<!--Don't modify anything above here.-->


<!--Insert one block of MXML code in this area for
each question.-->


<!--The following is a template for a True/False
question. Set answer to "1" for true and "0" for
false.-->
<questionClasses:TrueFalse01
question=
"1.  Snow White didn't take a bite of the apple."
answer="0"
/>


<!--The following is a template for a multiple-choice
question with three choices. Set answer to "0" for
the first choice, "1" for the second choice, and
"2" for the third choice.-->
<questionClasses:ThreeChoices01
question=
"2.  Which of the following is not the name of one of the
seven dwarfs?"
choice0="Dopey"
choice1="Sneezy"
choice2="Harold"
answer="2"
/>


<!--The following is a template for a multiple-choice
question with four choices. Set answer to "0" for
the first choice, "1" for the second choice, "2"
for the third choice and "3" for the fourth
choice.-->
<questionClasses:FourChoices01
question=
"3.  Which of the following is not the name of one of the
seven dwarfs?"
choice0="Dopey"
choice1="Sneezy"
choice2="Happy"
choice3="Harold"
answer="3"
/>


<!--The following is a template for a multiple-choice
question with four choices and a URL reference to
study material for the correct answer. Set answer
to "0" for the first choice, "1" for the second
choice, "2" for the third choice and "3" for the
fourth choice. Set referenceURL to the address of
a web page containing reference material for the
question.-->
<questionClasses:FourChoicesWithRef01
question=
"4.  Which of the following is not the name of an event
that is supported by the Flex CheckBox component?"
choice0="activate"
choice1="action"
choice2="add"
choice3="added"
answer="1"
referenceURL=
"http://livedocs.adobe.com/flex/3/langref/index.html"
/>


<!--The following is a template for a multiple-choice
question with four choices and an image. Images of types
JPEG, PNG, and GIF are supported. Put the image file in a
folder named Images that is a child of the folder named
src. Set imageName to the name of the image file.
Set answer to "0" for the first choice, "1" for the second
choice, "2" for the third choice and "3" for the fourth
choice.-->
<questionClasses:FourChoicesWithImage01
question=
"5.  What output is produced by the following Java
program?"
imageName="flex0120z.jpg"
choice0="Compiler error"
choice1="Runtime error"
choice2="Hello World"
choice3="Goodbye Cruel World"
answer="2"
/>

<!--The following is a template for a multiple-choice
question with four choices where it is possible for
a combination of none, one, or more than one of the
choices to be the correct answer.
List the correct choices from 0 through 3 in quotation
marks separated by commas in the value of the answer
attribute.-->
<questionClasses:FourAnswers01
question=
"6.  Which of the following are correct names for some
of the seven dwarfs?"
choice0="Dopey"
choice1="Harold"
choice2="Happy"
choice3="Sneezy"
answer="0,2,3"
/>


<!--Don't modify anything below here.-->
    <mx:Style>
        RadioButton {
            fontWeight: bold;
            fontSize: 14;
        }
        Label{
            fontWeight: bold;
            fontSize: 18;
            color:  #FFFF00;
        }
        Button{
            fontWeight: bold;
            fontSize: 14;
        }
        TextArea{
            fontWeight: bold;
            fontSize: 14;
        }
    </mx:Style>
</mx:Application>
|
Listing 34. ActionScript code for
TrueFalse01.as.
//TrueFalse01.as
//This file contains a class definition used to
// instantiate True/False question objects.
// Copyright 2009 R.G.Baldwin
package QuestionClasses{
    import flash.events.*;

    import mx.containers.VBox;
    import mx.controls.Button;
    import mx.controls.RadioButton;
    import mx.controls.TextArea;
    import mx.events.FlexEvent;

    public class TrueFalse01 extends VBox{

        private var theQuestion:TextArea;
        private var trueButton:RadioButton;
        private var falseButton:RadioButton;
        private var checkButton:Button;
        private var result:TextArea;

        private var theAnswer:String;
        private var theQuestionNumber:String;

        //Increase the following value to 925 to cause the
        // width of the question area to be full screen
        // width on a 1024x768 screen.
        private var vboxWidth:int = 375;

        public function set question(textIn:String):void{
            theQuestion.text = textIn;
        }//end implicit setter

        public function set answer(answerIn:String):void{
            theAnswer = answerIn;
        }//end implicit setter

        public function TrueFalse01(){//constructor

            width=vboxWidth;
            setStyle("borderStyle","solid");
            setStyle("backgroundColor",0xffff00);

            theQuestion = new TextArea();
            theQuestion.editable = false;
            theQuestion.width=vboxWidth - 2;
            addChild(theQuestion);

            trueButton = new RadioButton();
            trueButton.label="True";
            trueButton.groupName="radioButtonGroup";
            addChild(trueButton);

            falseButton = new RadioButton();
            falseButton.label="False";
            falseButton.groupName="radioButtonGroup";
            addChild(falseButton);

            checkButton = new Button();
            checkButton.label = "Click to Check Answer";
            checkButton.addEventListener(MouseEvent.CLICK,
                                    checkButtonHandler);
            addChild(checkButton);

            result = new TextArea();
            result.editable = false;
            result.width=vboxWidth - 2;
            result.height=22;
            result.visible=false;
            addChild(result);

            //Register an event listener that will be
            // executed when this object has been fully
            // constructed. It will set the height of
            // the VBox based on the sum of the heights
            // of the components.
            this.addEventListener(
                mx.events.FlexEvent.CREATION_COMPLETE,
                completeHandler);

        }//end constructor

        private function checkButtonHandler(
                                event:MouseEvent):void{
            result.visible=true;

            var correctAnswer:String;

            if(theAnswer == "0"){
                correctAnswer = "False";
            }else{
                correctAnswer = "True";
            }//end else


            if((correctAnswer=="True"
                                && trueButton.selected) ||
               (correctAnswer=="False"
                                && falseButton.selected)){

                result.setStyle("color",0x00ff00);
                result.text = "Correct: answer is "
                                        + correctAnswer;
            }else{
                result.setStyle("color",0xff0000);
                result.text = "Wrong: Correct answer is "
                                        + correctAnswer;
            }//end else
        }//end checkButtonHandler

        private function completeHandler(
                        event:mx.events.FlexEvent):void{
            //Set the height equal to the sum of the
            // heights of the components plus six
            // pixels per component to account for the
            // space between components.
            this.height =
                theQuestion.height
                + trueButton.height
                + falseButton.height
                + checkButton.height
                + result.height
                + 30;//six spaces per compnent
        }//end complete handler

    }//end class TrueFalse01
}//end package
|
Listing 35. ActionScript code for
ThreeChoices01.as.
//ThreeChoices01.as
//This file contains a class definition used to
// instantiate multiple-choice question objects for
// questions having three choices.
// Copyright 2009 R.G.Baldwin
package QuestionClasses{
    import flash.events.*;
    import mx.containers.VBox;
    import mx.controls.Button;
    import mx.controls.Label;
    import mx.controls.RadioButton;
    import mx.controls.TextArea;
    import mx.events.FlexEvent;

    public class ThreeChoices01 extends VBox{
        private var theQuestion:TextArea;
        private var choice00:RadioButton;
        private var choice01:RadioButton;
        private var choice02:RadioButton;
        private var checkButton:Button;
        private var result:TextArea;

        private var theAnswer:String;//numeric string
        private var correctAnswer:String;//actual string

        //Increase the following value to 925 to cause the
        // width of the question area to be full screen
        // width on a 1024x768 screen.
        private var vboxWidth:int = 375;

        public function set question(textIn:String):void{
            theQuestion.text = textIn;
        }//end implicit setter

        public function set answer(answerIn:String):void{
            theAnswer = answerIn;
        }//end implicit setter

        public function set choice0(choice:String):void{
            choice00.label=choice;
        }//end implicit setter

        public function set choice1(choice:String):void{
            choice01.label=choice;
        }//end implicit setter

        public function set choice2(choice:String):void{
            choice02.label=choice;
        }//end implicit setter

        public function ThreeChoices01(){//constructor

            width=vboxWidth;
            setStyle("borderStyle","solid");
            setStyle("backgroundColor",0xffff00);

            theQuestion = new TextArea();
            theQuestion.editable = false;
            theQuestion.width=vboxWidth - 2;
            addChild(theQuestion);

            choice00 = new RadioButton();
            choice00.groupName="radioButtonGroup";
            addChild(choice00);

            choice01 = new RadioButton();
            choice01.groupName="radioButtonGroup";
            addChild(choice01);

            choice02 = new RadioButton();
            choice02.groupName="radioButtonGroup";
            addChild(choice02);

            checkButton = new Button();
            checkButton.label = "Click to Check Answer";
            checkButton.addEventListener(MouseEvent.CLICK,
                                    checkButtonHandler);
            addChild(checkButton);

            result = new TextArea();
            result.editable = false;
            result.width=vboxWidth - 2;
            result.visible=false;
            addChild(result);

            //Register an event listener that will be
            // executed when this object has been fully
            // constructed. It will set the height of
            // the VBox based on the sum of the heights
            // of the components.
            this.addEventListener(
                mx.events.FlexEvent.CREATION_COMPLETE,
                completeHandler);

        }//end constructor

        private function checkButtonHandler(
                                event:MouseEvent):void{
            result.visible=true;

            if(theAnswer == "0"){
                correctAnswer = choice00.label;
            }else if(theAnswer == "1"){
                correctAnswer = choice01.label;
            }else{
                correctAnswer = choice02.label;
            }//end else

            if((theAnswer=="0" && choice00.selected) ||
               (theAnswer=="1" && choice01.selected) ||
               (theAnswer=="2" && choice02.selected)){

                result.setStyle("color",0x00ff00);
                result.text =
                        "Correct\nCorrect Answer is: "
                                         + correctAnswer;
            }else{
                result.setStyle("color",0xff0000);
                result.text = "Wrong\nCorrect Answer is: "
                                         + correctAnswer;
            }//end else
        }//end checkButtonHandler

        private function completeHandler(
                        event:mx.events.FlexEvent):void{
            //Set the height equal to the sum of the
            // heights of the components plus six
            // pixels per component to account for the
            // space between components.
            this.height =
                theQuestion.height
                + choice00.height
                + choice01.height
                + choice02.height
                + checkButton.height
                + result.height
                + 36;//six spaces per compnent
        }//end complete handler

    }//end class ThreeChoices01
}//end package
|
Listing 36. ActionScript code for
FourChoices01.as.
//FourChoices01.as
//This file contains a class definition used to
// instantiate multiple-choice question objects for
// questions having four choices.
// Copyright 2009 R.G.Baldwin
package QuestionClasses{
    import flash.events.*;
    import mx.containers.VBox;
    import mx.controls.Button;
    import mx.controls.Label;
    import mx.controls.RadioButton;
    import mx.controls.TextArea;
    import mx.events.FlexEvent;

    public class FourChoices01 extends VBox{
        private var theQuestion:TextArea;
        private var choice00:RadioButton;
        private var choice01:RadioButton;
        private var choice02:RadioButton;
        private var choice03:RadioButton;
        private var checkButton:Button;
        private var result:TextArea;

        private var theAnswer:String;//numeric string
        private var correctAnswer:String;//actual string

        //Increase the following value to 925 to cause the
        // width of the question area to be full screen
        // width on a 1024x768 screen.
        private var vboxWidth:int = 375;

        public function set question(textIn:String):void{
            theQuestion.text = textIn;
        }//end implicit setter

        public function set answer(answerIn:String):void{
            theAnswer = answerIn;
        }//end implicit setter

        public function set choice0(choice:String):void{
            choice00.label=choice;
        }//end implicit setter

        public function set choice1(choice:String):void{
            choice01.label=choice;
        }//end implicit setter

        public function set choice2(choice:String):void{
            choice02.label=choice;
        }//end implicit setter

        public function set choice3(choice:String):void{
            choice03.label=choice;
        }//end implicit setter

        public function FourChoices01(){//constructor

            width=vboxWidth;
            setStyle("borderStyle","solid");
            setStyle("backgroundColor",0xffff00);

            theQuestion = new TextArea();
            theQuestion.editable = false;
            theQuestion.width=vboxWidth - 2;
            addChild(theQuestion);

            choice00 = new RadioButton();
            choice00.groupName="radioButtonGroup";
            addChild(choice00);

            choice01 = new RadioButton();
            choice01.groupName="radioButtonGroup";
            addChild(choice01);

            choice02 = new RadioButton();
            choice02.groupName="radioButtonGroup";
            addChild(choice02);

            choice03 = new RadioButton();
            choice03.groupName="radioButtonGroup";
            addChild(choice03);

            checkButton = new Button();
            checkButton.label = "Click to Check Answer";
            checkButton.addEventListener(MouseEvent.CLICK,
                                    checkButtonHandler);
            addChild(checkButton);

            result = new TextArea();
            result.editable = false;
            result.width=vboxWidth - 2;
            result.visible=false;
            addChild(result);

            //Register an event listener that will be
            // executed when this object has been fully
            // constructed. It will set the height of
            // the VBox based on the sum of the heights
            // of the components.
            this.addEventListener(
                mx.events.FlexEvent.CREATION_COMPLETE,
                completeHandler);

        }//end constructor

        private function checkButtonHandler(
                                event:MouseEvent):void{
            result.visible=true;
            if(theAnswer == "0"){
                correctAnswer = choice00.label;
            }else if(theAnswer == "1"){
                correctAnswer = choice01.label;
            }else if(theAnswer == "2"){
                correctAnswer = choice02.label;
            }else{
                correctAnswer = choice03.label;
            }//end else

            if((theAnswer=="0" && choice00.selected) ||
               (theAnswer=="1" && choice01.selected) ||
               (theAnswer=="2" && choice02.selected) ||
               (theAnswer=="3" && choice03.selected)){

                result.setStyle("color",0x00ff00);
                result.text =
                            "Correct\nCorrect Answer is: "
                                         + correctAnswer;
            }else{
                result.setStyle("color",0xff0000);
                result.text = "Wrong\nCorrect Answer is: "
                                         + correctAnswer;
            }//end else
        }//end checkButtonHandler

        private function completeHandler(
                        event:mx.events.FlexEvent):void{
            //Set the height equal to the sum of the
            // heights of the components plus six
            // pixels per component to account for the
            // space between components.
            this.height =
                theQuestion.height
                + choice00.height
                + choice01.height
                + choice02.height
                + choice03.height
                + checkButton.height
                + result.height
                + 42;//six spaces per compnent
        }//end complete handler

    }//end class FourChoices01
}//end package
|
Listing 37. FourChoicesWithRef01.as
//FourChoicesWithRef01.as
//This file contains a class definition used to
// instantiate multiple-choice question objects for
// questions having four choices and a reference to a
// web page containing information about the topic of
// the question.// Copyright 2009 R.G.Baldwin
package QuestionClasses{
    import flash.events.*;
    import mx.containers.VBox;
    import mx.controls.Button;
    import mx.controls.Label;
    import mx.controls.RadioButton;
    import mx.controls.TextArea;
    import flash.net.navigateToURL;
    import flash.net.URLRequest;
    import mx.controls.Alert;
    import mx.events.FlexEvent;

    public class FourChoicesWithRef01 extends VBox{
        private var result:TextArea;
        private var choice00:RadioButton;
        private var choice01:RadioButton;
        private var choice02:RadioButton;
        private var choice03:RadioButton;
        private var checkButton:Button;
        private var theQuestion:TextArea;
        private var refButton:Button;
        private var theAnswer:String;//numeric string
        private var correctAnswer:String;//actual string
         private var theReferenceURL:String =
                "http://www.dickbaldwin.com/tocFlex.htm";

        //Increase the following value to 925 to cause the
        // width of the question area to be full screen
        // width on a 1024x768 screen.
        private var vboxWidth:int = 375;

        public function set question(textIn:String):void{
            theQuestion.text = textIn;
        }//end implicit setter

        public function set answer(answerIn:String):void{
            theAnswer = answerIn;
        }//end implicit setter

        public function set choice0(choice:String):void{
            choice00.label=choice;
        }//end implicit setter

        public function set choice1(choice:String):void{
            choice01.label=choice;
        }//end implicit setter

        public function set choice2(choice:String):void{
            choice02.label=choice;
        }//end implicit setter

        public function set choice3(choice:String):void{
            choice03.label=choice;
        }//end implicit setter

        public function set referenceURL(
                                    refURL:String):void{
            theReferenceURL = refURL;
        }//end implicit setter

        public function FourChoicesWithRef01(){

            width=vboxWidth;
            setStyle("borderStyle","solid");
            setStyle("backgroundColor",0xffff00);

            theQuestion = new TextArea();
            theQuestion.editable = false;
            theQuestion.width=vboxWidth - 2;
            addChild(theQuestion);

            choice00 = new RadioButton();
            choice00.groupName="radioButtonGroup";
            addChild(choice00);

            choice01 = new RadioButton();
            choice01.groupName="radioButtonGroup";
            addChild(choice01);

            choice02 = new RadioButton();
            choice02.groupName="radioButtonGroup";
            addChild(choice02);

            choice03 = new RadioButton();
            choice03.groupName="radioButtonGroup";
            addChild(choice03);

            checkButton = new Button();
            checkButton.label = "Click to Check Answer";
            checkButton.addEventListener(MouseEvent.CLICK,
                                    checkButtonHandler);
            addChild(checkButton);

            result = new TextArea();
            result.editable = false;
            result.width=vboxWidth - 2;
            result.visible=false;
            addChild(result);

            refButton = new Button();
            refButton.label =
                    "Click to View Reference Material";
            refButton.addEventListener(MouseEvent.CLICK,
                                    refButtonHandler);
            addChild(refButton);

            //Register an event listener that will be
            // executed when this object has been fully
            // constructed. It will set the height of
            // the VBox based on the sum of the heights
            // of the components.
            this.addEventListener(
                mx.events.FlexEvent.CREATION_COMPLETE,
                completeHandler);

        }//end constructor

        private function checkButtonHandler(
                                event:MouseEvent):void{
            result.visible=true;
            if(theAnswer == "0"){
                correctAnswer = choice00.label;
            }else if(theAnswer == "1"){
                correctAnswer = choice01.label;
            }else if(theAnswer == "2"){
                correctAnswer = choice02.label;
            }else{
                correctAnswer = choice03.label;
            }//end else

            if((theAnswer=="0" && choice00.selected) ||
               (theAnswer=="1" && choice01.selected) ||
               (theAnswer=="2" && choice02.selected) ||
               (theAnswer=="3" && choice03.selected)){

                result.setStyle("color",0x00ff00);
                result.text =
                            "Correct\nCorrect Answer is: "
                                         + correctAnswer;
            }else{
                result.setStyle("color",0xff0000);
                result.text = "Wrong\nCorrect Answer is: "
                                         + correctAnswer;
            }//end else
        }//end checkButtonHandler

        private function refButtonHandler(
                                event:MouseEvent):void{
            var request:URLRequest =
                        new URLRequest(theReferenceURL);
            try{
                navigateToURL(request);
            }catch (e:Error){
                Alert.show(e as String,"Error", Alert.OK);
            }//end catch block
        }//end refButtonHandler

        private function completeHandler(
                        event:mx.events.FlexEvent):void{
            //Set the height equal to the sum of the
            // heights of the components plus six
            // pixels per component to account for the
            // space between components.
            this.height =
                theQuestion.height
                + choice00.height
                + choice01.height
                + choice02.height
                + choice03.height
                + checkButton.height
                + result.height
                + refButton.height
                + 48;//six spaces per compnent
        }//end complete handler

    }//end class FourChoicesWithRef01
}//end package
|
Listing 38. ActionScript code for
FourChoicesWithImage01.as.
//FourChoicesWithImage01.as
//This file contains a class definition used to
// instantiate multiple-choice question objects for
// questions having four choices and an image.
// Copyright 2009 R.G.Baldwin
package QuestionClasses{
    import flash.events.*;

    import mx.containers.VBox;
    import mx.controls.Alert;
    import mx.controls.Button;
    import mx.controls.Image;
    import mx.controls.RadioButton;
    import mx.controls.TextArea;
    import mx.events.FlexEvent;

    public class FourChoicesWithImage01 extends VBox{
        private var resizeButton:Button;
        private var result:TextArea;
        private var choice00:RadioButton;
        private var choice01:RadioButton;
        private var choice02:RadioButton;
        private var choice03:RadioButton;
        private var checkButton:Button;
        private var theQuestion:TextArea;
        private var theAnswer:String;//numeric string
        private var correctAnswer:String;//actual string
        private var theImage:Image;
        private var theImageName:String;

        //Increase the following value to 925 to cause the
        // width of the question area to be full screen
        // width on a 1024x768 screen.
        private var vboxWidth:int = 375;

        public function set question(textIn:String):void{
            theQuestion.text = textIn;
        }//end implicit setter

        public function set answer(answerIn:String):void{
            theAnswer = answerIn;
        }//end implicit setter

        public function set choice0(choice:String):void{
            choice00.label=choice;
        }//end implicit setter

        public function set choice1(choice:String):void{
            choice01.label=choice;
        }//end implicit setter

        public function set choice2(choice:String):void{
            choice02.label=choice;
        }//end implicit setter

        public function set choice3(choice:String):void{
            choice03.label=choice;
        }//end implicit setter

        public function set imageName(image:String):void{
            theImageName = image;
        }//end implicit setter

        public function FourChoicesWithImage01(){

            width=vboxWidth;
            setStyle("borderStyle","solid");
            setStyle("backgroundColor",0xffff00);

            resizeButton = new Button();
            resizeButton.label = "Click to Resize";
            resizeButton.addEventListener(
                                    MouseEvent.CLICK,
                                    resizeButtonHandler);
            addChild(resizeButton);

            theQuestion = new TextArea();
            theQuestion.editable = false;
            theQuestion.width=vboxWidth - 2;
            addChild(theQuestion);

            theImage = new Image();
            addChild(theImage);

            choice00 = new RadioButton();
            choice00.groupName="radioButtonGroup";
            addChild(choice00);

            choice01 = new RadioButton();
            choice01.groupName="radioButtonGroup";
            addChild(choice01);

            choice02 = new RadioButton();
            choice02.groupName="radioButtonGroup";
            addChild(choice02);

            choice03 = new RadioButton();
            choice03.groupName="radioButtonGroup";
            addChild(choice03);

            checkButton = new Button();
            checkButton.label = "Click to Check Answer";
            checkButton.addEventListener(MouseEvent.CLICK,
                                    checkButtonHandler);
            addChild(checkButton);

            result = new TextArea();
            result.editable = false;
            result.width=vboxWidth - 2;
            result.visible=false;
            addChild(result);

            //Register an event listener that will be
            // executed when this object has been fully
            // constructed.
            this.addEventListener(
                mx.events.FlexEvent.CREATION_COMPLETE,
                completeHandler);

        }//end constructor

        private function checkButtonHandler(
                                event:MouseEvent):void{
            result.visible=true;
            if(theAnswer == "0"){
                correctAnswer = choice00.label;
            }else if(theAnswer == "1"){
                correctAnswer = choice01.label;
            }else if(theAnswer == "2"){
                correctAnswer = choice02.label;
            }else{
                correctAnswer = choice03.label;
            }//end else

            if((theAnswer=="0" && choice00.selected) ||
               (theAnswer=="1" && choice01.selected) ||
               (theAnswer=="2" && choice02.selected) ||
               (theAnswer=="3" && choice03.selected)){

                result.setStyle("color",0x00ff00);
                result.text =
                            "Correct\nCorrect Answer is: "
                                         + correctAnswer;
            }else{
                result.setStyle("color",0xff0000);
                result.text = "Wrong\nCorrect Answer is: "
                                         + correctAnswer;
            }//end else
        }//end checkButtonHandler

        private function completeHandler(
                        event:mx.events.FlexEvent):void{
            //Put code in here that suffers from timing
            // problems during the construction process.
            // This mainly involves code that refers to
            // instance variable values that are set by
            // an implicit setter, such as theImageName.
            // If you don't delay the execution of such
            // code, it often executes while the instance
            // variable still contains null.
            theImage.source = "Images/" + theImageName;

            //Set the height equal to the sum of the
            // heights of the components plus six
            // pixels per component to account for the
            // space between components plus 100 pixels
            // to partially account for the height of
            // the image. This can be changed later by
            // clicking the resize button.
            this.height =
                resizeButton.height
                + theQuestion.height
                + choice00.height
                + choice01.height
                + choice02.height
                + choice03.height
                + checkButton.height
                + result.height
                + 142;//six spaces per compnent

        }//end complete handler

        private function resizeButtonHandler(
                                event:MouseEvent):void{

            //Set the height equal to the sum of the
            // heights of the components plus six
            // pixels per component to account for the
            // space between components. If the image
            // width is greater than the width of the
            // VBox, change the width of the VBox and
            // the TextArea containing the question to
            // match the width of the image.
            this.height =
                resizeButton.height
                + theQuestion.height
                + theImage.height
                + choice00.height
                + choice01.height
                + choice02.height
                + choice03.height
                + checkButton.height
                + result.height
                + 54;//six spaces per compnent

            if(theImage.width > vboxWidth){
                this.width = theImage.width;
                theQuestion.width = theImage.width;
            }//end if

        }//end resizeButtonHandler

    }//end class FourChoicesWithImage01
}//end package
|
Listing 39. ActionScript code for
FourAnswers01.as.
//FourAnswers01.as
//This file contains a class definition used to
// instantiate multiple-choice question objects for
// questions having four choices where it is possible for
// a combination of none, one, or more than one of the
// choices to be the correct answer.
// Copyright 2009 R.G.Baldwin
package QuestionClasses{
    import flash.events.*;

    import mx.containers.VBox;
    import mx.controls.Button;
    import mx.controls.Label;
    import mx.controls.RadioButton;
    import mx.controls.TextArea;
    import mx.events.FlexEvent;

    public class FourAnswers01 extends VBox{
        private var theQuestion:TextArea;
        private var choice00:RadioButton;
        private var choice01:RadioButton;
        private var choice02:RadioButton;
        private var choice03:RadioButton;
        private var checkButton:Button;
        private var resetButton:Button;
        private var result:TextArea;
        private var instruction:Label;

        private var theAnswer:String;//numeric string
        private var correctAnswer:String;//actual string

        //Increase the following value to 925 to cause the
        // width of the question area to be full screen
        // width on a 1024x768 screen.
        private var vboxWidth:int = 375;

        public function set question(textIn:String):void{
            theQuestion.text = textIn;
        }//end implicit setter

        public function set answer(answerIn:String):void{
            theAnswer = answerIn;
        }//end implicit setter

        public function set choice0(choice:String):void{
            choice00.label=choice;
        }//end implicit setter

        public function set choice1(choice:String):void{
            choice01.label=choice;
        }//end implicit setter

        public function set choice2(choice:String):void{
            choice02.label=choice;
        }//end implicit setter

        public function set choice3(choice:String):void{
            choice03.label=choice;
        }//end implicit setter

        public function FourAnswers01(){//constructor

            width=vboxWidth;
            setStyle("borderStyle","solid");
            setStyle("backgroundColor",0xffff00);

            theQuestion = new TextArea();
            theQuestion.editable = false;
            theQuestion.width=vboxWidth - 2;
            addChild(theQuestion);

            instruction = new Label();
            instruction.text =
                        "Select none or all that apply";
            addChild(instruction);

            //Note that the buttons are not part of the
            // same button group. Therefore, it is
            // possible to select more than one at a
            // time.
            choice00 = new RadioButton();
            choice00.groupName="00";
            addChild(choice00);

            choice01 = new RadioButton();
            choice01.groupName="01";
            addChild(choice01);

            choice02 = new RadioButton();
            choice02.groupName="02";
            addChild(choice02);

            choice03 = new RadioButton();
            choice03.groupName="03";
            addChild(choice03);

            resetButton = new Button();
            resetButton.label = "Click to Reset";
            resetButton.addEventListener(MouseEvent.CLICK,
                                    resetButtonHandler);
            addChild(resetButton);

            checkButton = new Button();
            checkButton.label = "Click to Check Answer";
            checkButton.addEventListener(MouseEvent.CLICK,
                                    checkButtonHandler);
            addChild(checkButton);

            result = new TextArea();
            result.editable = false;
            result.width=vboxWidth - 2;
            result.visible=false;
            addChild(result);

            //Register an event listener that will be
            // executed when this object has been fully
            // constructed. It will set the height of
            // the VBox based on the sum of the heights
            // of the components.
            this.addEventListener(
                mx.events.FlexEvent.CREATION_COMPLETE,
                completeHandler);

        }//end constructor


        private function checkButtonHandler(
                                event:MouseEvent):void{

            //Create an array of Boolean values that
            // matches the currently selected set of
            // radio buttons.
    	    var buttonArray:Array = [choice00.selected,
    	                             choice01.selected,
    	                             choice02.selected,
    	                             choice03.selected];

    	    //Create an array of Boolean values that will
    	    // be used to store information about the
    	    // correct answer.
    	    var answerArray:Array = [false,false,
    	                             false,false];

            //Parse the answer eliminating all characters
            // other than 0 1 2 and 3. Use those
            // characters to set Boolean true values in
            // the answerArray. The Unicode value for
            // the character 0 is 48 and the Unicode value
            // for the character 4 is 51.
    	    for(var cnt:int = 0;cnt < theAnswer.length;
    	                                         cnt++){
    	    	if((theAnswer.charCodeAt(cnt) >= 48) &&
    	            (theAnswer.charCodeAt(cnt) <= 51)){

    	    	    answerArray[
    	    	       theAnswer.charCodeAt(cnt) - 48]
    	    	                                   = true;
    	    	}//end if
    	    }//end for loop

            result.visible=true;

            //Construct a string containing the correct
            // answer based on the answer numbers in the
            // calling MXML file.
            correctAnswer = "";
            if(answerArray[0] == true){
                correctAnswer = correctAnswer +
                                    choice00.label + " ";
            }//end if
            if(answerArray[1] == true){
                correctAnswer = correctAnswer +
                                    choice01.label + " ";
            }//end if
            if(answerArray[2] == true){
                correctAnswer = correctAnswer +
                                    choice02.label + " ";
            }//end if
            if(answerArray[3] == true){
                correctAnswer = correctAnswer +
                                    choice03.label + " ";
            }//end if

            //Compare selected radio buttons with the
            // answer to determine if the given answer
            // is correct.
            if(answerArray[0] == buttonArray[0]
                && answerArray[1] == buttonArray[1]
                && answerArray[2] == buttonArray[2]
                && answerArray[3] == buttonArray[3]){

                result.setStyle("color",0x00ff00);
                result.text =
                            "Correct\nCorrect Answer is: "
                                         + correctAnswer;
            }else{
                result.setStyle("color",0xff0000);
                result.text = "Wrong\nCorrect Answer is: "
                                         + correctAnswer;
            }//end else

        }//end checkButtonHandler


        private function resetButtonHandler(
                                event:MouseEvent):void{
            choice00.selected = false;
            choice01.selected = false;
            choice02.selected = false;
            choice03.selected = false;
        }//end resetButtonHandler


        private function completeHandler(
                        event:mx.events.FlexEvent):void{

            //Set the appearance of the instruction.
            instruction.setStyle("color",0x000000);
            instruction.setStyle("fontSize",16);

            //Set the height equal to the sum of the
            // heights of the components plus six
            // pixels per component to account for the
            // space between components.
            this.height =
                theQuestion.height
                + instruction.height
                + choice00.height
                + choice01.height
                + choice02.height
                + choice03.height
                + resetButton.height
                + checkButton.height
                + result.height
                + 54;//six spaces per compnent
        }//end complete handler

    }//end class FourAnswers01
}//end package
|
Copyright 2009, Richard G. Baldwin. Reproduction in whole or in part in any form or medium without express written permission from Richard Baldwin is prohibited.
Richard has participated in numerous consulting projects and he frequently provides onsite training at the high-tech companies located in and around Austin, Texas. He is the author of Baldwin's Programming Tutorials, which have gained a worldwide following among experienced and aspiring programmers. He has also published articles in JavaPro magazine.
In addition to his programming expertise, Richard has many years of practical experience in Digital Signal Processing (DSP). His first job after he earned his Bachelor's degree was doing DSP in the Seismic Research Department of Texas Instruments. (TI is still a world leader in DSP.) In the following years, he applied his programming and DSP expertise to other interesting areas including sonar and underwater acoustics.
Richard holds an MSEE degree from Southern Methodist University and has many years of experience in the application of computer technology to real-world problems.
-end-