Published:
May 4, 2008
Last Revised: May 16, 2008
By Richard G. Baldwin
Homeschool Programming Notes # 106
This tutorial lesson is part of a continuing series that is designed specifically for teaching computer programming to homeschool students and their parents. However, even though the series is designed for homeschool students, everyone is welcome to use the lessons to learn computer programming.
In this lesson, I will begin by teaching you about operators and operands in general. I will also teach you about expressions and statements. I will give a very brief introduction to type, a topic that will be covered in more detail later in tutorial lessons using Alice and Java. I will present and explained a Scratch program that shows how to use arithmetic operators in Scratch.
Finally, I will provide the specifications for a student-programming project for you to complete in order to demonstrate your understanding of what you learned from the first program.
I recommend that you open another copy of this document in a separate browser window and use the following links to easily find and view the figures while you are reading about them.
I recommend that you also study the other lessons in my extensive collection of online programming tutorials. You will find a consolidated index at www.DickBaldwin.com.
The lessons in this series are designed specifically for homeschool students and their parents (but everyone is welcome to use them). I will assume that neither the students nor their parents knew anything about computer programming before beginning their study of the lessons in this series. As such, I will explain programming concepts and issues beginning at a very fundamental level.
OperatorsOperators are the action elements of a computer program. They perform actions such as adding two variables, dividing one variable by another variable, comparing one variable to another variable, etc.
Operands
According to the current jargon, operators operate on operands.
For example, in the following expression, the plus character is an operator while x and y are operands.
x + y
Assuming that x and y are numeric variables, this expression produces the sum of the values stored in the two variables. The variable x would be called the left operand and the variable y would be called the right operand.
|
Expressions
Computer programs in many languages, including Java and Alice, consist of statements, which in turn, consist of expressions. (Programming blocks substitute for statements in Scratch.)In your past experience, you may have referred to expressions by the names formulas or equations. Although formulas and equations are not exactly the same thing as expressions, they are close enough to help you understand what expressions are and how they are used.
Statements
A statement is a specific combination of expressions. In Java, C#, and C++, statements are terminated by a semicolon. The following is an example of a Java statement comprised of expressions.
z = x + y;
Operationally, values are retrieved from the variables named x and y in the above statement. These two values are added together. The result is stored in (assigned to) the variable named z, replacing whatever value may previously have been contained in that variable.
The plus character (+) would commonly be referred to as the addition operator or the concatenation operator, depending on the type of data stored in the variables named x and y. The equal character (=) would commonly be called the assignment operator in Java, Alice, C#, and C++, but we will see in a future lesson that it is also used as a relational operator in Scratch.
A brief word about type
I will explain type in detail in conjunction with the Alice and Java programming languages. In the meantime, as a very crude analogy, you can think of variables as the pens at the animal shelter and think of type as the kinds of animals that reside in those pens. Dogs and cats are different types of animals that usually don't coexist very well in the same pen. Therefore, they are normally put in different pens.
Similarly, different types of data don't coexist well in the same variable in type sensitive languages. Therefore, in type-sensitive languages such as Alice and Java, there are very stringent rules as to the types of data that can be stored in each variable. Because Scratch has only one type of data (numeric), type is not an issue in Scratch.
Unary, binary, and ternary operatorsJava, C#, and C++ provide operators that can be used to perform an action on one, two, or three operands. I believe that operators in Scratch and Alice are confined to only one or two operands.
An operator that operates on one operand is called a unary operator. An operator that operates on two operands is called a binary operator. An operator that operates on three operands is called a ternary operator (there is only one ternary operator in Java and none in Alice or Scratch).
Some operators can be either unary or binary
Some operators can behave either as a unary or as a binary operator in languages such as Java and C#. However, this is not the case in Scratch. The best-known operator that can behave either way is the minus character (-).
As a binary operator, the minus character causes its right operand to be subtracted from its left operand. For example, the third statement below subtracts the variable y from the variable x and assigns the result of the subtraction to the variable z. After the third statement is executed, the variable z contains the value 1.
int x = 6;
int y = 5;
int z = x - y;
The minus character as a unary operator
As a unary operator, the minus character causes the algebraic sign of the right operand to be changed. For example, the following two statements cause a value of -5 to be assigned to (stored in) the variable x.
int y = 5;
int x = -y;
Binary operators use infix notation
To keep you abreast of the current jargon, binary operators in Scratch, Alice, and Java always use infix notation. This means that the operator appears between its operands.
Much later in this series of tutorial lessons, I will introduce you to some unary operators that use prefix notation and postfix notation. For prefix notation, the operator appears before (to the left of) its operand. For postfix notation, the operator appears after (to the right of) its operand.
|
General behavior of an operator
As a result of performing the specified action, an operator can be said to return a value (or evaluate to a value) of a given type. The type of value returned depends on the operator and the type of the operands.
Operator categories
There are many different kinds of operators. Therefore, the easiest way to study them is to divide them into categories such as the following
This lesson will concentrate on arithmetic operators. Future lessons will deal with the other kinds of operators.
In this lesson, I will present and explain a Scratch program named Arithmetic01. This program illustrates the use of the following arithmetic operators:
Variables with the following names are created and displayed on the screen:
In addition, a button is displayed on the screen.
The user adjusts the values of the LeftOperand and RightOperand variables with a pair of sliders. When the user clicks the button, the variable named Sum displays the sum of the values of the left and right operands. The variable named Diff displays the result of subtracting the right operand from the left operand.
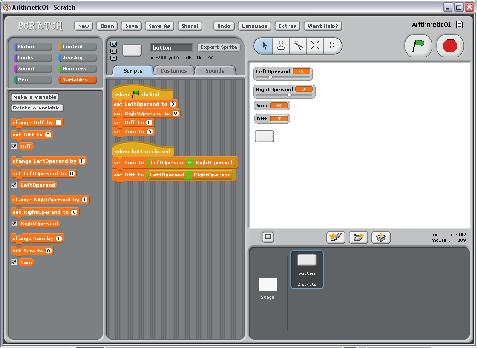
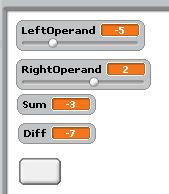
To begin with, Figure 1 shows a reduced screen shot of the user interface.
Figure 1. Reduced screen shot of Arithmetic01 in operation.
|
|
I realize that Figure 1 lacks detail due to the requirement to reduce the size of the screen shot for publication in this narrow format, but there are some aspects of Figure 1 that are worth noting. I will go from left to right in Figure 1 making comments.
Four variables
The leftmost panel shows that four variables have been created. Because you can't read the names of those variables, I will list them here:
You can barely see that the checkboxes next to all four variables have been checked. As you learned in an earlier lesson, checking this box causes a variable to be displayed in the white Stage area on the right. Thus you can see all four variables being displayed in the upper left corner of the Stage.
A button
Skipping to the area immediately below the Stage, we can see that a button has been added to the program. That button has been selected in Figure 1, making it possible to drag blocks into the center panel that controls the behavior of the button.
Two scripts in the center panel
Although you can't read the details in Figure 1, you can see that there are two scripts showing in the center panel. I will show you a full-size screen shot of the center panel later in Figure 2, but for now, suffice it to say that the top script initializes the values stored in all four variables when the user clicks the green flag in the upper right of Figure 1. The bottom script in the center panel defines the behavior of the program when the user clicks the button in the Stage area.
Variables with sliders
If you look carefully, you can tell that the top two variables that are displayed in the Stage area look different from the bottom two variables. This is because a slider has been assigned to each of the top two variables (see Figure 5). This makes it possible for the user to manually set the values stored in each of these two variables.
To create a slider for a variable, right click on the display of the variable in the Stage area and select show slider in the popup menu that appears. Once you have caused a slider to appear with the variable display, you can right-click on the variable display again and select set slider min and max in the popup menu to specify the range of the slider. This will cause a simple dialog box to appear into which you can enter the minimum value and the maximum value and then click an OK button. In this program, I have both sliders set to a minimum value of -10 and a maximum value of +10.
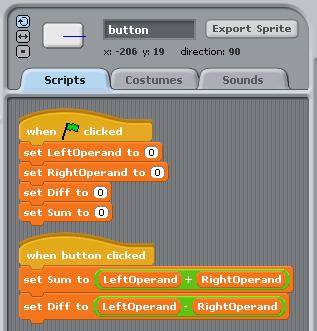
Full-size view of the center panel
Figure 2 shows a full-size view of the center panel after having selected the button icon in the area immediately below the Stage in Figure 1.
Figure 2. Full-size view of the center panel.
|
|
Initialize the variable values to zero
As I mentioned earlier, the top script in Figure 2 sets the value of each of the four variables to zero when the user clicks the green flag. The code in that script should be completely familiar to you by now and no explanation should be necessary.
Define the behavior of the button
The bottom script in Figure 2 defines the behavior of the program when the button is clicked. Basically, that code says to set the value of the variable named Sum to the sum of the contents of the two variables named LeftOperand and RightOperand and to set the value of the variable named Diff to the value of the left operand minus the value of the right operand.
Constructing the script
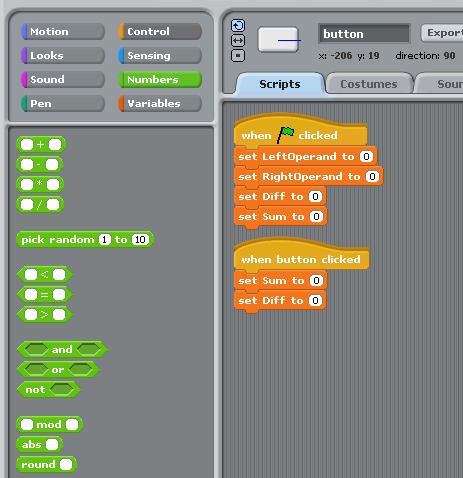
That seems straightforward enough. However, the process of constructing that script contains some new material, so I will walk you through the process.
Figure 3 shows the state of the development process immediately after the blocks for the variables named Sum and Diff have been dragged from the Variables panel to the center panel and connected to the block that reads when button clicked.
Figure 3. Preparing to use the arithmetic operators.
|
|
Not exactly what we want to happen
In Figure 3, as it stands now, the variables named Sum and Diff will be set to a value of zero when the user clicks the button. That isn't what we want, so we have some more programming to do.
The desired behavior is for the value of the variable named Sum to be set to the sum of the variables named LeftOperand and RightOperand when the user clicks the button. Similarly, we want the value of the variable named Diff to be set to the difference between those two variables.
The Numbers panel
The left panel in Figure 3 shows the blocks that are exposed when the green button labeled Numbers is clicked. Eight of those blocks are of the correct shape to fit into the white boxes in the two bottom orange blocks in the center panel. This means that we could drag any one of those eight blocks and drop them into those white boxes.
Four arithmetic operators
The top four green blocks in the left panel are particularly interesting. They contain the following arithmetic symbols as part of their labels:
These are the symbols that are commonly used for addition, subtraction, multiplication, and division in computer programming. The top two match what you are accustomed to seeing on your hand calculator, but the bottom two probably don't match.
Use an asterisk for multiplication
Most programming languages use the * character instead of the X character for multiplication in order to keep the multiplication operator from being confused with the letter that uses the X symbol.
Use a forward slash for division
Insofar as division is concerned, most computer keyboards don't have a symbol that matches the symbol commonly used for division on hand calculators, so the / character is used instead.
Four more blocks of the correct shape
Before leaving the discussion of the left panel in Figure 3, I will explain the behavior of the remaining four blocks that are of the correct shape for being dropped into the white boxes in the variable blocks in the center panel.
Random numbers
The block labeled pick random 1 to 10 lets you enter other values in place of 1 and 10. Then this block will deliver a random number within that range when it is called upon to do so. Random numbers are often used in game programs to simulate the throwing of a pair of die or the spinning of a wheel of fortune, for example.
The modulus
The block labeled mod will produce the modulus of two values when called upon to do so. The modulus of two numbers is the remainder that results from dividing one number by another number. You may remember the remainder from when you learned to do long division in elementary school but before you learned about decimals. In Java, C#, and C++, the modulus is represented by the % symbol.
The absolute value
The block labeled abs will deliver the absolute value of a decimal number by throwing away the algebraic sign and returning the value as a positive value regardless of its original sign. There is no operator for this in Java. Instead, this capability is provided by a method in the Java Math library.
Rounding a number
Finally, the block labeled round will round a decimal number to the nearest whole number. Hopefully you learned about rounding decimal numbers at some earlier point in your education.
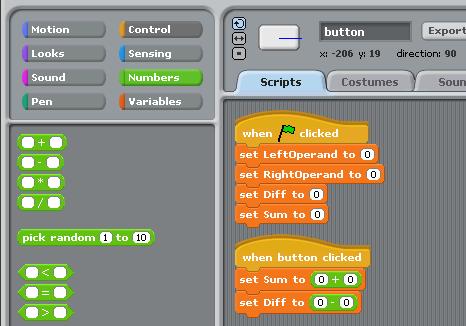
Drag and drop the plus and minus operators
Figure 4 shows the result of dragging the top two green blocks from the left panel and dropping them into the white boxes in the bottom two orange variable blocks in the center panel.
Figure 4. Result of dropping addition and subtraction operators into variable blocks.
|
|
Are we there yet?
If you compare Figure 4 with Figure 2, you will see that Figure 4 is close to what we are shooting for, but we aren't quite there yet. In order to cause the bottom two blocks in the center panel in Figure 4 to match the bottom two blocks in Figure 2, we need to do the following:
That's the solution. The upper left portion of your Stage area should look similar to Figure 5. (Note however that you may need to use the mouse to arrange the four variables and the button to get your Stage arranged like Figure 5.)
Figure 5. Stage area of the finished program.
|
|
Operation of the program
Once you reach this point, you can click the green flag to initialize all four variables to zero. Then you can move the sliders back and forth to manually set the values for the variables named LeftOperand and RightOperand. Then when you click the button at the bottom of Figure 5, the variable named Sum will display the sum of the values of the top two variables, and the variable named Diff will display the value of LeftOperand minus the value of RightOperand.
An online version of this program is available
A copy of this program has been posted online for your review (see Resources for the URL). If you don't find the program using that URL, search the Scratch site for the user named dbal.
I encourage you to use the information provided above to write this program. Experiment with the code, making changes, and observing the results of your changes. Make certain that you can explain why your changes behave as they do.
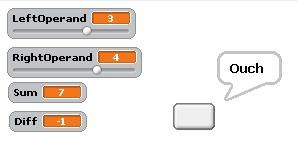
Just for fun, move the button a little to the right and cause it to say Ouch for about five seconds each time you click it as shown in Figure 6. Hint: See the purple button labeled Looks in Figure 3.
Figure 6. Making the button say ouch.
|
|
I also encourage you to write the program described below.
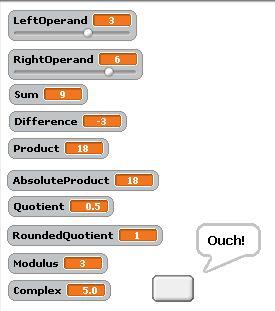
Write a Scratch program named Arithmetic02 that produces the output shown in Figure 7 when the user adjusts the sliders to the values shown and clicks the button. Make the word Ouch! appear and then go away after about five seconds.
Figure 7. Output from student project program named Arithmetic02.
|
|
A copy of this program has been posted online for your review (see Resources for the URL). If you don't find the program using that URL, search the Scratch site for the user named dbal.
I began by teaching you about operators and operands in general. I also taught you about expressions and statements. I gave a very brief introduction to type. This is a topic that will be covered in more detail later in lessons using Alice and Java. I presented and explained a sample Scratch program that illustrates how to use arithmetic operators in Scratch.
Finally, I provided the specifications for a student-programming project for you to write in order to demonstrate your understanding of what you learned from the first program.
Copies of both programs have been posted online for your review (see Resources for the URL). If you don't find the program using that URL, search the Scratch site for the user named dbal.
This lesson concentrated on arithmetic operators. The next few lessons will deal with relational and logical operators as well as selection and loops.
Copyright 2008, Richard G. Baldwin. Reproduction in whole or in part in any form or medium without express written permission from Richard Baldwin is prohibited.
Richard has participated in numerous consulting projects and he frequently provides onsite training at the high-tech companies located in and around Austin, Texas. He is the author of Baldwin's Programming Tutorials, which have gained a worldwide following among experienced and aspiring programmers. He has also published articles in JavaPro magazine.
In addition to his programming expertise, Richard has many years of practical experience in Digital Signal Processing (DSP). His first job after he earned his Bachelor's degree was doing DSP in the Seismic Research Department of Texas Instruments. (TI is still a world leader in DSP.) In the following years, he applied his programming and DSP expertise to other interesting areas including sonar and underwater acoustics.
Richard holds an MSEE degree from Southern Methodist University and has many years of experience in the application of computer technology to real-world problems.
-end-