Published: May 6, 2008
Last Revised: May 16, 2008
By Richard G. Baldwin
Homeschool Programming Notes # 108
This tutorial lesson is part of a continuing series that is designed specifically for teaching computer programming to homeschool students and their parents. However, even though the series is designed for homeschool students, everyone is welcome to use the lessons to learn computer programming.
In this lesson, I will begin by providing a very brief review of material from previous lessons.
Then I will present and explain the detailed steps required to write a Scratch program that uses the relational operators: less than, equal to, and greater than.
I recommend that you open another copy of this document in a separate browser window and use the following links to easily find and view the figures while you are reading about them.
I recommend that you also study the other lessons in my extensive collection of online programming tutorials. You will find a consolidated index at www.DickBaldwin.com.
First, a quick review of material from earlier lessons:
Operator categories
There are many different kinds of operators. The easiest way to study them is to divide them into categories such as the following
An earlier lesson explained arithmetic operators. This lesson will explain relational operators. Future lessons will deal with the other kinds of operators.
A previous lesson introduced you to the selection structure. This lesson will expand on that concept.
In this lesson, I will present and explain a Scratch program named Relational01. This program illustrates the use of the following relational operators:
The program creates the following five variables and a button and displays them on the Stage as shown in Figure 1 and Figure 6:
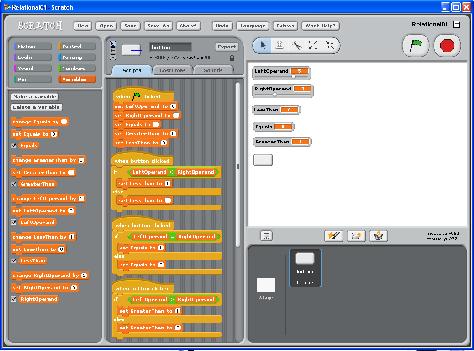
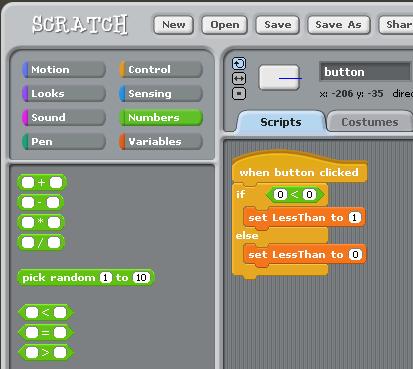
Figure 1. Reduced screen shot of program Relational01 in operation.
|
|
Program operation
When the user clicks the green flag, the two sliders at the top of Figure 6 are set to 0.
The user slides the two sliders to set the values of LeftOperand and RightOperand.
When the user clicks the button, three separate event handlers on the button test the left operand against the right operand for less than, equal to, and greater than and displays the results in the three variables having the corresponding names. A 0 is displayed if the value is false and a 1 is displayed if the value is true. Those three event handlers are shown as the bottom three scripts in the center panel of Figure 1.
No boolean type available in Scratch
Both Java and C# have a boolean type. This type is named boolean in Java and is named bool in C#. Unfortunately, Scratch doesn't have a boolean type for variables. (The only variable type in Scratch is numeric.) The availability of a boolean type serves to simplify programming code in many situations but such simplification is not possible in Scratch.
The boolean type is the simplest type supported by Java. It can have only two values:
Because of the lack of a boolean type in Scratch, you must improvise. As you will see in this program, we will use a numeric value of 0 to represent false and a numeric value of 1 to represent true.
As you can see in the bottom right of Figure 1, a button was added to this program. If you look very carefully at the left panel in Figure 1, you will see that five variables were created for the program and that all five of the variables were displayed in the Stage area in the upper right. (The checkboxes for all five variables were checked causing them to appear in the Stage area.) A better view of the Stage is provided in Figure 6.
The names of the five variables were listed above. By this point, you should have no difficulty creating variables and causing them to be displayed in the Stage, so no explanation should be necessary.
The program code
Figure 2 shows a full-size view of the center panel in Figure 1. This panel contains the program code associated with the button.
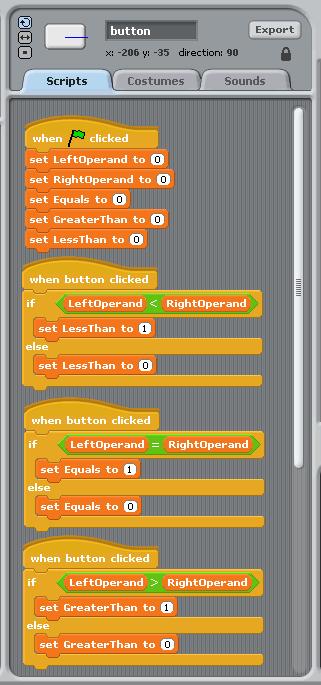
Figure 2. The center programming panel for Relational01.
|
|
Initialize the variables
The top script in Figure 2 initializes the values of all the variables to zero when the user clicks the green flag. You have seen code like this several times before in this series of lessons, so I won't discuss it further.
When the button is clicked...
Each of the bottom three scripts in Figure 2 are executed when the user clicks the button in the Stage area in Figure 1. These three scripts are very similar. However, they use three different relational operators to compare the values of the left and right operands and they set the values in three different variables accordingly.
I will walk you through the construction of one of the scripts with a detailed explanation of each step in the process. You should be able to extend that explanation to the other two scripts.
An if-else block
I'm going to walk you through the process of creating one of the bottom three scripts shown in Figure 2.
Figure 3 shows the result of having dragged an if-else block from the left panel into the center panel and having clicked it onto the block that is labeled when button clicked.
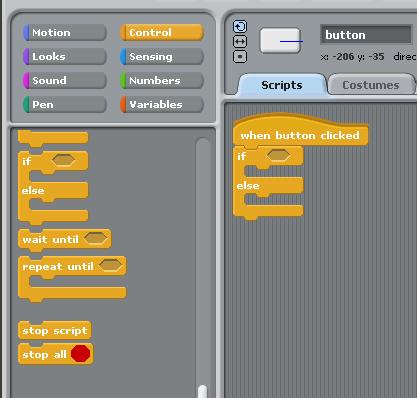
Figure 3. Starting to use an if-else block.
|
|
Need to put a conditional clause in the pocket
Note the depressed pocket immediately to the right of the word if on the if-else block. We must drop another block of the correct shape into this pocket. The code in that block must evaluate to either true or false. If that code evaluates to true, the code that we will insert into the mouth of the block immediately below the word if will be executed. If the code that we drop into the pocket evaluates to false, the code that we insert into the mouth of the block immediately below the word else will be executed.
Where are the blocks with the correct shape?
There are only two buttons that we can click in the upper left in Figure 3 that will expose blocks with shapes matching the pocket immediately to the right of the word if in Figure 3:
We used a block having the correct shape from the Sensing group in the earlier lesson titled Sequence, Selection, and Loop Structures (see Resources). An image of the blocks exposed by the Sensing button is shown in Figure 12 in that earlier lesson.
Will use blocks from the Numbers group
In this lesson, we will use three of the blocks that are exposed by clicking the green Numbers button as shown in Figure 4.
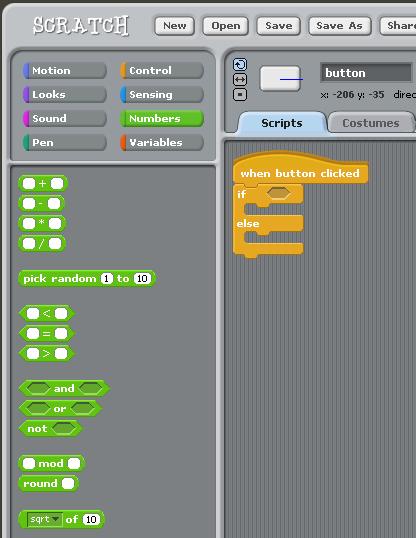
Figure 4. Green blocks exposed by clicking the Numbers button.
|
|
Six blocks have the correct shape
As you can see in Figure 4, there are six blocks of the correct shape exposed by clicking the Numbers button. Those blocks are identified as follows:
We will refer to the blocks highlighted in boldface above as relational operators. (They are used to evaluate the relationship between two values.) We will refer to the other three blocks in the above list as logical operators, and will deal with them in a future lesson.
Relational operators in Java
When we start studying Java, you will learn that Java and most other modern programming languages also include the following three relational operators:
However, although these operators are a great convenience, they are not essential. We can get by with only the three that are provided by Scratch.
Also, in Java, a pair of equal characters (==) is used for the equal to operator instead of the single equal character (=) used in Scratch.
Three steps at once
Figure 5 shows the result of having taken three more steps in the development of the program:
Figure 5. Intermediate stage in construction of if-else script.
|
|
Still need to complete the conditional clause
The script in Figure 5 includes the action to be taken if the relational expression following the word if evaluates to true. It also includes the action to be taken if the relational expression evaluates to false. (This relational expression is often referred to as a conditional clause.). However, we still haven't completed the conditional clause in Figure 5. We don't want to test for the relationship between the literal values 0 and 0 as shown in Figure 5. Instead we want to test the relationship between the values of the variables named LeftOperand and RightOperand as shown in the corresponding script in Figure 2.
Complete the relational expression
The next and final step for constructing this script is to:
Once we do that, we will have finished the construction of the second script from the top in Figure 2.
Completing the program
Following that, we need to go through essentially the same process to construct the bottom two scripts in Figure 2, using the other two relational operators in Figure 4 along with two of the other variables.
A screen shot of the program output
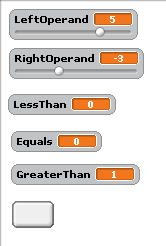
Figure 6 shows a screen shot of the upper left portion of the Stage for a given set of values for the variables named LeftOperand and RightOperand.
Figure 6. Screen shot of the output from the program named Relational01.
|
|
Interpretation of the results
The 0 showing in the variable named LessThan tells us that for these values, the following expression evaluates to false:
LeftOperand < RightOperandIn other words, the left operand (5) is not less than the right operand (-3).
The 0 showing in the variable named Equals tells us that for these values, the following expression evaluates to false:
LeftOperand = RightOperandIn other words, the left operand (5) is not equal to the right operand (-3).
Finally, the 1 showing in the variable named GreaterThan tells us that for these values, the following expression evaluates to true:
LeftOperand > RightOperandIn other words, the left operand (5) is greater than the right operand (-3).
If you move the sliders to change the values in the left and right operand variables and then click the button, you are likely to get different results.
An online version of this program is available
A copy of this program has been posted online for your review (see Resources for the URL). If you don't find the program using that URL, search the Scratch site for the user named dbal.
I encourage you to use the information provided above to write this program. Experiment with the code, making changes, and observing the results of your changes. Make certain that you can explain why your changes behave as they do.
Just for fun, see if you cause a short drum roll to be produced by your computer speakers each time the button is clicked.
I also encourage you to write the program described below.
Write a project that meets the following specifications:
File name: Relational02.sb
Description: This program illustrates the use of the following relational operators in addition to arithmetic operators:
This is an upgrade to the program named Relational01.sb
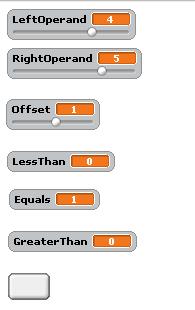
The program creates the following six variables and a button and displays them on the screen as shown in Figure 7:
Figure 7. Screen shot of the output from the program named Relational02.
|
|
Operation of the program
When the user clicks the green flag, the values of all three variables are set to 0.
The user slides the three sliders to set the values of LeftOperand, RightOperand, and Offset.
When the user clicks the button, three separate event handlers on the button test the sum of the left operand and the offset against the right operand for less than, equal to, and greater than and displays the results in the three variables having the corresponding names. A 0 is displayed if the value is false and a 1 is displayed if the value is true.
Make sure that your output matches the output shown in Figure 7 for the slider values shown in Figure 7.
A copy of this program has been posted online for your review (see Resources for the URL). If you don't find the program using that URL, search the Scratch site for the user named dbal.
I began by providing a very brief review of material from previous lessons.
Then I presented and explained the detailed steps required to write a Scratch program that uses the relational operators: less than, equal to, and greater than.
Finally, I provided the specifications for a student-programming project for you to demonstrate your understanding of what you learned from the first program and from earlier lessons.
Copies of both programs have been posted online for your review (see Resources for the URL). If you don't find the program using that URL, search the Scratch site for the user named dbal.
The previous lesson concentrated on arithmetic operators. This lesson explained the use of relational operators. The next lesson will explain the use of logical operators. Future lessons using the Scratch programming language will continue to deal with selection and will also deal with loops.
Copyright 2008, Richard G. Baldwin. Reproduction in whole or in part in any form or medium without express written permission from Richard Baldwin is prohibited.
Richard has participated in numerous consulting projects and he frequently provides onsite training at the high-tech companies located in and around Austin, Texas. He is the author of Baldwin's Programming Tutorials, which have gained a worldwide following among experienced and aspiring programmers. He has also published articles in JavaPro magazine.
In addition to his programming expertise, Richard has many years of practical experience in Digital Signal Processing (DSP). His first job after he earned his Bachelor's degree was doing DSP in the Seismic Research Department of Texas Instruments. (TI is still a world leader in DSP.) In the following years, he applied his programming and DSP expertise to other interesting areas including sonar and underwater acoustics.
Richard holds an MSEE degree from Southern Methodist University and has many years of experience in the application of computer technology to real-world problems.
-end-