
Published: January 13, 2009
By Richard G. Baldwin
Java Programming Notes # 349
This lesson is the next in a series (see Resources) designed to teach you how to write Java programs to do things like:
If you have ever wondered how to do these things, you've come to the right place.
If you have studied the earlier lessons in this series, you have learned:
You will learn how to edit the pixels in an image on a pixel-by-pixel basis using a program written entirely in Java.
I recommend that you open another copy of this document in a separate browser window and use the following links to easily find and view the figures and listings while you are reading about them.
I recommend that you also study the other lessons in my extensive collection of online programming tutorials. You will find a consolidated index at www.DickBaldwin.com.
In this series of lessons, I will present and explain many of the classes in a multimedia class library that was developed and released under a Creative Commons Attribution 3.0 United States License (see Resources) by Mark Guzdial and Barbara Ericson at Georgia Institute of Technology. In doing this, I will also present some interesting sample programs that use the library.
I explained how to download, install, and test the multimedia class library in an earlier lesson titled Multimedia Programming with Java, Getting Started (see Resources).
Normally, I provide and explain the code in relatively simple programs in order to teach you about specific programming concepts. However, I am going to depart from my normal approach in this lesson. In this lesson, I will present a relatively complex program designed to edit individual pixels in an image. I will explain how to use the program for that purpose, but I won't explain the code. You will have to wait for future lessons to learn about the programming concepts behind the program code.
A single-pixel editor program
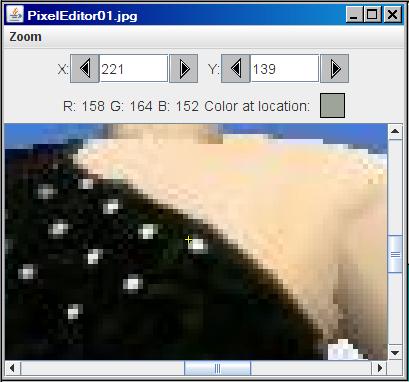
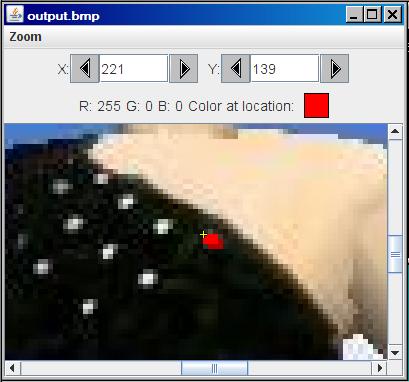
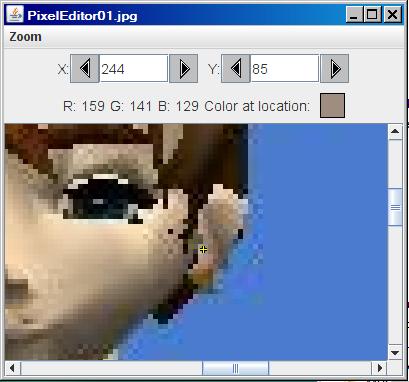
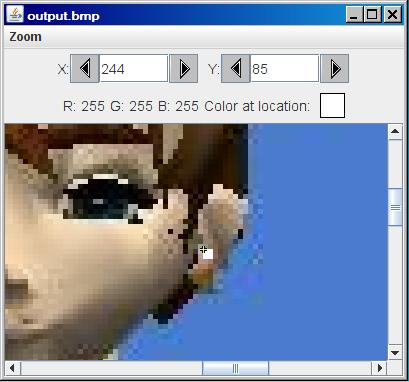
Sometimes it is useful to be able to edit the colors in an image on a pixel-by-pixel basis. Figure 1 shows the result of such an editing process, but you may have to look closely to identify the pixels that were edited.
Figure 1. Input and output from the program named PixelEditor01.
|
|
A red sequin and a diamond ear stud
If you look closely at the top image in Figure 1, you will see that the upper portion of the skater's costume is adorned with sequins. Each sequin is represented by a very small number of very light colored pixels. In order to demonstrate what you can do with this program, I changed the color of one of the sequins to red. You should be able to spot the red sequin in the bottom image in Figure 1.
In addition, I placed a diamond stud in the skater's left earlobe that isn't there in the original image. You should be able to see it in the bottom image but not in the top image.
The source code for this program is provided in Listing 1 and Listing 2 near the end of the lesson.
Listing 1 provides the source code for my original program named PixelEditor01.
Listing 2 is my modified version of the class named PictureExplorer from Ericson's multimedia library. I added several public accessor methods to the class to make it possible for objects instantiated from other classes to access certain private instance variables from a PictureExplorer object.
This program capitalizes on the availability of the PictureExplorer class, making it possible to edit the color of individual pixels in an image.
More specifically, Ericson's PictureExplorer class was modified to make certain instance variables of PictureExplorer objects accessible to objects instantiated from other classes.
Then a Java GUI was written that makes it possible to open an image file in a PictureExplorer object and edit the colors of the individual pixels in the image using the GUI.
Operational information
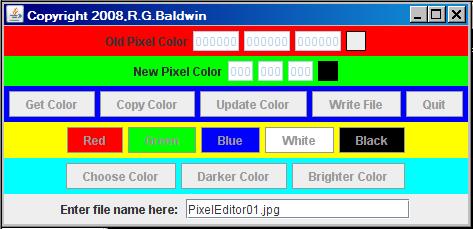
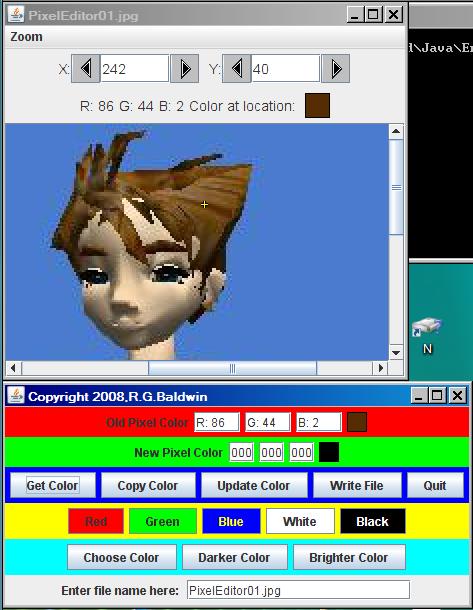
The program starts with a GUI in the upper-left corner of the screen as shown in Figure 2.
Figure 2. The program GUI at startup.
|
|
At that point, all of the user-input components are disabled except for the field at the bottom of the GUI where the user enters the name of the image file to be processed.
Enter the name of an image file
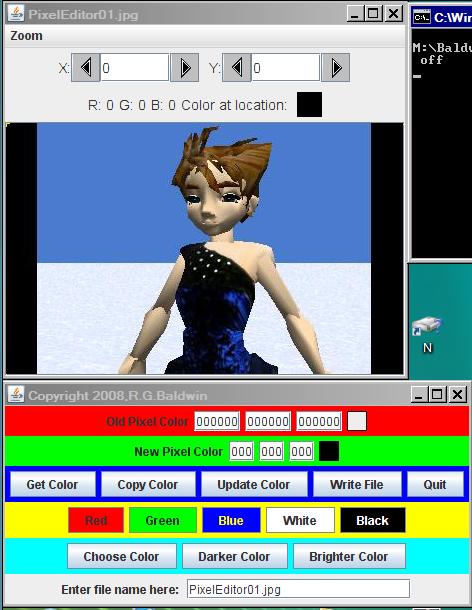
When the user identifies an image file in the text field labeled Enter file name here, the image is opened in a PictureExplorer object in the upper-left corner of the screen and the GUI is moved to a location immediately below the PictureExplorer object as shown in Figure 3.
Figure 3. A PictureExplorer object and the Program GUI.
|
|
Specifying the image file name
You can specify an input image file using only the file name and extension if the file is in the current directory. If it is not in the current directory, you must enter the full path to the file.
JPEG, PNG, and BMP files
The program has been tested for use with jpg files, png files, and bmp files as input files. Because the JPEG compression scheme can do strange things with colors, the output file is a bmp file written into the same directory as the input file.
The output file name is the same as the input file name except that the letters BAK are inserted immediately ahead of the extension, and the extension is always bmp. The input file is not modified.
Editing pixels
Once you reach the point shown in Figure 3, you can begin editing pixels. You select a pixel by clicking on it in the explorer window, or by using the controls in the upper portion of the explorer window.
You can zoom in or out on the image in the explorer window to see the pixels in more or less detail. For example, Figure 4 shows the image from Figure 1 zoomed by 500% to show the sequin that was converted to red in more detail. (Note that the crosshair cursor appears at the upper-left corner of the selected pixel.)
Figure 4. Zoomed view of sequins before modification.
|
|
The sequin is approximately 3 pixels by 5 pixels in size
As you can see, that sequin is about three pixels wide and two pixels high.
Figure 5 shows the zoomed view after I changed the color of the sequin to red.
Figure 5. Zoomed view of sequins after modification.
|
|
Two different shades of red
I used two different shades of red to create the red sequin. The lower-right portion of the red sequin is darker than the upper-left portion. (In retrospect, it probably would have been better if I had also made the left and top edges of the sequin darker than the middle of the sequin.)
A zoomed earlobe
In a similar vein, Figure 6 shows the skater's left ear before I inserted the diamond stud in her left earlobe.
Figure 6. Skater's left ear without the diamond stud.
|
|
Figure 7 shows her left ear after I inserted the diamond stud.
Figure 7. Skater's left ear after insertion of the diamond stud.
|
|
Suitable for very intricate work
This program makes it possible to do very intricate work insofar as editing an image is concerned. For example, the program could easily be used to remove a mole, pimple, or similar blemish from a digital photograph of someone's face. You could do that by replacing the pixels that define the mole with pixels having the color of neighboring pixels from unblemished skin.
Edit pixels using buttons and text fields
Once the image is loaded into the PictureExplorer object, you can edit any of the pixels in the image using the buttons and text fields in the GUI along with the user controls in the explorer window.
I will start at the top of the GUI and work my way down, describing the purpose of the buttons and the text fields as I go.
The Old Pixel Color data and the Get Color button
The text fields in the red panel in Figure 3 are for display of numeric data only. (They are always disabled insofar as data entry is concerned.) If you place the cursor at a particular location in the explorer window and click the Get Color button in the GUI, the numeric values for the color under the explorer cursor will be displayed in these three text fields. Also, the small square immediately to the right of the text fields in the red panel will show the color under the explorer cursor.
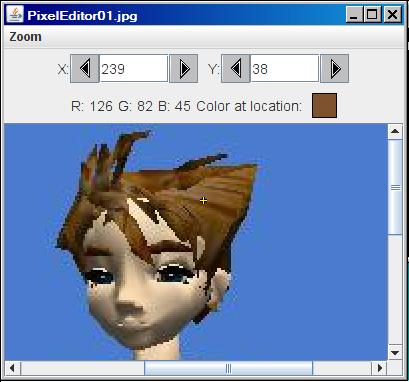
The skater has brown hair
For example, Figure 8 shows the result of clicking the Get Color button in the GUI while the explorer cursor (crosshair) is in the skater's hair.
Figure 8. Illustration of the Get Color button behavior.
|
|
Information matches between the two displays
As you would expect, the color values shown in the text fields in the red panel in the GUI and the color of the square to their right match the information in the upper portion of the explorer window.
The New Pixel Color values
The color of a pixel in the image is changed (or at least re-written) by clicking the button labeled Update Color in the GUI.
The three text fields in the green panel in the GUI are used to store the red, green, and blue color values that will be deposited into the currently-selected pixel in the explorer window when the user clicks the Update Color button in the GUI.
Several ways to establish new color values
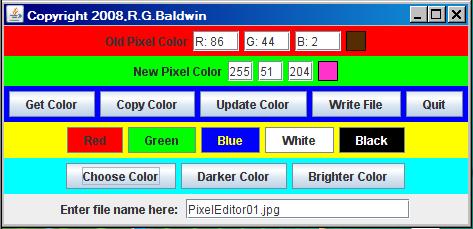
There are several ways that the values in these three text fields can be established. For example, the user can simply type numeric values into the text fields as shown in Figure 9.
Figure 9. Result of entering values into the New Pixel Color fields.
|
|
I manually entered the values 255, 51, and 204 into the three text fields in the green panel in Figure 9. This caused the square immediately to the right of the text fields to take on the color specified by the RGB values. If I were to click the Update Color button at this point, the pixel under the cursor in the explorer window would be changed to the color shown.
The Copy Color button
Another way to establish New Pixel Color values in the text fields in the green GUI panel is by clicking the Copy Color button.
I showed you earlier that clicking the Get Color button causes the color under the explorer cursor to be deposited into the text fields in the red panel in the GUI. Clicking the Copy Color button causes those values to be copied into the three text fields in the green panel.
Modify color but stay within the same family of colors
This capability is useful for modifying the color of a pixel in the explorer window while staying within the same family of colors.
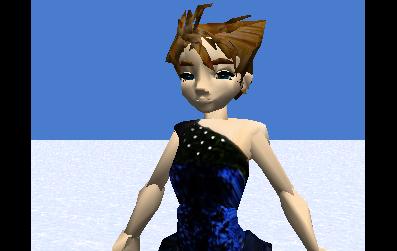
For example, that there is a blue highlight in each eye in Figure 8. Suppose we wanted to make those highlights a brighter shade of blue. Four pixels make up the highlights, two in each eye. We could accomplish this by clicking the following sequence of buttons once for each of the four pixels:
The results of doing this are shown in Figure 10.
Figure 10. Result of brightening eyeball highlights.
|
|
Compare Figure 10 with Figure 8
If you compare Figure 10 with Figure 8, you should see that the blue highlights in the skater's eyes in Figure 10 are a brighter shade of blue than in Figure 8.
Removal of moles, pimples, and other blemishes
Another good use for the Copy Color button would be in the removal of moles, pimples, and other skin blemishes from photographs. In this case, you could position the explorer cursor on neighboring unblemished skin and click the following buttons in sequence:
Then you could use the controls in the explorer window to position the cursor in the blemished portion of skin and click the Update Color button in the GUI. Using this approach, you could "paint over" a skin blemish, one pixel at a time, using the color of the nearest patch of unblemished skin.
The Write File button
You already know what the button labeled Update Color is used for, so I will move along to the button labeled Write File.
When the program first starts running, it copies the input image file into an output file of type bmp as described earlier. When you terminate the program, the final state of the image is written into that output file. At any point during the editing process, you can click the Write File button to cause the current state of the image to be written into the output file. For example, if you would like to save an intermediate version of the image, click the Write File button. Then use operating system features to make a copy of the file in its current state.
The Quit button
Clicking the large X in the upper-right corner of the explorer window has no effect because one of the modifications that I made to the PictureExplorer class was to disable that button.
However, clicking the large X in the upper-right corner of the GUI, or clicking the button labeled Quit, causes the current state of the image to be written into the output file described earlier and causes the program to terminate.
Buttons on the yellow panel
As I mentioned earlier, there are several different ways to cause color component values to be entered into the text fields on the green panel. If you click any of the five buttons labeled Red, Green, Blue, White, and Black on the yellow panel, the color values for the corresponding color will be written into the three text fields on the green panel. For example, if you want to change the color of a pixel underneath the cursor in the explorer window to blue, just click the following two buttons in sequence:
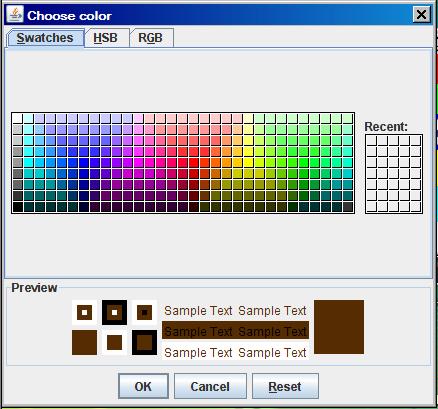
The button labeled Choose a Color
Most of us don't have the color component values for very many different colors stored in our heads. Therefore, we need some help in choosing a color and getting the color component values for that color. That is the purpose of the button labeled Choose a Color.
When you click the button labeled Choose a Color, a standard Java color-chooser dialog opens as shown in Figure 11.
Figure 11. A standard Java color-chooser dialog.
|
|
A pre-selected color
When the color-chooser dialog opens, the color defined by the text fields in the red panel of the GUI has been selected. For example, the dialog shown in Figure 11 corresponds to the state of the image and the GUI in Figure 8. As a result, the dialog has opened with the color of the skater's hair already selected.
Different ways to select a color
The color-chooser dialog provides three tabs, each of which provides a different way to select a color. When the user clicks the OK button in the dialog, the color component values for the selected color are deposited into the text fields in the green panel of the GUI, ready to be deposited under the explorer cursor. This provides a different way to begin with the color of a pixel and use that color to select a new related color for the pixel.
The Darker Color and Brighter Color buttons
The Color class of the standard Java library provides two methods named darker and brighter that can be used to create darker and brighter versions of a specified color. Clicking the Darker Color button or the Brighter Color button causes the corresponding method of the Color class to be applied to the color component values in the text fields in the green panel. That is why I used the Brighter Color button earlier to replace the blue highlights in the skater's eyes with a brighter shade of blue.
I encourage you to copy the code from Listing 1 and Listing 2, compile the code, and execute it. Make certain that the compiled version of the PictureExplorer class is either in the directory with your other class files, or at least is on the classpath ahead of the corresponding class file in Ericson's multimedia library.
Experiment with the code, making changes, and observing the results of your changes. Think of ways to improve the usefulness of the program. Make certain that you can explain why your changes behave as they do.
In this program, I introduced you to a new Java program that can be used to edit the pixels in an image on a pixel-by-pixel basis.
In the next lesson, you will learn about color distance, projecting 3D coordinates onto a 2D display plane, and edge detection. Understanding these concepts will help you to better understand modern image processing.
Listing 1. Source code for the program named PixelEditor01.
/*File PixelEditor01 Copyright 2009 R.G.Baldwin

This program capitalizes on the availability of the
PictureExplorer class released under a Creative Commons
Attribution 3.0 United States License by Barb Ericson
at Georgia Institute of Technology. The program makes it
possible to edit the color of individual pixels in an
image.

More specifically, Ericson's PictureExplorer class was
modified to make certain internals of PictureExplorer
objects accessible to objects instantiated from other
classes. Then a Java GUI was written that makes it
possible to open an image file in a PictureExplorer
object and edit the colors of the individual pixels
in the image using the GUI.

Specify an input image file using only the file name and
extension if the file is in the current directory.
Specify the full path to the file if it is not in the
current directory.

Both jpg and bmp file types are supported as input files.
The output file is a bmp file with the letters BAK
inserted in the file name. It is written in the same
directory as the input file. The input file is not
modified.

The program starts with a GUI in the upper-left corner of
the screen. When the user enters the name of the input
image file, the image is opened in a PictureExplorer
object in the upper-left corner of the screen and the GUI
is moved to a location immediately below the
PictureExplorer object.

From that point on, the user can edit pixels in the image
using the buttons and text fields in the GUI. A Write
button is provided to allow the user to save intermediate
versions of the edited image. Note, however, that each
time the Write button is clicked, the previously written
output file is overwritten. The user should manually save
the intermediate versions if they will be needed later.

The final edited version of the image is automatically
written to the disk when the user clicks the Quit button
or clicks the X in the upper-right corner of the GUI.

Tested using Windows Vista Premium Home Edition,
Java v1.6, and the version of Ericson's multimedia library
contained in bookClasses10-1-07.zip.
*********************************************************/

import java.awt.event.MouseEvent;
import java.awt.event.ActionEvent;
import java.awt.event.ActionListener;
import java.awt.event.WindowAdapter;
import java.awt.event.WindowListener;
import java.awt.event.WindowEvent;
import javax.swing.JButton;
import javax.swing.JFrame;
import javax.swing.JPanel;
import javax.swing.JTextField;
import javax.swing.JLabel;
import javax.swing.JColorChooser;
import javax.swing.WindowConstants;
import javax.swing.event.DocumentListener;
import javax.swing.event.DocumentEvent;
import javax.swing.border.LineBorder;
import java.awt.Color;
import java.awt.BorderLayout;
import java.awt.Dimension;
import java.io.File;

public class PixelEditor01 extends JFrame{

  public static void main(String[] args){
    new PixelEditor01();
  }//end main method
//------------------------------------------------------//

  //Declare a large number of working variables.
  // Initialize some of them.
  PixelEditor01 thisObj = null;
  JFrame explorerFrame = null;
  PictureExplorer explorer = null;
  Picture pix;

  JPanel controlPanel = new JPanel();
  JPanel topPanel = new JPanel();
  JPanel bottomPanel = new JPanel();

  JPanel oldColorPanel = new JPanel();
  JPanel newColorPanel = new JPanel();
  JPanel buttonPanel = new JPanel();

  JPanel swatchPanel = new JPanel();
  JPanel choosePanel = new JPanel();
  JPanel fileNamePanel = new JPanel();

  JPanel oldColorIndicatorPanel = new JPanel();
  JPanel newColorIndicatorPanel = new JPanel();


  JTextField oldRedField = new JTextField("000000");
  JTextField oldGreenField = new JTextField("000000");
  JTextField oldBlueField = new JTextField("000000");

  JTextField newRedField = new JTextField("000");
  JTextField newGreenField = new JTextField("000");
  JTextField newBlueField = new JTextField("000");

  //Pre-load the input file name field with the name of
  // a specific test file.
  JTextField inputFileNameField = new JTextField(
                                  "PixelEditor01.jpg",20);


  JButton getColorButton = new JButton("Get Color");
  JButton copyColorButton = new JButton("Copy Color");
  JButton updateColorButton = new JButton("Update Color");
  JButton writeButton = new JButton("Write File");
  JButton quitButton = new JButton("Quit");

  JButton redButton = new JButton("Red");
  JButton greenButton = new JButton("Green");
  JButton blueButton = new JButton("Blue");
  JButton whiteButton = new JButton("White");
  JButton blackButton = new JButton("Black");
  JButton chooseButton = new JButton("Choose Color");
  JButton darkerButton = new JButton("Darker Color");
  JButton brighterButton = new JButton("Brighter Color");


  //Integer representations of old and new colors
  int oldRedInt = 0;
  int oldGreenInt = 0;
  int oldBlueInt = 0;

  int newRedInt = 0;
  int newGreenInt = 0;
  int newBlueInt = 0;

  //Copies of properties of the PictureExplorer object
  int xIndex = 0;
  int yIndex = 0;
  double zoomFactor = 0;

  String fileName = "no file specified";
  String outputPath = null;
  //----------------------------------------------------//

  public PixelEditor01(){//constructor
    //Construct the GUI.
    controlPanel.setLayout(new BorderLayout());
    controlPanel.add(topPanel,BorderLayout.NORTH);
    controlPanel.add(bottomPanel,BorderLayout.SOUTH);

    topPanel.setLayout(new BorderLayout());
    topPanel.add(oldColorPanel,BorderLayout.NORTH);
    topPanel.add(newColorPanel,BorderLayout.CENTER);
    topPanel.add(buttonPanel,BorderLayout.SOUTH);

    bottomPanel.setLayout(new BorderLayout());
    bottomPanel.add(swatchPanel,BorderLayout.NORTH);
    bottomPanel.add(choosePanel,BorderLayout.CENTER);
    bottomPanel.add(fileNamePanel,BorderLayout.SOUTH);

    oldColorPanel.setBackground(Color.RED);
    oldColorPanel.add(new JLabel("Old Pixel Color"));
    oldColorPanel.add(oldRedField);
    oldColorPanel.add(oldGreenField);
    oldColorPanel.add(oldBlueField);
    oldColorPanel.add(oldColorIndicatorPanel);

    newColorPanel.setBackground(Color.GREEN);
    newColorPanel.add(new JLabel("New Pixel Color"));
    newColorPanel.add(newRedField);
    newColorPanel.add(newGreenField);
    newColorPanel.add(newBlueField);
    newColorPanel.add(newColorIndicatorPanel);

    buttonPanel.setBackground(Color.BLUE);
    buttonPanel.add(getColorButton);
    buttonPanel.add(copyColorButton);
    buttonPanel.add(updateColorButton);
    buttonPanel.add(writeButton);
    buttonPanel.add(quitButton);


    swatchPanel.setBackground(Color.YELLOW);
    swatchPanel.add(redButton);
    swatchPanel.add(greenButton);
    swatchPanel.add(blueButton);
    swatchPanel.add(whiteButton);
    swatchPanel.add(blackButton);


    choosePanel.setBackground(Color.CYAN);
    choosePanel.add(chooseButton);
    choosePanel.add(darkerButton);
    choosePanel.add(brighterButton);


    fileNamePanel.add(new JLabel(
                               "Enter file name here: "));
    fileNamePanel.add(inputFileNameField);


    oldColorIndicatorPanel.setBorder(new LineBorder(
                                          Color.black,1));
    oldColorIndicatorPanel.setPreferredSize(
                                    new Dimension(20,20));


    newColorIndicatorPanel.setBorder(new LineBorder(
                                          Color.black,1));
    newColorIndicatorPanel.setPreferredSize(
                                    new Dimension(20,20));
    paintNewColorIndicator();


    redButton.setBackground(Color.RED);
    greenButton.setBackground(Color.GREEN);
    blueButton.setForeground(Color.YELLOW);
    blueButton.setBackground(Color.BLUE);
    whiteButton.setBackground(Color.WHITE);
    blackButton.setForeground(Color.WHITE);
    blackButton.setBackground(Color.BLACK);


    //Add the controlPanel to the content pane, adjust to
    // the correct size, and set the title.
    getContentPane().add(controlPanel);
    pack();
    setTitle("Copyright 2008,R.G.Baldwin");

    //Disable all user controls except for the text field
    // where the user enters the name of the input file.
    //The user controls will be enabled when the user
    // enters the name of the input file.
    getColorButton.setEnabled(false);
    copyColorButton.setEnabled(false);
    updateColorButton.setEnabled(false);
    writeButton.setEnabled(false);
    quitButton.setEnabled(false);

    redButton.setEnabled(false);
    greenButton.setEnabled(false);
    blueButton.setEnabled(false);
    whiteButton.setEnabled(false);
    blackButton.setEnabled(false);
    chooseButton.setEnabled(false);
    darkerButton.setEnabled(false);
    brighterButton.setEnabled(false);

    oldRedField.setEnabled(false);
    oldGreenField.setEnabled(false);
    oldBlueField.setEnabled(false);

    newRedField.setEnabled(false);
    newGreenField.setEnabled(false);
    newBlueField.setEnabled(false);


    //Make the GUI visible, set the focus, and establish a
    // reference to the GUI object.
    setVisible(true);
    inputFileNameField.requestFocus();
    thisObj = this;

    //--------------------------------------------------//
    //Register listeners on the user input components.
    //--------------------------------------------------//
    getColorButton.addActionListener(
      new ActionListener(){
        public void actionPerformed(ActionEvent e){
          oldRedField.setText(explorer.getRValue());
          oldGreenField.setText(explorer.getGValue());
          oldBlueField.setText(explorer.getBValue());

          String oldRedString = oldRedField.getText();
          String oldGreenString = oldGreenField.getText();
          String oldBlueString = oldBlueField.getText();
          oldRedInt = goParseInt(oldRedString.substring(
                            oldRedString.indexOf(':')+2));
          oldGreenInt = goParseInt(
                        oldGreenString.substring(
                          oldGreenString.indexOf(':')+2));
          oldBlueInt = goParseInt(oldBlueString.substring(
                           oldBlueString.indexOf(':')+2));

          oldColorIndicatorPanel.setBackground(
             new Color(oldRedInt,oldGreenInt,oldBlueInt));
        }//end action performed
      }//end newActionListener
    );//end addActionListener
    //--------------------------------------------------//

    copyColorButton.addActionListener(
      new ActionListener(){
        public void actionPerformed(ActionEvent e){
          newRedField.setText("" + oldRedInt);
          newGreenField.setText("" + oldGreenInt);
          newBlueField.setText("" + oldBlueInt);
        }//end action performed
      }//end newActionListener
    );//end addActionListener
    //--------------------------------------------------//

    updateColorButton.addActionListener(
      new ActionListener(){
        public void actionPerformed(ActionEvent e){

          xIndex = explorer.getXIndex();
          yIndex = explorer.getYIndex();
          zoomFactor = explorer.getZoomFactor();
          String zoomString = "100%";
          if(zoomFactor == 0.25){
            zoomString = "25%";
          }else if(zoomFactor == 0.50){
            zoomString = "50%";
          }else if(zoomFactor == 0.75){
            zoomString = "75%";
          }else if(zoomFactor == 1.0){
            zoomString = "100%";
          }else if(zoomFactor == 1.5){
            zoomString = "150%";
          }else if(zoomFactor == 2.0){
            zoomString = "200%";
          }else if(zoomFactor == 5.0){
            zoomString = "500%";
          }else{
            zoomString = "100%";//in case no match
          }//end else

          int newRedInt = goParseInt(
                                   newRedField.getText());
          int newGreenInt = goParseInt(
                                 newGreenField.getText());
          int newBlueInt = goParseInt(
                                  newBlueField.getText());

          if(!((newRedInt >= 0) && (newRedInt <= 255))){
            newRedInt = 0;
            newRedField.setText("Err");
          }//end if

          Color newColor = new Color(
                        newRedInt,newGreenInt,newBlueInt);
          pix.getPixel(xIndex,yIndex).setColor(newColor);

          //Dispose of the existing explorer and create a
          // new one.
          explorerFrame.dispose();

          explorer = new PictureExplorer(
                                        new Picture(pix));
          //Get ref to the new frame
          explorerFrame = explorer.getFrame();
          explorerFrame.setDefaultCloseOperation(
                     WindowConstants.DO_NOTHING_ON_CLOSE);

          //Now set the state of the new explorer.
          //Simulate a mouse pressed event in the picture
          // to set the cursor and the text in the
          // coordinate fields.
          explorer.mousePressed(new MouseEvent(
                           new JButton("dummy component"),
                           MouseEvent.MOUSE_PRESSED,
                           (long)0,
                           0,
                           xIndex,
                           yIndex,
                           0,
                           false));

          //Simulate an action event on the zoom menu to
          // set the zoom.
          explorer.actionPerformed(new ActionEvent(
                             explorer,
                             ActionEvent.ACTION_PERFORMED,
                             zoomString));


        }//end actionPerformed
      }//end newActionListener
    );//end addActionListener
    //--------------------------------------------------//

    redButton.addActionListener(
      new ActionListener(){
        public void actionPerformed(ActionEvent e){
          newRedField.setText("255");
          newGreenField.setText("000");
          newBlueField.setText("000");
        }//end action performed
      }//end newActionListener
    );//end addActionListener
    //--------------------------------------------------//

    greenButton.addActionListener(
      new ActionListener(){
        public void actionPerformed(ActionEvent e){
          newRedField.setText("000");
          newGreenField.setText("255");
          newBlueField.setText("000");
        }//end action performed
      }//end newActionListener
    );//end addActionListener
    //--------------------------------------------------//

    blueButton.addActionListener(
      new ActionListener(){
        public void actionPerformed(ActionEvent e){
          newRedField.setText("000");
          newGreenField.setText("000");
          newBlueField.setText("255");
        }//end action performed
      }//end newActionListener
    );//end addActionListener
    //--------------------------------------------------//

    whiteButton.addActionListener(
      new ActionListener(){
        public void actionPerformed(ActionEvent e){
          newRedField.setText("255");
          newGreenField.setText("255");
          newBlueField.setText("255");
        }//end action performed
      }//end newActionListener
    );//end addActionListener
    //--------------------------------------------------//

    blackButton.addActionListener(
      new ActionListener(){
        public void actionPerformed(ActionEvent e){
          newRedField.setText("000");
          newGreenField.setText("000");
          newBlueField.setText("000");
        }//end action performed
      }//end newActionListener
    );//end addActionListener
    //--------------------------------------------------//

    chooseButton.addActionListener(
      new ActionListener(){
        public void actionPerformed(ActionEvent e){
          Color selColor = JColorChooser.showDialog(
                    chooseButton,"Choose color",new Color(
                       oldRedInt,oldGreenInt,oldBlueInt));
          if(selColor != null){
            //Don't change the color if the user cancels
            // out.
            newRedField.setText("" + selColor.getRed());
            newGreenField.setText(
                                "" + selColor.getGreen());
            newBlueField.setText("" + selColor.getBlue());
          }//end if
        }//end action performed
      }//end newActionListener
    );//end addActionListener
    //--------------------------------------------------//

    writeButton.addActionListener(
      new ActionListener(){
        public void actionPerformed(ActionEvent e){
            pix.write(outputPath);
        }//end action performed
      }//end newActionListener
    );//end addActionListener
    //--------------------------------------------------//

    darkerButton.addActionListener(
      new ActionListener(){
        public void actionPerformed(ActionEvent e){
          Color color = new Color(
               newRedInt,newGreenInt,newBlueInt).darker();
          newRedField.setText("" + color.getRed());
          newGreenField.setText("" + color.getGreen());
          newBlueField.setText("" + color.getBlue());
        }//end action performed
      }//end newActionListener
    );//end addActionListener
    //--------------------------------------------------//

    brighterButton.addActionListener(
      new ActionListener(){
        public void actionPerformed(ActionEvent e){
          Color color = new Color(
             newRedInt,newGreenInt,newBlueInt).brighter();
          newRedField.setText("" + color.getRed());
          newGreenField.setText("" + color.getGreen());
          newBlueField.setText("" + color.getBlue());
        }//end action performed
      }//end newActionListener
    );//end addActionListener
    //--------------------------------------------------//

    //Note that the Quit button and the JFrame close
    // button are designed to behave the same way: save
    // the file and terminate the program.
    quitButton.addActionListener(
      new ActionListener(){
        public void actionPerformed(ActionEvent e){
          pix.write(outputPath);
          System.exit(0);
        }//end action performed
      }//end newActionListener
    );//end addActionListener
    //--------------------------------------------------//

    thisObj.addWindowListener(
      new WindowAdapter(){
        public void windowClosing(WindowEvent e){
          pix.write(outputPath);
          System.exit(0);
        }//end windowClosing
      }//end new WindowAdapter
    );//end addWindowListener
    //--------------------------------------------------//

    inputFileNameField.addActionListener(
      new ActionListener(){
        public void actionPerformed(ActionEvent e){
          fileName = inputFileNameField.getText();

          pix = new Picture(fileName);

          //Because color corruption can occur when
          // writing jpg files in Java, the following code
          // makes a copy of the input file as a bmp file.
          // All further processing and writing is done in
          // bmp format. The characters BAK are
          // inserted in the output file immediately
          // before the extension. The final output is a
          // bmp file, which can be converted back to a
          // jpg file using an image-utility program such
          // as Lview.
          String inputPath = new File(fileName).
                                        getAbsolutePath();
          int posDot = inputPath.lastIndexOf('.');
          outputPath = inputPath.substring(0,posDot)
                                              + "BAK.bmp";
          pix.write(outputPath);

          explorer =
                    new PictureExplorer(new Picture(pix));
          explorerFrame = explorer.getFrame();
          explorerFrame.setDefaultCloseOperation(
                     WindowConstants.DO_NOTHING_ON_CLOSE);
          thisObj.setDefaultCloseOperation(
                     WindowConstants.DO_NOTHING_ON_CLOSE);

          //Cause the GUI to be located immediately below
          // the PictureExplorer object.
          setLocation(0,explorerFrame.getHeight());

          getColorButton.setEnabled(true);
          copyColorButton.setEnabled(true);
          updateColorButton.setEnabled(true);
          writeButton.setEnabled(true);
          quitButton.setEnabled(true);

          redButton.setEnabled(true);
          greenButton.setEnabled(true);
          blueButton.setEnabled(true);
          whiteButton.setEnabled(true);
          blackButton.setEnabled(true);
          chooseButton.setEnabled(true);
          darkerButton.setEnabled(true);
          brighterButton.setEnabled(true);

          oldRedField.setEnabled(true);
          oldGreenField.setEnabled(true);
          oldBlueField.setEnabled(true);

          newRedField.setEnabled(true);
          newGreenField.setEnabled(true);
          newBlueField.setEnabled(true);

        }//end action performed
      }//end newActionListener
    );//end addActionListener
    //--------------------------------------------------//

    newRedField.getDocument().addDocumentListener(
      new DocumentListener(){
        public void changedUpdate(DocumentEvent e){}

        public void removeUpdate(DocumentEvent e){
          try{
            newRedInt = Integer.parseInt(
                                   newRedField.getText());
            if((newRedInt >= 0) && (newRedInt <= 255)){
              paintNewColorIndicator();
            }//end if
          }catch(Exception ex){
            //do nothing on exception
          }//end catch
        }//end removeUpdate

        public void insertUpdate(DocumentEvent e){
          try{
            newRedInt = Integer.parseInt(
                                   newRedField.getText());
            if((newRedInt >= 0) && (newRedInt <= 255)){
              paintNewColorIndicator();
            }//end if
          }catch(Exception ex){
            //do nothing on exception
          }//end catch
        }//end insertUpdate

      }//end new DocumentListener
    );//end addDocumentListener
    //--------------------------------------------------//

    newGreenField.getDocument().addDocumentListener(
      new DocumentListener(){
        public void changedUpdate(DocumentEvent e){}

        public void removeUpdate(DocumentEvent e){
          try{
            newGreenInt = Integer.parseInt(
                                 newGreenField.getText());
            if((newGreenInt >= 0) && (newGreenInt <= 255))
            {
              paintNewColorIndicator();
            }//end if
          }catch(Exception ex){
            //do nothing on exception
          }//end catch
        }//end removeUpdate

        public void insertUpdate(DocumentEvent e){
          try{
            newGreenInt = Integer.parseInt(
                                 newGreenField.getText());
            if((newGreenInt >= 0) && (newGreenInt <= 255))
            {
              paintNewColorIndicator();
            }//end if
          }catch(Exception ex){
            //do nothing on exception
          }//end catch
        }//end insertUpdate

      }//end new DocumentListener
    );//end addDocumentListener
    //--------------------------------------------------//
    newBlueField.getDocument().addDocumentListener(
      new DocumentListener(){
        public void changedUpdate(DocumentEvent e){}

        public void removeUpdate(DocumentEvent e){
          try{
            newBlueInt = Integer.parseInt(
                                  newBlueField.getText());
            if((newBlueInt >= 0) && (newBlueInt <= 255)){
              paintNewColorIndicator();
            }//end if
          }catch(Exception ex){
            //do nothing on exception
          }//end catch
        }//end removeUpdate

        public void insertUpdate(DocumentEvent e){
          try{
            newBlueInt = Integer.parseInt(
                                  newBlueField.getText());
            if((newBlueInt >= 0) && (newBlueInt <= 255)){
              paintNewColorIndicator();
            }//end if
          }catch(Exception ex){
            //do nothing on exception
          }//end catch
        }//end insertUpdate

      }//end new DocumentListener
    );//end addDocumentListener
    //--------------------------------------------------//
  }//end constructor
  //----------------------------------------------------//

  //The purpose of this method is to color a swatch next
  // to the new RGB values.
  void paintNewColorIndicator(){
    newColorIndicatorPanel.setBackground(
             new Color(newRedInt,newGreenInt,newBlueInt));
  }//end paintNewColorIndicator

  //----------------------------------------------------//

  //The purpose of this method is to absorb exceptions
  // that may be thrown by the parseInt method. In the
  // event that an exception is thrown, this method simply
  // returns an int value of 0;
  private int goParseInt(String string){
    int result = 0;
    try{
      result = Integer.parseInt(string);
    }catch(Exception e){
      result = 0;
    }//end catch
    return result;
  }//end goParseInt
  //----------------------------------------------------//

}//end class PixelEditor01 |
Listing 2. Source code for the PictureExplorer class.
import java.awt.*;
import java.awt.event.*;
import javax.swing.*;
import java.awt.image.*;
import javax.swing.border.*;

/**
 * Displays a picture and lets you explore the picture by
 * displaying the x, y, red, green, and blue values of the
 * pixel at the cursor when you click a mouse button or
 * press and hold a mouse button while moving the cursor.
 * It also lets you zoom in or out.  You can also type in
 * a x and y value to see the color at that location.
 *
 * Originally created for the Jython Environment for
 * Students (JES).
 * Modified to work with DrJava by Barbara Ericson
 *
 * Copyright Georgia Institute of Technology 2004
 * @author Keith McDermottt, gte047w@cc.gatech.edu
 * @author Barb Ericson ericson@cc.gatech.edu
 */

/*
12/24/08 Modified by Baldwin to add get methods to cause
the following values to be accessible from outside the
object:

int xIndex
int yIndex
String rValue text
String gValue text
String bValue text
double zoomFactor
JFrame pictureFrame

Also disabled the call to setDefaultCloseOperation
Also made minor formatting changes to force the code to
fit within the width of this narrow publication format.
*/

public class PictureExplorer implements
       MouseMotionListener, ActionListener, MouseListener{

 // current x and y index
 private int xIndex = 0;
 private int yIndex = 0;

 //Main gui variables
 private JFrame pictureFrame;
 private JScrollPane scrollPane;

 //information bar variables
 private JLabel xLabel;
 private JButton xPrevButton;
 private JButton yPrevButton;
 private JButton xNextButton;
 private JButton yNextButton;
 private JLabel yLabel;
 private JTextField xValue;
 private JTextField yValue;
 private JLabel rValue;
 private JLabel gValue;
 private JLabel bValue;
 private JLabel colorLabel;
 private JPanel colorPanel;

 // menu components
 private JMenuBar menuBar;
 private JMenu zoomMenu;
 private JMenuItem twentyFive;
 private JMenuItem fifty;
 private JMenuItem seventyFive;
 private JMenuItem hundred;
 private JMenuItem hundredFifty;
 private JMenuItem twoHundred;
 private JMenuItem fiveHundred;

 /** The picture being explored */
 private DigitalPicture picture;

 /** The image icon used to display the picture */
 private ImageIcon scrollImageIcon;

 /** The image display */
 private ImageDisplay imageDisplay;

 /** the zoom factor (amount to zoom) */
 private double zoomFactor;

 /** the number system to use, 0 means starting at 0,
  *1 means starting at 1 */
 private int numberBase=0;

 /**
  * Public constructor
  * @param picture the picture to explore
  */
 public PictureExplorer(DigitalPicture picture)
 {
   // set the fields
   this.picture=picture;
   zoomFactor=1;

   // create the window and set things up
   createWindow();
 }

//===Methods added by Baldwin on 12/24/08===============//
  /**
   *Method to get the xIndex value.
   */
  public int getXIndex(){
    return xIndex;
  }//end getXIndex

  /**
   *Method to get the yIndex value.
   */
  public int getYIndex(){
    return yIndex;
  }//end getYIndex

  /**
   *Method to get the rValue text.
   */
  public String getRValue(){
    return rValue.getText();
  }//end getRValue

  /**
   *Method to get the gValue text.
   */
  public String getGValue(){
    return gValue.getText();
  }//end getGValue

  /**
   *Method to get the brValue text.
   */
  public String getBValue(){
    return bValue.getText();
  }//end getBValue

  /**
   *Method to get the zoomFactor value.
   */
  public double getZoomFactor(){
    return zoomFactor;
  }//end getZoomFactor

  /**
   *Method to get a reference to the frame
   */
  public JFrame getFrame(){
    return pictureFrame;
  }//end getFrame()

//===End methods added by Baldwin on 12/24/08===========//

 /**
  * Changes the number system to start at one
  */
 public void changeToBaseOne()
 {
   numberBase=1;
 }

 /**
  * Set the title of the frame
  *@param title the title to use in the JFrame
  */
 public void setTitle(String title)
 {
   pictureFrame.setTitle(title);
 }

 /**
  * Method to create and initialize the picture frame
  */
 private void createAndInitPictureFrame()
 {
   pictureFrame = new JFrame(); // create the JFrame
   // allow the user to resize it
   pictureFrame.setResizable(true);
   pictureFrame.getContentPane().setLayout(
                 new BorderLayout()); // use border layout
// pictureFrame.setDefaultCloseOperation(
//  JFrame.DISPOSE_ON_CLOSE); // when close stop
   pictureFrame.setTitle(picture.getTitle());
   PictureExplorerFocusTraversalPolicy newPolicy =
                new PictureExplorerFocusTraversalPolicy();
   pictureFrame.setFocusTraversalPolicy(newPolicy);

 }

 /**
  * Method to create the menu bar, menus, and menu items
  */
 private void setUpMenuBar()
 {
   //create menu
   menuBar = new JMenuBar();
   zoomMenu = new JMenu("Zoom");
   twentyFive = new JMenuItem("25%");
   fifty = new JMenuItem("50%");
   seventyFive = new JMenuItem("75%");
   hundred = new JMenuItem("100%");
   hundred.setEnabled(false);
   hundredFifty = new JMenuItem("150%");
   twoHundred = new JMenuItem("200%");
   fiveHundred = new JMenuItem("500%");

   // add the action listeners
   twentyFive.addActionListener(this);
   fifty.addActionListener(this);
   seventyFive.addActionListener(this);
   hundred.addActionListener(this);
   hundredFifty.addActionListener(this);
   twoHundred.addActionListener(this);
   fiveHundred.addActionListener(this);

   // add the menu items to the menus
   zoomMenu.add(twentyFive);
   zoomMenu.add(fifty);
   zoomMenu.add(seventyFive);
   zoomMenu.add(hundred);
   zoomMenu.add(hundredFifty);
   zoomMenu.add(twoHundred);
   zoomMenu.add(fiveHundred);
   menuBar.add(zoomMenu);

   // set the menu bar to this menu
   pictureFrame.setJMenuBar(menuBar);
 }

 /**
  * Create and initialize the scrolling image
  */
 private void createAndInitScrollingImage()
 {
   scrollPane = new JScrollPane();

   BufferedImage bimg = picture.getBufferedImage();
   imageDisplay = new ImageDisplay(bimg);
   imageDisplay.addMouseMotionListener(this);
   imageDisplay.addMouseListener(this);
   imageDisplay.setToolTipText("Click a mouse button on"
               + " a pixel to see the pixel information");
   scrollPane.setViewportView(imageDisplay);
   pictureFrame.getContentPane().add(
                         scrollPane, BorderLayout.CENTER);
 }

 /**
  * Creates the JFrame and sets everything up
  */
 private void createWindow()
 {
   // create the picture frame and initialize it
   createAndInitPictureFrame();

   // set up the menu bar
   setUpMenuBar();

   //create the information panel
   createInfoPanel();

   //creates the scrollpane for the picture
   createAndInitScrollingImage();

   // show the picture in the frame at the size it needs
   // to be
   pictureFrame.pack();
   pictureFrame.setVisible(true);
 }

 /**
  * Method to set up the next and previous buttons for the
  * pixel location information
  */
 private void setUpNextAndPreviousButtons()
 {
   // create the image icons for the buttons
   Icon prevIcon = new ImageIcon(
         SoundExplorer.class.getResource("leftArrow.gif"),
                                 "previous index");
   Icon nextIcon = new ImageIcon(
        SoundExplorer.class.getResource("rightArrow.gif"),
                                 "next index");
   // create the arrow buttons
   xPrevButton = new JButton(prevIcon);
   xNextButton = new JButton(nextIcon);
   yPrevButton = new JButton(prevIcon);
   yNextButton = new JButton(nextIcon);

   // set the tool tip text
   xNextButton.setToolTipText(
                       "Click to go to the next x value");
   xPrevButton.setToolTipText(
                   "Click to go to the previous x value");
   yNextButton.setToolTipText(
                       "Click to go to the next y value");
   yPrevButton.setToolTipText(
                   "Click to go to the previous y value");

   // set the sizes of the buttons
   int prevWidth = prevIcon.getIconWidth() + 2;
   int nextWidth = nextIcon.getIconWidth() + 2;
   int prevHeight = prevIcon.getIconHeight() + 2;
   int nextHeight = nextIcon.getIconHeight() + 2;
   Dimension prevDimension =
                      new Dimension(prevWidth,prevHeight);
   Dimension nextDimension =
                     new Dimension(nextWidth, nextHeight);
   xPrevButton.setPreferredSize(prevDimension);
   yPrevButton.setPreferredSize(prevDimension);
   xNextButton.setPreferredSize(nextDimension);
   yNextButton.setPreferredSize(nextDimension);

   // handle previous x button press
   xPrevButton.addActionListener(new ActionListener() {
     public void actionPerformed(ActionEvent evt) {
       xIndex--;
       if (xIndex < 0)
         xIndex = 0;
       displayPixelInformation(xIndex,yIndex);
     }
   });

   // handle previous y button press
   yPrevButton.addActionListener(new ActionListener() {
     public void actionPerformed(ActionEvent evt) {
       yIndex--;
       if (yIndex < 0)
         yIndex = 0;
       displayPixelInformation(xIndex,yIndex);
     }
   });

   // handle next x button press
   xNextButton.addActionListener(new ActionListener() {
     public void actionPerformed(ActionEvent evt) {
       xIndex++;
       if (xIndex >= picture.getWidth())
         xIndex = picture.getWidth() - 1;
       displayPixelInformation(xIndex,yIndex);
     }
   });

   // handle next y button press
   yNextButton.addActionListener(new ActionListener() {
     public void actionPerformed(ActionEvent evt) {
       yIndex++;
       if (yIndex >= picture.getHeight())
         yIndex = picture.getHeight() - 1;
       displayPixelInformation(xIndex,yIndex);
     }
   });
 }

 /**
  * Create the pixel location panel
  * @param labelFont the font for the labels
  * @return the location panel
  */
 public JPanel createLocationPanel(Font labelFont) {

   // create a location panel
   JPanel locationPanel = new JPanel();
   locationPanel.setLayout(new FlowLayout());
   Box hBox = Box.createHorizontalBox();

   // create the labels
   xLabel = new JLabel("X:");
   yLabel = new JLabel("Y:");

   // create the text fields
   xValue = new JTextField(
                 Integer.toString(xIndex + numberBase),6);
   xValue.addActionListener(new ActionListener() {
     public void actionPerformed(ActionEvent e) {
       displayPixelInformation(
                       xValue.getText(),yValue.getText());
     }
   });
   yValue = new JTextField(
                 Integer.toString(yIndex + numberBase),6);
   yValue.addActionListener(new ActionListener() {
     public void actionPerformed(ActionEvent e) {
      displayPixelInformation(
                       xValue.getText(),yValue.getText());
     }
   });

   // set up the next and previous buttons
   setUpNextAndPreviousButtons();

   // set up the font for the labels
   xLabel.setFont(labelFont);
   yLabel.setFont(labelFont);
   xValue.setFont(labelFont);
   yValue.setFont(labelFont);

   // add the items to the vertical box and the box to the
   // panel
   hBox.add(Box.createHorizontalGlue());
   hBox.add(xLabel);
   hBox.add(xPrevButton);
   hBox.add(xValue);
   hBox.add(xNextButton);
   hBox.add(Box.createHorizontalStrut(10));
   hBox.add(yLabel);
   hBox.add(yPrevButton);
   hBox.add(yValue);
   hBox.add(yNextButton);
   locationPanel.add(hBox);
   hBox.add(Box.createHorizontalGlue());

   return locationPanel;
 }

 /**
  * Create the color information panel
  * @param labelFont the font to use for labels
  * @return the color information panel
  */
 private JPanel createColorInfoPanel(Font labelFont)
 {
   // create a color info panel
   JPanel colorInfoPanel = new JPanel();
   colorInfoPanel.setLayout(new FlowLayout());

   // get the pixel at the x and y
   Pixel pixel = new Pixel(picture,xIndex,yIndex);

   // create the labels
   rValue = new JLabel("R: " + pixel.getRed());
   gValue = new JLabel("G: " + pixel.getGreen());
   bValue = new JLabel("B: " + pixel.getBlue());

   // create the sample color panel and label
   colorLabel = new JLabel("Color at location: ");
   colorPanel = new JPanel();
   colorPanel.setBorder(new LineBorder(Color.black,1));

   // set the color sample to the pixel color
   colorPanel.setBackground(pixel.getColor());

   // set the font
   rValue.setFont(labelFont);
   gValue.setFont(labelFont);
   bValue.setFont(labelFont);
   colorLabel.setFont(labelFont);
   colorPanel.setPreferredSize(new Dimension(25,25));

   // add items to the color information panel
   colorInfoPanel.add(rValue);
   colorInfoPanel.add(gValue);
   colorInfoPanel.add(bValue);
   colorInfoPanel.add(colorLabel);
   colorInfoPanel.add(colorPanel);

   return colorInfoPanel;
 }

 /**
  * Creates the North JPanel with all the pixel location
  * and color information
  */
 private void createInfoPanel()
 {
   // create the info panel and set the layout
   JPanel infoPanel = new JPanel();
   infoPanel.setLayout(new BorderLayout());

   // create the font
   Font largerFont = new Font(
                       infoPanel.getFont().getName(),
                       infoPanel.getFont().getStyle(),14);

   // create the pixel location panel
   JPanel locationPanel = createLocationPanel(largerFont);

   // create the color informaiton panel
   JPanel colorInfoPanel =
                         createColorInfoPanel(largerFont);

   // add the panels to the info panel
   infoPanel.add(BorderLayout.NORTH,locationPanel);
   infoPanel.add(BorderLayout.SOUTH,colorInfoPanel);

   // add the info panel
   pictureFrame.getContentPane().add(
                            BorderLayout.NORTH,infoPanel);
 }

 /**
  * Method to check that the current position is in the
  * viewing area and if not scroll to center the current
  * position if possible
  */
 public void checkScroll()
 {
   // get the x and y position in pixels
   int xPos = (int) (xIndex * zoomFactor);
   int yPos = (int) (yIndex * zoomFactor);

   // only do this if the image is larger than normal
   if (zoomFactor > 1) {

     // get the rectangle that defines the current view
     JViewport viewport = scrollPane.getViewport();
     Rectangle rect = viewport.getViewRect();
     int rectMinX = (int) rect.getX();
     int rectWidth = (int) rect.getWidth();
     int rectMaxX = rectMinX + rectWidth - 1;
     int rectMinY = (int) rect.getY();
     int rectHeight = (int) rect.getHeight();
     int rectMaxY = rectMinY + rectHeight - 1;

     // get the maximum possible x and y index
     int maxIndexX = (int) (picture.getWidth()
                            * zoomFactor) - rectWidth - 1;
     int maxIndexY = (int) (picture.getHeight()
                           * zoomFactor) - rectHeight - 1;

     // calculate how to position the current position in
     // the middle of the viewing area
     int viewX = xPos - (int) (rectWidth / 2);
     int viewY = yPos - (int) (rectHeight / 2);

     // reposition the viewX and viewY if outside allowed
     // values
     if (viewX < 0)
       viewX = 0;
     else if (viewX > maxIndexX)
       viewX = maxIndexX;
     if (viewY < 0)
       viewY = 0;
     else if (viewY > maxIndexY)
       viewY = maxIndexY;

     // move the viewport upper left point
     viewport.scrollRectToVisible(
         new Rectangle(viewX,viewY,rectWidth,rectHeight));
   }
 }

 /**
  * Zooms in the on picture by scaling the image.
  * It is extremely memory intensive.
  * @param factor the amount to zoom by
  */
 public void zoom(double factor)
 {
   // save the current zoom factor
   zoomFactor = factor;

   // calculate the new width and height and get an image
   // that size
   int width = (int) (picture.getWidth()*zoomFactor);
   int height = (int) (picture.getHeight()*zoomFactor);
   BufferedImage bimg = picture.getBufferedImage();

   // set the scroll image icon to the new image
   imageDisplay.setImage(bimg.getScaledInstance(
                     width, height, Image.SCALE_DEFAULT));
   imageDisplay.setCurrentX((int) (xIndex * zoomFactor));
   imageDisplay.setCurrentY((int) (yIndex * zoomFactor));
   imageDisplay.revalidate();
   checkScroll();  // check if need to reposition scroll
 }

 /**
  * Repaints the image on the scrollpane.
  */
 public void repaint()
 {
   pictureFrame.repaint();
 }

 //****************************************//
 //               Event Listeners          //
 //****************************************//

 /**
  * Called when the mouse is dragged (button held down and
  * moved)
  * @param e the mouse event
  */
 public void mouseDragged(MouseEvent e)
 {
   displayPixelInformation(e);
 }

 /**
  * Method to check if the given x and y are in the
  * picture
  * @param x the horiztonal value
  * @param y the vertical value
  * @return true if the x and y are in the picture and
  * false otherwise
  */
 private boolean isLocationInPicture(int x, int y)
 {
   boolean result = false; // the default is false
   if (x >= 0 && x < picture.getWidth() &&
       y >= 0 && y < picture.getHeight())
     result = true;

   return result;
 }

 /**
  * Method to display the pixel information from the
  * passed x and y but also converts x and y from strings
  * @param xString the x value as a string from the user
  * @param yString the y value as a string from the user
  */
 public void displayPixelInformation(
                           String xString, String yString)
 {
   int x = -1;
   int y = -1;
   try {
     x = Integer.parseInt(xString);
     x = x - numberBase;
     y = Integer.parseInt(yString);
     y = y - numberBase;
   } catch (Exception ex) {
   }

   if (x >= 0 && y >= 0) {
     displayPixelInformation(x,y);
   }
 }

 /**
  * Method to display pixel information for the passed x
  * and y
  * @param pictureX the x value in the picture
  * @param pictureY the y value in the picture
  */
 private void displayPixelInformation(
                               int pictureX, int pictureY)
 {
   // check that this x and y is in range
   if (isLocationInPicture(pictureX, pictureY))
   {
     // save the current x and y index
     xIndex = pictureX;
     yIndex = pictureY;

     // get the pixel at the x and y
     Pixel pixel = new Pixel(picture,xIndex,yIndex);

     // set the values based on the pixel
     xValue.setText(Integer.toString(xIndex+numberBase));
     yValue.setText(Integer.toString(yIndex+numberBase));
     rValue.setText("R: " + pixel.getRed());
     gValue.setText("G: " + pixel.getGreen());
     bValue.setText("B: " + pixel.getBlue());
     colorPanel.setBackground(new Color(pixel.getRed(),
                                        pixel.getGreen(),
                                        pixel.getBlue()));

   }
   else
   {
     clearInformation();
   }

   // notify the image display of the current x and y
   imageDisplay.setCurrentX((int) (xIndex * zoomFactor));
   imageDisplay.setCurrentY((int) (yIndex * zoomFactor));
 }

 /**
  * Method to display pixel information based on a mouse
  * event
  * @param e a mouse event
  */
 private void displayPixelInformation(MouseEvent e)
 {

   // get the cursor x and y
   int cursorX = e.getX();
   int cursorY = e.getY();

   // get the x and y in the original (not scaled image)
   int pictureX = (int) (cursorX / zoomFactor+numberBase);
   int pictureY = (int) (cursorY / zoomFactor+numberBase);

   // display the information for this x and y
   displayPixelInformation(pictureX,pictureY);

 }

 /**
  * Method to clear the labels and current color and reset
  * the current index to -1
  */
 private void clearInformation()
 {
   xValue.setText("N/A");
   yValue.setText("N/A");
   rValue.setText("R: N/A");
   gValue.setText("G: N/A");
   bValue.setText("B: N/A");
   colorPanel.setBackground(Color.black);
   xIndex = -1;
   yIndex = -1;
 }

 /**
  * Method called when the mouse is moved with no buttons
  * down
  * @param e the mouse event
  */
 public void mouseMoved(MouseEvent e)
 {}

 /**
  * Method called when the mouse is clicked
  * @param e the mouse event
  */
 public void mouseClicked(MouseEvent e)
 {
   displayPixelInformation(e);
 }

 /**
  * Method called when the mouse button is pushed down
  * @param e the mouse event
  */
 public void mousePressed(MouseEvent e)
 {
   displayPixelInformation(e);
 }

 /**
  * Method called when the mouse button is released
  * @param e the mouse event
  */
 public void mouseReleased(MouseEvent e)
 {
 }

 /**
  * Method called when the component is entered (mouse
  * moves over it)
  * @param e the mouse event
  */
 public void mouseEntered(MouseEvent e)
 {
 }

 /**
  * Method called when the mouse moves over the component
  * @param e the mouse event
  */
 public void mouseExited(MouseEvent e)
 {
 }

 /**
  * Method to enable all menu commands
  */
 private void enableZoomItems()
 {
   twentyFive.setEnabled(true);
   fifty.setEnabled(true);
   seventyFive.setEnabled(true);
   hundred.setEnabled(true);
   hundredFifty.setEnabled(true);
   twoHundred.setEnabled(true);
   fiveHundred.setEnabled(true);
 }

 /**
  * Controls the zoom menu bar
  *
  * @param a the ActionEvent
  */
 public void actionPerformed(ActionEvent a)
 {

   if(a.getActionCommand().equals("Update"))
   {
     this.repaint();
   }

   if(a.getActionCommand().equals("25%"))
   {
     this.zoom(.25);
     enableZoomItems();
     twentyFive.setEnabled(false);
   }

   if(a.getActionCommand().equals("50%"))
   {
     this.zoom(.50);
     enableZoomItems();
     fifty.setEnabled(false);
   }

   if(a.getActionCommand().equals("75%"))
   {
     this.zoom(.75);
     enableZoomItems();
     seventyFive.setEnabled(false);
   }

   if(a.getActionCommand().equals("100%"))
   {
     this.zoom(1.0);
     enableZoomItems();
     hundred.setEnabled(false);
   }

   if(a.getActionCommand().equals("150%"))
   {
     this.zoom(1.5);
     enableZoomItems();
     hundredFifty.setEnabled(false);
   }

   if(a.getActionCommand().equals("200%"))
   {
     this.zoom(2.0);
     enableZoomItems();
     twoHundred.setEnabled(false);
   }

   if(a.getActionCommand().equals("500%"))
   {
     this.zoom(5.0);
     enableZoomItems();
     fiveHundred.setEnabled(false);
   }
 }

 /**
  * Test Main.  It will ask you to pick a file and then
  * show it
  */
 public static void main( String args[])
 {
   Picture p = new Picture(FileChooser.pickAFile());
   PictureExplorer test = new PictureExplorer(p);

 }

 /**
  * Class for establishing the focus for the textfields
  */
 private class PictureExplorerFocusTraversalPolicy
                 extends FocusTraversalPolicy {

        /**
         * Method to get the next component for focus
         */
        public Component getComponentAfter(
                                 Container focusCycleRoot,
                                 Component aComponent) {
            if (aComponent.equals(xValue))
              return yValue;
            else
              return xValue;
        }

        /**
         * Method to get the previous component for focus
         */
         public Component getComponentBefore(
                                 Container focusCycleRoot,
                                 Component aComponent) {
            if (aComponent.equals(xValue))
              return yValue;
            else
              return xValue;
         }

         public Component getDefaultComponent(
                               Container focusCycleRoot) {
            return xValue;
        }

        public Component getLastComponent(
                               Container focusCycleRoot) {
            return yValue;
        }

        public Component getFirstComponent(
                               Container focusCycleRoot) {
            return xValue;
        }
    }

} |
Copyright 2009, Richard G. Baldwin. Reproduction in whole or in part in any form or medium without express written permission from Richard Baldwin is prohibited.
Richard has participated in numerous consulting projects and he frequently provides onsite training at the high-tech companies located in and around Austin, Texas. He is the author of Baldwin's Programming Tutorials, which have gained a worldwide following among experienced and aspiring programmers. He has also published articles in JavaPro magazine.
In addition to his programming expertise, Richard has many years of practical experience in Digital Signal Processing (DSP). His first job after he earned his Bachelor's degree was doing DSP in the Seismic Research Department of Texas Instruments. (TI is still a world leader in DSP.) In the following years, he applied his programming and DSP expertise to other interesting areas including sonar and underwater acoustics.
Richard holds an MSEE degree from Southern Methodist University and has many years of experience in the application of computer technology to real-world problems.
-end-