
Published: March 10, 2009
By Richard G. Baldwin
Java Programming Notes # 353
This lesson is the next in a series (see Resources) designed to teach you how to write Java programs to do things like:
If you have ever wondered how to do these things, you've come to the right place.
If you have studied the earlier lessons in this series, you have learned:
You will learn how to write a Java program to apply a sharpening filter to your digital photos where the amount of sharpening is controlled by the user with a slider.
In addition, you will see what happens when sharpening is overdone, causing the program to degenerate to an edge-detection program.
I recommend that you open another copy of this document in a separate browser window and use the following links to easily find and view the figures and listings while you are reading about them.
I recommend that you also study the other lessons in my extensive collection of online programming tutorials. You will find a consolidated index at www.DickBaldwin.com.
In this series of lessons, I will present and explain many of the classes in a multimedia class library that was developed and released under a Creative Commons Attribution 3.0 United States License (see Resources) by Mark Guzdial and Barbara Ericson at Georgia Institute of Technology. In doing this, I will also present some interesting sample programs that use the library.
I explained how to download, install, and test the multimedia class library in an earlier lesson titled Multimedia Programming with Java, Getting Started (see Resources).
Two programs
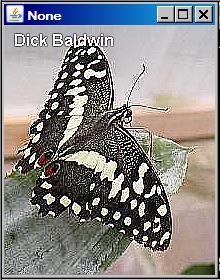
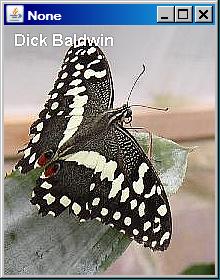
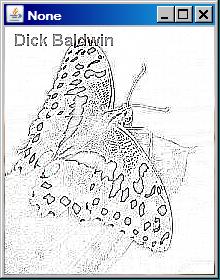
I will present and explain two different programs in this lesson. In the first program named Sharpening01, I will show you how to write a program in which the user controls the amount of sharpening that is applied to a digital image using a slider. The results are immediately visible in a display of the image to which the sharpening is being applied as shown in Figure 1.
Figure 1. Sample output from the program names Sharpen01.
|
|
|
For convenience purposes, this program can also be used to apply a softening filter to the image as an alternative to the sharpening filter.
From maximum sharpening to maximum softening
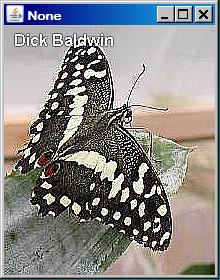
Figure 2 shows a series of output displays for slider values of -100, -20, -1, +1, +20, and +100 going from left to right, top to bottom.
Figure 2. From maximum sharpening to maximum softening.
 |
 |
 |
 |
 |
 |
The picture in the upper-left corner shows maximum sharpening and the picture in the lower-right corner shows maximum softening. The two images in the middle should be identical with no sharpening or softening.
Incremental changes in sharpening
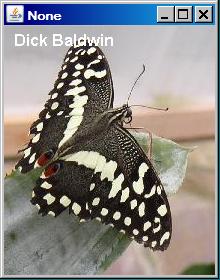
When applying sharpening to your digital photos, you will probably be working in the area closer to zero on the slider. Figure 3 shows a series of output displays for slider values of -1, -2, -3, -4, -5, and -6 going from left to right, top to bottom.
Figure 3. Incremental changes in sharpening.
|
 |
 |
 |
 |
 |
No sharpening a the top left
No sharpening was applied to the image in upper-left corner. The sharpening was increased in slider-unit steps going from there to the bottom-right corner in left-to-right order.
Adjust the granularity
If those unit steps in sharpening are too granular, or not granular enough for your needs, there is a variable named sensitivity in the code that you can modify to decrease or increase the granularity. I will point it out later when explaining the code.
When sharpening is overdone...
In the second program, I will show you one of the things that can happen if you get it wrong when writing a sharpening program. The result in this case is that the program degenerates into an edge-detection program. Once again, the results are immediately visible in a display of the image to which sharpening is being applied.
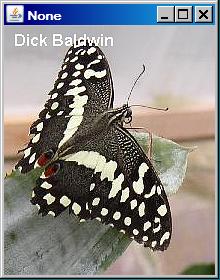
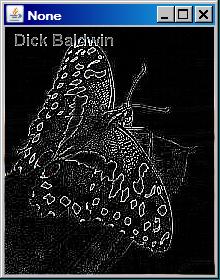
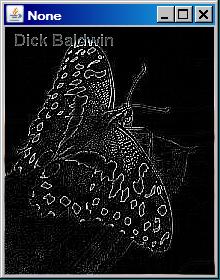
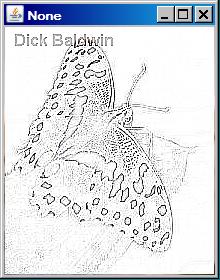
Figure 4 shows the output from the program named EdgeDetect03 for slider values of -100, -20, -1, +1, +20, and +100 going from left to right, top to bottom.
EdgeDetect03 program output for six sample slider values
Figure 4 shows a series of output displays for slider values of -100, -20, -1, +1, +20, and +100 going from left to right, top to bottom. These are the same slider values that were used for the other program in Figure 2.
Figure 4. EdgeDetect03 program output for six sample slider values.
 |
 |
 |
 |
 |
 |
Maximum sharpening at the upper left corner
As before, the picture in the upper-left corner shows maximum sharpening. However, unlike the previous program, this program does not soften the image when the slider moves to the right of zero. Instead, this program applies the same algorithm for slider values on both sides of zero. However, when the slider is positioned to the right of +1, the color is inverted before storing it in the output display image. Thus, the bottom-right image is an inverted version of the top-left image.
Designing an effective softening filter is a cakewalk compared to designing an effective sharpening filter. I discussed the issues involved with sharpening filters in some detail in an earlier lesson titled Processing Image Pixels, Applying Image Convolution in Java, Part 1, (see Resources), so I won't repeat that discussion here.
Started with the template program
This program was created using the program named SingleSliderTemplate01 as the starting point. I explained that template in the earlier lesson titled A Slider-Controlled Softening Program for Digital Photos (see Resources).
Purpose of the program
The purpose of this program is to teach you how to write a slider-controlled program to apply a sharpening filter to your digital photos. The amount of sharpening is controlled by the user with a slider.
A dual-purpose program
In addition to applying a sharpening filter, the program is also designed to allow the user to apply a softening filter, (as an alternative to the sharpening filter), using an algorithm that was explained in the earlier program. In other words, this program can be used to either sharpen or soften a digital photo. The program requires access to Ericson's multimedia library.
This program was designed to emphasize an understanding of the image-sharpening process and was not designed for speed.
Two parts to the screen output
The screen output produced by the program consists of two parts as shown in Figure 1:
Configuration of the slider
As you can see in Figure 1, the slider ranges from -100 to +100. The initial position of the slider when the program starts running is 0. The program applies a sharpening filter when the slider is to the left of -1, and applies a softening filter when the slider is to the right of +1. No sharpening or softening occurs when the slider is between -1 and +1 inclusive.
The algorithms
The sharpening or softening algorithm is applied separately to the red, green, and blue color values of all the pixels. I will provide a detailed explanation of the sharpening algorithm later. You can read about the softening algorithm in the earlier lesson titled A Slider-Controlled Softening Program for Digital Photos (see Resources).
Writing backup files
Positioning the slider at some point along its range and clicking the Write button in Figure 1 causes a bmp-formatted backup file to be written containing the current state of the display. See the explanation of the program named SingleSliderTemplate01 in the earlier lesson for information regarding the number of sequential backup files that are saved and the names of those files.
Termination of the program
Clicking the large X in the upper-right corner of the display does not terminate the program. This simply hides the display and is of no practical use. The program is terminated by clicking the large X in the upper-right corner of the GUI.
Before terminating, the program writes an output file containing the final state of the display in the same format as the input file. The name of the output file is the same as the name of the input file except that the word FINAL is inserted immediately ahead of the extension.
This program does not modify the contents of the input file.
Will explain in fragments
As usual, I will explain this program in fragments. A complete listing of the program is provided in Listing 6 near the end of the lesson.
Because this program is based on the template from the program named SingleSliderTemplate01, and because you (hopefully) learned all about that template in the earlier lesson titled A Slider-Controlled Softening Program for Digital Photos (see Resources), I will only need to explain the method from Listing 6 named processThePicture.
The method named processThePicture
This version of the method named processThePicture applies both a sharpening algorithm and a softening algorithm to an image depending on whether the user selects sharpening or softening.
|
Convolution
In pure technical terms, this method convolves the pixels in the image with two different nine-point, two-dimensional convolution filters (depending on the selection of smoothing versus sharpening) having very specific characteristics. The convolution filters are applied separately to the red, green, and blue color values of the pixels.
More familiar terminology
Using terminology that may be more familiar to you as a programmer, each color value for each pixel is replaced by a weighted sum of the color value for that pixel (referred to as the center pixel) and the color values for its eight closest neighbors (referred to as the neighbors).
Characteristics of the algorithm
Some of the characteristics of the algorithm are:
Weighting factors are based on the slider value
The current value of the slider is used with a logarithmic algorithm to compute the weights that are applied to the pixel and its eight neighbors. However, different algorithms are used to compute the weights for sharpening and the weights for softening.
The slider is configured to range from -100 to +100 as shown in Figure 1, and the initial slider position is 0. (This requires a minor change to the template program, which you can view in Listing 6.)
No sharpening or softening in the middle
When the slider position is between -1 and +1 inclusive, a weight of 1.0 is applied to the center pixel and weights of 0.0 are applied to the neighboring pixels. No sharpening or softening occurs for this case.
Softening to the right
The softening algorithm is applied when the slider position is to the right of +1. The amount of softening increases as the slider is moved further to the right. When the slider is at +100, a weight of 0 is applied to the center pixel and weights of 0.125 are applied to each of the neighbors. This results in maximum softening.
|
Sharpening to the left
The sharpening algorithm is applied when the slider position is to the left of -1. The amount of sharpening increases as the slider is moved further to the left. When the slider is positioned at -100, a weight of 5 is applied to the center pixel and weights of -0.5 are applied to the neighbors. This results in maximum sharpening.
Brief operational description
A fresh display picture, based on the specified input file, is created and the method named processThePicture is called each time the user moves the slider to a new position. (Code associated with the slider component prevents the method from being called while the slider is in motion.)
Code in the method named processThePicture modifies the display picture and then repaints it on the screen. At that point, the program pauses, doing nothing until the user either moves the slider to another new position, clicks the Write button shown in Figure 1, or clicks the large X in the upper-right corner of the GUI in Figure 1.
If the user clicks the Write button, the program writes the current state of the display picture into an output backup file and pauses again.
If the user moves the slider to a different position, the method named processThePicture is called and the overall process repeats.
If the user clicks the large X in the upper right corner of the GUI in Figure 1, the final output file is written and the program terminates.
Beginning of the method named processThePicture
The method named processThePicture begins in Listing 1.
Listing 1. Beginning of the method named processThePicture.
  private void processThePicture(){
    //Compute the weights that will be applied to the
    // center pixel and its eight closest neighbors.
    double centerWeight = 0.0;
    double neighborWeight = 0.0;

    //Get the current value of the slider. Note that the
    // getValue method returns type int. It is being cast
    // to double to make it compatible with future
    // computations.
    double value = (double)(slider.getValue());
|
No explanation should be required for Listing 1 beyond the embedded comments.
The filter for a flat color surface
Both filters are designed so that there is no change in the color of the center pixel when there is no change in the color of the input image in a 3x3 pixel area. In other words, working with the red, green, and blue color values independently, if the color value is constant across that nine-pixel square area, the corresponding output color value is the same as the color value across the area.
Changes in the output color values occur when there are changes in the color values across the nine-pixel square area. Depending on the weighting factors used, these changes can sharpen the image, soften the image, or do lots of strange and interesting things to the image. (See the earlier lessons on processing image pixels in Resources.)
Compute weighting factors for two different cases
Listing 2 computes the weighting factors for two different cases based on the value of the slider. The listing begins by computing the weighting factors for a softening filter when the slider is to the right of +1.
Listing 2. Compute weighting factors for two different cases.
    if(value > 1.0){
      //Compute weights for a softening filter when the
      // slider is to the right of +1.
      centerWeight = 1.0 - Math.log10(value)/2;
      neighborWeight = (1.0 - centerWeight)/8.0;
    }else if((value >= -1) && (value <= 1)){
      //Make the filter a do-nothing filter for the range
      // -1 to 1. This filter will not cause sharpening or
      // blurring to occur.
      centerWeight = 1.0;
      neighborWeight = 0.0;
|
The algorithm that is applied for that case is the same algorithm that you learned about in the earlier lesson titled A Slider-Controlled Softening Program for Digital Photos (see Resources). Therefore, no further explanation of the code for the first case in Listing 2 should be required.
Slider between -1 and +1 inclusive
The second case in Listing 2 is the case where the slider is between -1 and +1 inclusive. For this case, the weight that is applied to the center pixel in the 3x3 square of pixels is 1.0 and the weights applied to the remaining eight pixels is 0.0. Therefore, those eight pixels have no effect on the output and no sharpening or softening occurs for this case.
The sharpening filter
The code in Listing 3 computes the weighting factors for the sharpening filter. This occurs when the slider is to the left of -1.
To begin with, because the slider is to the left of -1, the value of the slider is negative. A positive value is needed for computation of the weighting factors, so I needed to change the algebraic sign of the value of the slider. I could have simply incorporated this into the computation that follows, but I elected to change the sign explicitly for clarity.
Listing 3. Compute weighting factors for the sharpening filter.
    }else{
      value = -value;

      double sensitivity = 2.0;
      centerWeight =
                    (1.0 + Math.log10(value)*sensitivity);
      neighborWeight = (1-centerWeight)/8.0;
    }//end else
|
The sensitivity factor
As I mentioned earlier, I also decided to include a sensitivity factor for you to experiment with by changing the value of the factor and recompiling the program.
If you increase the value of the variable named sensitivity, you will increase the sensitivity of the sharpening process. In other words, you will cause the amount of sharpening to increase for the same amount of travel of the slider toward the left end of the slider. Similarly, decreasing the value will reduce the sensitivity of the sharpening process.
Increasing that value causes the value of the centerWeight factor (which is applied to the center pixel in the 3x3 square of pixels), which will, in turn, drive the factor that is applied to the other eight pixels in the 3x3 square in the negative direction.
Can produce negative weighting factors
If you examine the code in Listing 3, you should conclude that the weighting factors that are applied to the eight pixels around the edge of the 3x3 square can and often will be negative.
Image convolution with all positive weighting factors is relatively predictable and easy to understand because it is simply a weighted averaging process. However, as I explained in the earlier lesson titled Processing Image Pixels, Applying Image Convolution in Java, Part 1, (see Resources), strange things can occur when negative weighting factors are involved. One of the most obvious is that negative output values can result, which is not a legal color value for a pixel.
Approximates the first derivative
For those who remember their differential calculus, to a first degree of approximation, the application of the convolution filter for which the weighting factors were computed in Listing 3 approximates taking the first derivative of the color surface.
Proportional to the slope of the surface
As a result, the output is somewhat proportional to the slope of the surface at any given point on that surface. If the surface is flat (the slope is zero), the output is essentially the same as the input.
If the surface is not flat...
However, if the topography of the surface is changing rapidly, as is the case in those areas where the color of the image is changing, the magnitude of the output is greater and can be negative.
Some difficult concepts are involved
This concept alone can be difficult to wrap your mind around. Add to that the fact that there are three colors involved and only those output color values between 0 and 255 are allowed and things can become even more difficult for many of us to get a good grasp on.
Apply the filter
From here on, with one major exception, the code is pretty much the same as the code that you learned about in the earlier lesson on softening filters. That code continues in Listing 4.
Listing 4. Apply the filter.
    //Declare some working variables.
    int width = display.getWidth();
    int height = display.getHeight();
    int red = 0;
    int green = 0;
    int blue = 0;
    Pixel pixel = null;
    Pixel[] pixels = new Pixel[8];

    //Create a temporary copy of the display to serve as
    // input to the computations that follow. This will
    // prevent the processing of one row from having an
    // influence on the processing of the next row.
    Picture temp = new Picture(display);

    //Process each pixel.
    for(int col = 1;col < width -1;col++){
      for(int row = 1;row < height - 1;row++){
        //Get and save the pixel at the center of the
        // current nine-pixel group.
        pixel = display.getPixel(col,row);

        //Get and save the eight surrounding pixels.
        pixels[0] = temp.getPixel(col-1,row-1);
        pixels[1] = temp.getPixel(col,row-1);
        pixels[2] = temp.getPixel(col+1,row-1);

        pixels[3] = temp.getPixel(col-1,row);
        pixels[4] = temp.getPixel(col+1 ,row);

        pixels[5] = temp.getPixel(col-1,row+1);
        pixels[6] = temp.getPixel(col,row+1);
        pixels[7] = temp.getPixel(col+1,row+1);

        //Compute the weighted sum of the red values.
        red = 0;
        //First compute the sum of the color values for
        // the eight neighboring pixels.
        for(int cnt = 0;cnt < pixels.length;cnt++){
          red += pixels[cnt].getRed();
        }//end for loop
        //Now apply the weights and store the resulting
        // value in the center pixel of the nine-pixel
        // group in the display.
        red = (int)(red*neighborWeight
                           + pixel.getRed()*centerWeight);
        //Make certain that the color value is within its
        // allowable limits of 0 to 255 inclusive.
        if(red > 255) red = 255;
        if(red < 0) red = 0;
        pixel.setRed(red);
|
The exception
The major exception that I mentioned earlier is shown in the first two of the last three statements in Listing 4. Because of the strong possibility of this algorithm producing negative output values or producing values greater than 255, I inserted the two statement in Listing 4 that clip the output color value to either 0 or 255 when that occurs.
Remainder of the code for the program named Sharpen01
When the code in Listing 4 finishes executing, the new red color value for a single pixel has been computed and set into the output display image.
Listing 5 uses the same approach to compute the output values for the green and blue colors, and iterates within the pair of nested for loops until all of the pixels in the picture have been processed.
Listing 5. Remainder of the code for the program named Sharpen01.
        //Compute the weighted sum of the green values.
        // This is essentially the same algorithm as for
        // the red values.
        green = 0;
        for(int cnt = 0;cnt < pixels.length;cnt++){
          green += pixels[cnt].getGreen();
        }//end for loop
        green = (int)(green*neighborWeight
                         + pixel.getGreen()*centerWeight);
        if(green > 255) green = 255;
        if(green < 0) green = 0;
        pixel.setGreen(green);

        //Compute the weighted sum of the blue values.
        // This is essentially the same algorithm as for
        // the red values.
        blue = 0;
        for(int cnt = 0;cnt < pixels.length;cnt++){
          blue += pixels[cnt].getBlue();
        }//end for loop
        blue = (int)(blue*neighborWeight
                          + pixel.getBlue()*centerWeight);
        if(blue > 255) blue = 255;
        if(blue < 0) blue = 0;
        pixel.setBlue(blue);

      }//end inner loop
    }//end outer loop

    display.repaint();

  }//end processThePicture
  //----------------------------------------------------//

}//end class Sharpen01
|
Once all the pixels have been processed, Listing 5 repaints the display and the method named processThePicture terminates.
Wait for something to happen
As explained earlier, at that point, the program pauses, doing nothing until the user either moves the slider to a new position, clicks the Write button shown in Figure 1, or clicks the large X in the upper-right corner of the GUI in Figure 1.
If the user clicks the Write button, the program writes the current state of the display picture into an output backup file and pauses again.
If the user moves the slider to a different position, the method named processThePicture is called and the overall process repeats.
If the user clicks the large X in the upper right corner of the GUI in Figure 1, the program writes the final output file and terminates.
A complete listing of this program is provided in Listing 7 near the end of the lesson.
If you compare Figure 4 with Figure 2, you will see that the behavior of this program is radically different from the behavior of the earlier program named Sharpen01.
One statement makes all the difference
The critical difference in the behavior of the two programs is the result of the modification of a single statement in the computation of the weighting factor that is applied to the eight outer pixels in the 3x3 square of pixels.
Several changes made, only one was critical
The softening code on the right side of the slider was replaced by sharpening code with an inverted color output in this program. This resulted in some rearrangement of the overall structure of the code. However, neither of these changes was responsible for the difference that you see when you compare Figure 2 and Figure 4.
The critical difference
The critical difference is the difference in the two statements shown in Figure 5.
Figure 5. Changes in program code.
neighborWeight = (1-centerWeight)/8.0;

neighborWeight = -centerWeight/8.0;
|
Computing neighborWeight in Sharpen01
The first statement in Figure 5 was extracted from Listing 3, which shows the computation of the weight that is applied to the eight outer pixels in the 3x3 square of pixels in the earlier program named Sharpen01.
Computing neighborWeight in EdgeDetect03
The second statement in Figure 5 shows the computation of the corresponding weighting factor that was extracted from Listing 7, which is the source code for the program that produced the output shown in Figure 4.
The weighting factor was used the same way in both programs
The most obvious difference between the two values of neighborWeight is as follows.
For the program named Sharpen01
For the first case shown in Figure 5, the sum of the weights applied to the nine pixels in the 3x3 square is equal to 1.0.
Therefore, when the weights are applied to an area of the image for which the color is relatively constant across the 3x3 square (such as the area immediately to the left of the butterfly's left wing in the upper-left image in Figure 3), the output color is essentially the same as the color at the center of the square.
When the square moves into an area where the color is changing (such as the left edge of the butterfly's left wing in the same image), the output color differs from the color at the center of the square
For example, if you examine the left edge of the left wing in the upper-left image in Figure 2, you will see that the wing is bordered by a narrow band of white (or nearly) white pixels. That band of white pixels doesn't exist in the original image shown at the left center of Figure 2.
For the program named EdgeDetect03
For the second case shown in Figure 5, the sum of the weights applied to the nine pixels in the 3x3 square is equal to 0.0 instead of 1.0.
Therefore, when the weights are applied to an area of the image for which the color is relatively constant across the 3x3 square (again, such as the area immediately to the left of the butterfly's left wing in the upper-left image in Figure 3), the output color is not the same color as the color at the center of the square. Instead, it is black or nearly black as shown in Figure 4.
When the square moves into an area where the color is changing (such as the left edge of the butterfly's left wing in the same image) the output color changes to something other than black.
As you can see in the upper-left image in Figure 4, the output color at that point changed to white (or nearly white) similar to the case for the upper-left image in Figure 2.
Why white?
The resulting white color in both cases is probably the result of the output color exceeding a value of 255 and being clipped to 255. If you use the second statement in Figure 5 with a much less sensitive sharpening filter, you are likely to see colors other than black and white as the filter moves across the color changes in the input image.
Why did I show you this?
I showed you this program mainly to illustrate the sorts of strange results that can occur when you overdo the sharpening process. However, this program isn't completely without some merit.
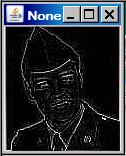
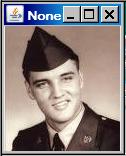
Figure 6 shows a picture of the king during his Army days, with the picture having been subjected to edge detection.
Figure 6. The king with edge detection.
 |
 |
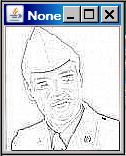 |
If you were going to make a pencil drawing of the king, this might be a good way to get started. However, I doubt that you will create and save very many edge-detected pictures of your friends in your electronic scrapbook.
I encourage you to copy the code from Listing 6 and Listing 7, compile the code, and execute it. Experiment with the code, making changes, and observing the results of your changes. Make certain that you can explain why your changes behave as they do.
See if you can find ways to modify the algorithms to improve the speed without changing the behavior. For example, consider using the techniques described in the lesson titled Using the Java 2D ConvolveOp Filter Class to Process Images (see Resources).
I explained two different programs in this lesson. In the first program, I showed you how to write a program that can be used to either sharpen or soften a picture. The amount of sharpening or softening is controlled by the user with a slider.
The second program is similar to the first except that I showed you how sharpening can go terribly wrong if you don't program it properly. By making a seemingly minor modification to one statement in this program relative to the other program, I caused the sharpening algorithm to degenerate into an edge-detection algorithm.
On the other hand, if you are interested in edge detection, this could be a useful program.
In the next lesson, you will learn more about the Picture an SimplePicture classes along with the DigitalPicture interface.
Listing 6. Source code for the program named Sharpen01.
/*File Sharpen01 Copyright 2009 R.G.Baldwin

This program was created using the program named
SingleSliderTemplate01 as the starting point.

The purpose of this program is to teach you how to write a
slider-driven program to apply a sharpening filter to your
digital photos. The degree of sharpening is controlled by
the user with a slider.

In addition to applying a sharpening filter, the program
is also designed to apply a blurring filter using an
algorithm that was demonstrated in an earlier program. In
other words, this program can be used to either sharpen
or blur a digital photo.

The  program requires access to Ericson's multimedia
library.

The speed and smoothness of programs that you write using
the template program will depend on a combination of your
programming skills and the speed of your computer. This
program was designed to emphasize an understanding of the
image sharpening process and was not designed for speed.

The screen output produced by the program consists of two
parts: a display of the picture being processed and a GUI.

See the comments at the beginning of the program named
SingleSliderTemplate01 for a detailed discussion of the
components in the GUI.

The slider ranges from -100 to +100 with the initial
position of the slider at 0. The program applies a
sharpening filter when the slider is to the left of -1,
and applies a blurring filter when the slider is to the
right of +1.

No sharpening or blurring occurs when the slider is
between -1 and +1 inclusive.

The sharpening or blurring algorithm is applied separately
to the red, green, and blue color values of all the
pixels.

A detailed description of the algorithm is provided in the
comments at the beginning of the method named
processThePicture.

Positioning the slider at some point along its range and
clicking the Write button causes a backup file to be
written containing the current state of the display. See
the program named SingleSliderTemplate01 for information
regarding the number of sequential backup files that are
saved and the names of those files.

Clicking the large X in the upper-right corner of the
display does not terminate the program.  This simply hides
the display and is of no practical value.

The program is terminated by clicking the large X in the
upper-right corner of the GUI. Before terminating, the
program writes an output file containing the final state
of the display in the same format as the input file. The
name of the output file is the same as the name of the
input file except that the word FINAL is inserted
immediately ahead of the extension.

This program does not modify the contents of the original
input file.

Tested using Windows Vista Home Premium Edition,
Java 1.6x, and the version of Ericson's multimedia library
contained in bookClasses10-1-07.zip.
*********************************************************/

import java.awt.Graphics;
import java.awt.Image;
import java.awt.BorderLayout;
import java.awt.event.ActionListener;
import java.awt.event.ActionEvent;
import java.awt.event.WindowAdapter;
import java.awt.event.WindowEvent;

import javax.swing.JFrame;
import javax.swing.JPanel;
import javax.swing.JSlider;
import javax.swing.JLabel;
import javax.swing.JButton;
import javax.swing.JTextField;
import javax.swing.event.ChangeListener;
import javax.swing.event.ChangeEvent;
import javax.swing.WindowConstants;

import java.io.File;

public class Sharpen01 extends JFrame{
  private JPanel mainPanel = new JPanel();
  private JPanel southPanel = new JPanel();

  private JLabel purposeLabel =new JLabel(
            "    Sharpen to the left,blur to the right.");
  private JLabel fileNameLabel = new JLabel("File Name:");
  private JButton writeButton = new JButton("Write");
  private JTextField fileNameField =
                          new JTextField("Sharpen01.jpg");
  private JSlider slider = new JSlider(-100,100,0);

  //A reference to the original Picture object will be
  // stored here.
  private Picture picture = null;
  //A reference to a modified copy of the original
  // Picture object will be stored here.
  private Picture display = null;

  //Miscellaneous working variables.
  private Image image = null;
  private Graphics graphics = null;

  private Pixel pixel = null;
  private int red = 0;
  private int writeCounter = 0;

  private Pixel[] pixels = null;

  private String fileName = "NONE";
  private String outputPath = null;
  private String extension = null;
  //----------------------------------------------------//

  public static void main(String[] args){
    new Sharpen01();
  }//end main method
  //----------------------------------------------------//

  public Sharpen01(){//constructor

    //All close operations are handled in a WindowListener
    // object.
    setDefaultCloseOperation(
                     WindowConstants.DO_NOTHING_ON_CLOSE);

    //Put the decorations on the slider. See the
    // documentation to learn how to decorate the slider
    // differently.
    slider.setMajorTickSpacing(20);
    slider.setMinorTickSpacing(5);
    slider.setPaintTicks(true);
    slider.setPaintLabels(true);

    //Construct the GUI.
    mainPanel.setLayout(new BorderLayout());

    mainPanel.add(purposeLabel,BorderLayout.NORTH);
    mainPanel.add(slider,BorderLayout.CENTER);

    southPanel.add(writeButton);
    southPanel.add(fileNameLabel);
    southPanel.add(fileNameField);
    mainPanel.add(southPanel,BorderLayout.SOUTH);

    //Disable the slider and the writeButton until the
    // user enters the file name. Put the focus on the
    // text field where the user will enter the file
    // name.
    slider.setEnabled(false);
    writeButton.setEnabled(false);
    fileNameField.requestFocus();

    //Set the size of the GUI and display it in the upper-
    // left corner of the screen. It will be moved later
    // to a position immediately below the display of the
    // picture.
    getContentPane().add(mainPanel);
    pack();
    setVisible(true);
    //--------------------------------------------------//

    //Register a listener on the text field. When the user
    // enters the file name in the text field, set
    // everything up properly so that the program will
    // function as an event-driven picture-manipulation
    // program until the user clicks the large X in the
    // upper-right of the GUI.
    fileNameField.addActionListener(
      new ActionListener(){
        public void actionPerformed(ActionEvent e){
          //Disable the text field to prevent the user
          // from entering anything else in it.
          fileNameField.setEnabled(false);
          fileNameLabel.setEnabled(false);

          //Get the file name from the text field and use
          // it to create a new Picture object. Display my
          // name in the image.
          fileName = fileNameField.getText();
          picture = new Picture(fileName);
          picture.addMessage("Dick Baldwin",10,20);

          //Get information that will be used to write the
          // output files.
          String inputPath = new File(fileName).
                                        getAbsolutePath();
          int posDot = inputPath.lastIndexOf('.');
          outputPath = inputPath.substring(0,posDot);
          //Write the first copy of the output backup
          // file.
          picture.write(outputPath
                       + "BAK" + writeCounter++ + ".bmp");

          //Get filename extension. It will be used later
          // to write the final output file.
          extension = inputPath.substring(posDot);

          //Decorate the GUI.
          setTitle("Copyright 2009, R.G.Baldwin");

          //Create the picture that will be processed.
          // Note that the original image file is not
          // modified by this program.
          int pictureWidth = picture.getWidth();
          int pictureHeight = picture.getHeight();
          display = new Picture(
                              pictureWidth,pictureHeight);

          //Draw the initial display.
          graphics = display.getGraphics();
          graphics.drawImage(picture.getImage(),0,0,null);
          display.show();

          //Adjust the width of the GUI to match the width
          // of the display if possible. Then relocate the
          // GUI to a position immediately below the
          // display.
          //Establish the preferred size now that the
          // input file name has been entered.
          pack();
          int packedHeight = getHeight();
          int packedWidth = getWidth();
          if((pictureWidth + 7) >= packedWidth){
            //Make the width of the GUI the same as the
            // width of the display.
            setSize(pictureWidth + 7,packedHeight);
          }//Else, just leave the GUI at its current size.
          //Put the GUI in its new location immediately
          // below the display.
          setLocation(0,pictureHeight + 30);

          //Enable the user input controls.
          slider.setEnabled(true);
          writeButton.setEnabled(true);

        }//end actionPerformed
      }//end new ActionListener
    );//end addActionListener
    //--------------------------------------------------//

    //Register an ActionListener on the writeButton.
    // Each time the user clicks the button, a backup bmp
    // file containing the current state of the display is
    // written into the directory from which the original
    // picture was read. The five most recent backup files
    // are saved. The names of the backup files are the
    // same as the name of the input file except that BAKn
    // is inserted immediately ahead of the extension
    // where n is a digit ranging from 0 to 4. The value
    // of n rolls over at 4 and starts back at 0.
    writeButton.addActionListener(
      new ActionListener(){
        public void actionPerformed(ActionEvent e){
          display.write(outputPath
                       + "BAK" + writeCounter++ + ".bmp");
          //Reset the writeCounter if it exceeds 4 to
          // conserve disk space.
          if(writeCounter > 4){
            writeCounter = 0;
          }//end if
        }//end action performed
      }//end newActionListener
    );//end addActionListener
    //--------------------------------------------------//

    //Register a WindowListener that will respond when the
    // user clicks the large X in the upper-right corner
    // of the GUI. This event handler will write the final
    // state of the display into an output file of the
    // same type as the original input file. The name will
    // be the same except that the word FINAL will be
    // inserted immediately ahead of the extension.
    addWindowListener(
      new WindowAdapter(){
        public void windowClosing(WindowEvent e){
          display.write(outputPath + "FINAL" + extension);
          System.exit(0);
        }//end windowClosing
      }//end new WindowAdapter
    );//end addWindowListener
    //--------------------------------------------------//
    //Register a ChangeListener object on the slider.
    //Each time the slider fires a ChangeEvent, this event
    // handler creates a new display as a copy of the
    // original picture and calls a method named
    // processThePicture.
    slider.addChangeListener(
      new ChangeListener(){
        public void stateChanged(ChangeEvent e){
          //Draw a new copy of the picture on the display.
          graphics = display.getGraphics();
          graphics.drawImage(picture.getImage(),0,0,null);
          processThePicture();
        }//end stateChanged
      }//end new ChangeListener
    );//end addChangeListener
    //--------------------------------------------------//

  }//end constructor
  //----------------------------------------------------//

  /*This version of the method named processThePicture
  applies both a sharpening algorithm and a blurring
  algorithm to an image. In pure technical terms, this
  method convolves the pixels in the image with a
  nine-point, two-dimensional convolution filter having
  very  specific characteristics. The convolution filter
  is applied separately to the red, green, and blue color
  values of the pixels.

  Using terminology that may be more familiar to you, each
  color value for each pixel is replaced by a weighted
  sum of the color value for that pixel (referred to as
  the center pixel) and the color values for its eight
  closest neighbors (referred to as the neighbors). The
  center pixel and its eight neighbors constitute a 3x3
  square of pixels.

  Equal weights are applied to each of the eight
  neighbors.

  The sum of the weights applied to the center pixel and
  its eight neighbors is 1.0.

  The current value of the slider is used with a
  logarithmic algorithm to compute the weights that are
  applied to the pixel and its eight neighbors. However,
  different algorithms are used to compute the weights for
  sharpening and the weights for blurring.

  The slider is configured to range from -100 to +100 and
  the initial slider position is 0.

  When the slider position is is between -1 and 1
  inclusive, a weight of 1.0 is applied to the center
  pixel and weights of 0.0 are applied to the neighboring
  pixels. No sharpening or blurring occurs for this case.

  When the slider position is to the right of +1, blurring
  occurs. The degree of blurring increases as the slider
  is moved further to the right. When the slider is at
  +100, a weight of 0 is applied to the center pixel and
  weights of 0.125 are applied to the neighbors. This
  results in maximum blurring.

  When the slider position is to the left of -1,
  sharpening occurs. The degree of sharpening increases as
  the slider is moved further to the left. When the slider
  is positioned at -100, a weight of 5 is applied to the
  center pixel and weights of -0.5 are applied to the
  neighbors. This results in maximum sharpening.
  */
  private void processThePicture(){
    //Compute the weights that will be applied to the
    // center pixel and its eight closest neighbors.
    double centerWeight = 0.0;
    double neighborWeight = 0.0;

    //Get the current value of the slider. Note that the
    // getValue method returns type int. It is being cast
    // to double to make it compatible with future
    // computations.
    double value = (double)(slider.getValue());

    //Compute weighting factors based on the value of the
    // slider. Make the response for both filters
    // equal to 1.0 when applied to a region of the
    // image where there is no change in a color value
    // across the 3x3 square of pixels. Colors values in
    // those areas will be reproduced with no change.
    if(value > 1.0){
      //Compute weights for a blurring filter when the
      // slider is to the right of 1.
      centerWeight = 1.0 - Math.log10(value)/2;
      neighborWeight = (1.0 - centerWeight)/8.0;
    }else if((value >= -1) && (value <= 1)){
      //Make the filter a do-nothing filter for the range
      // -1 to 1. This filter will not cause sharpening or
      // blurring to occur.
      centerWeight = 1.0;
      neighborWeight = 0.0;
    }else{
      //Compute weights for a sharpening filter when the
      // slider is to the left of -1.
      //Note that the value of the slider is negative here
      // so the sign of value needs to be changed to
      // positive. I could simply include this in the
      // computation but made it explicit for clarity.
      value = -value;
      //The sensitivity of the sharpening process can be
      // increased by increasing the value of the variable
      // named sensitivity and recompiling the program.
      // This causes the value of centerWeight to increase
      // and drives the value of neighborWeight in the
      // negative direction.
      double sensitivity = 2.0;
      centerWeight =
                    (1.0 + Math.log10(value)*sensitivity);
      neighborWeight = (1-centerWeight)/8.0;
    }//end else

    //Declare some working varibles.
    int width = display.getWidth();
    int height = display.getHeight();
    int red = 0;
    int green = 0;
    int blue = 0;
    Pixel pixel = null;
    Pixel[] pixels = new Pixel[8];

    //Create a temporary copy of the display to serve as
    // input to the computations that follow. This will
    // prevent the processing of one row from having an
    // influence on the processing of the next row.
    Picture temp = new Picture(display);

    //Process each pixel.
    for(int col = 1;col < width -1;col++){
      for(int row = 1;row < height - 1;row++){
        //Get and save the pixel at the center of the
        // current nine-pixel group.
        pixel = display.getPixel(col,row);

        //Get and save the eight surrounding pixels.
        pixels[0] = temp.getPixel(col-1,row-1);
        pixels[1] = temp.getPixel(col,row-1);
        pixels[2] = temp.getPixel(col+1,row-1);

        pixels[3] = temp.getPixel(col-1,row);
        pixels[4] = temp.getPixel(col+1 ,row);

        pixels[5] = temp.getPixel(col-1,row+1);
        pixels[6] = temp.getPixel(col,row+1);
        pixels[7] = temp.getPixel(col+1,row+1);

        //Compute the weighted sum of the red values.
        red = 0;
        //First compute the sum of the color values for
        // the eight neighboring pixels.
        for(int cnt = 0;cnt < pixels.length;cnt++){
          red += pixels[cnt].getRed();
        }//end for loop
        //Now apply the weights and store the resulting
        // value in the center pixel of the nine-pixel
        // group in the display.
        red = (int)(red*neighborWeight
                           + pixel.getRed()*centerWeight);
        //Make certain that the color value is within its
        // allowable limits of 0 to 255 inclusive.
        if(red > 255) red = 255;
        if(red < 0) red = 0;
        pixel.setRed(red);

        //Compute the weighted sum of the green values.
        // This is essentially the same algorighm as for
        // the red values.
        green = 0;
        for(int cnt = 0;cnt < pixels.length;cnt++){
          green += pixels[cnt].getGreen();
        }//end for loop
        green = (int)(green*neighborWeight
                         + pixel.getGreen()*centerWeight);
        if(green > 255) green = 255;
        if(green < 0) green = 0;
        pixel.setGreen(green);

        //Compute the weighted sum of the blue values.
        // This is essentially the same algorighm as for
        // the red values.
        blue = 0;
        for(int cnt = 0;cnt < pixels.length;cnt++){
          blue += pixels[cnt].getBlue();
        }//end for loop
        blue = (int)(blue*neighborWeight
                          + pixel.getBlue()*centerWeight);
        if(blue > 255) blue = 255;
        if(blue < 0) blue = 0;
        pixel.setBlue(blue);

      }//end inner loop
    }//end outer loop

    display.repaint();

  }//end processThePicture
  //----------------------------------------------------//

}//end class Sharpen01
|
Listing 7. Source code for the program named EdgeDetect03.
/*File EdgeDetect03 Copyright 2009 R.G.Baldwin

This program was created by starting with the program
named SingleSliderTemplate01.

The purpose of this program is to teach you how to write a
slider-driven program to apply a sharpening filter to your
digital photos. The degree of sharpening is controlled by
the user with a slider.

The sharpening filter is so severe that the program tends
to degenerate to an edge detector program.

The  program requires access to Ericson's multimedia
library.

The speed and smoothness of programs that you write using
the template program will depend on a combination of your
programming skills and the speed of your computer. This
program was designed to emphasize an understanding of the
image sharpening process and was not designed for speed.

The screen output produced by the program consists of two
parts: a display of the picture being processed and a GUI.

See the comments at the beginning of the program named
SingleSliderTemplate01 for a detailed discussion of the
components in the GUI.

The slider ranges from -100 to +100 with the initial
position of the slider at 0. The program applies a
sharpening filter when the slider is to the left of -1 and
also applies the same sharpening filter when the slider is
to the right of +1. However, in the latter case, the color
is inverted before being stored in the output display.

No sharpening occurs when the slider is
between -1 and +1 inclusive.

The sharpening algorithm is applied separately
to the red, green, and blue color values of all the
pixels.

A detailed description of the algorithm is provided in the
comments at the beginning of the method named
processThePicture.

Positioning the slider at some point along its range and
clicking the Write button causes a backup file to be
written containing the current state of the display. See
the program named SingleSliderTemplate01 for information
regarding the number of sequential backup files that are
saved and the names of those files.

Clicking the large X in the upper-right corner of the
display does not terminate the program.  This simply hides
the display and is of no practical value.

The program is terminated by clicking the large X in the
upper-right corner of the GUI. Before terminating, the
program writes an output file containing the final state
of the display in the same format as the input file. The
name of the output file is the same as the name of the
input file except that the word FINAL is inserted
immediately ahead of the extension.

This program does not modify the contents of the original
input file.

Tested using Windows Vista Home Premium Edition,
Java 1.6x, and the version of Ericson's multimedia library
contained in bookClasses10-1-07.zip.
*********************************************************/

import java.awt.Graphics;
import java.awt.Image;
import java.awt.BorderLayout;
import java.awt.event.ActionListener;
import java.awt.event.ActionEvent;
import java.awt.event.WindowAdapter;
import java.awt.event.WindowEvent;

import javax.swing.JFrame;
import javax.swing.JPanel;
import javax.swing.JSlider;
import javax.swing.JLabel;
import javax.swing.JButton;
import javax.swing.JTextField;
import javax.swing.event.ChangeListener;
import javax.swing.event.ChangeEvent;
import javax.swing.WindowConstants;

import java.io.File;

public class EdgeDetect03 extends JFrame{
  private JPanel mainPanel = new JPanel();
  private JPanel southPanel = new JPanel();

  private JLabel purposeLabel =new JLabel(
            "    Sharpen to the left,blur to the right.");
  private JLabel fileNameLabel = new JLabel("File Name:");
  private JButton writeButton = new JButton("Write");
  private JTextField fileNameField =
                       new JTextField("EdgeDetect03.jpg");
  private JSlider slider = new JSlider(-100,100,0);

  //A reference to the original Picture object will be
  // stored here.
  private Picture picture = null;
  //A reference to a modified copy of the original
  // Picture object will be stored here.
  private Picture display = null;

  //Miscellaneous working variables.
  private Image image = null;
  private Graphics graphics = null;

  private Pixel pixel = null;
  private int red = 0;
  private int writeCounter = 0;

  private Pixel[] pixels = null;

  private String fileName = "NONE";
  private String outputPath = null;
  private String extension = null;
  //----------------------------------------------------//

  public static void main(String[] args){
    new EdgeDetect03();
  }//end main method
  //----------------------------------------------------//

  public EdgeDetect03(){//constructor

    //All close operations are handled in a WindowListener
    // object.
    setDefaultCloseOperation(
                     WindowConstants.DO_NOTHING_ON_CLOSE);

    //Put the decorations on the slider. See the
    // documentation to learn how to decorate the slider
    // differently.
    slider.setMajorTickSpacing(20);
    slider.setMinorTickSpacing(5);
    slider.setPaintTicks(true);
    slider.setPaintLabels(true);

    //Construct the GUI.
    mainPanel.setLayout(new BorderLayout());

    mainPanel.add(purposeLabel,BorderLayout.NORTH);
    mainPanel.add(slider,BorderLayout.CENTER);

    southPanel.add(writeButton);
    southPanel.add(fileNameLabel);
    southPanel.add(fileNameField);
    mainPanel.add(southPanel,BorderLayout.SOUTH);

    //Disable the slider and the writeButton until the
    // user enters the file name. Put the focus on the
    // text field where the user will enter the file
    // name.
    slider.setEnabled(false);
    writeButton.setEnabled(false);
    fileNameField.requestFocus();

    //Set the size of the GUI and display it in the upper-
    // left corner of the screen. It will be moved later
    // to a position immediately below the display of the
    // picture.
    getContentPane().add(mainPanel);
    pack();
    setVisible(true);
    //--------------------------------------------------//

    //Register a listener on the text field. When the user
    // enters the file name in the text field, set
    // everything up properly so that the program will
    // function as an event-driven picture-manipulation
    // program until the user clicks the large X in the
    // upper-right of the GUI.
    fileNameField.addActionListener(
      new ActionListener(){
        public void actionPerformed(ActionEvent e){
          //Disable the text field to prevent the user
          // from entering anything else in it.
          fileNameField.setEnabled(false);
          fileNameLabel.setEnabled(false);

          //Get the file name from the text field and use
          // it to create a new Picture object. Display my
          // name in the image.
          fileName = fileNameField.getText();
          picture = new Picture(fileName);
          picture.addMessage("Dick Baldwin",10,20);

          //Get information that will be used to write the
          // output files.
          String inputPath = new File(fileName).
                                        getAbsolutePath();
          int posDot = inputPath.lastIndexOf('.');
          outputPath = inputPath.substring(0,posDot);
          //Write the first copy of the output backup
          // file.
          picture.write(outputPath
                       + "BAK" + writeCounter++ + ".bmp");

          //Get filename extension. It will be used later
          // to write the final output file.
          extension = inputPath.substring(posDot);

          //Decorate the GUI.
          setTitle("Copyright 2009, R.G.Baldwin");

          //Create the picture that will be processed.
          // Note that the original image file is not
          // modified by this program.
          int pictureWidth = picture.getWidth();
          int pictureHeight = picture.getHeight();
          display = new Picture(
                              pictureWidth,pictureHeight);

          //Draw the initial display.
          graphics = display.getGraphics();
          graphics.drawImage(picture.getImage(),0,0,null);
          display.show();

          //Adjust the width of the GUI to match the width
          // of the display if possible. Then relocate the
          // GUI to a position immediately below the
          // display.
          //Establish the preferred size now that the
          // input file name has been entered.
          pack();
          int packedHeight = getHeight();
          int packedWidth = getWidth();
          if((pictureWidth + 7) >= packedWidth){
            //Make the width of the GUI the same as the
            // width of the display.
            setSize(pictureWidth + 7,packedHeight);
          }//Else, just leave the GUI at its current size.
          //Put the GUI in its new location immediately
          // below the display.
          setLocation(0,pictureHeight + 30);

          //Enable the user input controls.
          slider.setEnabled(true);
          writeButton.setEnabled(true);

        }//end actionPerformed
      }//end new ActionListener
    );//end addActionListener
    //--------------------------------------------------//

    //Register an ActionListener on the writeButton.
    // Each time the user clicks the button, a backup bmp
    // file containing the current state of the display is
    // written into the directory from which the original
    // picture was read. The five most recent backup files
    // are saved. The names of the backup files are the
    // same as the name of the input file except that BAKn
    // is inserted immediately ahead of the extension
    // where n is a digit ranging from 0 to 4. The value
    // of n rolls over at 4 and starts back at 0.
    writeButton.addActionListener(
      new ActionListener(){
        public void actionPerformed(ActionEvent e){
          display.write(outputPath
                       + "BAK" + writeCounter++ + ".bmp");
          //Reset the writeCounter if it exceeds 4 to
          // conserve disk space.
          if(writeCounter > 4){
            writeCounter = 0;
          }//end if
        }//end action performed
      }//end newActionListener
    );//end addActionListener
    //--------------------------------------------------//

    //Register a WindowListener that will respond when the
    // user clicks the large X in the upper-right corner
    // of the GUI. This event handler will write the final
    // state of the display into an output file of the
    // same type as the original input file. The name will
    // be the same except that the word FINAL will be
    // inserted immediately ahead of the extension.
    addWindowListener(
      new WindowAdapter(){
        public void windowClosing(WindowEvent e){
          display.write(outputPath + "FINAL" + extension);
          System.exit(0);
        }//end windowClosing
      }//end new WindowAdapter
    );//end addWindowListener
    //--------------------------------------------------//
    //Register a ChangeListener object on the slider.
    //Each time the slider fires a ChangeEvent, this event
    // handler creates a new display as a copy of the
    // original picture and calls a method named
    // processThePicture.
    slider.addChangeListener(
      new ChangeListener(){
        public void stateChanged(ChangeEvent e){
          //Draw a new copy of the picture on the display.
          graphics = display.getGraphics();
          graphics.drawImage(picture.getImage(),0,0,null);
          processThePicture();
        }//end stateChanged
      }//end new ChangeListener
    );//end addChangeListener
    //--------------------------------------------------//

  }//end constructor
  //----------------------------------------------------//

  /*This version of the method named processThePicture
  applies a severe sharpening algorith to an image. The
  algorithm is so severe that it often behaves as an edge
  detector causing pixels at locations where the color is
  changing to be displayed as black or white. In pure
  technical terms, this method convolves the pixels in the
  image with a nine-point, two-dimensional convolution
  filter having very  specific characteristics. The
  convolution filter is applied separately to the red,
  green, and blue color values of the pixels.

  Using terminology that may be more familiar to you,
  each color value for each pixel is replaced by a
  weighted sum of the color value for that pixel
  (referred to as the center pixel) and the color values
  for its eight closest neighbors (referred to as the
  neighbors). The center pixel and its eight neighbors
  constitute a 3x3 square of pixels.

  Equal weights are applied to each of the eight
  neighbors.

  IMPORTANT: The sum of the weights applied to the center
  pixel and its eight neighbors is 0.0. This causes the
  output color to be black when the filter is passing
  over a flat surface. Application of the filter often
  results in negative color values and color values
  greater than 255. When this happens, the color value is
  set to 0 or 255 as appropriate.

  The current value of the slider is used with a
  logarithmic algorithm to compute the weights that are
  applied to the pixel and its eight neighbors.

  The slider is configured to range from -100 to +100 and
  the initial slider position is 0.

  When the slider position is is between -1 and 1
  inclusive, a weight of 1.0 is applied to the center
  pixel and weights of 0.0 are applied to the neighboring
  pixels. No sharpening occurs for this case.

  When the slider position is to the left of -1,
  sharpening occurs. The degree of sharpening increases as
  the slider is moved further to the left. When the slider
  is positioned at -100, a weight of 5 is applied to the
  center pixel and weights of -0.625 are applied to the
  neighbors. This results in maximum sharpening, which
  often results in white edges on a black background.

  When the slider position is to the right of +1, exactly
  the same sharpening algorithm is applied. However, in
  this case the color is inverted before being stored in
  the output display. This often results in black edges on
  a white background.
  */
  private void processThePicture(){
    //Compute the weights that will be applied to the
    // center pixel and its eight closest neighbors.
    double centerWeight = 0.0;
    double neighborWeight = 0.0;
    boolean blackEdges = false;//Invert picture on true.

    //Get the current value of the slider. Note that the
    // getValue method returns type int. It is being cast
    // to double to make it compatible with future
    // computations.
    double value = (double)(slider.getValue());
    //Compute weighting factors based on the value of the
    // slider. Make the response for the filter
    // equal to 0.0 when applied to a region of the
    // image where there is no change in a color value
    // across the 3x3 square of pixels. Colors in those
    // areas will be converted to black.

    //The sensitivity of the sharpening process can be
    // increased by increasing the value of the variable
    // named sensitivity and recompiling the program.
    // This causes the value of centerWeight to increase
    // and drives the value of neighborWeight in the
    // negative direction.
    double sensitivity = 2.0;

    //Deal first with the area between -1 and +1
    // inclusive on the slider.
    if((value >= -1) && (value <= 1)){
    //Make the filter a do-nothing filter for the range
    // -1 to 1. This filter will not cause sharpening to
    // occur.
    centerWeight = 1.0;
    neighborWeight = 0.0;
    }else{
      //Now deal with the area of the slider to the right
      // of +1 and to the left of -1.
      if(value > 1){
        //Invert the colors of the processed image. This
        // will convert black to white and white to black.
        blackEdges = true;
      }else{
        //Change the sign on value to compensate for the
        // fact that the slider is in  the negative
        // region.
        value = -value;
      }//end else

      //Now compute the weighting factors regardless of
      // which side of 0 the slider is on.
      //IMPORTANT: Note that the sum of the weights is 0
      // instead of 1 as was the case for the earlier
      // sharpening filter in another program. This will
      // cause the output to be 0 when the filter is
      // moving across a flat color surface.
      centerWeight =
                    (1.0 + Math.log10(value)*sensitivity);
      //IMPORTANT: NOTE THAT THE FOLLOWING EXPRESSION IS
      // DIFFERENT FROM THE CORRESPONDING EXPRESSION IN
      // THE PROGRAM NAMED Sharpen01.
      neighborWeight = -centerWeight/8.0;
    }//end else

    //Declare some working varibles.
    int width = display.getWidth();
    int height = display.getHeight();
    int red = 0;
    int green = 0;
    int blue = 0;
    Pixel pixel = null;
    Pixel[] pixels = new Pixel[8];

    //Create a temporary copy of the display to serve as
    // input to the computations that follow. This will
    // prevent the processing of one row from having an
    // influence on the processing of the next row.
    Picture temp = new Picture(display);

    //Process each pixel.
    for(int col = 1;col < width -1;col++){
      for(int row = 1;row < height - 1;row++){
        //Get and save the pixel at the center of the
        // current nine-pixel group.
        pixel = display.getPixel(col,row);

        //Get and save the eight surrounding pixels.
        pixels[0] = temp.getPixel(col-1,row-1);
        pixels[1] = temp.getPixel(col,row-1);
        pixels[2] = temp.getPixel(col+1,row-1);

        pixels[3] = temp.getPixel(col-1,row);
        pixels[4] = temp.getPixel(col+1 ,row);

        pixels[5] = temp.getPixel(col-1,row+1);
        pixels[6] = temp.getPixel(col,row+1);
        pixels[7] = temp.getPixel(col+1,row+1);

        //Compute the weighted sum of the red values.
        red = 0;
        //First compute the sum of the color values for
        // the eight neighboring pixels.
        for(int cnt = 0;cnt < pixels.length;cnt++){
          red += pixels[cnt].getRed();
        }//end for loop
        //Now apply the weights and store the resulting
        // value in the center pixel of the nine-pixel
        // group in the display.
        red = (int)(red*neighborWeight
                           + pixel.getRed()*centerWeight);
        //Make certain that the color value is within its
        // allowable limits of 0 to 255 inclusive. If not,
        // set it to the limit.
        if(red > 255) red = 255;
        if(red < 0) red = 0;
        if(blackEdges){
          //Invert the color value for the right side of
          // the slider.
          pixel.setRed(255-red);
        }else{
          pixel.setRed(red);
        }//end else

        //Compute the weighted sum of the green values.
        // This is essentially the same algorighm as for
        // the red values.
        green = 0;
        for(int cnt = 0;cnt < pixels.length;cnt++){
          green += pixels[cnt].getGreen();
        }//end for loop
        green = (int)(green*neighborWeight
                         + pixel.getGreen()*centerWeight);
        if(green > 255) green = 255;
        if(green < 0) green = 0;

        if(blackEdges){
          pixel.setGreen(255-green);
        }else{
          pixel.setGreen(green);
        }//end else

        //Compute the weighted sum of the blue values.
        // This is essentially the same algorighm as for
        // the red values.
        blue = 0;
        for(int cnt = 0;cnt < pixels.length;cnt++){
          blue += pixels[cnt].getBlue();
        }//end for loop
        blue = (int)(blue*neighborWeight
                          + pixel.getBlue()*centerWeight);
        if(blue > 255) blue = 255;
        if(blue < 0) blue = 0;

        if(blackEdges){
          pixel.setBlue(255-blue);
        }else{
          pixel.setBlue(blue);
        }//end else

      }//end inner loop
    }//end outer loop

    display.repaint();

  }//end processThePicture
  //----------------------------------------------------//

}//end class EdgeDetect03
|
Copyright 2009, Richard G. Baldwin. Reproduction in whole or in part in any form or medium without express written permission from Richard Baldwin is prohibited.
Richard has participated in numerous consulting projects and he frequently provides onsite training at the high-tech companies located in and around Austin, Texas. He is the author of Baldwin's Programming Tutorials, which have gained a worldwide following among experienced and aspiring programmers. He has also published articles in JavaPro magazine.
In addition to his programming expertise, Richard has many years of practical experience in Digital Signal Processing (DSP). His first job after he earned his Bachelor's degree was doing DSP in the Seismic Research Department of Texas Instruments. (TI is still a world leader in DSP.) In the following years, he applied his programming and DSP expertise to other interesting areas including sonar and underwater acoustics.
Richard holds an MSEE degree from Southern Methodist University and has many years of experience in the application of computer technology to real-world problems.
-end-