
|
|
Published: October 28, 2009
Updated: December 14, 2009
Validated with Amaya
by Richard G. Baldwin
Flex Programming Notes # 0114
This tutorial lesson is part of a continuing series dedicated to programming with Adobe Flex.
An earlier lesson titled The Default Application Container provided information on how to get started programming with Adobe's Flex Builder 3. (See Baldwin's Flex programming website.)
What you will learn
In this lesson, you will learn how to incorporate ActionScript code into your Flex projects in the following four ways:
I recommend that you open another copy of this document in a separate browser window and use the following links to easily find and view the figures and listings while you are reading about them.
I recommend that you also study the other lessons in my extensive collection of online programming tutorials. You will find a consolidated index at www.DickBaldwin.com.
What is ActionScript?
According to Using ActionScript in Flex applications,
Flex developers can use ActionScript to implement custom behavior within their Flex applications. You first use MXML tags to declare things like the containers, controls, effects, formatters, validators, and web services that your application requires, and to lay out its user interface. Each of these components provides the standard behavior you'd expect. For example, a button automatically highlights when you roll over it, without requiring you to write any ActionScript. But a declarative language like MXML is not appropriate for coding what you want to happen when the user clicks a button. For that, you need to use a procedural language like ActionScript, which offers executable methods, various types of storage variables, and flow control such as conditionals and loops. In a general sense, MXML implements the static aspects of your application, and ActionScript implements its dynamic aspects.
ActionScript is an object-oriented procedural programming language, based on the ECMAScript (ECMA-262) edition 4 draft language specification. You can use a variety of methods to mix ActionScript and MXML.
I will explain four of those methods in this tutorial lesson. In addition, I will briefly touch on the object-oriented capabilities of ActionScript, version 3 or later.
What is Flex?
While this may not be rigorously true in detail, it is probably a reasonable explanation from a big-picture viewpoint.
Flex is simply a way to use XML to create an ActionScript class. The Flex compiler converts your mxml file into an ActionScript class based on the classes in the ActionScript class library. Therefore, when you create an mxml file, you are really defining an ActionScript class.
This class is combined with other ActionScript code that you may have provided and compiled into an swf file that can be executed in the Flash Player plug-in, version 9 or later.
What is Flex Builder 3 (or Flash Builder 4)?
Flex Builder 3 is an integrated development environment (IDE) that makes it possible to use drag-and-drop techniques to create an mxml file and to cause the file to be compiled and executed in Flash Player. Therefore, Flex Builder 3 is an IDE that makes it possible to use drag-and-drop techniques to write, compile, and execute programs that combine Flex MXML code with ActionScript code.
Why incorporate ActionScript now?
I have generally avoided the use of ActionScript in the previous lessons in this series. That is because those lessons were written mainly for the benefit of students in a course titled Introduction to XML that I teach. Students in that course are not expected to have any prior programming knowledge, and are not expected to learn how to use a serious programming language such as ActionScript 3.
However, the requirements for that course have been satisfied by the previous lessons in the series. Therefore, I won't hesitate to incorporate ActionScript version 3 or later into the Flex projects in this and future lessons.
I am also publishing a parallel series of tutorials titled Object-Oriented Programming (OOP) with ActionScript on my website.
Running the flex application named ActionScript01
I encourage you to run the online version of this program before continuing with this lesson.
Program output at startup
Figure 1 shows the output that should appear in your browser when the application first starts running.
Figure 1. Program output at startup.
Behavior of the application
This application consists almost entirely of Label and Button components with associated ActionScript code.
Handlers for click events are registered on the top five buttons in Figure 1. Those handlers use ActionScript code to cause the colored text in the four labels at the top to toggle between "Long Label" as shown in Figure 1 and "Short" as shown by the yellow, green, and cyan text in Figure 2.
Figure 2. Program output after clicking some buttons.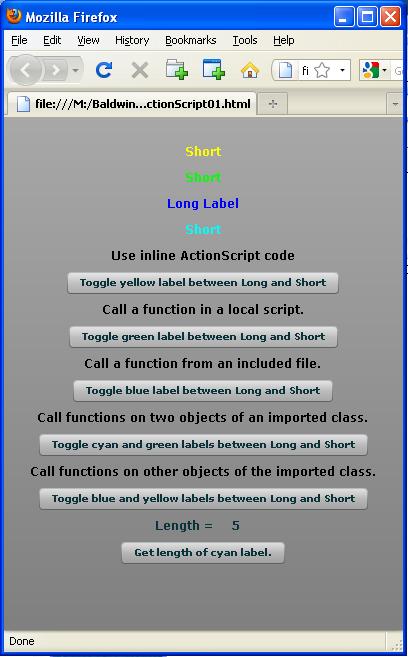
Get and display the length of the cyan text
A click event handler that is registered on the bottom button uses ActionScript to cause the current length of the cyan text to be displayed immediately above the button as shown near the bottom of Figure 2.
As I mentioned earlier, this lesson will teach you how to incorporate ActionScript code into your Flex projects in the following four ways:
The first three items listed above correspond to the ActionScript code associated with the top three buttons in Listing 1. To understand that code, you will need to have prior knowledge of procedural programming concepts at a level that you might learn in a non-AP computer programming course in high school. In addition, you will need to have a rudimentary understanding of the general concept of event handling in modern computer programming.
Object-oriented programming knowledge
The fourth item listed above corresponds to the ActionScript code associated with the bottom three buttons in Listing 1. To understand that code, you will need to have prior knowledge of the basics of object-oriented programming comparable to the first few lessons in the 1600-series on my website. Once again, you will also need to have a rudimentary understanding of the general concept of event handling in modern computer programming.
Flex programming knowledge
Finally, for all four items listed above, you will need to have prior knowledge of everything that I have explained in the earlier lessons in this series of tutorial lessons.
Will explain in fragments
I will explain this Flex application in fragments. A complete listing of the XML code is provided in Listing 18 near the end of the lesson.
Beginning of the XML code
The XML code for the application begins in Listing 1. In addition to creating the Application container object and setting its background color, Listing 1 calls an event handler for the creationComplete event.
(See the earlier lesson titled Handling Slider Change Events in Flex for a rudimentary discussion of event handling in Flex without the use of ActionScript.)
Listing 1. Beginning of the application
named ActionScript01.
<?xml version="1.0"?>

<mx:Application xmlns:mx="http://www.adobe.com/2006/mxml"
    backgroundColor="#999999"
    creationComplete="initApp();">
|
Embedded ActionScript code can be confusing
Because it is possible to embed ActionScript code as inline code in the Flex XML code, it is sometimes difficult to know where the XML ends and the ActionScript begins. I will highlight much of the ActionScript code in this lesson in yellow to visually separate the ActionScript code from the XML code.
A creationComplete event handler
The code that is highlighted in yellow in Listing 1 is a call to an ActionScript function named initApp. This call occurs when an event of type creationComplete is fired (dispatched) by the Application object. Here is part of what the Flex 3.4 documentation (see Resources) has to say about the creationComplete event:
"Dispatched when the component has finished its construction, property processing, measuring, layout, and drawing.
At this point, depending on its visible property, the component may not be visible even though it has been drawn."
When is the event fired?
Because this event handler is registered on the Application object, it is fired when everything that you see in Figure 1 "has finished its construction, property processing, measuring, layout, and drawing." At that point, the initApp function, which I will explain later, is called to instantiate some new objects of an imported custom class (item 4 above).
Create the colored labels
Listing 2 creates the four Label objects having colored text shown at the top of Figure 1. The text in these labels is modified later by click event handlers on the top five buttons in Figure 1.
Listing 2. Create the colored labels.
    <!--These labels are modified by click event handlers
        on the buttons.-->
    <mx:Label id="yellowLabel" text="Long Label"
        color="#FFFF00" fontSize="12" fontWeight="bold"/>
    <mx:Label id="greenLabel" text="Long Label"
        color="#00FF00" fontSize="12" fontWeight="bold"/>
    <mx:Label id="blueLabel" text="Long Label"
        color="#0000FF" fontSize="12" fontWeight="bold"/>
    <mx:Label id="cyanLabel" text="Long Label"
        color="#00FFFF" fontSize="12" fontWeight="bold"/>
|
Not much that's new here
There is nothing in Listing 2 that is new to this lesson. Perhaps the only thing worth mentioning is that Listing 2 creates a unique id attribute value for each Label object. The id attribute serves as a "handle" or "reference" by which ActionScript code later in the application can gain access to the Label object and its property named text.
Listing 3 begins by creating the descriptive Label object shown above the top button in Figure 1. That XML code shouldn't require an explanation at this point in the series of lessons.
Listing 3. Inline ActionScript code.
    <!--Use inline ActionScript code. Note that normal
    ActionScript comments are not allowed in the code. -->

    <mx:Label text="Use inline ActionScript code"
        color="#000000"
        fontSize="12" fontWeight="bold"/>

    <mx:Button
        label="Toggle yellow label between Long and Short"
        click="
        if(yellowLabel.text=='Long Label'){
            yellowLabel.text='Short';
        }else{
            yellowLabel.text='Long Label';
        }//end else
        //end inline ActionScript code.
        "/>
|
Now for something new
Then Listing 3 uses inline ActionScript code (highlighted in yellow) to define and register an ActionScript click event handler on the Button object. The ActionScript code in Listing 3 is executed every time the button fires a click event. The button fires a click event each time the user clicks the button with the mouse or presses the space bar while the button has the focus (and possibly at other times as well).
Behavior of the event handler
The ActionScript code in Listing 3 modifies the value of the text property in the Label object with the id value of yellowLabel. (An examination of the code in Listing 2 shows that this is the yellow label at the top in Figure 1.) The behavior is to cause the text value to toggle between "Long Label" and "Short" each time the click event is fired.
If you have a rudimentary understanding of procedural programming, you should have no difficulty understanding the behavior of the ActionScript code in Listing 3.
Very sensitive syntax
Note, however, that the overall syntax of inline ActionScript code is very sensitive. The code must be placed between the pair of quotation marks that delineates the value assigned to the click attribute. Apparently you may not place standard ActionScript comments in the code until you reach the end of the ActionScript code. For that reason, my advice is to use inline ActionScript code for only the simplest requirements, such as the ActionScript code in Listing 1 for example.
Listing 4 defines an ActionScript function named toggleGreenLabel within an XML Script element.
Listing 4. ActionScript function in a
local script.
    <!--Define a function in a local script.-->
    <mx:Script><![CDATA[
        //ActionScript code in a local script.
        private function toggleGreenLabel():void{
            if(greenLabel.text=="Long Label"){
                greenLabel.text = "Short";
            }else{
                greenLabel.text = "Long Label";
            }//end else
        }//end function toggleGreenLabel
    ]]></mx:Script>
|
The ActionScript code (highlighted in yellow) is placed in an XML CDATA block for the reasons that I explained in the earlier lesson titled Panels, Divided Boxes, Text Areas, and Color Pickers.
Behavior of the toggleGreenLabel function
An examination of the code in Listing 4 will reveal that the behavior of the toggleGreenLabel function is essentially the same as the behavior of the inline ActionScript code in Listing 3 except that Listing 4 toggles the text in the Label object with the id value of greenLabel.
An examination of the code in Listing 2 shows that this is the second Label object from the top in Figure 1 (the object with the green text).
Handle a click event on a button
Listing 5 begins by creating the label with the descriptive text immediately above the second button in Figure 1. There is nothing new here.
Then Listing 5 registers a click event handler on the second button by calling the function named toggleGreenLabel that is defined in the Script element in Listing 4.
Listing 5. Handle a click event on a
button.
    <!--Call the function in the local script. -->
    <mx:Label text="Call a function in a local script."
        color="#000000"
        fontSize="12" fontWeight="bold"/>

    <mx:Button
        label="Toggle green label between Long and Short"
        click="toggleGreenLabel()"/>
|
In my opinion, this is a much cleaner approach than the inline approach used in Listing 3 to accomplish essentially the same thing. Others may not agree with that opinion, however.
What about the missing semicolon?
You may have noticed that the function call in Listing 1 is terminated by a semicolon while the function call in Listing 5 is not terminated by a semicolon. How can that be?
For an answer, here is part of what the documentation at Syntax has to say about the use of the semicolon character:
"You can use the semicolon character (;) to terminate a statement. Alternatively, if you omit the semicolon character, the compiler will assume that each line of code represents a single statement. Because many programmers are accustomed to using the semicolon to denote the end of a statement, your code may be easier to read if you consistently use semicolons to terminate your statements.
Using a semicolon to terminate a statement allows you to place more than one statement on a single line, but this may make your code more difficult to read."
Listing 6 shows two different ways to write ActionScript code that will copy the code in an external file and paste it into your XML code.
Listing 6. Include an external file.
   <!--Include a file in a local script.-->
    <mx:Script><![CDATA[
        //ActionScript code to include an external
        // file.
        include "includedFiles/IncludedFile.as";
    ]]></mx:Script>

    <!-- Another way to include an external file.
    <mx:Script  source="includedFiles/IncludedFile.as"/>
    -->
|
What does the documentation have to say?
Here is part of what Comparing, including, and importing ActionScript code has to say on the topic:
"To include ActionScript code, you reference an external ActionScript file in your <mx:Script> tags. At compile time, the compiler copies the entire contents of the file into your MXML application, as if you had actually typed it. ...
There are two ways to include an external ActionScript file in your Flex application:
- The source attribute of the <mx:Script> tag. This is the preferred method for including external ActionScript class files.
- The include statement inside <mx:Script> blocks."
Location of the external ActionScript file
Listing 6 includes the contents of a file named IncludedFile.as, which is located in a folder named includeFiles as shown in Figure 3. The folder named includeFiles is a child of the folder named src, which contains the XML file named ActionScript01.mxml.
Project file structure
Figure 3 shows a screen shot of the project file structure taken from the Flex Builder 3 IDE.
Figure 3. Project file structure.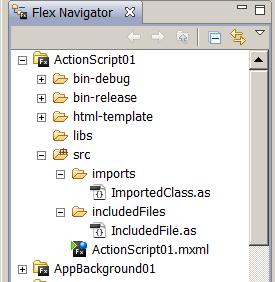
The file named IncludedFile.as
The file named IncludedFile.as is shown in its entirety in Listing 19. The code in the file defines a function named toggleBlueLabel.
The behavior of the toggleBlueLabel function is essentially the same as the behavior of the function named toggleGreenLabel (see Listing 4) except that it toggles the text in the label object having the id value of blueLabel. This is the third label down from the top of Figure 1 with blue text.
Handle a click event on a button
Listing 7 begins by creating the label with the descriptive text immediately above the third button in Figure 1. There is nothing new here.
Then Listing 7 registers a click event handler on the third button by calling the function named toggleBlueLabel that is defined in the external file named IncludedFile.as in Listing 19. That function is included in (copied into) the mxml program by the Script element in Listing 6.
Listing 7. Handle a click event on a
button
    <!--Call a function from the included file. -->
    <mx:Label
        text="Call a function from an included file."
        color="#000000"
        fontSize="12" fontWeight="bold"/>

    <mx:Button
        label="Toggle blue label between Long and Short"
        click="toggleBlueLabel()"/>
|
This may be the point where I lose those readers who don't have object-oriented programming (OOP) knowledge. If you are one of those readers, don't despair. There is a lot that you can accomplish using ActionScript without using OOP concepts. You can learn about OOP and come back to this section later. Or, keep reading. You may learn something even without an OOP background.
In order to import a class, we must have access to a class to import. Listing 8 shows the beginning of a class definition for a new class named ImportedClass.
Beginning of the class definition
Listing 8 shows the beginning of the definition for an ActionScript class named ImportedClass. (A complete listing of this class is provided in Listing 20. All of the code in Listing 8 and Listing 20 is ActionScript code.)
Listing 8. Beginning of the definition for
the class named ImportedClass.
package imports{
    import mx.controls.Label;

    public class ImportedClass extends Object{
        private var label:Label = null;//instance var

        public function ImportedClass(label:Label){
            this.label=label;
        }//end constructor
|
If you happen to have a Java OOP background, you will see a lot that looks familiar in this class definition and a few things that don't look familiar.
The package directive
Without getting into a lot of detail, the package directive essentially identifies the folder that contains the class definition file. This class definition is contained in a file named ImportedClass.as, which is in a folder named imports. The folder named imports is a child of the folder named src, which is the location of the Flex file named ActionScript01.mxml. (See Figure 3.)
Note the left curly brace following the import directive. That is different from Java syntax. Of course, there must be a right curly brace at the end of the class definition later.
The import directive
The import directive defines the location of the Flex Label class, which will be needed later by the code in the class definition.
Save a reference to a Label object
The constructor for the class receives an incoming parameter, which is a reference to a Label object. It saves the reference in an instance variable named label to make it accessible to the functions that follow.
A function named toggleLabel
Listing 9 defines a function named toggleLabel inside the class definition. Because it is not declared static, this is what we call an instance function.
Listing 9. A function named toggleLabel.
        public function toggleLabel():void {
            if (label.text=="Long Label") {
                label.text = "Short";
            }else{
                label.text = "Long Label";
            }//end else
        }//end toggleLabel
|
The behavior of the function
The behavior of this function is essentially the same as the behavior of the functions named toggleGreenLabel and toggleBlueLabel discussed earlier. The major difference is that the function named toggleLabel applies to the Label object whose reference is stored in the instance variable named label that is defined and populated in Listing 8. Thus, this function can be applied to any Label object.
A function named getLength
Listing 10 defines another instance function named getLength.
Listing 10. A function named getLength.
        public function getLength():Number{
            return label.text.length;
        }//end getLength
        //==============================================//

    }//end class named ImportedClass
}//end package named imports
|
This function returns the number of characters in the text property belonging to the Label object whose reference is stored in the instance variable named label that is defined and populated in Listing 8.
Two different functions can be applied
Therefore, once an object of this class is instantiated to encapsulate a reference to a particular Label object, two different functions can be applied to that label. One function toggles the value of the text property between "Long Label" and "Short" (see Listing 9). The other function returns the number of character in the current value of the text property (see Listing 10).
The end of the class definition
Listing 10 also signals the end of the class definition and includes the closing curly brace associated with the package directive in Listing 8.
Our objective
Our objective is to instantiate four objects of the class named ImportedClass. Each object will encapsulate a reference to one of the four Label objects that were created in Listing 2.
Having done that, we will be able to call either or both of the functions defined in Listing 9 and Listing 10 on each object in order to manipulate the Label object whose reference is encapsulated in the object.
Saving a reference to an object
Usually, (but not always), when we instantiate an object of a class, we save a reference to that object in a reference variable. This is necessary if we want to refer to the object later in the execution of the program.
Declare variables of type ImportedClass
The ActionScript code in Listing 11 declares four variables of type ImportedClass that will be used later to store references to objects instantiated from the class named ImportedClass.
Listing 11. Declare variables of type
ImportedClass.
    <!--Import a custom class and instantiate four
        objects from the imported class.-->
    <mx:Script><![CDATA[
        //ActionScript code to instantiate four objects
        // of an imported class.
        import imports.ImportedClass;
        private var yellowObj:ImportedClass = null;
        private var greenObj:ImportedClass = null;
        private var blueObj:ImportedClass = null;
        private var cyanObj:ImportedClass = null;
|
The creationComplete event
As you saw earlier, Listing 1 contains a call to an ActionScript function named initApp. This call is made when the Application object fires a creationComplete event.
The objective of putting the call to the initApp function in the creationComplete event handler is to cause the program to take the actions defined in the initApp function, but to make certain that those actions are not taken until the Application object and all of its children "has finished its construction, property processing, measuring, layout, and drawing."
Definition of the initApp function
The ActionScript code in Listing 12 defines the initApp function.
Listing 12. Definition of the initApp
function.
        private function initApp():void {
            yellowObj = new ImportedClass(yellowLabel);
            greenObj = new ImportedClass(greenLabel);
            blueObj = new ImportedClass(blueLabel);
            cyanObj = new ImportedClass(cyanLabel);
        }//end initApp
    ]]></mx:Script>
|
This function uses the new operator to instantiate four objects of the class named ImportedClass. Each call to the constructor for the ImportedClass class passes a reference to one of the Label objects created in Listing 2 and stores the new object's reference in one of the reference variables declared in Listing 11.
Based on the creationComplete event
It is important to make certain that a Label object exists before attempting to pass its reference to a constructor. Therefore, the creationComplete event was used to make certain that these calls to the constructor for the ImportedClass weren't made until the Label objects actually existed.
Save the references to the objects
The code in Listing 12 saves a reference to each new object in one of the reference variables declared in Listing 11. From that point forward, any of the four variables can be used to apply the functions belonging to the ImportedClass object to the Label object whose reference is encapsulated in the object referred to by the variable.
Display a label
Listing 13 displays the label immediately above the fourth button in Figure 1.
Listing 13. Display a label.
    <mx:Label
        text=
"Call functions on two objects of an imported class."
        color="#000000"
        fontSize="12" fontWeight="bold"/>
|
There's nothing new about Listing 13 except that I had to break my indentation scheme to cause the label's text to fit in this narrow publication format.
Call functions on two objects of ImportedClass
Listing 14 uses inline ActionScript code to define a click event handler on the fourth button in Figure 1.
Listing 14. Call functions on two objects
of ImportedClass.
    <mx:Button
        label=
"Toggle cyan and green labels between Long and Short"
        click="
            greenObj.toggleLabel();
            cyanObj.toggleLabel();
        "/>
|
Toggle the text in two labels
The code in Listing 14 calls the toggleLabel functions on two of the four objects instantiated in Listing 12. These are the objects that encapsulate references to the labels with the green and cyan text shown at the top of Figure 1.
If you run this application and click the fourth button, you will see that the text for those two labels toggles between "Long Label" and "Short" as defined by the code in Listing 9.
Toggle the text on the blue and yellow labels
Listing 15 does essentially the same thing as Listings 13 and 14, together except that the ActionScript code in Listing 15 causes the text in the blue and yellow labels to be toggled when the user clicks the fifth button in Figure 1.
Listing 15. Toggle the text on the blue
and yellow labels.
    <!--Call functions on two other objects of the
        imported class -->
    <mx:Label text=
"Call functions on other objects of the imported class."
        color="#000000"
        fontSize="12" fontWeight="bold"/>

    <mx:Button
        label=
"Toggle blue and yellow labels between Long and Short"
        click="
            blueObj.toggleLabel();
            yellowObj.toggleLabel();
        "/>
|
Put two Label objects in an HBox object
Listing 16 uses an HBox object to arrange two Label objects horizontally as shown immediately above the bottom button in Figure 1.
Listing 16. Put two Label objects in an
HBox object.
    <!--One of the labels in this box is modified by a
        click event handler on the following button.-->
    <mx:HBox>
        <mx:Label text="Length = "
            fontSize="12" fontWeight="bold"/>
        <mx:Label id="lengthLabel" text="?"
            fontSize="12" fontWeight="bold"/>
    </mx:HBox>
|
There is nothing in Listing 16 that is new to this lesson. Note, however, that a value of lengthLabel is assigned to the id attribute of the rightmost Label object so that it can be referred to later.
Display text length for the cyan label
Listing 17 defines a click event handler on the bottom button in Figure 2.
Listing 17. Display text length for the
cyan label.
    <!--Call a different function on one of the objects
        of the imported class.-->
    <mx:Button
        label="Get length of cyan label."
        click="lengthLabel.text =
            cyanObj.getLength().toString();
        "/>

</mx:Application>
|
Call the getLength function
The ActionScript code in this event handler calls the getLength function (see Listing 10) on the object that encapsulates a reference to the Label object with the cyan text.
The getLength function returns the number of characters that currently reside in that text (the length of the text). The returned value is immediately converted to a string by a call to the built-in toString function.
The resulting string is assigned to the text property of the Label object referred to by lengthLabel (see Listing 16). This is the rightmost Label object immediately above the bottom button in Figure 2.
The length was 5
As you can see from Figure 2, when that screen shot was captured, the text "Short" was being displayed by the cyan button and the number of characters reported by the getLength function was 5.
Was it worth it?
You may well wonder if the benefits of defining and importing a custom class are worth the extra effort. In this example, which was designed solely to illustrate the concept, the benefits may not have been worth the effort. Rest assured, however, that there are many capabilities of ActionScript (version 3 or later) that can only be accessed in Flex by defining and importing custom ActionScript classes.
The end of the application
Listing 17 signals the end of the Application element.
I encourage you to run the online version of this program. Then copy the code from Listings 18, 19, and 20. Use that code to create a Flex project. Compile and run the project. Experiment with the code, making changes, and observing the results of your changes. Make certain that you can explain why your changes behave as they do.
You learned how to incorporate ActionScript code into your Flex projects in the following four ways:
Listing 18. XML Source code for the
application named ActionScript01.
<?xml version="1.0"?>
<!--
ActionScript01
Illustrates four different ways to incorporate
ActionScript into Flex:

1.  Inline ActionScript code.
2.  ActionScript code in a local script.
3.  ActionScript code from an included file.
4.  ActionScript code from an imported class.
-->
<mx:Application xmlns:mx="http://www.adobe.com/2006/mxml"
    backgroundColor="#999999"
    creationComplete="initApp();">

    <!--These labels are modified by click event handlers
        on the buttons.-->
    <mx:Label id="yellowLabel" text="Long Label"
        color="#FFFF00" fontSize="12" fontWeight="bold"/>
    <mx:Label id="greenLabel" text="Long Label"
        color="#00FF00" fontSize="12" fontWeight="bold"/>
    <mx:Label id="blueLabel" text="Long Label"
        color="#0000FF" fontSize="12" fontWeight="bold"/>
    <mx:Label id="cyanLabel" text="Long Label"
        color="#00FFFF" fontSize="12" fontWeight="bold"/>


    <!--Use inline ActionScript code. Note that normal
    ActionScript comments are not allowed in the code.-->
    <mx:Label text="Use inline ActionScript code"
        color="#000000"
        fontSize="12" fontWeight="bold"/>
    <mx:Button
        label=
            "Toggle yellow label between Long and Short"
        click="
        if(yellowLabel.text=='Long Label'){
            yellowLabel.text='Short';
        }else{
            yellowLabel.text='Long Label';
        }//end else
        //end inline ActionScript code.
        "/>


    <!--Define a function in a local script.-->
    <mx:Script><![CDATA[
        //ActionScript code in a local script.
        private function toggleGreenLabel():void{
            if(greenLabel.text=="Long Label") {
                greenLabel.text = "Short";
            }else{
                greenLabel.text = "Long Label";
            }//end else
        }//end function toggleGreenLabel
    ]]></mx:Script>

    <!--Call the function in the local script. -->
    <mx:Label text="Call a function in a local script."
        color="#000000"
        fontSize="12" fontWeight="bold"/>
    <mx:Button
        label="Toggle green label between Long and Short"
        click="toggleGreenLabel()"/>


   <!--Include a file in a local script.-->
    <mx:Script><![CDATA[
        //ActionScript code to include an external
        // file.
        include "includedFiles/IncludedFile.as";
    ]]></mx:Script>

    <!-- Another way to include an external file.
    <mx:Script  source="includedFiles/IncludedFile.as"/>
    -->

    <!--Call a function from the included file. -->
    <mx:Label
        text="Call a function from an included file."
        color="#000000"
        fontSize="12" fontWeight="bold"/>
    <mx:Button
        label="Toggle blue label between Long and Short"
        click="toggleBlueLabel()"/>


    <!--Import a custom class and instantiate four
        objects from the imported class.-->
    <mx:Script><![CDATA[
        //ActionScript code to instantiate four objects
        // of an imported class.
        import imports.ImportedClass;
        private var yellowObj:ImportedClass = null;
        private var greenObj:ImportedClass = null;
        private var blueObj:ImportedClass = null;
        private var cyanObj:ImportedClass = null;

        private function initApp():void {
            yellowObj = new ImportedClass(yellowLabel);
            greenObj = new ImportedClass(greenLabel);
            blueObj = new ImportedClass(blueLabel);
            cyanObj = new ImportedClass(cyanLabel);
        }//end initApp
    ]]></mx:Script>

    <!--Call functions on two objects of the imported
        class -->
    <mx:Label
        text=
"Call functions on two objects of an imported class."
        color="#000000"
        fontSize="12" fontWeight="bold"/>
    <mx:Button
        label=
"Toggle cyan and green labels between Long and Short"
        click="
            greenObj.toggleLabel();
            cyanObj.toggleLabel();
        "/>

    <!--Call functions on two other objects of the
        imported class -->
    <mx:Label text=
"Call functions on other objects of the imported class."
        color="#000000"
        fontSize="12" fontWeight="bold"/>
    <mx:Button
        label=
"Toggle blue and yellow labels between Long and Short"
        click="
            blueObj.toggleLabel();
            yellowObj.toggleLabel();
        "/>


    <!--One of the labels in this box is modified by a
        click event handler on the following button.-->
    <mx:HBox>
        <mx:Label text="Length = "
            fontSize="12" fontWeight="bold"/>
        <mx:Label id="lengthLabel" text="?"
            fontSize="12" fontWeight="bold"/>
    </mx:HBox>

    <!--Call a different function on one of the objects
        of the imported class.-->
    <mx:Button
        label="Get length of cyan label."
        click="lengthLabel.text =
            cyanObj.getLength().toString();
        "/>

</mx:Application>
|
Listing 19. ActionScript code in the file
named IncludedFile.as.
//File:  src/IncludedFiles/IncludedFile.as
public function toggleBlueLabel():void {
    if (blueLabel.text=="Long Label") {
        blueLabel.text = "Short";
    }else{
        blueLabel.text = "Long Label";
    }//end else
}//end function toggleBlueLabel
|
Listing 20. Definition of the
ActionScript class named ImportedClass.
package imports{
    import mx.controls.Label;

    public class ImportedClass extends Object{
        private var label:Label = null;//instance var

        public function ImportedClass(label:Label){
            this.label=label;
        }//end constructor
        //==============================================//

        public function toggleLabel():void {
            if (label.text=="Long Label") {
                label.text = "Short";
            }else{
                label.text = "Long Label";
            }//end else
        }//end toggleLabel
        //==============================================//

        public function getLength():Number{
            return label.text.length;
        }//end getLength
        //==============================================//

    }//end class named ImportedClass
}//end package named imports
|
Copyright 2009, Richard G. Baldwin. Reproduction in whole or in part in any form or medium without express written permission from Richard Baldwin is prohibited.
Richard has participated in numerous consulting projects and he frequently provides onsite training at the high-tech companies located in and around Austin, Texas. He is the author of Baldwin's Programming Tutorials, which have gained a worldwide following among experienced and aspiring programmers. He has also published articles in JavaPro magazine.
In addition to his programming expertise, Richard has many years of practical experience in Digital Signal Processing (DSP). His first job after he earned his Bachelor's degree was doing DSP in the Seismic Research Department of Texas Instruments. (TI is still a world leader in DSP.) In the following years, he applied his programming and DSP expertise to other interesting areas including sonar and underwater acoustics.
Richard holds an MSEE degree from Southern Methodist University and has many years of experience in the application of computer technology to real-world problems.
-end-