Published:
May 12, 2008
Last Revised: May 16, 2008
By Richard G. Baldwin
Homeschool Programming Notes # 112
This tutorial lesson is part of a continuing series that is designed specifically for teaching computer programming to homeschool students and their parents. However, even though the series is designed for homeschool students, everyone is welcome to use the lessons to learn computer programming.
In this lesson, I will present and explain three Scratch programs. One program uses a forever if block to cause a sprite to move in a small circle while the space bar is pressed. You will learn that it is not possible to connect another block to the bottom of a forever if block. Therefore, if you use forever if block (or a forever block), it must be the last block in the script in which it is contained.
The second program uses a forever if block to create a counter loop. That program will be used as the jumping-off point for a discussion of the similarities and differences between a forever if block and a repeat block.
The third program uses a repeat until block to cause a sprite to run in a small circle until the user presses the space bar. Unlike the forever if block, it is possible to connect another block to the bottom of a repeat until block. Therefore, it is not necessary for a repeat until block to be the last block in a script.
Finally, I will provide the specifications for a student-programming project for you to demonstrate your understanding of what you learned from the three programs listed above and from earlier lessons.
I recommend that you open another copy of this document in a separate browser window and use the following links to easily find and view the figures while you are reading about them.
I recommend that you also study the other lessons in my extensive collection of online programming tutorials. You will find a consolidated index at www.DickBaldwin.com.
In an earlier lesson (see Resources) I told you that any programming logic problem could be solved using an appropriate combination of only three programming structures, none of which are complicated. The three structures are known generally as:
I have explained the sequence and selection structures and some of the loop structures in earlier lessons. I will continue to concentrate on the loop structure in this lesson.
In this lesson, I will present and explain the following three Scratch programs:
In addition, I will provide the specifications for a student-programming project for you to demonstrate your understanding of what you learned from the three programs listed above and from earlier lessons.
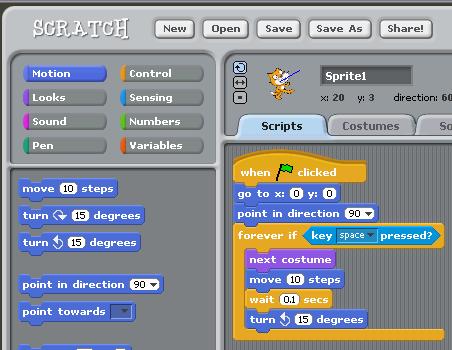
This program illustrates the use of a forever if block. When the user clicks the green flag, the program implements the pseudocode shown in Figure 1.
Figure 1. Pseudocode for the program named ForeverLoop01.
Move the cat to the center of the stage.
Turn the cat to face to the right.
while(true){//infinite loop
  while(space bar is pressed){
    Change cat to next costume image
    Move cat forward 10 steps.
    Wait 0.1 seconds.
    Turn cat clockwise 15 degrees.
  }//end while loop
}//end infinite while loop
|
While the space bar is pressed, the cat moves around the circumference of a small circle, appearing to walk due to the visual effect produced by switching between two images (known in Scratch as costumes). As explained in the previous lesson (see Resources), the two costumes were designed to produce the illusion of walking.
Program code for the program named ForeverLoop01
The code for this program is shown in Figure 2.
Figure 2. Program code for the program named ForeverLoop01.
|
|
Note that because the bottom of the forever if block is smooth, nothing can be connected to the bottom of the block. Therefore, it must be the last block in the script that contains it.
Except for the forever if and next costume blocks, none of the blocks in Figure 2 are new to this lesson.
The next costume block
The previous lesson used a switch to costume block to cause the existing image of a sprite to be replaced by a different image. That block requires the programmer to specify the new costume by name each time a change in costume is needed.
The next costume block used in Figure 2 is easier to use from a programming standpoint. As explained in the previous lesson (see Resources), there is a list of one or more costumes associated with each sprite. The next costume command causes the sprite to switch from the current costume to the next costume in the list. If the current costume is the last costume in the list, the command causes the sprite to switch back up to the first costume in the list.
The forever if block
As you can see in Figure 2, there is a light blue conditional clause placed in the forever if block. This program will run forever (or until it is purposely terminated) during which time it will monitor the condition specified in the conditional clause. Each time it performs the test and finds the condition to be true, the code inside the block will be executed.
When the condition is true
In this program, the condition is true if the space bar is pressed. When the condition is found to be true, the sprite:
No screen shot of the output
Because this program is animated, a screen shot of the Stage wouldn't impart much information so I won't show you one. Basically, it would look very similar to Figure 8 without the thought bubble. You can copy the code from Figure 2 and run the program locally. Also, the program has been posted online so that you can run it from there. (See the link to the online version in Resources.)
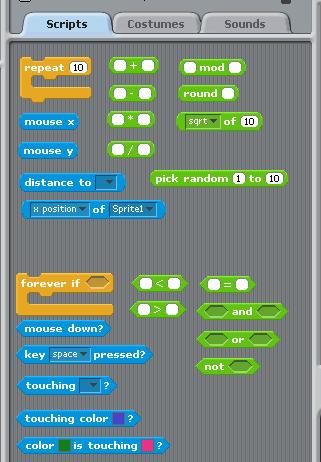
This program illustrates another usage of a forever if block. The behavior of this program is very similar to a program that I explained in the previous lesson (see Resources) using the repeat block. However, there are major differences between the forever if and repeat blocks, and those differences are illustrated in Figure 3.
Comparison between repeat and forever if blocks
One of the major differences between the two blocks is the shape of the block that can be dropped into the pocket on the block.
Figure 3. Comparison between repeat and forever if blocks.
|
|
No drop-in required for a repeat block
To begin with, the repeat block doesn't require that any other block be dropped into the pocket to make it fully functional. All that is required is that a literal value be entered into the pocket, or that the default literal value be accepted. Used in this way, the repeat block will cause the code inside the block to be executed a number of times matching the literal value.
The drop-in block must be a rounded rectangle for the repeat block
If you do drop a block into the pocket, the repeat block requires that a block with a rounded-rectangle shape be used. Figure 3 shows a sampling of the kinds of blocks that have a rounded rectangle shape. All of these blocks evaluate to a numeric value in one way or another, so the code within the repeat block will be executed that number of times, or not at all if the value is 0.
The drop-in must be a squashed hexagon for the forever if block
On the other hand, the forever if block requires that another block be dropped into the pocket to make it functional. (Actually if you don't drop a block into the pocket, it simply acts like there is a false block in the pocket and does nothing.)
Blocks having shapes that are compatible with the pocket in the forever if block look like squashed hexagons with pointed ends. A sampling of such blocks is shown in Figure 3. All of the squashed hexagon blocks evaluate to true or false. The code inside a forever if block will be executed once and only once each time the condition specified by the embedded hexagonal block evaluates to true.
The forever if block is more versatile than the repeat block
In this program, I used a counter variable to construct the hexagonal block, thus causing the behavior of the forever if block to be similar to the behavior of a repeat block. However, forever if block is much more versatile. It can be used to execute a block of code on the basis of any block that you can construct that will evaluate to true or false.
Can't connect to the bottom
There is one important stipulation, which I mentioned earlier. The bottom of the forever if block is smooth and it is not possible to connect another block to the bottom of the forever if block. Therefore, it must always be the last block in a script. Also, a script that ends with a forever if block will continue to execute forever unless the program is manually terminated. That may or may not be a good thing.
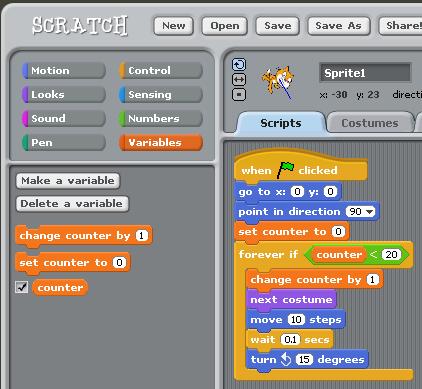
Program code for the program named ForeverLoop02
The code for this program is shown in Figure 4.
Figure 4. Program code for the program named ForeverLoop02.
|
|
Pseudocode for the program named ForeverLoop02
When the user clicks the green flag, the program implements the pseudocode shown in Figure 5.
Figure 5. Pseudocode for the program named ForeverLoop02.
Move the cat to the center of the stage.
Turn the cat to face to the right.
Set counter to 0.
while(true){//infinite loop
  while(counter < 20){
    Increment counter by 1.
    Change to next costume image
    Move cat forward 10 steps.
    Wait 0.1 seconds.
    Turn cat clockwise 15 degrees.
  }//end while loop
}//end infinite while loop
|
A counter variable
The program creates a variable named counter and initializes its value to zero. The code in the forever if block increments the counter by one during each iteration. For a counter limit value of 20, the code inside the forever if block is executed 20 times.
When the user clicks the green flag, the 20 iterations of the forever if loop cause the cat to walk about 80-percent of the way around the circumference of a small circle.
No screen shot of the output
Again, because this program is animated, a screen shot of the Stage wouldn't impart much information so I won't show you one. You can copy the code from Figure 4 and run the program locally. Also, the program has been posted online so that you can run it from there. (See the link to the online version in Resources.)
This program uses a repeat until block to construct a loop structure. This block makes it possible to create a loop that is similar, but different from a do-while loop in Java. (I will have more to say about the Java loop in a future lesson.)
Program behavior
When the user clicks the green flag, the program implements the pseudocode shown in Figure 6.
Figure 6. Pseudocode for the program named RepeatUntil01.
Move the cat to the center of the stage.
Turn the cat to face to the right.
repeat until user presses space bar{
  Change to next costume image
  Move cat forward 10 steps.
  Wait 0.1 seconds.
  Turn cat clockwise 15 degrees.
}//end repeat until block
Move the cat to the center of the stage.
Turn the cat to face to the right.
Cause the cat to think (Hmm...)
|
Program code for the program named RepeatUntil01
The code for this program is shown in Figure 7.
Figure 7. Program code for the program named RepeatUntil01.
|
|
What does the cat do?
When the user clicks the green flag, the cat
The cat continues to run in the circle until the user presses the space bar, at which point the repeat until loop terminates.
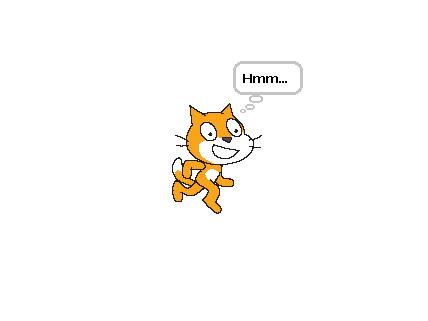
Then the cat moves back to the center facing to the right where it executes a think command, producing the output shown in Figure 8.
Figure 8. Final screen output from the program named RepeatUntil01.
|
|
Doesn't have to be the last block in the script
It is very important to note that unlike the forever if block, it is possible to connect another block to the bottom of a repeat until block. Therefore, it is not necessary for a repeat until block to be the last block in a script. This means that a program can continue to execute a repeat until block until a specified condition becomes true, and then move on to execute additional code.
This structure is more similar to the structures typically found in modern programming languages than are the structures required by the forever if block. However, most modern programming structures repeat something while a condition is true instead of repeating it until a condition becomes true.
The rotation buttons
There are three small buttons immediately to the left of the cat sprite image shown at the top of Figure 7. Without getting into the details at this point in time, I need to tell you that the top (blue) button in the column must be selected in order for this program to execute properly.
Available online
At the real risk of becoming really boring, I will tell you again that you can copy the code from Figure 7 and run the program locally. Also, the program has been posted online so that you can run it from there. (See the link to the online version in Resources.)
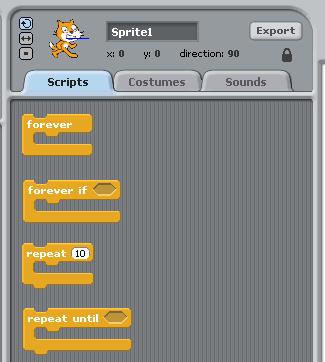
Unless I missed one, the four blocks shown in Figure 9 are the only blocks that are available to create loop structures in Scratch version 1.2.1.
Figure 9. Blocks that can be used to create loop structures.
|
|
In this and the previous program, I have provides discussion and sample programs using the bottom three blocks in Figure 9. However, because of its simplicity, I haven't provided a sample program using the forever block at the top of Figure 9.
If you were to replace the forever if block with a forever block in Figure 4 and then click the green flag, the cat would continue to run in a circle and the counter variable would continue to increment forever or at least until you manually terminate the program. (I don't know what would happen when the counter variable finally reached the largest allowable value and I don't have the patience to find out.)
I encourage you to use the information provided above to write and run these three programs. Experiment with the code, making changes, and observing the results of your changes. Make certain that you can explain why your changes behave as they do.
Just for fun, see if you can cause the cat to change color as it marches around in the circle.
I also encourage you to write the program described below.
Write a program named ForeverLoop03 that is very similar to the program named ForeverLoop01. Once again, the cat marches in a circle when the user holds down the space bar (after first clicking the green flag). However, this program also produces an audio output that is a nice drumbeat and the cat marches in synchronism with the drumbeat.
My version of this program has been posted online so that you can run it from there. (See Resources for the link to the online version.)
In this lesson, I presented and explained three Scratch programs. One program uses a forever if block to cause a sprite to move in a small circle while the space bar is pressed. I explained that it is not possible to connect another block to the bottom of a forever if block. Therefore, if you use forever if block (or a forever block), it must be the last block in the script in which it is contained.
The second program uses a forever if block to create a counter loop. That program was used as the jumping-off point for a discussion of the similarities and differences between a forever if block and a repeat block.
The third program uses a repeat until block to cause a sprite to run in a small circle until the user presses the space bar. I pointed out that unlike the forever if block, it is possible to connect another block to the bottom of a repeat until block. Therefore, it is not necessary for a repeat until block to be the last block in a script.
Finally, I provided the specifications for a student-programming project for you to demonstrate your understanding of what you learned from the three programs listed above and from earlier lessons.
In the first lesson in this series (see Resources), I presented a list of concepts that I consider to be fundamental to programming. By that, I mean that the concepts on the list are implemented in very similar ways in most modern programming languages, and learning the concepts in one language is good preparation for tackling another language. That list included the following:
I have covered those topics in this and earlier lessons in this series using the Scratch programming language.
Have run out of fundamental capabilities in Scratch
I have now covered about all of the fundamental programming concepts that I am able to teach you using Scratch. To cover the remaining fundamental programming concepts, we will need more conventional and powerful programming languages such as Alice (with some limitations) and Java.
Have not covered all there is to Scratch
However, that doesn't mean that we have covered everything that you can do with Scratch. In fact, we have barely scratched the surface of what you can do with Scratch (pardon the pun).
If you have visited the Scratch web site and have taken a look at some of the hundreds (probably thousands) of projects that are posted there, you are probably aware that Scratch has capabilities far beyond what we have covered here. It is those capabilities that make programming with scratch both fun and engaging. However those capabilities are not fundamental. Rather, they are proprietary and peculiar to Scratch. By that, I mean that the way you access and use those capabilities in Scratch is significantly different from the way that you would access and use similar capabilities in other programming languages.
Will publish a few lessons on non-fundamental Scratch capabilities
The next several lessons will concentrate on some of the non-fundamental but fun and engaging capabilities of Scratch such as music, art, etc. If you are pressed for time and need to stick with the fundamentals, I recommend that you start working through the tutorial lessons on my Alice website. (See the link titled Learn to Program using Alice in Resources.)
In the meantime, if you have some time to spare, just stay with this series and let's have some fun with Scratch.
Copyright 2008, Richard G. Baldwin. Reproduction in whole or in part in any form or medium without express written permission from Richard Baldwin is prohibited.
Richard has participated in numerous consulting projects and he frequently provides onsite training at the high-tech companies located in and around Austin, Texas. He is the author of Baldwin's Programming Tutorials, which have gained a worldwide following among experienced and aspiring programmers. He has also published articles in JavaPro magazine.
In addition to his programming expertise, Richard has many years of practical experience in Digital Signal Processing (DSP). His first job after he earned his Bachelor's degree was doing DSP in the Seismic Research Department of Texas Instruments. (TI is still a world leader in DSP.) In the following years, he applied his programming and DSP expertise to other interesting areas including sonar and underwater acoustics.
Richard holds an MSEE degree from Southern Methodist University and has many years of experience in the application of computer technology to real-world problems.
-end-