Published:
March 18, 2009
By Richard G. Baldwin
Java Programming Notes # 355
This lesson is the next in a series (see Resources) designed to teach you how to write Java programs to do things like:
If you have ever wondered how to do these things, you've come to the right place.
If you have studied the earlier lessons in this series, among other things, you have learned:
In this lesson, you will learn about the HSB color model. You will learn that the HSB color model is closer to the way we think and talk about color than the RGB color model. You will also learn how to write a program that lets you convert back and forth between the two models.
The purpose of this lesson is to help you develop not only a technical understanding but also an intuitive understanding of the HSB color model.
I recommend that you open another copy of this document in a separate browser window and use the following links to easily find and view the figures and listings while you are reading about them.
I recommend that you also study the other lessons in my extensive collection of online programming tutorials. You will find a consolidated index at www.DickBaldwin.com.
In this series of lessons, I will present and explain many of the classes in a multimedia class library that was developed and released under a Creative Commons Attribution 3.0 United States License (see Resources) by Mark Guzdial and Barbara Ericson at Georgia Institute of Technology. In doing this, I will also present some interesting sample programs that use the library.
I explained how to download, install, and test the multimedia class library in an earlier lesson titled Multimedia Programming with Java, Getting Started (see Resources).
Color is tricky. Not only do different individuals perceive color in different ways, the same color often looks different to the same person when viewed under different lighting conditions, and often looks different when viewed on different computer monitors.
There are several different models that are used to describe color in the computer world. Fortunately, we have well-defined mathematical ways to define color.
Won't make you an expert
Even if I were qualified to do so, I wouldn't try to make you a digital color expert in this lesson. Instead, I will briefly introduce you to some of the different color models that are in common use today. Then I will try to teach you enough about the HSB color model that you can understand what you are doing when you use a program that I will explain in a future lesson (or any other software based on HSB) to edit your digital photographs.
What are a color model and a color space?
According to Wikipedia, "A color model is an abstract mathematical model describing the way colors can be represented as multiples of numbers, typically as three or four values or color components. When this model is associated with a precise description of how the components are to be interpreted (viewing conditions, etc.), the resulting set of colors is called color space."
Different color models
Several different color models are commonly used to represent colors in a computer. These include:
I am assuming that you are already well versed in the use of the basic RGB color model. In this lesson, we will be concerned mainly with the third model in the above list (HSB).
HSV versus HSB
According to Light and color: an introduction (see Resources),
"Hue is what we perceive as color. S is saturation: 100% is a pure color. 0% is a shade of gray. Value is related to brightness. HSV and HSL (below) are obtained by mathematically transforming RGB. HSV is the identical to HSB"
I included this quotation, and particularly the last sentence in the quotation to deal with the following issue. The Java Color class provides methods for converting back and forth between the RGB and the HSB color models. As far as I know, the Java API does not provide direct support for HSV. On the other hand, most of the articles that you find on the web refer to the model as HSV rather than HSB. For purposes of this lesson, I will assume that either the HSB and HSV models are identical (as indicated in the above quotation), or they are so close that the differences are of no practical importance.
Why do we need HSB when we already have RGB?
The RGB color model is convenient for storing pixel-color data in a computer. In addition, it maps very well into the way that color is displayed on a color monitor where each pixel consists of three tiny dots, each of which can be caused to glow in red, green, or blue.
However, it does not map very well into the way we think and talk about color. For example, it is unlikely that you would go into a clothing store and tell the clerk that you would like to see a jacket with a red color value of 0x96 (hex), a green color value of 0x48, and a blue color value of 0x1B. (Well -- if you are a true computer geek you might, but the clerk probably wouldn't know what you are talking about.)
|
Burnt orange
On the other hand, you might very well describe the color as orange, not too bright, and not too vivid or bold. In that case, you would be describing the color using parameters that are similar to the parameters in the HSB color model.
To a first approximation, orange corresponds to hue, vivid or bold corresponds to saturation, and bright corresponds to brightness. In other words, the HSB color model is closer to the way we think and talk about colors than the RGB model.
How did I create burnt orange?
In case you are wondering how I came up with the RGB formula for a color that is very close to UT burnt orange (see sidebar), I used the program that I will explain later in this lesson and adjusted the sliders shown in Figure 1 to produce a color that is orange, not too bright, and not too vivid or bold. Then I made some minor adjustments to the positions of the sliders to produce a color that is very close to the color on a University of Texas coffee mug.
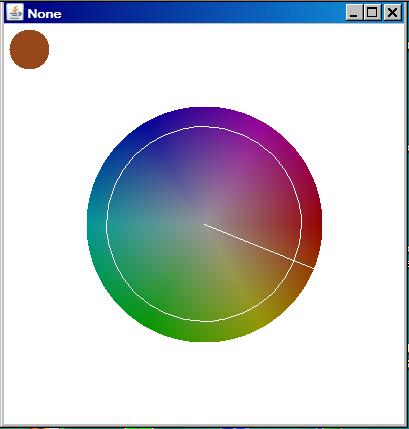
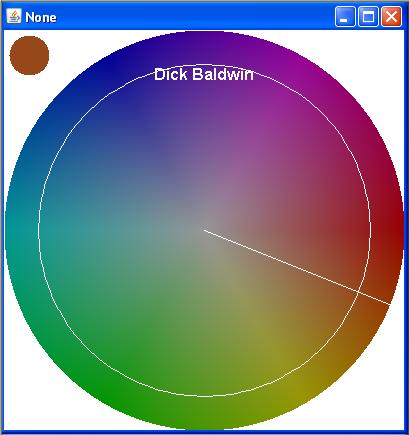
In this lesson, I will present and explain a program that lets you experiment with the HSB color model and its relationship to the RGB model. The program displays an HSB color wheel and a GUI as shown in Figure 1.
Figure 1. Sample screen output for the program named HsbColor01.
|
|
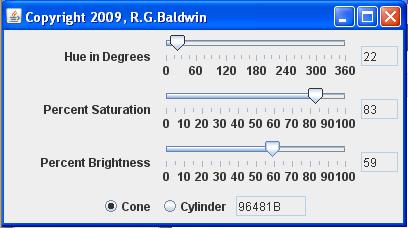
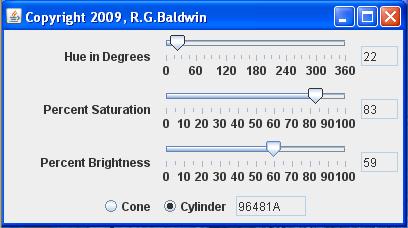
The GUI
There are three sliders, a pair of radio buttons, and four text fields in the GUI. The radio buttons control whether the HSB color model is displayed as a slice through a cone or a slice through a cylinder. (I will have more to say about this later.)
A 3D geometric solid
Using the HSB color model, any color can be specified by the values of three parameters. One parameter is an angular measure ranging from 0 to 360 degrees. The other two parameters are linear measures ranging from 0 to 1.0.
As with other models defined by three parameters, it is convenient to visualize the HSB model as being represented by a solid shape in 3D space. Using that concept, each color is represented by a point somewhere inside or on the surface of the solid.
A cylinder or a cone
There are a variety of different ways to visualize that 3D shape. Because one of the parameters is an angular measure, it is convenient to visualize the shape as either a cylinder or a cone. Using that concept, one of the linear parameters can be visualized as relating to the radius of the cylinder or the cone. The other linear parameter can be visualized as a longitudinal axis extending from one end of the cylinder or cone to the other end of the cylinder or cone. Most authors seem to prefer a cone to a cylinder. I will let you decide for yourself which you prefer.
A slice through the cylinder or the cone
Using this concept, the color wheel shown in the top image in Figure 1 becomes a slice through the cylinder or the cone. If the slice is at the very top of the cone, the diameter of the slice is equal to the maximum diameter of the cone. If the slice is at the very bottom of the cone, the diameter of the slice is very small.
If the model is visualized as a cylinder, the diameter of the slice will be equal to the diameter of the cylinder no matter where it is taken.
The sliders
The value of the bottom slider in the GUI in Figure 1 (labeled Percent Brightness) determines which horizontal slice of the cone (or cylinder) is displayed in the image above the GUI.
The value of the top slider labeled Hue in Degrees determines the angular position of the white radial line shown in the top image in Figure 1. The value of the middle slider labeled Percent Saturation determines the radius of the white circle shown in Figure 1.
The color specified by the slider values
The colored disk in the upper-left corner of Figure 1 shows the color specified by the intersection of the slice through the cone, the radial line, and the circle. The three text fields to the right of the sliders show the current values pointed to by the buttons on the sliders.
The Text field at the bottom of the GUI displays the RGB color value in hexadecimal corresponding to that color. In other words, the values of the three sliders (and their corresponding text fields) specify a color using HSB parameters. The text field at the bottom shows the parameters of the RGB color model corresponding to that same color. The colored disk in the upper-left corner shows the color independent of the manner in which it is specified.
UT burnt orange
Figure 1 shows the slider positions that produced the burnt orange color that I referred to earlier. As you can see, the HSB parameter values for this color are 22 degrees for hue, 83-percent saturation, and 59-percent brightness.
The purpose of this program is to demonstrate and allow you to experiment with the HSB color model.
This program requires access to Ericson's multimedia library.
Terminating the program
Clicking the large X in the upper-right corner of the color-wheel display shown in Figure 1 will not terminate the program. Instead, the program is terminated by clicking the large X in the upper-right corner of the GUI shown in the lower portion of Figure 1.
The handleSliders method
Aside from the event handlers that are registered on the sliders, the behavior of this program is largely controlled by a method named handleSliders, which is called by the event handlers. This method processes the three sliders, the two radio buttons, the four text fields, the filled oval, and the large display of a color wheel shown in Figure 1.
|
The hue slider
The radio buttons allow the HSB color model to be displayed either as a cone or as a cylinder. In either case, the slider labeled Hue in Degrees, which is graduated in degrees from 0 to 360, specifies a value for hue between zero and 360 degrees inclusive.
Because it is difficult to read an exact value from the slider, the current value of the slider in degrees is also displayed in a text field to the right of the slider.
The saturation slider
A second slider labeled Percent Saturation, which is graduated from 0 to 100, specifies a value for saturation from 0 to 100-percent. (The value of 100-percent corresponds to an actual computational value of 1.0.) The current percentage value of the saturation slider is displayed in a text field to the right of the slider.
The brightness slider
A third slider labeled Percentage Brightness, which is graduated from 0 to 100, specifies a value for brightness from 0 to 100-percent (1.0). Once again, the percentage value of the slider is displayed in a text field to the right of the slider.
The color wheel
The color wheel that is displayed represents a horizontal slice through the cone or the cylinder with the location of the slice being specified by the value of the brightness slider.
A brightness value of 0 produces a horizontal slice at the very bottom. For the cone display format, this is simply a black dot in the center of the picture. I won't show a screen shot of it here because I am confident that you know what a black dot looks like.
The color wheel for a brightness value of zero and the cylinder display format is a black disk having the same diameter as the color wheel in Figure 2. Again, I won't waste space with a screen shot because you know what a black disk looks like.
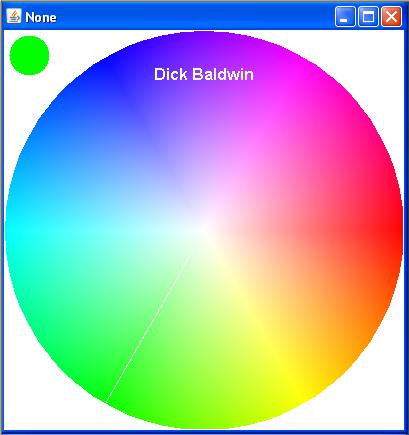
A brightness value of 100 produces a horizontal slice at the very top of the cone or cylinder as shown in Figure 2.
Figure 2. Top surface of the HSB cone.
 |
 |
In effect, Figure 2 shows the top surface of the cone or the cylinder.
Color wheel appearance versus brightness value
As the brightness slider moves toward 0, the color wheel becomes darker as shown in Figure 1. For the cone display format, the color wheel becomes smaller in diameter, also as shown by the color wheel in Figure 1.
A white radial line
Moving the hue slider causes a white radial line, similar to the big hand on a clock, to be displayed on the color wheel to show the value of the hue slider in degrees.
The line is in the 3:00 o'clock position for a hue of red at the 0 and 360-degree positions at the ends of the track. Although barely visible, the white line is in the green area at a hue value of 120 degrees in Figure 2. The white line is much easier to see in Figure 1 due to the improved contrast between the darker background color and the white line.
Moving the hue slider to the right causes the white line to rotate in a clockwise direction.
A white circle
Moving the saturation slider causes a white circle to be displayed inside of and concentric with the color wheel as shown in Figure 1.
The white circle is the same size as the color wheel when the slider is at the 100 end of the track. (Therefore, it can't be seen in Figure 2.) The diameter of the white circle reduces to zero and the circle disappears when the slider approaches the 0 at the left end of the track. The white circle is easy to see in Figure 1 for a saturation value of 83-percent.
A specific color
The intersection of the horizontal plane defined by the value of the brightness slider, the radial line defined by the value of the hue slider, and the circle defined by the value of the saturation slider identifies a specific color. That color, which is the color of the wheel at the intersection, is also enlarged and displayed in a filled oval in the upper-left corner of the display. The color is burnt orange in Figure 1, and is fully-saturated pure green in Figure 2.
A hexadecimal color display
The color specified by the positions of the three sliders is also displayed in numeric RGB hexadecimal format in a text field at the bottom of the GUI. If you are familiar with this format, you will know that the text field at the bottom of Figure 2 contains the RGB value for pure green (00FF00).
Selection of the cone or cylinder display format
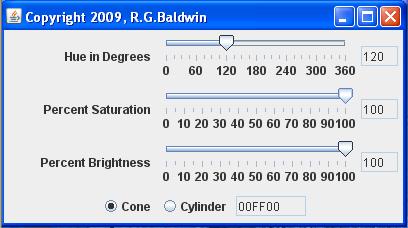
A pair of radio buttons labeled Cone and Cylinder allows the user to select either the cone display format or the cylinder display format. Figure 1 shows the cone format along with the HSB parameter values for burnt orange. Figure 3 shows the same HSB parameter values in cylinder format.
Figure 3. HSB parameters for burnt orange in cylinder format.
 |
 |
The big difference is the diameter
The only real difference between the cone and cylinder display formats is that with the cone format, the diameter of the color wheel is proportional to the brightness value. With the cylinder format, the diameter of the color wheel is the same regardless of the brightness value.
Will explain in fragments
As is my custom, I will break the program down into code fragments and explain the fragments. A complete listing of the program is provided in Listing 13 near the end of the lesson.
|
Beginning of the class named HsbColor01
The class named HsbColor01 begins in Listing 1. A very large percentage of the code in this class is concerned only with declaring instance variables and with the construction of the GUI in terms of placing sliders, radio buttons, etc., in the JFrame object. I will assume that none of that is new to you and will skip over that material. You can view the code that I skipped in Listing 13.
Listing 1. Beginning of the class named HsbColor01.
public class HsbColor01 extends JFrame{

//Code skipped for brevity.


    //Cause the color wheel image to be created on the
    // display.
    handleSliders();

    //Display the GUI and the color wheel.
    setVisible(true);
    display.show();
    //--------------------------------------------------//

    //Register a ChangeListener object on the hueSlider.
    // Each time the hueSlider fires a ChangeEvent, this
    // event handler erases the current image and calls a
    // method named handleSliders to create and process a
    // new image.
    hueSlider.addChangeListener(
      new ChangeListener(){
        public void stateChanged(ChangeEvent e){
          //Erase the current display.
          graphics = display.getGraphics();
          graphics.drawImage(picture.getImage(),0,0,null);
          //Create and process a new display.
          handleSliders();
        }//end stateChanged
      }//end new ChangeListener
    );//end addChangeListener
    //--------------------------------------------------//
//Registration of event handlers on the satSlider and the
// bright slider skipped for brevity.
    //--------------------------------------------------//

  }//end constructor
|
A call to the handleSliders method
Having skipped a large portion of the code in Listing 13, Listing 1 picks up with a call to the method named handleSliders. Most of the significant behavior of this program resides in that method and I will explain the method in detail shortly.
Register listener objects on the sliders
Then Listing 13 uses anonymous classes to register a different ChangeListener object on each of the three sliders shown in Figure 1. The code used to register the listener object on each slider is essentially the same. Listing 1 shows only the code required to register the listener object on the slider referred to by the instance variable named hueSlider. You can view the registration of the listener objects on the other two sliders in Listing 13.
Once again, I will assume that you are familiar with the use of anonymous classes to register listener objects on objects that are capable of firing events. If not, you should probably study some of my other lessons.
Erase the current image from the display
The top image in Figure 1 is a Picture object referred to by an instance variable named display. The body of the registration code in Listing 1 begins by erasing the image of the color wheel from that Picture object. This is accomplished by drawing a copy of another Picture object onto the display object. The second Picture object contains an all-white image, and the result is to cause the display object to also contain an all-white image.
Create and process a new display
Then the body of the event-registration code calls the method named handleSliders to create and process a new display.
Each time a button on one of the sliders is moved, the display is erased and then redrawn by the code in the method named handleSliders. Therefore, it is important for the code in that method to execute very quickly. I made some efforts in the design of the method to cause it to execute quickly. If the method doesn't execute quickly, the program will not be responsive to the movement of the sliders.
Improving the speed
For example, one of the things that I did in an attempt to improve the speed of the method was to declare all of the required working variables as instance variables. This eliminates the requirement to declare local variables and to push them onto the runtime stack every time the method is called.
I also used an Ellipse2D.Double object to limit the number of required computations in a manner that I will explain later.
Listing 1 also signals the end of the constructor, so it is time for me to explain the method named handleSliders.
Beginning of the method named handleSliders
This method is called once during the construction process and then each time the user moves a button on any of the three sliders. Regardless of what caused the method to be called, Listing 2:
The conversion to type float is necessary because the method named HSBtoRGB that will be called later requires that the HSB parameter be in this format.
Listing 2. Beginning of the method named handleSliders.
  private synchronized void handleSliders(){
    tempInt = hueSlider.getValue();
    hueField.setText("" + tempInt);
    hue = tempInt/360.0;

    tempInt = satSlider.getValue();
    satField.setText("" + tempInt);
    sat = tempInt/100.0;

    tempInt = brightSlider.getValue();
    brightField.setText("" + tempInt);
    bright = tempInt/100.0;
|
The uses of the slider values
The value of the brightness slider will be used to establish the slice through the cone or the cylinder that will be drawn as a color wheel.
The hue and saturation slider values will be used to draw the white line and the white circle shown in Figure 1 onto the color wheel after the color wheel has been drawn.
Decide between cone and cylinder display formats
Listing 3 tests the current status of the two radio buttons at the bottom of the GUI in Figure 1 to determine if the HSB color model should be displayed as a cone or as a cylinder.
Listing 3. Decide between cone and cylinder display formats.
    if(coneButton.isSelected()){
      //Use the following for a cone.
      radius = halfWidth * bright;
    }else{
      //Use the following for a cylinder.
      radius = halfWidth;
    }//end else
|
If the button labeled Cone is selected, the diameter of the color wheel is proportional to the brightness value as shown in Figure 1. If the button labeled Cylinder is selected, the diameter of the color wheel is the same regardless of the brightness value as shown in Figure 3.
Construct a new Ellipse2D.Double object
As you can see in Figure 1 through Figure 3, a large percentage of the pixels in the Picture object that displays the color wheel are always white. Other pixels are frequently white, depending on the diameter of the color wheel. Therefore, there is no need to waste computer resources processing these pixels. They are already white (see Listing 1) and that is the color that they need to stay.
Listing 4 constructs an object of the Ellipse2D.Double class.
Listing 4. Construct a new Ellipse2D.Double object.
    ellipse = new Ellipse2D.Double(halfWidth-radius,
                                   halfHeight-radius,
                                   2*radius,2*radius);
|
A somewhat unusual use of an Ellipes2D.Double object
Typically, an object of this class is used to draw an ellipse on the screen. However, that is not the purpose of the object in this case. The purpose of the object in this case is probably a little unusual.
One of the methods of an Ellipse2D.Double object allows the program to test a pair of pixel-coordinate values to determine if they are contained inside the boundary of the ellipse.
In this program, the Ellipse2D.Double object is constructed as a circle, centered on the color wheel with the same radius as the color wheel (but it is never drawn on the screen). If a pair of coordinate values is not contained in the ellipse, the coordinates are not contained in the color wheel either.
If a pixel at the specified coordinates is inside the color wheel, it is processed. Otherwise the pixel is simply ignored and allowed to remain white.
Beginning of the pixel processing loop
Listing 5 shows the beginning of a pair of nested for loops. The code in the loops examines every pixel in the picture to determine whether or not an individual pixel is contained in the ellipse described above. If the pixel is contained in the ellipse, it is processed. Otherwise, it is ignored and the next pixel is examined.
Listing 5. Beginning of the pixel processing loop.
    for(int row = 0;row < pictureWidth;row++){
      for(int col = 0;col < pictureHeight;col++){
        if(ellipse.contains(col,row)){
          //Only process those pixels that are inside the
          // ellipse.
          //Compute values for x and y relative to the
          // center.
          x = col - halfWidth;
          y = row - halfHeight;
|
Staying on track
Just to help you to stay on track, let me point out that the purpose of the code in the nested for loops is to draw the color wheel. The values of the hue slider and the saturation slider are not involved in that process. Those values are not used until later when time comes to draw the white line and the white circle onto the color wheel.
A new pair of coordinates
When a pixel is determined to be within the boundary of the ellipse, two new coordinates named x and y are created to describe the location of the pixel relative to the center of the color wheel. Those coordinate values are used for most of the processing that follows.
Caution, trigonometry ahead
In order to understand the processing that follows, you must understand trigonometry. If that is not the case, there is little that I can do about that. In that case, you will simply need to read along and take my word for it that the code works correctly.
Compute the hue angle for the pixel
Listing 6 calls the atan method of the Math class to determine the angle (relative to the horizontal axis) of a line that goes through the center of the color wheel and also goes through the pixel.
Listing 6. Compute the hue angle for the pixel.
          if(x != 0){
            //Must avoid division by 0.
            hueAngle = (float)(Math.atan(y/x));
          }else{
            //x is equal to zero
            if(y >= 0){
              hueAngle = (float)(Math.PI/2);
            }else{
              hueAngle = (float)(2 * Math.PI - Math.PI/2);
            }//end else
          }//end else
|
This angle determines the hue value that will be ascribed to the pixel later when the HSB parameters for the pixel are converted to RGB colors so that the pixel can be drawn with the correct color.
Listing 6 also contains some code that is required to avoid division by zero. If you understand trigonometry, you should have no problem understanding the code in Listing 6.
|
Translate the angle into the correct quadrant
If you understand trigonometry, you will also know that simply calling the atan method as in Listing 6 doesn't provide a complete answer. In particular, the method returns the angle in the range -pi/2 through pi/2 (-90 degrees through 90 degrees). This is true even if the pixel is actually located in one of the other two quadrants.
The code in Listing 7 applies the necessary correction to translate the angle computed in Listing 6 into the correct quadrant.
Listing 7. Translate the angle into the correct quadrant.
          //Now get the angle into the correct quadrant.
          if((x < 0) && (y <= 0)){
            hueAngle = (float)(Math.PI + hueAngle);
          }else if((x > 0) && (y < 0)){
            hueAngle = (float)(2 * Math.PI + hueAngle);
          }else if((x < 0) && (y > 0)){
            hueAngle = (float)(Math.PI + hueAngle);
          }//end else
|
Compute the saturation value for the pixel
Listing 6 and Listing 7 together tell us the hue value for the pixel being processed. Listing 8 computes the saturation value for the pixel.
Listing 8. Compute the saturation value for the pixel.
          if(radius != 0){
            satVal = (float)(Math.sqrt(
                               (x/radius) * (x/radius) +
                               (y/radius) * (y/radius)));
          }else{
            //The radius is equal to 0. This is the
            // very bottom of the cone.
            satVal = (float)(0.0);
          }//end else
|
The square root of the sum of the squares
The saturation value for the pixel is the distance of the pixel from the center of the color wheel. For the cone display format, the saturation value is actually the distance of the pixel from the center of the color wheel as a fraction of the radius of the color wheel for that brightness value.
If the radius of the color wheel is greater than zero, Listing 8 gets the length of a line from the center of the color wheel to the pixel as the square root of the sum of the squares of the x and y coordinate values.
Not an absolute
Note that this is not an absolute distance. Rather, the computed distance is normalized by the radius of the HSB color model at the current brightness value. As mentioned above, this is a necessary adjustment for the cone display format.
Once again, it is necessary to avoid division by zero. Therefore, for the case at the very bottom of the cone where the radius is zero, Listing 8 sets the saturation value to 0.0.
Draw the pixel in the correct color
At this point, we have determined the brightness value based on the current position of the brightness slider, and have determined the hue and saturation values based on the location of the pixel relative to the center of the color wheel. The time has come to apply the hue, saturation, and brightness values and draw the pixel in the correct color.
Convert from radians to degrees
All of the angles involved in the earlier trigonometric calculations were expressed in radians instead of degrees. In order to get back into territory that is more familiar to those without a background in trigonometry, the first statement in Listing 9 calls the toDegrees method of the Math class to convert the hue angle from radians to degrees. Because the HSBtoRGB method that will be called later requires the hue angle value to be type float instead of type double, that statement also casts the hue angle in degrees to type float.
Convert to RGB and draw the pixel
The Pixel class in the Ericson library provides a setColor method that allows for setting the color of a pixel by passing a parameter of type Color. It appears that all of the constructors for objects of the Color class are based on the RGB color model. None are based on the HSB color model.
An int representation of a color
The second statement in Listing 9 calls the HSBtoRGB method of the Color class, passing the hue, saturation, and brightness values as parameters of type float. This method returns an int value that encodes the red, green, and blue color values in the 24 least-significant bits of the int value.
Listing 9. Convert to RGB and draw the pixel in the correct color.
          //Convert hue angle to degrees.
          hueAngle = (float)(Math.toDegrees(hueAngle));

          //Convert the color to an RGB color that can be
          // used to set the color of a pixel. Note that
          // this method requires parameters of type float
          // and not type double.
          color = new Color(Color.HSBtoRGB(
                                    (float)(hueAngle/360),
                                    satVal,
                                    (float)bright));

          //Set the color of the pixel.
          pixel = display.getPixel(col,row);
          pixel.setColor(color);

        }//end if on ellipse contains the coordinates

      }//end inner loop
    }//end outer loop
|
Construct a new Color object
This int value is then passed to a Color constructor to create a new Color object, whose reference is saved in the instance variable named color.
Set the color of the pixel
This Color object is then used to set the color of the pixel whose location is specified by the col and row indices of the nested for loops that began in Listing 5. Once again note that this pixel has been processed only if the coordinates of the pixel are inside the ellipse (having the same radius and center as the color wheel), which was constructed in Listing 4.
When the for loops terminate...
When the inner and outer for loops (that begin in Listing 5 and end in Listing 9) terminate, the color of each pixel inside the color wheel has been set based on the hue, saturation, and brightness values ascribed to the pixel. Those values are ascribed to the pixel on the basis of the pixel's location relative to the center of the color wheel being drawn. The brightness value will have been used to determine which slice through the HSB color model to draw.
What about the hue and saturation slider values?
As I mentioned earlier, the values of the hue and saturation sliders that were saved in Listing 2 have not yet come into play. The appearance of the color wheel depends only on the value of the brightness slider.
The values of the hue and saturation sliders are not used to draw the color wheel. Instead, they are used to draw the white radial hue line and the white saturation circle onto the color wheel as shown in Figure 1.
Caution, more trigonometry ahead
The next step is to use the hue and saturation slider values saved in Listing 2 to compute the location of the intersection between an imaginary radial line that represents the value of the hue slider and an imaginary circle that represents the value of the saturation slider. This is accomplished in Listing 10.
Listing 10. Get intersection coordinates of hue and saturation.
    graphics = display.getGraphics();

    //Get the coordinates of the intersection of the
    // radial hue line indicated by hueSlider and the
    // saturation circle indicated by satSlider.
    int xLoc = (int)(halfWidth +
                       (radius*satSlider.getValue()/100) *
                                Math.cos(Math.toRadians(
                                  hueSlider.getValue())));
    int yLoc = (int)(halfHeight +
                       (radius*satSlider.getValue()/100) *
                                Math.sin(Math.toRadians(
                                  hueSlider.getValue())));
|
Once again, if you understand trigonometry (and maybe a little about vectors), you should have no problem with the code in Listing 10. (Listing 10 also gets a reference to a Graphics object that represents the display. This object will be used later to draw the white line and the white circle shown in Figure 1.)
Get the color at the intersection
Listing 11 begins by getting the color of the pixel at the location of the intersection of the imaginary line and the imaginary circle described above. (Note that the white line and the white circle shown in Figure 1 haven't been drawn yet. If they had been drawn, the color of the pixel at the intersection would always be white.)
Listing 11. Display the color at the intersection.
    if((xLoc < pictureWidth) && (yLoc < pictureHeight)){
      color = display.getPixel(xLoc,yLoc).getColor();
    }//end if

    //Display the value of the color in hex format in a
    // text field.
    hexField.setText(Integer.toHexString(color.getRGB()).
                              toUpperCase().substring(2));
    //Draw a round color swatch in the upper-left corner
    // that matches the pixel color at the intersection.
    graphics.setColor(color);
    graphics.fillOval(5,5,40,40);
|
Display the color at the intersection
Then Listing 11 displays the color at the intersection in two different formats. First, an int value that encodes the red, green, and blue color values in the 24 least significant bits is obtained, converted to hexadecimal format, and displayed in a text field at the bottom of the GUI in Figure 1. (Only the hexadecimal value of the 24 least significant bits is displayed in the text field.)
Then the Color object is used to draw and fill a small circle in the upper-left corner of the display as shown in Figure 1.
An interactive program
When the button on any of the sliders shown in Figure 1 is moved, the color wheel is redrawn at the brightness value specified by the brightness slider. Then the values of the hue and saturation sliders are used to specify the location of a particular pixel within the color wheel at the intersection of the hue and saturation slider values.
The color of the pixel at the intersection of hue and saturation is enlarged and shown as an actual color in a filled circle in the upper-left corner of the display. The color is also converted to RGB hexadecimal format and displayed in a text field at the bottom of the GUI.
Provide visual feedback to the user
In order for the program to be useful to a human, it needs to provide visual feedback showing the effect on the color wheel of moving any of the three sliders.
Moving the brightness slider
When the user moves the brightness slider, the overall color of the color wheel becomes darker or lighter depending on the new position of the slider. In addition, when the cone display format has been selected, the diameter of the color wheel gets smaller as the button is moved toward zero on the slider and gets larger as the button is moved toward 100.
Moving the hue slider
When the user moves the hue slider, the white radial line shown in Figure 1 rotates around the center of the color wheel like the big hand on a clock. The line is at the 3:00 o'clock position when the hue slider value is zero. It rotates in a clockwise direction making one full revolution as the button on the slider is moved from the zero position at the left end to the 360-degree position at the right end.
Moving the saturation slider
When the user moves the saturation slider, the radius of the white circle shown in Figure 1 increases and decreases. The radius is zero when the saturation slider is at the zero position, and is the same as the radius of the color wheel when the saturation slider is at the 100-percent position.
Get the color and then draw the line and the circle
Once again, let me emphasize that the white line and the white circle are not drawn until the program gets and displays the color of the pixel at the location that will be the intersection of the line and the circle when they are drawn.
Draw the white radial hue line and the white saturation circle
The code in Listing 12 uses the drawOval method and the drawLine methods of the Graphics class to draw the white circle and the white line as shown in Figure 1.
Listing 12. Draw the white radial hue line and the white saturation circle.
    //Now draw the white radial hue line and the white
    // saturation circle.
    graphics.setColor(Color.WHITE);

    //Draw a white circle at the saturation value
    // indicated by satSlider.
    graphics.drawOval(
        (int)(halfWidth-radius*satSlider.getValue()/100),
        (int)(halfHeight-radius*satSlider.getValue()/100),
        (int)(2*radius*satSlider.getValue()/100),
        (int)(2*radius*satSlider.getValue()/100));

    //Draw a radial line at the hue angle indicated by
    // hueSlider.
    graphics.drawLine(
                halfWidth,
                halfHeight,
                halfWidth + (int)(radius * Math.cos(
                  Math.toRadians(hueSlider.getValue()))),
                halfHeight + (int)(radius * Math.sin(
                  Math.toRadians(hueSlider.getValue()))));

    //Autograph the painting.
    display.addMessage("Dick Baldwin",150,50);

    //Repaint the display.
    display.repaint();

  }//end handleSliders
  //----------------------------------------------------//

}//end class HsbColor01
|
Then Listing 12 autographs and repaints the display.
Listing 12 also signals the end of the handleSliders method, the end of the HsbColor01 class, and the end of the program.
I encourage you to copy the code from Listing 13, compile the code, and execute it. Experiment with the code, making changes, and observing the results of your changes. Make certain that you can explain why your changes behave as they do.
Also use the program to produce colors that match the colors of some of your favorite items. See if you agree that this process is much more intuitive when it is based on the HSB color model than it would be if it were based on the RGB color model.
As a major exercise, try restructuring this program so that it can be instantiated as an HSB color chooser dialog, returning the color specified by the three sliders to another program.
Don't forget that this program requires access to Ericson's multimedia library.
In this lesson, I taught you a little about the HSB color model and showed you how to write a program that you can use to experiment with the model.
In the next lesson in this series, you will learn how the show() method of the Picture class causes the image contained in a Picture object to be displayed on the screen in a JFrame object. You will also learn about the PictureFrame class, which serves as an intermediary between the Picture object and the JFrame object.
Listing 13. Source code for the program named HsbColor01.
/*File HsbColor01 Copyright 2009 R.G.Baldwin

The purpose of this program is to demonstrate the HSB
color model. See the comments at the beginning of the
method named handleSliders for a more complete description
of the program.

This program requires access to Ericson's multimedia
library.

The program is terminated by clicking the large X in the
upper-right corner of the GUI.

Tested using Windows Vista Home Premium Edition,
Java 1.6x, and the version of Ericson's multimedia library
contained in bookClasses10-1-07.zip.
*********************************************************/
import javax.swing.JFrame;
import javax.swing.JPanel;
import javax.swing.JSlider;
import javax.swing.JRadioButton;
import javax.swing.ButtonGroup;
import javax.swing.WindowConstants;
import javax.swing.JLabel;
import javax.swing.JTextField;

import java.awt.Graphics;
import java.awt.Color;
import java.awt.BorderLayout;
import java.awt.FlowLayout;
import java.awt.event.WindowAdapter;
import java.awt.event.WindowEvent;
import javax.swing.event.ChangeListener;
import javax.swing.event.ChangeEvent;

import java.awt.geom.Ellipse2D;
import java.awt.geom.Ellipse2D.Double;

public class HsbColor01 extends JFrame{
  //The following constants are used to configure the
  // JSlider components as well as the text on the JSlider
  // and JLabel components.

  //Change the following int values to change the limits
  // and initial positions of the sliders.
  private final int hueSliderMin = 0;//minimum
  private final int hueSliderMax = 360;//maximum
  private final int hueSliderInit = 0;//initial value

  private final int satSliderMin = 0;
  private final int satSliderMax = 100;
  //Set to following value 99 to cause the saturation
  // circle to initially be inside the radius.
  private final int satSliderInit = 99;

  private final int brightSliderMin = 0;
  private final int brightSliderMax = 100;
  private final int brightSliderInit = 100;

  //Change the following int values to change the tick
  // spacing on the sliders.
  private final int hueSliderMajorTickSpacing = 60;
  private final int hueSliderMinorTickSpacing = 15;
  private final int satSliderMajorTickSpacing = 10;
  private final int satSliderMinorTickSpacing = 5;
  private final int brightSliderMajorTickSpacing = 10;
  private final int brightSliderMinorTickSpacing = 5;

  //Change these string values to change the labels
  // displayed to the left of the sliders.
  private final String hueSliderLabel = "Hue in Degrees";
  private final String satSliderLabel =
                                     "Percent Saturation";
  private final String brightSliderLabel =
                                     "Percebt Brightness";
  //----------------------------------------------------//

  //The following components are used to build up the GUI.
  private final JPanel mainPanel = new JPanel();
  private final JPanel northPanel = new JPanel();
  private final JPanel radioButtonPanel = new JPanel();

  private final JPanel hueSliderPanel = new JPanel();
  private final JPanel satSliderPanel = new JPanel();
  private final JPanel brightSliderPanel = new JPanel();

  //Change the int values at the beginning of the program
  // to configure these sliders.
  private final JSlider hueSlider =
     new JSlider(hueSliderMin,hueSliderMax,hueSliderInit);
  private final JSlider satSlider =
     new JSlider(satSliderMin,satSliderMax,satSliderInit);
  private final JSlider brightSlider = new JSlider(
        brightSliderMin,brightSliderMax,brightSliderInit);

  private final ButtonGroup buttonGroup =
                                        new ButtonGroup();
  private final JRadioButton coneButton =
                            new JRadioButton("Cone",true);
  private final JRadioButton cylinderButton =
                             new JRadioButton("Cylinder");

  //The hue, saturation, brightness, and RGB color values
  // will be displayed in the following text fields.
  private final JTextField hueField = new JTextField(3);
  private final JTextField satField = new JTextField(3);
  private final JTextField brightField =
                                        new JTextField(3);
  private final JTextField hexField = new JTextField(6);

  //This program draws either a cone or a cylinder that
  // displays HSB colors. Define the size of the Picture
  // object on which the cone or the cylinder is
  // displayed.
  private int pictureWidth = 400;
  private int pictureHeight = 400;
  private int halfWidth = pictureWidth/2;
  private int halfHeight = pictureHeight/2;

  //Instantiate a blank white Picture object that is used
  // to erase the current drawing on the display each time
  // a slider fires an event.
  private Picture picture =
                  new Picture(pictureWidth,pictureHeight);

  //A second Picture object is actually used to draw the
  // slice through the cone or the cylinder. A reference
  // to that object will be stored here.
  private Picture display =
                  new Picture(pictureWidth,pictureHeight);

  //Miscellaneous working variables.
  private Graphics graphics = null;
  private Pixel pixel = null;
  private Color color = null;
  private  double hue = 0;
  private double sat = 0;
  private double bright = 0;
  private double x = 0;
  private double y = 0;
  private double radius = 0;
  private float hueAngle = 0;
  private float satVal = 0;
  private Ellipse2D.Double ellipse = null;
  private int tempInt = 0;
  //----------------------------------------------------//

  public static void main(String[] args){
    new HsbColor01();
  }//end main method
  //----------------------------------------------------//

  public HsbColor01(){//constructor
    //Put decorations on the sliders. Change the constants
    // at the beginning of the program to control major
    // and minor tick spacing.
    hueSlider.setMajorTickSpacing(
                               hueSliderMajorTickSpacing);
    hueSlider.setMinorTickSpacing(
                               hueSliderMinorTickSpacing);
    hueSlider.setPaintTicks(true);
    hueSlider.setPaintLabels(true);

    satSlider.setMajorTickSpacing(
                               satSliderMajorTickSpacing);
    satSlider.setMinorTickSpacing(
                               satSliderMinorTickSpacing);
    satSlider.setPaintTicks(true);
    satSlider.setPaintLabels(true);

    brightSlider.setMajorTickSpacing(
                            brightSliderMajorTickSpacing);
    brightSlider.setMinorTickSpacing(
                            brightSliderMinorTickSpacing);
    brightSlider.setPaintTicks(true);
    brightSlider.setPaintLabels(true);

    //Construct the GUI working generally from the top
    // down.
    mainPanel.setLayout(new BorderLayout());

    mainPanel.add(northPanel,BorderLayout.NORTH);
    mainPanel.add(radioButtonPanel,BorderLayout.CENTER);

    northPanel.setLayout(new BorderLayout());

    //Add sliders.
    northPanel.add(hueSliderPanel,BorderLayout.NORTH);
    northPanel.add(satSliderPanel,BorderLayout.CENTER);
    northPanel.add(brightSliderPanel,BorderLayout.SOUTH);

    hueSliderPanel.setLayout(
                        new FlowLayout(FlowLayout.RIGHT));
    hueSliderPanel.add(new JLabel(hueSliderLabel));
    hueSliderPanel.add(hueSlider);
    hueSliderPanel.add(hueField);
    hueField.setEditable(false);//make it read only

    satSliderPanel.setLayout(
                        new FlowLayout(FlowLayout.RIGHT));
    satSliderPanel.add(new JLabel(satSliderLabel));
    satSliderPanel.add(satSlider);
    satSliderPanel.add(satField);
    satField.setEditable(false);

    brightSliderPanel.setLayout(
                        new FlowLayout(FlowLayout.RIGHT));
    brightSliderPanel.add(new JLabel(brightSliderLabel));
    brightSliderPanel.add(brightSlider);
    brightSliderPanel.add(brightField);
    brightField.setEditable(false);

    //Add radio buttons.
    radioButtonPanel.add(coneButton);
    radioButtonPanel.add(cylinderButton);
    //Make the radio buttons mutually exclusive.
    buttonGroup.add(coneButton);
    buttonGroup.add(cylinderButton);

    //Add a text field to display hex color value
    radioButtonPanel.add(hexField);
    hexField.setEditable(false);

    getContentPane().add(mainPanel);
    //Call the pack method to get the height right on the
    // GUI.
    pack();
    //Set the width of the GUI to match the width of the
    // color wheel display.
    setSize(pictureWidth + 7,this.getHeight());

    //Decorate the GUI.
    setTitle("Copyright 2009, R.G.Baldwin");

    //Position the GUI immediately below the color wheel
    // display.
    setLocation(0,pictureHeight + 30);

    //Terminate the program when the user clicks the large
    // X in the upper-right corner of the GUI.
    setDefaultCloseOperation(JFrame.EXIT_ON_CLOSE);

    //Cause the color wheel image to be created on the
    // display.
    handleSliders();

    //Display the GUI and the color wheel.
    setVisible(true);
    display.show();
    //--------------------------------------------------//

    //Register a ChangeListener object on the hueSlider.
    // Each time the hueSlider fires a ChangeEvent, this
    // event handler erases the current image and calls a
    // method named handleSliders to create and process a
    // new image.
    hueSlider.addChangeListener(
      new ChangeListener(){
        public void stateChanged(ChangeEvent e){
          //Erase the current display.
          graphics = display.getGraphics();
          graphics.drawImage(picture.getImage(),0,0,null);
          //Create and process a new display.
          handleSliders();
        }//end stateChanged
      }//end new ChangeListener
    );//end addChangeListener
    //--------------------------------------------------//
    //Register a ChangeListener object on the satSlider.
    //Behavior is the same as the hueSlider.
    satSlider.addChangeListener(
      new ChangeListener(){
        public void stateChanged(ChangeEvent e){
          graphics = display.getGraphics();
          graphics.drawImage(picture.getImage(),0,0,null);
          handleSliders();
        }//end stateChanged
      }//end new ChangeListener
    );//end addChangeListener
    //--------------------------------------------------//
    //Register a ChangeListener object on the
    // brightSlider.
    //Behavior is the same as the hueSlider.
    brightSlider.addChangeListener(
      new ChangeListener(){
        public void stateChanged(ChangeEvent e){
          graphics = display.getGraphics();
          graphics.drawImage(picture.getImage(),0,0,null);
          handleSliders();
        }//end stateChanged
      }//end new ChangeListener
    );//end addChangeListener
    //--------------------------------------------------//

  }//end constructor
  //----------------------------------------------------//

  /*
  This method processes three sliders, two radio buttons,
  four text fields, a filled oval, and a large display of
  a color wheel.

  The radio buttons allow the HSB color model to be
  displayed either as a cone or as a cylinder. In either
  case, one slider labeled Hue in Degrees, which is
  graduated in degrees from 0 to 360 specifies a value for
  hue between zero and 360 degrees inclusive. Because it
  is difficult to read an exact value from the slider, the
  current value of the slider in degrees is also displayed
  in a text field to the right of the slider. The value in
  degrees is converted to a value from 0 to 1.0 for
  computational purposes.

  A second slider labeled Percent Saturation, which is
  graduated from 0 to 100 specifies a value for saturation
  from 0 to 100-percent or 1.0. The current percentage
  value of the slider is displayed in a text field to the
  right of the slider.

  A third slider labeled Percentage Brightness, which is
  graduated from 0 to 100 specifies a value for brightness
  from 0 to 100-percent or 1.0. The percentage value is
  displayed in a text field to the right of the slider.

  The color wheel that is displayed represents a
  horizontal slice through the cone or the cylinder with
  the location of the slice being specified by the value
  of the brightness slider. A value of 0 produces a
  horizontal slice at the very bottom, which for the cone
  display is simply a dot. A value of 100 produces a
  horizontal slice at the very top. In effect, this is the
  top surface of the cone or the cylinder. Generally, as
  the slider approaches 0, the display becomes darker, and
  for the cone display format, becomes smaller in
  diameter.

  Moving the hue slider causes a radial line, similar to
  the big hand on a clock to be displayed to show a value
  for hue in degrees. The line is in the 3:00 o'clock
  position for a hue of red at the 0 and 360-degree
  positions at the ends of the track.

  Moving the saturation slider causes a circle to be
  displayed inside of and concentric with the color wheel.
  It is the same size as the wheel when the slider is at
  the 100 end of the track. The diameter of the circle
  reduces to zero and the circle disappears when the
  slider approaches the 0 end of the track.

  The intersection of the horizontal plane defined by the
  value of the brightness slider, the radial line defined
  by the value of the hue slider, and the circle defined
  by the value of the saturation slider defines a
  specific color. That color is displayed in a filled oval
  in the upper-left corner of the display and is also
  displayed in hexadecimal format in a text field at the
  bottom of the GUI.

  A pair of radio buttons labeled Cone and Cylinder allows
  the user to select either the cone display format or the
  cylinder display format.

  The method is synchronized to eliminate the possiblilty
  that it may be called on two threads concurrently.

  All of the working variables in this method were
  declared as instance variables in an attempt to make the
  method as responsive as possible.
  */
  private synchronized void handleSliders(){
    //Get the hue, saturation, and brightness values from
    // the sliders, display them in the text fields, and
    // convert them to floating point values ranging from
    // 0 to 1.0.
    tempInt = hueSlider.getValue();
    hueField.setText("" + tempInt);
    hue = tempInt/360.0;

    tempInt = satSlider.getValue();
    satField.setText("" + tempInt);
    sat = tempInt/100.0;

    tempInt = brightSlider.getValue();
    brightField.setText("" + tempInt);
    bright = tempInt/100.0;

    //Decide between cone and cylinder display formats.
    if(coneButton.isSelected()){
      //Use the following for a cone.
      radius = halfWidth * bright;
    }else{
      //Use the following for a cylinder.
      radius = halfWidth;
    }//end else

    //Construct a circle object with the same radius as
    // the wheel. It will be used to avoid processing any
    // pixels that are outside the wheel.
    ellipse = new Ellipse2D.Double(halfWidth-radius,
                                   halfHeight-radius,
                                   2*radius,2*radius);

    //Process every pixel in the wheel.
    for(int row = 0;row < pictureWidth;row++){
      for(int col = 0;col < pictureHeight;col++){
        if(ellipse.contains(col,row)){
          //Only process those pixels that are inside the
          // ellipse.
          //Compute values for x and y relative to the
          // center.
          x = col - halfWidth;
          y = row - halfHeight;
          if(x != 0){
            //Must avoid division by 0.
            hueAngle = (float)(Math.atan(y/x));
          }else{
            //x is equal to zero
            if(y >= 0){
              hueAngle = (float)(Math.PI/2);
            }else{
              hueAngle = (float)(2 * Math.PI - Math.PI/2);
            }//end else
          }//end else

          //Now get the angle into the correct quadrant.
          if((x < 0) && (y <= 0)){
            hueAngle = (float)(Math.PI + hueAngle);
          }else if((x > 0) && (y < 0)){
            hueAngle = (float)(2 * Math.PI + hueAngle);
          }else if((x < 0) && (y > 0)){
            hueAngle = (float)(Math.PI + hueAngle);
          }//end else

          if(radius != 0){
            //Get the length of a line from the center to
            // the pixel as the square root of the sum of
            // the squares. Must avoid division by 0.
            // Must also scale by radius to support the
            // varying diameter of the color wheel for the
            // cone display format.
            satVal = (float)(Math.sqrt(
                               (x/radius) * (x/radius) +
                               (y/radius) * (y/radius)));
          }else{
            //The radius is equal to 0. This is the
            // very bottom of the cone.
            satVal = (float)(0.0);
          }//end else

          //Up to this point, the angle has been expressed
          // in radians. Convert it to degrees.
          hueAngle = (float)(Math.toDegrees(hueAngle));

          //Convert the color to an RGB color that can be
          // used to set the color of a pixel. Note that
          // this method requires parameters of type float
          // and not type double.
          color = new Color(Color.HSBtoRGB(
                                    (float)(hueAngle/360),
                                    satVal,
                                    (float)bright));

          //Set the color of the pixel.
          pixel = display.getPixel(col,row);
          pixel.setColor(color);

        }//end if
      }//end inner loop
    }//end outer loop

    //The wheel has been drawn with the correct colors for
    // the horizontal slice through the cone or the
    // cylinder based on the value of the Brightness
    // slider.
    //Now superimpose a white radial line and a white
    // circle on the wheel with their positions, radius,
    // etc., based on the values of the Hue and Saturation
    // sliders.
    graphics = display.getGraphics();

    //Get the coordinates of the intersection of the
    // radial hue line indicated by hueSlider and the
    // saturation circle indicated by satSlider.
    int xLoc = (int)(halfWidth +
                       (radius*satSlider.getValue()/100) *
                                Math.cos(Math.toRadians(
                                  hueSlider.getValue())));
    int yLoc = (int)(halfHeight +
                       (radius*satSlider.getValue()/100) *
                                Math.sin(Math.toRadians(
                                  hueSlider.getValue())));

    //Get the color of the pixel at the intersection.
    // Note, the line and the circle haven't been drawn
    // yet. Otherwise, the color of the pixel would be
    // white.
    if((xLoc < pictureWidth) && (yLoc < pictureHeight)){
      color = display.getPixel(xLoc,yLoc).getColor();
    }//end if

    //Display the value of the color in hex format in a
    // text field.
    hexField.setText(Integer.toHexString(color.getRGB()).
                              toUpperCase().substring(2));
    //Draw a round color swatch in the upper-left corner
    // that matches the pixel color at the intersection.
    graphics.setColor(color);
    graphics.fillOval(5,5,40,40);

    //Now draw the white radial hue line and the white
    // saturation circle.
    graphics.setColor(Color.WHITE);

    //Draw a white circle at the saturation value
    // indicated by satSlider.
    graphics.drawOval(
        (int)(halfWidth-radius*satSlider.getValue()/100),
        (int)(halfHeight-radius*satSlider.getValue()/100),
        (int)(2*radius*satSlider.getValue()/100),
        (int)(2*radius*satSlider.getValue()/100));

    //Draw a radial line at the hue angle indicated by
    // hueSlider.
    graphics.drawLine(
                halfWidth,
                halfHeight,
                halfWidth + (int)(radius * Math.cos(
                  Math.toRadians(hueSlider.getValue()))),
                halfHeight + (int)(radius * Math.sin(
                  Math.toRadians(hueSlider.getValue()))));

    //Autograph the painting.
    display.addMessage("Dick Baldwin",150,50);

    //Repaint the display.
    display.repaint();

  }//end handleSliders
  //----------------------------------------------------//

}//end class HsbColor01
|
Copyright 2009, Richard G. Baldwin. Reproduction in whole or in part in any form or medium without express written permission from Richard Baldwin is prohibited.
Richard has participated in numerous consulting projects and he frequently provides onsite training at the high-tech companies located in and around Austin, Texas. He is the author of Baldwin's Programming Tutorials, which have gained a worldwide following among experienced and aspiring programmers. He has also published articles in JavaPro magazine.
In addition to his programming expertise, Richard has many years of practical experience in Digital Signal Processing (DSP). His first job after he earned his Bachelor's degree was doing DSP in the Seismic Research Department of Texas Instruments. (TI is still a world leader in DSP.) In the following years, he applied his programming and DSP expertise to other interesting areas including sonar and underwater acoustics.
Richard holds an MSEE degree from Southern Methodist University and has many years of experience in the application of computer technology to real-world problems.
-end-