Published: March 19, 2009
By Richard G. Baldwin
Java Programming Notes # 357
This lesson is the next in a series (see Resources) designed to teach you how to write Java programs to do things like:
If you have ever wondered how to do these things, you've come to the right place.
If you have studied the earlier lessons in this series, you have learned:
You will learn how to use the HSB color model to adjust the hue, saturation, and brightness of your digital photos.
You will also learn about a new template program that I have developed that makes it much easier for you to write a variety of different types image-processing programs.
I recommend that you open another copy of this document in a separate browser window and use the following links to easily find and view the figures and listings while you are reading about them.
I recommend that you also study the other lessons in my extensive collection of online programming tutorials. You will find a consolidated index at www.DickBaldwin.com.
In this series of lessons, I will present and explain many of the classes in a multimedia class library that was developed and released under a Creative Commons Attribution 3.0 United States License (see Resources) by Mark Guzdial and Barbara Ericson at Georgia Institute of Technology. In doing this, I will also present some interesting sample programs that use the library.
I explained how to download, install, and test the multimedia class library in an earlier lesson titled Multimedia Programming with Java, Getting Started (see Resources).
As I explained in an earlier lesson titled The HSB Color Model (see Resources), color is tricky. Not only do different individuals perceive color in different ways, the same color often looks different to the same person when viewed under different lighting conditions, and often looks different when viewed on different computer monitors.
There are several different models that are used to describe color in the computer world. Fortunately, we have well-defined mathematical ways to define color.
Won't make you an expert
Even if I were qualified to do so, (which I'm not), I didn't try to make you a digital color expert in the earlier lesson. Instead, I briefly introduced you to some of the different color models that are in common use today. Then I tried to teach you enough about the HSB color model that you can understand what you are doing when you use the program that I will explain in this lesson (or any other software based on HSB) to edit your digital photographs.
What are a color model and a color space?
As you learned in the earlier lesson, according to Wikipedia, "A color model is an abstract mathematical model describing the way colors can be represented as multiples of numbers, typically as three or four values or color components. When this model is associated with a precise description of how the components are to be interpreted (viewing conditions, etc.), the resulting set of colors is called color space."
Different color models
Several different color models are commonly used to represent colors in a computer. These include:
I am assuming that you are already well versed in the use of the basic RGB color model. In this lesson, we will be concerned mainly with model 3 in the above list (HSB).
Why do we need HSB when we already have RGB?
In case you missed this explanation in the earlier lesson, I will repeat it here for your convenience.
The RGB color model is convenient for storing pixel-color data in a computer. In addition, it maps very well into the way that color is displayed on a color monitor where each pixel consists of three tiny dots, each of which can be caused to glow in red, green, or blue.
However, it does not map very well into the way we think and talk about color. For example, it is unlikely that you would go into a clothing store and tell the clerk that you would like to see a jacket with a red color value of 0x96 (hex), a green color value of 0x48, and a blue color value of 0x1B. (Well -- if you are a true computer geek you might, but the clerk probably wouldn't know what you are talking about.)
|
Burnt orange
On the other hand, you might very well describe the color as orange, not too bright, and not too vivid or bold. In that case, you would be describing the color using parameters that are similar to the parameters in the HSB color model.
To a first approximation, orange corresponds to hue, vivid or bold corresponds to saturation, and bright corresponds to brightness. In other words, the HSB color model is closer to the way we think and talk about colors than the RGB model.
How did I create burnt orange?
In case you are wondering how I came up with the RGB formula for a color that is very close to UT burnt orange (see sidebar), I used the program that I explained in the earlier lesson and adjusted the sliders to produce a color that is orange, not too bright, and not too vivid or bold. Then I made some minor adjustments to the positions of the sliders to produce a color that is very close to the color on a University of Texas coffee mug.
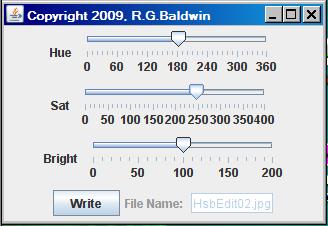
Sample screen output
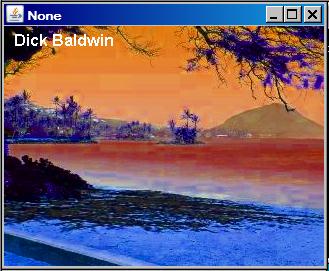
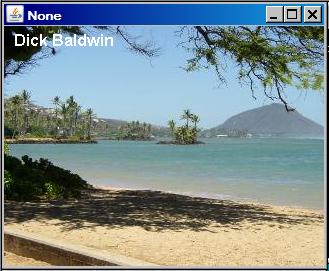
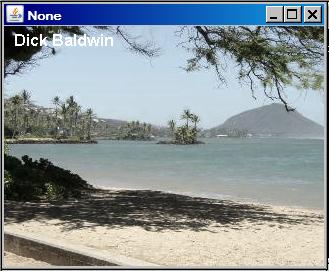
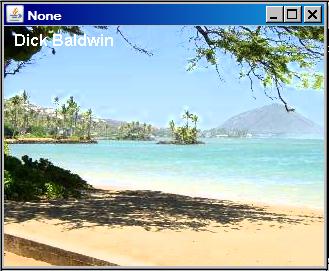
When you run the program named HsbEdit02 that I will explain in this lesson, if you set the sliders to the same positions shown in Figure 1, you should get a screen output similar to that shown in Figure 1. (The beach scene shown in Figure 1 is available as a jpeg file in Ericson's multimedia library.)
Figure 1. Sample screen output from the program named HsbEdit02.
|
|
The HSB color values were modified
For every pixel in the beach image shown in Figure 1, the hue (color) was shifted by 180-degrees. The saturation was increased by a factor of 2.5, and the brightness was unchanged.
Sliders for hue, saturation, and brightness
As you can see, there are three sliders on the GUI in Figure 1. These sliders make it possible for you to adjust the hue, saturation, and brightness of every pixel in the image displayed in the top of Figure 1.
The image shown in the top changes in real time as you move the sliders so that you can see the results of your changes immediately.
My next challenge is to help you understand what happens when you move the sliders and adjust the HSB properties of the pixels in the image.
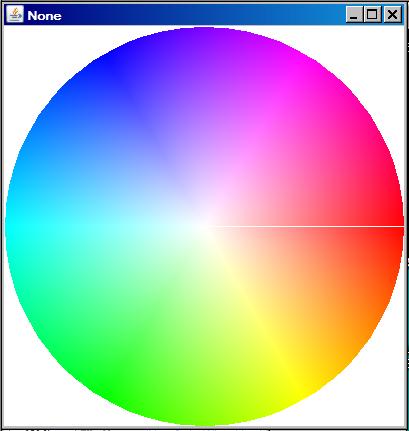
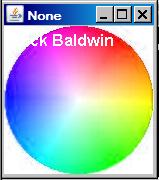
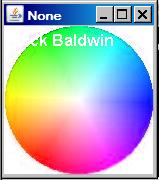
You learned about the color wheel and the relationship of the color wheel and the hue value in the earlier lesson. We will reinforce what you learned in that lesson using the material in this lesson. A color wheel, produced as the top surface of the HSB cone model in the earlier lesson is shown in Figure 2.
Figure 2. The color wheel.
|
|
Allowable HSB parameter values
With the Java API, the value for hue can be any value of type float. The value for saturation must be a float value between 0.0 and 1.0. The value for brightness must also be a float value between 0.0 and 1.0.
Changing the HSB property values
The purpose of the sliders in Figure 1 is to make it possible for you to change the hue, saturation, and brightness values for every pixel in the image being processed. When you move a slider, the HSB properties for every pixel in the image are changed in the same way.
A disclaimer
I am definitely not an expert in this area. The explanations that follow are based on what I have learned and concluded from reading what numerous others have written on the web.
Let brightness and saturation be 1.0
Assume that for a given pixel, the brightness value is 1.0. That being the case, the visible color of the pixel must be one of the colors shown in the color wheel of Figure 2. (I explained the reasons for that conclusion in the earlier lesson and will explain further in conjunction with my cone discussion later.)
Assume that the saturation value for the pixel is also 1.0. In that case, the color of the pixel must be one of the colors on the outer circumference of the color wheel shown in Figure 2. These are often referred to as the pure colors. (I will explain the reason for this later as well.)
Hue is often described in angular degrees
Pretend that the color wheel in Figure 2 is the face of a clock for which the "little hand" has been broken off. Assume that the length of the remaining "big hand" is exactly equal to the radius of the color wheel. A hue value of zero degrees (or 360 degrees) is represented by the big hand pointing exactly to the three-o'clock position.
If you look very carefully at the color wheel in Figure 2, you can see a white radial line in the middle of the red area pointing exactly at the three-o'clock position. This represents a hue value of zero degrees and also represents a hue value of 360 degrees. If the white line was pointing directly at the six-o'clock position, that would represent a hue value of 45 degrees. You should be able to extrapolate from there.
The hue slider in Figure 1 is calibrated to extend from 0 to 360. Although there is no label that says so, the scale on that slider is intended to represent degrees from 0 to 360 inclusive. As the slider is moved from 0 to 360, our imaginary big hand would make one complete revolution beginning and ending at the three-o'clock position.
Pure colors versus angles on the color wheel
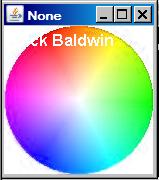
Getting back to the color wheel in Figure 2, the table in Figure 3 shows some sample values of the relationship between the hue angle in degrees, the pure color on the circumference of the color wheel, and the RGB representation of that color in hexadecimal.
Figure 3. Pure colors versus angles on the color wheel.
| Angle | Color | RGB value |
| 0 | red | FF0000 |
| 60 | yellow | FFFF00 |
| 120 | green | 00FF00 |
| 180 | cyan | 00FFFF |
| 240 | blue | 0000FF |
| 300 | magenta | FF00FF |
| 360 | red | FF0000 |
The colors are cyclic
As you can see from Figure 2, the colors are cyclic, starting at red for zero degrees and ending up back at red for 360 degrees.
For example, assume that you have a pixel with a hue of 60 degrees, a saturation value of 1.0, and a brightness value of 1.0 (yellow). If you add 60 degrees to the hue value, the pixel will turn green. (See Figure 4.) If you add 300 degrees to the hue, the pixel will turn red.
If you add 360 degrees, the color of the pixel won't change, but if you add 420 degrees, it will turn green, just as if you had added 60 degrees.
Adding a hue value that is not a multiple of 60 degrees will cause the color to change to one of the other colors on the circumference of the color wheel in Figure 2.
Methods of the Color class
The Color class has a static method that can be used to convert the three values of a color in the HSB model to the three values required by the RGB model. Here is some of what Sun has to say about the requirements for the three HSB values in order to successfully make the conversion.
"The saturation and brightness components should be floating-point values between zero and one (numbers in the range 0.0-1.0).
The hue component can be any floating-point number. The floor of this number is subtracted from it to create a fraction between 0 and 1. This fractional number is then multiplied by 360 to produce the hue angle in the HSB color model."
Note in particular the handling of the hue component value. Assume, for example that the method is presented with a hue value of 35.5. The method will first subtract 35, resulting in a fractional hue value of 0.5. Then it will multiply that value by 360 to convert the fractional value into degrees. For the case of a hue value of 35.5, this will result in a hue value of 180 degrees. Using that value, it will then proceed to convert from HSB to RGB.
Example of color shifting using the hue slider
Figure 4 shows five examples of what happens to colored pixels when subjected to color shifting through the hue slider.
Figure 4. Example of color shifting using the Hue slider.
 |
 |
 |
 |
 |
 |
No change in saturation and brightness values
In Figure 1, the pointers on the saturation and brightness sliders were both set to 100. The saturation and brightness values of each pixel were being multiplied by 100/100.0 or 1.0. In that case, the saturation and brightness values weren't being modified. That was also the case for all six images in Figure 4.
Varying the hue
Going from left to right, top to bottom, the pointer on the hue slider was set to the following values when the six consecutive screen shots were taken:
Track a single pixel
If you pick any pixel in the upper-left image and add an angular value to its hue value, the effect on the color of the pixel is the same as keeping that pixel the same distance from the center and rotating it around the center by that number of degrees in a counter-clockwise direction.
For example, if you choose the pixel at the very bottom of the lower-case L in the word Baldwin in the upper-left image, applying a 180-degree color shift by moving the hue pointer to the 180-degree position would cause its color to change to the color of the pixel in exactly the same location in the lower-left image in Figure 4. Moving the slider to the 300-degree position would cause the color of the pixel to change to the color of the pixel in exactly the same location in the lower-right image.
Changing colors with the sliders
Therefore, if a pixel has one of the colors on the color wheel shown in Figure 2, you can change the color of that pixel to any color in the color wheel that is the same distance from the center of the wheel by keeping the saturation and brightness sliders at 100 and manipulating only the hue slider.
You can change it to other colors by moving either or both of the saturation and brightness sliders.
Saturation may be the most difficult of the three HSB properties to understand.
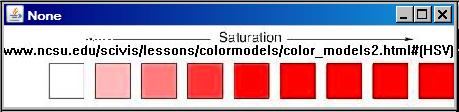
Comparison for different saturation factors
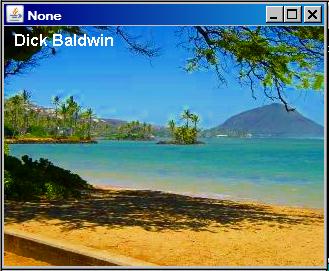
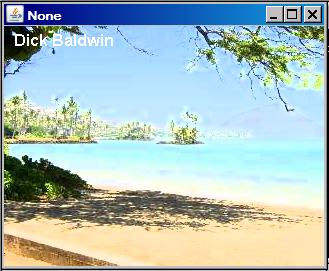
At this point, I will show you the same image that you saw in Figure 1 with for some different slider positions. The top image in Figure 5 shows the image with the hue slider set to 0, the saturation slider set to 100, and the brightness slider set to 100. This is the raw image with no color modifications.
Figure 5. Comparison for different saturation factors.
 |
 |
 |
Increase the saturation by a factor of 2.5
The middle image in Figure 5 shows the effect of moving the pointer on the saturation slider to 250 without changing the hue slider or the brightness slider. This caused the saturation value for every pixel to be 2.5 times greater than the original value. (If the result was greater than 1.0, it was clipped to 1.0.)
The effect of the hue slider
Note that the saturation and brightness sliders in the middle image in Figure 5 were the same as the values for those two sliders in Figure 1. Only the position of the hue slider was different. By comparing the image in Figure 1 with middle image in Figure 5, you can see the effect of using the hue slider to shift the color for the same values of saturation and brightness. Applying a 180 degree color shift in Figure 1 caused the blue sky in Figure 5 to become red-orange in Figure 1 and caused the sand color in Figure 5 to become blue in Figure 1. The ocean color in Figure 5 turned red in Figure 1, etc.
Result of saturation change only
By comparing the middle image with the top image in Figure 5, you can see the effect of using the saturation slider to increase the saturation values of the pixels in the image without changing the hue or the brightness.
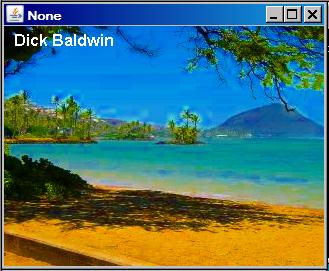
The bottom image in Figure 5 shows the effect of moving the pointer on the saturation slider to 400 without changing the hue slider or the brightness slider.
By comparing the three images going from top to bottom in Figure 5, you can see the effect of increasing the saturation factor from 1.0 to 2.5 and then to 4.0. (My guess is that the saturation value for many of the pixels in the bottom image exceeded its maximum allowable limit and was therefore clipped to the limit of 1.0.)
Let's get some help
At this point I'm going to enlist some help from another excellent website. One of the best explanations of HSV (and hence HSB) that I have found is on the web page titled Color Principles - Hue, Saturation, and Value. I call your attention to Figure 9 on that page.
Think of the HSB color model as a cone
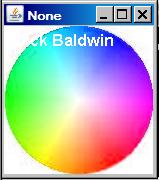
The HSB color model can be described as a cone with the pointed end at the bottom as suggested by Figure 9 on that web page. Although that author shows only a small sampling of the colors on the top surface of the cone, that surface consists of the entire color wheel shown in Figure 2. Note that in both cases, the center of the wheel is white and the pure colors described earlier exist at the outer circumference of the wheel.
Many colors are possible
Every possible HSB color value is represented by a point somewhere within the volume of or on the surface of that cone. For example, if the HSB color value for brightness is zero, the color is black and is represented by the single point that constitutes the very bottom of the cone. (It doesn't matter what the hue and saturation values are if the brightness is zero.)
If the color values for saturation and brightness are 0.0 and 1.0 respectively, the color is white and is represented by the point at the center of the top surface of the cone. In this case, it doesn't matter what the value for hue is. If the saturation value is 0.0, the color of the pixel will range from white to black with shades of gray in between depending on the value of brightness.
Three dimensions
The HSB color model has three dimensions:
What do the sliders do?
When we use the three sliders in Figure 1 to change the hue, saturation, and brightness of a pixel, we cause the program to behave in the following ways:
Explained another way
In other words:
Changing the elevation of the plane
By moving the brightness slider in Figure 1, you change the vertical elevation of the horizontal plane for the color of each pixel in the image. (Note that the colors of individual pixels are not necessarily on the same horizontal plane.)
The brightness value for each pixel is multiplied by a factor ranging from 0.0 to 2.0. (The multiplicative factor is 1.0 when the pointer is at the 100 position.) If the multiplication results in a new brightness value greater than 1.0, the value is simply set to 1.0.
Changing the distance from the center
By moving the saturation slider in Figure 1, you change the distance from the center of the cone for the color of each pixel in the image. (Note that the colors of individual pixels are not necessarily the same distance from the center.)
The saturation value for each pixel is multiplied by a factor ranging from 0.0 to 4.0. (The multiplicative factor is 1.0 when the pointer is at the 100 position.) Once again, if the multiplication results in a new saturation value greater than 1.0, the value is simply set to 1.0.
Changing the hue angle
By moving the hue slider in Figure 1, you change the angular position of a radial line on which the color for each pixel resides. This is an additive change. If the addition results in a new hue value greater than 360 degrees, the value effectively starts over at zero degrees. In other words, a hue value of 370 degrees is equivalent to a hue value of 10 degrees.
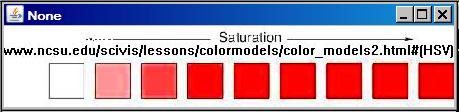
Another saturation demonstration
Figure 6 shows another example of moving the saturation slider without changing the hue or brightness sliders. In this case, the hue slider was set to 0 and the brightness slider was set to 100. The saturation slider was set to 100 (a multiplicative factor of 1.0) for the top image in Figure 6, so that the colors in the image were not being modified by the program.
Figure 6. Another saturation demonstration.
 |
 |
 |
 |
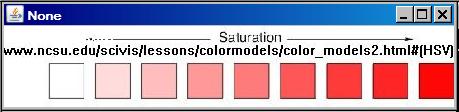
Colors at nine points along the radial line
The top image in Figure 6 shows the colors at nine points along a radial line from the center to the outer edge of the cone on a fixed horizontal plane. The angular position of that line was close to zero. As you can see, this resulted in the points having the color red. The leftmost square shows the color at the center of the cone (white) and the rightmost square shows the color at the surface of the cone.
Changing the saturation values
The bottom three images in Figure 6 show the effect of positioning the slider at 200, 300, and 400 respectively. The color of the rightmost square was fully saturated at the beginning, meaning that its color was at the surface of the cone with a saturation value at or near 1.0. Multiplying this value by factors of 2, 3, and 4 simply resulted in products that exceeded the allowable limit of 1.0, so the new value was set to 1.0. Therefore, there is no visible color change as the eye progresses down the right side of Figure 6.
Zero multiplied by any number is still zero
The color of the leftmost square was at the center of the cone at the beginning meaning that it had a saturation value at or near 0.0. Multiplying this value by factors of 2, 3, and 4 simply resulted in a product at or near zero, so there is no visible color change as the eye progresses down the left side of Figure 6.
The squares in the middle
The colors of the squares between the ends of the top image in Figure 6 had saturation values greater than 0.0 and less than 1.0. Multiplying these values by factors of 2, 3, and 4 resulted in larger saturation values. In some cases, the new value probably exceeded the limit and was set to the limit at 1.0. As a result, the colors of these squares approach, and sometimes reach the fully-saturated level as the eye progresses down Figure 6. The multiplication process moves the color value further from the center of the cone and closer to the edge of the cone.
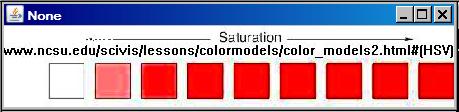
De-saturating an image
Figure 7 shows the effect of setting the saturation slider to 100, 50, and 0 respectively for the beach scene going from top to bottom. The hue slider was set to 0 and the brightness slider was set to 100 in all three cases.
Figure 7. De-saturating an image.
|
 |
 |
Reducing the saturation values for the pixels
The saturation value for every pixel was multiplied by 0.5 in the middle image in Figure 7, and was multiplied by zero in the bottom image. (The bottom image would probably be referred to as a de-saturated image, which is a grayscale image.)
Vivid colors
A comparison of the bottom image in Figure 7 with the bottom image in Figure 5 should help you to understand why I used the term vivid or bold earlier. The colors in the bottom image of Figure 5 are certainly more vivid than the colors in the bottom image of Figure 7.
Brightness is probably the easiest of the HSB properties to understand.
The four images in Figure 8 show the beach scene with the hue slider set to 0, the saturation slider set to 100, and the brightness slider set to values of 50, 100, 150, and 200 respectively going from top to bottom.
Figure 8. The effect of the brightness slider.
 |
|
 |
 |
Making things brighter
As you can see, the picture becomes brighter and brighter as the position of the brightness slider is increased. The brightness value for every pixel is multiplied by a factor derived from the position of the slider. The multiplicative factors for the four slider positions shown in Figure 8 were 0.5, 1.0, 1.5, and 2.0.
As with saturation, when the multiplicative product exceeds 1.0, it is simply set to 1.0. It appears that may have happened quite often for the bottom image in Figure 8.
A black rectangle
I elected not to show you the result for the brightness slider set to 0, because it is nothing but a black rectangle, corresponding to the bottom of the cone that I described earlier.
Two programs
I will present and explain two different programs in this lesson. In the first program named FiveSliderTemplate01, I will introduce you to a new template program that is designed to make it easier for you to write programs that use multiple sliders and buttons to edit digital photos.
In the second program, named HsbEdit02, I will show you how to begin with the template program described above and write a program to do the kind of HSB color editing that I explained in the previous section.
I showed you how to write a template program for editing digital photos in the earlier lesson titled A Slider-Controlled Softening Program for Digital Photos (see Resources). That program was limited to a single slider.
A major upgrade
This program is a major upgrade to the earlier program. This program makes it easy for you to create and use up to five sliders, three buttons, and their associated labels. In addition, the structure of this program makes it much easier for you to configure the sliders, the buttons, and the labels.
Default screen output
As shown in Figure 9, the program produces a display window for the Picture object being processed plus the following components with associated labels in a GUI object that is separate and distinct from the display window:
Figure 9. Typical screen display from the program named FiveSliderTemplate01.
 |
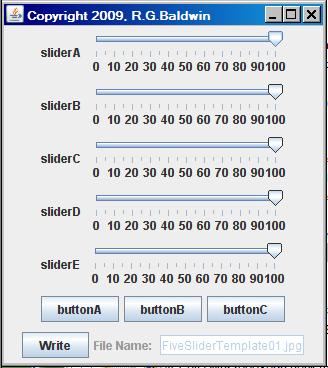 |
Components are easy to eliminate
Any of the general-purpose sliders and buttons that aren't needed can be eliminated from the GUI by setting the values of certain constants at the beginning of the program to false.
Concentrate on image-processing logic
Ideally, by using this template, you will be able to concentrate on image-processing logic and not have to deal with the programming details involved in the overall program structure.
The template program requires access to Ericson's multimedia library.
Execution speed and smoothness
The speed and smoothness of programs that you write using this template program will depend on a combination of your programming skills and the speed of your computer. Note, however that this template program was designed to teach programming and image processing concepts. It was not designed to compete on a speed or convenience basis with commercially-available photograph processing programs such as Adobe's Photoshop Elements.
Backup image files
A backup file containing the current state of the display is written into the directory from which the original image file was read each time the user clicks the Write button. The five most recent backup files are saved. The backup files are written in bmp format regardless of the format of the original image file in order to avoid JPEG compression and preserve picture quality. The names of the backup files are the same as the name of the original image file except that BAKn is inserted immediately ahead of the extension. The term n in the file name is a digit ranging from 0 to 4. The value of n rolls over and starts back at 0 when it exceeds 4.
Input image files
Input files of type jpg, bmp, and png are supported. If the input file is in the same directory as the program code, only the name and extension must be entered into the text field. Otherwise, a complete path and file name with extension must be entered.
Construction of the GUI
The GUI initially appears in the upper-left corner of the screen. At this point, the sliders and the buttons are all disabled. When the user enters the name of the input file, a display of the image contained in that file appears in the upper-left corner of the screen and the GUI is relocated to a position immediately below the display.
When the GUI is relocated, the sliders and the buttons are all enabled and the text field is disabled. Also, when the GUI is relocated, the width of the GUI is changed to match the width of the display unless the width of the display is less than the preferred width of the GUI. In that case, the GUI appears at its preferred width.
A demo program
In addition to serving as a template for future programs, this program also demonstrates the use of four sliders in a reasonably meaningful way. The fifth slider and the three buttons are demonstrated in a somewhat trivial way. (They simply cause the computer to beep when they fire an event to prove that they are alive.)
Configuring the GUI components
For this demonstration program, each slider ranges from 0 to 100 with the initial position of the slider at 100. Many aspects of the configuration of the GUI, (including the minimum, maximum, and initial position of each slider) can be established by changing the values of constants at the beginning of the program. For example, by setting some of the boolean constants to false, you can eliminate any combination of the sliders and buttons from the GUI. (You cannot eliminate the Write button using this approach.)
Various text and label values can also be configured in a similar manner. Note, however, that configuring the GUI by setting the above-mentioned boolean constants to false doesn't prevent the objects from being instantiated. It simply prevents them from becoming part of the GUI. In a production program, you would probably want to eliminate the instantiation as well to conserve resources.
Behavior of the demo program
This demonstration program uses four sliders to process a picture using a relatively simple algorithm. By moving the top three sliders in Figure 9, you can scale the red, green, and blue color values independently of one another. By moving the fourth slider, you can scale all three colors together.
Moving the fifth slider simply causes the computer to beep, as does clicking any of the three buttons. I left those four components in the GUI in this demonstration program for illustration purposes only.
Writing backup files
Positioning a slider at some point along its range and clicking the Write button causes a backup file to be written containing the current state of the display.
Terminating the program
Clicking the large X in the upper-right corner of the display does not terminate the program. It simply hides the display, which is of no practical use. The program is terminated by clicking the large X in the upper-right corner of the GUI.
Before terminating, the program writes an output file containing the final state of the display in the same format as the input file. The name of the output file is the same as the name of the input file except that the word FINAL is inserted immediately ahead of the extension. The final output file and all of the backup files are written into the same directory from which the image file was originally read. This program does not modify the contents of the input file.
ChangeListener objects
Separate ChangeListener objects are registered on each of the five sliders. In the demo program, each time one of the top four sliders fires a ChangeEvent, the event handler creates a new display containing a copy of the original picture.
The method named handleSliderABandC
The handlers for the top three sliders call the method named handleSliderABandC. This method adjusts all three colors in all of the pixels based on the current values of the three sliders. The top slider is used to adjust red; the second slider is used to adjust green; and the third slider is used to adjust blue.
The method named handleSliderD
The event handler on the fourth slider calls the method named handleSliderD. This method adjusts all three colors in all of the pixels based on the current value of the fourth slider.
The handler for the fifth slider simply causes the computer to beep to demonstrate that it is alive.
Making it easy to write image-processing programs
The main purpose of this template program is to make it possible for you to write image processing programs with a minimum of effort. For many different kinds of image processing programs, you should be able to confine most of your programming efforts to changing the constants at the beginning of the program, inserting code in the existing event listeners, and writing methods that are called by those event listeners.
Will explain in fragments
A complete listing of the program is provided in Listing 13 near the end of the lesson. Because of the similarity of this template program to the one that I explained in the earlier lesson, I won't explain this program in detail. Instead, I will confine my explanation to those aspects of the program that you will need to know about to use it effectively.
Beginning of the program named FiveSliderTemplate01
The program begins in Listing 1. As I mentioned earlier, you can configure the GUI by changing the values of constants at the beginning of the program. You can control whether or not the sliders and buttons appear in the GUI, along with the contents of various labels by changing the contents of the constants.
Listing 1. Beginning of the program named FiveSliderTemplate01.
public class FiveSliderTemplate01 extends JFrame{

  //SLIDERS
  //Change the following boolean values to false to
  // selectively exclude sliders
  private final boolean sliderAPanelInclude = true;
  private final boolean sliderBPanelInclude = true;
  private final boolean sliderCPanelInclude = true;
  private final boolean sliderDPanelInclude = true;
  private final boolean sliderEPanelInclude = true;
|
For example, you can selectively exclude any of the five sliders from the GUI by changing the values of the boolean constants in Listing 1 from true to false.
Set the minimum, maximum, and initial value for each slider
You can change the int values in Listing 2 to set the minimum, maximum, and initial pointer position for each of the five sliders. If you excluded a slider by setting a boolean constant in Listing 1 to false, you can simply ignore that slider from that point forward and you don't need to do anything to the constants for that slider in Listing 2.
Listing 2. Set the minimum, maximum, and initial value for each slider.
//Change the following int values to change the limits // and initial positions of the sliders. private final int sliderAMin = 0;//minimum private final int sliderAMax = 100;//maximum private final int sliderAInit = 100;//initial value private final int sliderBMin = 0; private final int sliderBMax = 100; private final int sliderBInit = 100; private final int sliderCMin = 0; private final int sliderCMax = 100; private final int sliderCInit = 100; private final int sliderDMin = 0; private final int sliderDMax = 100; private final int sliderDInit = 100; private final int sliderEMin = 0; private final int sliderEMax = 100; private final int sliderEInit = 100; |
Set the tick spacing on the sliders
The sliders move in steps of one unit. For example, if the slider extends from 0 at the left end to 200 at the right end, 200 steps are required to move the button from one end to the other. You can move the button one step at a time by clicking on the slider track. If you drag the button, the value of the slider will change by the number of steps traversed.
The tick marks on the sliders are for cosmetic and reference purposes only. They have nothing to do with the slider value.
You can change the spacing of the tick marks on the sliders by changing the int values in Listing 3. You may need to experiment with this for your program. Setting the major tick marks too close together can cause the labels on those tick marks to overlap.
Listing 3. Set the tick spacing on the sliders.
//Change the following int values to change the tick // spacing on the sliders. private final int sliderAMajorTickSpacing = 10; private final int sliderAMinorTickSpacing = 5; private final int sliderBMajorTickSpacing = 10; private final int sliderBMinorTickSpacing = 5; private final int sliderCMajorTickSpacing = 10; private final int sliderCMinorTickSpacing = 5; private final int sliderDMajorTickSpacing = 10; private final int sliderDMinorTickSpacing = 5; private final int sliderEMajorTickSpacing = 10; private final int sliderEMinorTickSpacing = 5; |
Set the labels to the left of each slider
If you examine Figure 9, you will see that there is a label to the left of each slider. The labels that I applied in Figure 9 were completely generic for illustration purposes. However, you can change the labels to make them more descriptive by changing the String values in Listing 4.
Listing 4. Set the labels to the left of each slider.
//Change these string values to change the labels // displayed to the left of the sliders. private final String sliderALabel = "sliderA"; private final String sliderBLabel = "sliderB"; private final String sliderCLabel = "sliderC"; private final String sliderDLabel = "sliderD"; private final String sliderELabel = "sliderE"; |
Now you know how to configure the sliders
That pretty well wraps it up insofar as configuring the sliders is concerned. I have assumed that you will always want the tick marks and the labels on those tick marks to be painted. If that is not the case, you can prevent them from being painted by going into the program and passing a false parameter to either or both of the following methods when it is called on a particular slider:
Exclude all three buttons from the GUI
You can exclude all three of the buttons from the GUI by setting the boolean value in Listing 5 to false. If you do that, you can simply ignore those buttons from that point forward.
Listing 5. Exclude all three buttons from the GUI.
//BUTTONS //Change the following value to false to exclude all // three buttons as a group. private final boolean buttonPanelInclude = true; |
Exclude some, but not all of the buttons from the GUI
You can selectively exclude some or all of the buttons from the GUI by leaving the boolean value in Listing 5 true and setting one or more of the boolean values in Listing 6 to false. If you exclude a button in this manner, you can simply ignore it from that point forward.
Listing 6. Exclude some, but not all of the buttons from the GUI.
//Change the following values to false to selectively // exclude individual buttons private final boolean buttonAInclude = true; private final boolean buttonBInclude = true; private final boolean buttonCInclude = true; |
Set the labels on the buttons
You can change the String values in Listing 7 to change the labels that appear on the face of the buttons. As you can see in Figure 9, I placed very generic labels on the buttons for illustration purposes. You can make those labels more meaningful by changing the strings in Listing 7.
Listing 7. Set the labels on the buttons.
//Change these string values to change the text on the // buttons private final String buttonALabel = "buttonA"; private final String buttonBLabel = "buttonB"; private final String buttonCLabel = "buttonC"; |
Of course, if you have already excluded a button from the GUI, you don't need to do anything about its label. Just ignore the code in Listing 7.
Set the label for the text field
There is a label to the left of the text field that describes the purpose of the text field as being the entry point for the file name. You can change that label if you wish by changing the String value in Listing 8.
Listing 8. Set the label for the text field.
  //MISCELLANEOUS
  //Change this string to change the text to the left of
  // the text field.
  private final JLabel fileNameLabel =
                                new JLabel("File Name: ");
|
Set the default input file name
Mainly to make it easier to test the program, I set a default value in the text field that is used to enter the file name. You can change that if you like by changing the String value in Listing 9.
Listing 9. Set the default input file name.
  //Change this string to change the path and name of the
  // default input file.
  private final String defaultFileName =
                               "FiveSliderTemplate01.jpg";
|
Program the listeners on the sliders and the buttons
The template program registers an anonymous ChangeListener object on each of the five sliders and an anonymous ActionListener object on each of the three buttons. As an example, Listing 10 shows the code for one of those listeners.
Listing 10. Program the ChangeListener on the sliders.
    sliderA.addChangeListener(
      new ChangeListener(){
        public void stateChanged(ChangeEvent e){
          //Draw a new copy of the picture on the display.
          graphics = display.getGraphics();
          graphics.drawImage(picture.getImage(),0,0,null);
          handleSliderABandC();
        }//end stateChanged
      }//end new ChangeListener
    );//end addChangeListener
|
Making your program different
It is likely that you will want the behavior of your program to be different from the behavior of the template program when the user moves a slider. In that case, you can:
That should cover the things that you need to know to make effective use of the template program for writing your own image-processing programs using sliders and buttons.
This is the program that was used to produce the images that you saw in Figure 1 through Figure 8. This program was written using the template program named FiveSliderTemplate01 as a starting point. Various constant values were modified at the beginning of the template program to configure the program for this intended purpose. In addition, the event handlers for three of the sliders were modified to serve the purposes of this program.
The purpose of this program is to show you how to perform HSB color editing on your digital photos.
Behavior of the program
The program presents an initial GUI in the upper-left corner of the screen that allows the user to specify an image file to be edited. When the user enters the name (and optionally the path) of the file to be edited, the user is presented with a display of the image being edited and a relocated version of the GUI. The GUI contains three sliders and a Write button as shown in Figure 1.
The sliders are labeled Hue, Sat, and Bright (abbreviations for hue, saturation, and brightness), which are the words behind the nomenclature for the HSB color model.
The user can change any combination of hue, saturation, and brightness of the image by adjusting the sliders.
Writing backup files
At any point, the user can click the Write button on the GUI to cause the processed image in its current state to be written into a backup file of type bmp. (Note that only the most recent five backup files are saved.)
A final output file
When the user terminates the program by clicking the large X in the upper-right corner of the GUI, the final processed image is written into a final output file. The name of the output file is the same as the name of the input file except that the word FINAL is inserted immediately ahead of the extension. The final output file and all of the backup files are written into the same directory from which the image file was originally read.
Ericson's multimedia library is required
As I explained in the earlier discussion of the template program, access to Ericson's multimedia library is required. Also, other considerations that I explained in conjunction with the template program apply to this program as well.
Even though I mentioned it in conjunction with the discussion of the template program, I want to emphasize that this program was designed to teach programming and image processing concepts. It was not designed to compete on a speed or convenience basis with commercially-available photograph processing programs such as Adobe's Photoshop Elements.
Will explain in fragments
A complete listing of this program is provided in Listing 14 near the end of the lesson. I will explain only that code that causes the template program to be specialized for this purpose.
Configuring the GUI
As I mentioned earlier, I configured the GUI by setting the values of certain constants at the beginning of the program. You can view those changes in Listing 14.
Programming the event handlers
The ChangeListener class definitions that are registered on the three sliders are shown in Listing 11.
Listing 11. Program the event handlers.
    sliderA.addChangeListener(
      new ChangeListener(){
        public void stateChanged(ChangeEvent e){
          //Draw a new copy of the picture on the display.
          graphics = display.getGraphics();
          graphics.drawImage(picture.getImage(),0,0,null);
          handleSliderABandC();
        }//end stateChanged
      }//end new ChangeListener
    );//end addChangeListener
    //--------------------------------------------------//

    sliderB.addChangeListener(
      new ChangeListener(){
        public void stateChanged(ChangeEvent e){
          //Draw a new copy of the picture on the display.
          graphics = display.getGraphics();
          graphics.drawImage(picture.getImage(),0,0,null);
          handleSliderABandC();
        }//end stateChanged
      }//end new ChangeListener
    );//end addChangeListener
    //--------------------------------------------------//

    sliderC.addChangeListener(
      new ChangeListener(){
        public void stateChanged(ChangeEvent e){
          //Draw a new copy of the picture on the display.
          graphics = display.getGraphics();
          graphics.drawImage(picture.getImage(),0,0,null);
          handleSliderABandC();
        }//end stateChanged
      }//end new ChangeListener
    );//end addChangeListener
|
The behavior of all three listeners is the same
A quick glance at Listing 11 will tell you that the behavior of all three listeners is the same. Each event handler creates a new display by copying the original picture. Then it calls a method named handleSliderABandC where the interesting behavior of the program is controlled.
These anonymous class definitions are the same as in the template program. All that I needed to do to modify the behavior of the program was to modify the behavior of the method named handleSliderABandC.
An alternative approach
It is probably worth noting that if I were writing this program from scratch instead of adopting a template program, I would probably define a single member class that implements the ChangeListener interface and register it on all three sliders instead of defining three separate anonymous listener classes.
The method named handleSliderABandC
This method makes it possible for the user to perform HSB color editing on a digital photo. The method is called each time any one of the hue, saturation, or brightness sliders shown in Figure 1 fires a ChangeEvent.
Events are fired when the user moves the buttons on the sliders.
Immediately before this method is called by the anonymous listeners in Listing 11, a new display is created. The display contains a copy of the original picture. This method operates only on the display. It does not modify the original picture.
Each time this method is called, it gets the value of each slider and uses those values to modify the corresponding hue, saturation, and brightness property for every pixel in the image currently residing in the display.
Basically, the method does the following for each pixel:
The method is synchronized to eliminate potential problems resulting from the possibility that the method may be called on two threads concurrently.
The method named handleSliderABandC is shown in its entirety in Listing 12.
Listing 12. The method named handleSliderABandC.
  private synchronized void handleSliderABandC(){
    pixels = display.getPixels();
    float[] hsbvals = new float[3];//HSB pixel values.

    //Process every pixel in the image using the same
    // algorithm.
    for(int cnt = 0;cnt < pixels.length;cnt++){
      //Get the red, green, and blue values for the
      // current pixel.
      red = pixels[cnt].getRed();
      green = pixels[cnt].getGreen();
      blue = pixels[cnt].getBlue();

      //Get the three HSB color model values that
      // correspond to the current pixel color expressed
      // in the RGB color model. When the method returns,
      // the three HSB values have been placed in the
      // three-element array referred to by hsbvals in the
      // order hue, saturation, and brightness.
      Color.RGBtoHSB(red,green,blue,hsbvals);

      //Modify the hue value for the pixel based on the
      // current value of the Hue slider. Note that this
      // statement performs addition instead of
      // multiplication.
      hsbvals[0] = (float)(hsbvals[0] +
                           sliderA.getValue()/360.0);//hue

      //Modify the saturation value for the pixel based
      // on the current value of the Sat slider. Note
      // that multiplication is used here.
      hsbvals[1] = (float)(hsbvals[1] *
                    sliderB.getValue()/100.0);//saturation
      //If the computed value is greter than 1.0, clip it
      // at 1.0.
      if(hsbvals[1] > 1.0) hsbvals[1] = (float)1.0;

      //Modify the brightness value for the pixel based
      // on the current value of the Bright slider. Once
      // again, multiplication is used here.
      hsbvals[2] = (float)(hsbvals[2] *
                    sliderC.getValue()/100.0);//brightness
      if(hsbvals[2] > 1.0) hsbvals[2] = (float)1.0;

      //Convert the HSB color values back into RGB color
      // values.
      int color = Color.HSBtoRGB(
                        hsbvals[0],hsbvals[1],hsbvals[2]);

      //Use the RGB color values to set the modified color
      // in the pixel.
      pixels[cnt].setColor(new Color(color));

    }//end for loop

    //Repaint the display.
    display.repaint();

  }//end handleSliderABandC
  //----------------------------------------------------//
|
By the time that you have reached this point in the lesson, the earlier explanation of the concepts of HSB pixel editing, the brief explanation of the processing steps, and the embedded comments in the method should provide a sufficient explanation for the behavior this method.
I encourage you to copy the code from Listing 13 and Listing 14, compile the code, and execute it. Experiment with the code, making changes, and observing the results of your changes. Make certain that you can explain why your changes behave as they do.
I provided the code for an upgraded template program for processing images. Then I explained the HSB color model and showed you how to write a program to adjust the hue, saturation, and brightness of your digital photos.
In the next lesson, you will learn how to use affine transforms to scale, rotate, and translate Picture objects.
Listing 13. Source code for the program named FiveSliderTemplate01.
/*File FiveSliderTemplate01 Copyright 2009 R.G.Baldwin

This is a template program that takes some of the pain out
of writing image processing programs. The program
produces a display window for a processed Picture object
plus the following components with associated labels in a
GUI object that is separate and distinct from the display
window:

1. A text field for entry of an input image file and path
name.
2. A Write button for writing backup files during
processing.
3. Up to five general-purpose sliders with registered
change listeners.
4. Up to three general-purpose buttons with registered
action listeners.
5. A shutdown procedure that writes a final output image
file.

Any of the general-purpose sliders and buttons that aren't
needed can be eliminated from the GUI by setting the
values of certain constants at the beginning of the
program to false.

Ideally, by using this template, you will be able to
concentrate on image-processing logic and not have to deal
with the programming details involved in the overall
program.

The template program requires access to Ericson's
multimedia library.

The speed and smoothness of programs that you write using
this template program will depend on a combination of your
programming skills and the speed of your computer. Note,
however that this template program was designed to teach
programming and image processing concepts. It was not
designed to compete on a speed or convenience basis with
commercially-available photograph processing programs such
as Adobe's Photoshop Elements.

Backup files containing the current state of the display
are written into the directory from which the original
image file was read. The five most recent backup files are
saved. The backup files are written in bmp format
regardless of the format of the original image file in
order to avoid JPEG compression and preserve picture
quality.  The names of the backup files are the same as
the name of the original image file except that BAKn is
inserted immediately ahead of the extension where n is a
digit ranging from 0 to 4. The value of n rolls over and
starts back at 0 when it exceeds 4.

Input files of type jpg, bmp, png are supported.

If the input file is in the same directory as the program
code, only the name and extension must be entered into the
text field. Otherwise, a complete path and file name with
extension must be entered.

The GUI initially appears in the upper-left corner of the
screen. At this point, the sliders and the buttons are all
disabled. When the user enters the name of the input file,
a display of the image contained in that file appears in
the upper-left corner of the screen and the GUI is
relocated to a position immediately below the display.

When the GUI is relocated to the position immediately
below the display, the sliders and the buttons are all
enabled. and the text field is disabled. The width of the
GUI is changed to match the width of the display unless
the width of the display is less than the preferred width
of the GUI. In that case, the GUI appears at its preferred
width.

This program demonstrates the use of four sliders in a
meaningful way. The fifth slider and the three buttons are
demonstrated in a trivial way. (They simply cause the
computer to beep when they fire an event.)

For this demonstration program, each slider ranges
from 0 to 100 with the initial position of the slider at
100.

As mentioned earlier, many aspects of the configuration of
the GUI can be established by changing the values of
constants at the beginning of the program. For example, by
setting some of the boolean constants to false, you can
eliminate any, all, or any combination of the sliders and
buttons from the GUI. (You cannot eliminate the Write
button using this approach.) Various text and label values
can be configured in a similar manner.

Note, however, that configuring the GUI by setting the
above-mentioned boolean constants to false doesn't prevent
the objects from being instantiated. It simply prevents
them from becoming part of the GUI. In a production
program, you would probably want to eliminate the
instantiation as well to conserve resources.

This demonstration program uses four sliders to process a
picture using a relatively simple algorithm. By moving the
top three sliders, you can scale the red, green, and blue
color values independently of one another. By moving the
fourth slider, you can scale all three colors together.

Moving the fifth slider simply causes the computer to
beep, as does clicking any of the three buttons. I left
those four components in the GUI in this demonstration
program for illustration purposes only.

Positioning a slider at some point along its range and
clicking the Write button causes a backup file to be
written containing the current state of the display.

Clicking the large X in the upper-right corner of the
display does not terminate the program. It simply hides
the display, which is of no practical use.

The program is terminated by clicking the large X in the
upper-right corner of the GUI. Before terminating, the
program writes an output file containing the final state
of the display in the same format as the input file. The
name of the output file is the same as the name of the
input file except that the word FINAL is inserted
immediately ahead of the extension. The final output file
(and all of the backup files) are written into the same
directory from which the image file was originally read.

This program does not modify the contents of the input
file.

Separate ChangeListener objects are registered on each of
the five sliders. Each time one of the top four sliders
fires a ChangeEvent, the event handler creates a new
display containing a copy of the original picture. The
handlers for the top three sliders call the method named
handleSliderABandC. This method adjusts all three colors
in all of the pixels based on the current values of the
three sliders. The top slider is used to adjust red; the
second slider is used to adjust green; and the third
slider is used to adjust blue. The event handler on the
fourth slider calls the method named handleSliderD. This
method adjusts all three colors in all of the pixels based
on the current value of the fourth slider. The handler for
the fifth slider simply causes the computer to beep to
demonstrate that it is alive.

The main purpose of this template program is to make it
possible for you to write image processing programs with a
minimum of effort. For many different kinds of image
processing programs, you should be able to confine most of
your programming efforts to changing the constants at the
beginning of the program, inserting code in the existing
event listeners, and writing methods that are called by
those event listeners.

Tested using Windows Vista Home Premium Edition,
Java 1.6x, and the version of Ericson's multimedia library
contained in bookClasses10-1-07.zip.
*********************************************************/

import java.awt.Graphics;
import java.awt.Image;
import java.awt.BorderLayout;
import java.awt.Color;
import java.awt.event.ActionListener;
import java.awt.event.ActionEvent;
import java.awt.event.WindowAdapter;
import java.awt.event.WindowEvent;

import javax.swing.JFrame;
import javax.swing.JPanel;
import javax.swing.JSlider;
import javax.swing.JLabel;
import javax.swing.JButton;
import javax.swing.JTextField;
import javax.swing.event.ChangeListener;
import javax.swing.event.ChangeEvent;
import javax.swing.WindowConstants;

import java.io.File;

public class FiveSliderTemplate01 extends JFrame{
  //The following constants are used to configure the GUI.
  // You can control whether or not the sliders and
  // buttons appear in the GUI, along with the contents of
  // various labels by changing the contents of the
  // following constants.

  //SLIDERS
  //Change the following boolean values to false to
  // selectively exclude sliders
  private final boolean sliderAPanelInclude = true;
  private final boolean sliderBPanelInclude = true;
  private final boolean sliderCPanelInclude = true;
  private final boolean sliderDPanelInclude = true;
  private final boolean sliderEPanelInclude = true;

  //Change the following int values to change the limits
  // and initial positions of the sliders.
  private final int sliderAMin = 0;//minimum
  private final int sliderAMax = 100;//maximum
  private final int sliderAInit = 100;//initial value

  private final int sliderBMin = 0;
  private final int sliderBMax = 100;
  private final int sliderBInit = 100;

  private final int sliderCMin = 0;
  private final int sliderCMax = 100;
  private final int sliderCInit = 100;

  private final int sliderDMin = 0;
  private final int sliderDMax = 100;
  private final int sliderDInit = 100;

  private final int sliderEMin = 0;
  private final int sliderEMax = 100;
  private final int sliderEInit = 100;

  //Change the following int values to change the tick
  // spacing on the sliders.
  private final int sliderAMajorTickSpacing = 10;
  private final int sliderAMinorTickSpacing = 5;
  private final int sliderBMajorTickSpacing = 10;
  private final int sliderBMinorTickSpacing = 5;
  private final int sliderCMajorTickSpacing = 10;
  private final int sliderCMinorTickSpacing = 5;
  private final int sliderDMajorTickSpacing = 10;
  private final int sliderDMinorTickSpacing = 5;
  private final int sliderEMajorTickSpacing = 10;
  private final int sliderEMinorTickSpacing = 5;

  //Change these string values to change the labels
  // displayed to the left of the sliders.
  private final String sliderALabel = "sliderA";
  private final String sliderBLabel = "sliderB";
  private final String sliderCLabel = "sliderC";
  private final String sliderDLabel = "sliderD";
  private final String sliderELabel = "sliderE";


  //BUTTONS
  //Change the following value to false to exclude all
  // three buttons as a group.
  private final boolean buttonPanelInclude = true;

  //Change the following values to false to selectively
  // exclude individual buttons
  private final boolean buttonAInclude = true;
  private final boolean buttonBInclude = true;
  private final boolean buttonCInclude = true;

  //Change these string values to change the text on the
  // buttons
  private final String buttonALabel = "buttonA";
  private final String buttonBLabel = "buttonB";
  private final String buttonCLabel = "buttonC";


  //MISCELLANEOUS
  //Change this string to change the text to the left of
  // the text field.
  private final JLabel fileNameLabel =
                                new JLabel("File Name: ");

  //Change this string to change the path and name of the
  // default input file.
  private final String defaultFileName =
                               "FiveSliderTemplate01.jpg";
  //----------------------------------------------------//


  private final JPanel mainPanel = new JPanel();

  private final JPanel northPanel = new JPanel();
  private final JPanel centerPanel = new JPanel();
  private final JPanel southPanel = new JPanel();

  private final JPanel sliderAPanel = new JPanel();
  private final JPanel sliderBPanel = new JPanel();
  private final JPanel sliderCPanel = new JPanel();
  private final JPanel sliderDPanel = new JPanel();
  private final JPanel sliderEPanel = new JPanel();

  private final JPanel buttonPanel = new JPanel();

  private final JButton writeButton =
                                     new JButton("Write");
  private final JButton buttonA =
                                new JButton(buttonALabel);
  private final JButton buttonB =
                                new JButton(buttonBLabel);
  private final JButton buttonC =
                                new JButton(buttonCLabel);

  //This text field is preloaded with the name of a test
  // file to make testing and debugging easier.
  private JTextField fileNameField =
                          new JTextField(defaultFileName);

  //Change the int values at the beginning of the program
  // to reconfigure these sliders.
  private final JSlider sliderA =
           new JSlider(sliderAMin,sliderAMax,sliderAInit);
  private final JSlider sliderB =
           new JSlider(sliderBMin,sliderBMax,sliderBInit);
  private final JSlider sliderC =
           new JSlider(sliderCMin,sliderCMax,sliderCInit);
  private final JSlider sliderD =
           new JSlider(sliderDMin,sliderDMax,sliderDInit);
  private final JSlider sliderE =
           new JSlider(sliderEMin,sliderEMax,sliderEInit);

  //A reference to the original Picture object will be
  // stored here.
  private Picture picture = null;
  //A reference to a modified copy of the original
  // Picture object will be stored here.
  private Picture display = null;

  //Miscellaneous working variables.
  private Image image = null;
  private Graphics graphics = null;

  private Pixel pixel = null;
  private int red = 0;
  private int green = 0;
  private int blue = 0;
  private int writeCounter = 0;

  private Pixel[] pixels = null;

  private String fileName = null;
  private String outputPath = null;
  private String extension = null;
  //----------------------------------------------------//

  public static void main(String[] args){
    new FiveSliderTemplate01();
  }//end main method
  //----------------------------------------------------//

  public FiveSliderTemplate01(){//constructor
    //All close operations are handled in a WindowListener
    // object.
    setDefaultCloseOperation(
                     WindowConstants.DO_NOTHING_ON_CLOSE);

    //Put decorations on the sliders. Change the constants
    // at the beginning of the program to control major
    // and minor tick spacing.
    sliderA.setMajorTickSpacing(sliderAMajorTickSpacing);
    sliderA.setMinorTickSpacing(sliderAMinorTickSpacing);
    sliderA.setPaintTicks(true);
    sliderA.setPaintLabels(true);

    sliderB.setMajorTickSpacing(sliderBMajorTickSpacing);
    sliderB.setMinorTickSpacing(sliderBMinorTickSpacing);
    sliderB.setPaintTicks(true);
    sliderB.setPaintLabels(true);

    sliderC.setMajorTickSpacing(sliderCMajorTickSpacing);
    sliderC.setMinorTickSpacing(sliderCMinorTickSpacing);
    sliderC.setPaintTicks(true);
    sliderC.setPaintLabels(true);

    sliderD.setMajorTickSpacing(sliderDMajorTickSpacing);
    sliderD.setMinorTickSpacing(sliderDMinorTickSpacing);
    sliderD.setPaintTicks(true);
    sliderD.setPaintLabels(true);

    sliderE.setMajorTickSpacing(sliderEMajorTickSpacing);
    sliderE.setMinorTickSpacing(sliderEMinorTickSpacing);
    sliderE.setPaintTicks(true);
    sliderE.setPaintLabels(true);

    //Construct the GUI working generally from the top
    // down.
    mainPanel.setLayout(new BorderLayout());

    mainPanel.add(northPanel,BorderLayout.NORTH);
    mainPanel.add(centerPanel,BorderLayout.CENTER);
    mainPanel.add(southPanel,BorderLayout.SOUTH);

    northPanel.setLayout(new BorderLayout());

    //Add sliders if the constants at the beginning of the
    // program are true.
    if(sliderAPanelInclude)
          northPanel.add(sliderAPanel,BorderLayout.NORTH);
    if(sliderBPanelInclude)
         northPanel.add(sliderBPanel,BorderLayout.CENTER);
    if(sliderCPanelInclude)
          northPanel.add(sliderCPanel,BorderLayout.SOUTH);

    centerPanel.setLayout(new BorderLayout());

    //Add more sliders if the constants at the beginning
    // of the program are true.
    if(sliderDPanelInclude)
         centerPanel.add(sliderDPanel,BorderLayout.NORTH);
    if(sliderEPanelInclude)
        centerPanel.add(sliderEPanel,BorderLayout.CENTER);

    //Add a panel containing from one to three buttons if
    // the constant at the beginning of the program is
    // true.
    if(buttonPanelInclude)
          centerPanel.add(buttonPanel,BorderLayout.SOUTH);

    //Add buttons if the constants at the beginning of the
    // program are true.
    if(buttonAInclude) buttonPanel.add(buttonA);
    if(buttonBInclude) buttonPanel.add(buttonB);
    if(buttonCInclude) buttonPanel.add(buttonC);

    //These components should always be added.
    southPanel.add(writeButton);
    southPanel.add(fileNameLabel);
    southPanel.add(fileNameField);

    sliderAPanel.add(new JLabel(sliderALabel));
    sliderAPanel.add(sliderA);

    sliderBPanel.add(new JLabel(sliderBLabel));
    sliderBPanel.add(sliderB);

    sliderCPanel.add(new JLabel(sliderCLabel));
    sliderCPanel.add(sliderC);

    sliderDPanel.add(new JLabel(sliderDLabel));
    sliderDPanel.add(sliderD);

    sliderEPanel.add(new JLabel(sliderELabel));
    sliderEPanel.add(sliderE);

    //Disable the sliders and the buttons until the
    // user enters the file name.
    sliderA.setEnabled(false);
    sliderB.setEnabled(false);
    sliderC.setEnabled(false);
    sliderD.setEnabled(false);
    sliderE.setEnabled(false);

    buttonA.setEnabled(false);
    buttonB.setEnabled(false);
    buttonC.setEnabled(false);
    writeButton.setEnabled(false);

    //Set the size of the GUI and display it in the upper-
    // left corner of the screen. It will be moved later
    // to a position immediately below the display of the
    // picture.
    getContentPane().add(mainPanel);
    pack();//Set to overall preferred size.
    setVisible(true);

    //Move the focus to the text field to make it easy
    // for the user to enter the name of the input file.
    fileNameField.requestFocus();
    //--------------------------------------------------//

    //Register a listener on the text field. When the user
    // enters the file name in the text field, set
    // everything up properly so that the program will
    // function as an event-driven picture-manipulation
    // program until the user clicks the large X in the
    // upper-right of the GUI.
    fileNameField.addActionListener(
      new ActionListener(){
        public void actionPerformed(ActionEvent e){
          //Disable the text field to prevent the user
          // from entering anything else in it.
          fileNameField.setEnabled(false);
          fileNameLabel.setEnabled(false);

          //Get the file name from the text field and use
          // it to create a new Picture object. Display my
          // name in the image.
          fileName = fileNameField.getText();
          picture = new Picture(fileName);
          picture.addMessage("Dick Baldwin",10,20);

          //Get information that will be used to write the
          // output files.
          String inputPath = new File(fileName).
                                        getAbsolutePath();
          int posDot = inputPath.lastIndexOf('.');
          outputPath = inputPath.substring(0,posDot);
          //Write the first copy of the output backup
          // file before any processing is done.
          picture.write(outputPath
                       + "BAK" + writeCounter++ + ".bmp");

          //Get filename extension. It will be used later
          // to write the final output file.
          extension = inputPath.substring(posDot);

          //Decorate the GUI.
          setTitle("Copyright 2009, R.G.Baldwin");

          //Create the picture that will be processed.
          // Note that the original image file is not
          // modified by this program.
          int pictureWidth = picture.getWidth();
          int pictureHeight = picture.getHeight();
          display = new Picture(
                              pictureWidth,pictureHeight);

          //Draw the initial display.
          graphics = display.getGraphics();
          graphics.drawImage(picture.getImage(),0,0,null);
          display.show();

          //Adjust the width of the GUI to match the width
          // of the display if possible. Then relocate the
          // GUI to a position immediately below the
          // display.
          //Establish the preferred size now that the
          // input file name has been entered.
          pack();
          int packedHeight = getHeight();
          int packedWidth = getWidth();
          if((pictureWidth + 7) >= packedWidth){
            //Make the width of the GUI the same as the
            // width of the display.
            setSize(pictureWidth + 7,packedHeight);
          }//Else, just leave the GUI at its current size.
          //Put the GUI in its new location immediately
          // below the display.
          setLocation(0,pictureHeight + 30);

          //Enable the sliders and the buttons.
          sliderA.setEnabled(true);
          sliderB.setEnabled(true);
          sliderC.setEnabled(true);
          sliderD.setEnabled(true);
          sliderE.setEnabled(true);

          buttonA.setEnabled(true);
          buttonB.setEnabled(true);
          buttonC.setEnabled(true);

          writeButton.setEnabled(true);

        }//end actionPerformed
      }//end new ActionListener
    );//end addActionListener
    //--------------------------------------------------//

    //Register an ActionListener on the writeButton.
    // Each time the user clicks the button, a backup bmp
    // file containing the current state of the display is
    // written into the directory from which the original
    // picture was read. The five most recent backup files
    // are saved. The names of the backup files are the
    // same as the name of the input file except that BAKn
    // is inserted immediately ahead of the extension
    // where n is a digit ranging from 0 to 4. The value
    // of n rolls over at 4 and starts back at 0.
    writeButton.addActionListener(
      new ActionListener(){
        public void actionPerformed(ActionEvent e){
          display.write(outputPath
                       + "BAK" + writeCounter++ + ".bmp");
          //Reset the writeCounter if it exceeds 4 to
          // conserve disk space.
          if(writeCounter > 4){
            writeCounter = 0;
          }//end if
        }//end action performed
      }//end newActionListener
    );//end addActionListener
    //--------------------------------------------------//

    //Register an ActionListener on buttonA. This button
    // and this listener are here for future expansion.
    // For demonstration purposes, make the computer beep
    // when the user clicks any of the three buttons.
    buttonA.addActionListener(
      new ActionListener(){
        public void actionPerformed(ActionEvent e){
          getToolkit().getDefaultToolkit().beep();
        }//end action performed
      }//end newActionListener
    );//end addActionListener
    //--------------------------------------------------//
    //Register an ActionListener on buttonB. This button
    // and this listener are here for future expansion.
    buttonB.addActionListener(
      new ActionListener(){
        public void actionPerformed(ActionEvent e){
          getToolkit().getDefaultToolkit().beep();
        }//end action performed
      }//end newActionListener
    );//end addActionListener
    //--------------------------------------------------//
    //Register an ActionListener on buttonC. This button
    // and this listener are here for future expansion.
    buttonC.addActionListener(
      new ActionListener(){
        public void actionPerformed(ActionEvent e){
          getToolkit().getDefaultToolkit().beep();
        }//end action performed
      }//end newActionListener
    );//end addActionListener
    //--------------------------------------------------//

    //Register a WindowListener that will respond when the
    // user clicks the large X in the upper-right corner
    // of the GUI. This event handler will write the final
    // state of the display into an output file of the
    // same type as the original input file. The name will
    // be the same except that the word FINAL will be
    // inserted immediately ahead of the extension.
    addWindowListener(
      new WindowAdapter(){
        public void windowClosing(WindowEvent e){
          display.write(outputPath + "FINAL" + extension);
          System.exit(0);
        }//end windowClosing
      }//end new WindowAdapter
    );//end addWindowListener
    //--------------------------------------------------//

    //Register a ChangeListener object on sliderA.
    //Each time sliderA fires a ChangeEvent, this event
    // handler creates a new display as a copy of the
    // original picture and calls a method named
    // handleSliderABandC. You can modify the code in this
    // listener, the listeners for the other sliders, and
    // the listeners for the buttons to customize the
    // behavior of the program to meet your needs.
    sliderA.addChangeListener(
      new ChangeListener(){
        public void stateChanged(ChangeEvent e){
          //Draw a new copy of the picture on the display.
          graphics = display.getGraphics();
          graphics.drawImage(picture.getImage(),0,0,null);
          handleSliderABandC();
        }//end stateChanged
      }//end new ChangeListener
    );//end addChangeListener
    //--------------------------------------------------//
    //Register a ChangeListener object on sliderB.
    //Each time sliderB fires a ChangeEvent, this event
    // handler creates a new display as a copy of the
    // original picture and calls a method named
    // handleSliderABandC.
    sliderB.addChangeListener(
      new ChangeListener(){
        public void stateChanged(ChangeEvent e){
          //Draw a new copy of the picture on the display.
          graphics = display.getGraphics();
          graphics.drawImage(picture.getImage(),0,0,null);
          handleSliderABandC();
        }//end stateChanged
      }//end new ChangeListener
    );//end addChangeListener
    //--------------------------------------------------//
    //Register a ChangeListener object on sliderC.
    //Each time sliderC fires a ChangeEvent, this event
    // handler creates a new display as a copy of the
    // original picture and calls a method named
    // handleSliderABandC.
    sliderC.addChangeListener(
      new ChangeListener(){
        public void stateChanged(ChangeEvent e){
          //Draw a new copy of the picture on the display.
          graphics = display.getGraphics();
          graphics.drawImage(picture.getImage(),0,0,null);
          handleSliderABandC();
        }//end stateChanged
      }//end new ChangeListener
    );//end addChangeListener
    //--------------------------------------------------//

    //Register a ChangeListener object on sliderD.
    //Each time sliderD fires a ChangeEvent, this event
    // handler creates a new display as a copy of the
    // original picture and calls a method named
    // handleSliderD. Note that this is a different
    // method than the method called by the three
    // previous listener objects.
    sliderD.addChangeListener(
      new ChangeListener(){
        public void stateChanged(ChangeEvent e){
          //Draw a new copy of the picture on the display.
          graphics = display.getGraphics();
          graphics.drawImage(picture.getImage(),0,0,null);
          handleSliderD();
        }//end stateChanged
      }//end new ChangeListener
    );//end addChangeListener
    //--------------------------------------------------//

    //Register a ChangeListener object on sliderE.
    //Each time sliderE fires a ChangeEvent, this event
    // handler causes the computer to beep solely to
    // demonstrate that the slider is alive. Note that the
    // beep occurs at the end of the slider travel.
    sliderE.addChangeListener(
      new ChangeListener(){
        public void stateChanged(ChangeEvent e){
          getToolkit().getDefaultToolkit().beep();
        }//end stateChanged
      }//end new ChangeListener
    );//end addChangeListener
    //--------------------------------------------------//

  }//end constructor
  //----------------------------------------------------//

  /*
  This version of the method named handleSliderABandC is
  designed for illustration purposes only. The method
  is called each time sliderA, sliderB, or sliderC fires
  a ChangeEvent.

  Immediately before this method is called, a new
  display is created as a copy of the original picture.
  This method operates only on the display. Each time
  the method is called, it gets the value of each slider
  and uses that value as a multiplicative factor to
  adjust the corresponding color value in everypixel in
  the current display.

  The value of sliderA is used to adjust the red color.
  The value of sliderB is used to adjust the green
  color, and the value of sliderC is used to adjust the
  blue color.

  Depending on the position of the sliders when the event
  is fired, each color value for every pixel in the
  current display will be set to a value ranging from
  zero to 100 percent of its original value.

  Methods that are written to replace this one in your
  programs should never access the original Picture
  object directly, but should confine their operations
  to the Picture object referred to by the variable
  named display.

  The method is synchronized to eliminate the possiblilty
  that it may be called on two threads concurrently.
  */
  private synchronized void handleSliderABandC(){
    //Adjust the values of the colors based on the current
    // values of sliderA, sliderB, and sliderC.
    pixels = display.getPixels();
    for(int cnt = 0;cnt < pixels.length;cnt++){
      red = (int)(pixels[cnt].getRed()
                              * sliderA.getValue()/100.0);
      green = (int)(pixels[cnt].getGreen()
                              * sliderB.getValue()/100.0);
      blue = (int)(pixels[cnt].getBlue()
                              * sliderC.getValue()/100.0);
      pixels[cnt].setColor(new Color(red,green,blue));
    }//end for loop

    display.repaint();

  }//end handleSliderABandC
  //----------------------------------------------------//

  //This method adjusts all three color values for every
  // pixel on the basis of the value of sliderD only.
  //The method is synchronized to eliminate the remote
  // possiblilty that it may be called on two threads
  // concurrently.

  private synchronized void handleSliderD(){
    //Adjust the value of all three colors on the
    // basis of the current value of the sliderD.
    pixels = display.getPixels();
    double scaleFactor = sliderD.getValue()/100.0;

    for(int cnt = 0;cnt < pixels.length;cnt++){
      red = (int)(pixels[cnt].getRed() * scaleFactor);
      green = (int)(pixels[cnt].getGreen()* scaleFactor);
      blue = (int)(pixels[cnt].getBlue() * scaleFactor);
      pixels[cnt].setColor(new Color(red,green,blue));
    }//end for loop

    display.repaint();

  }//end handleSliderD
  //----------------------------------------------------//

}//end class FiveSliderTemplate01
|
Listing 14. Source code for the program named HsbEdit02.
/*File HsbEdit02 Copyright 2009 R.G.Baldwin

This program was written using the template program named
FiveSliderTemplate01 as a starting point. See the comments
in that program for detailed information about the
template.

The purpose of the program is to show you how to perform
HSB color editing on your digital photos.

The program allows the user to specify an image file to be
edited. The user is then presented with a display of the
image being edited and a GUI containing three sliders, a
Write button, and a text field for entry of the file name.

The sliders are labeled Hue, Sat, and Bright. The labels
are abbreviations for Hue, Saturation, and Brightness,
which are the words behind the nomenclature for the HSB
color model.

The user can change any combination of hue, saturation,
and brightness of the image by adjusting the sliders.

At any point, the user can click a Write button on the GUI
and write the processed image in its current state into a
backup file. (Note that only the most recent five backup
files are saved.) When the user terminates the program,
the final processed image is written into a final output
file.

The template program requires access to Ericson's
multimedia library.

Input files of type jpg, bmp, png are supported. The input
image file is not modified.

If the input file is in the same directory as the program
files, only the name and extension must be entered into
the text field. Otherwise, a complete path and file name
with extension must be entered.

Note, that this  program was designed to teach
programming and image processing concepts. It was not
designed to compete on a speed or convenience basis with
commercially-available photograph processing programs such
as Adobe's Photoshop Elements.

The GUI initially appears in the upper-left corner of the
screen. At this point, the sliders and the buttons are all
disabled. When the user enters the name of the input file,
a display of the image contained in that file appears in
the upper-left corner of the screen and the GUI is
relocated to a position immediately below the display.

When the GUI is relocated to the position immediately
below the display, the sliders and the buttons are all
enabled. and the text field is disabled. The width of the
GUI is changed to match the width of the display if
possible.

Clicking the large X in the upper-right corner of the
display does not terminate the program. It simply hides
the display, which is of no practical use.

The program is terminated by clicking the large X in the
upper-right corner of the GUI. Before terminating, the
program writes an output file containing the final state
of the display in the same format as the input file. The
name of the output file is the same as the name of the
input file except that the word FINAL is inserted
immediately ahead of the extension. The final output file
(and all of the backup files) are written into the same
directory from which the image file was originally read.

Tested using Windows Vista Home Premium Edition,
Java 1.6x, and the version of Ericson's multimedia library
contained in bookClasses10-1-07.zip.
*********************************************************/

import java.awt.Graphics;
import java.awt.Image;
import java.awt.BorderLayout;
import java.awt.Color;
import java.awt.event.ActionListener;
import java.awt.event.ActionEvent;
import java.awt.event.WindowAdapter;
import java.awt.event.WindowEvent;

import javax.swing.JFrame;
import javax.swing.JPanel;
import javax.swing.JSlider;
import javax.swing.JLabel;
import javax.swing.JButton;
import javax.swing.JTextField;
import javax.swing.event.ChangeListener;
import javax.swing.event.ChangeEvent;
import javax.swing.WindowConstants;

import java.io.File;

public class HsbEdit02 extends JFrame{
  //The following constants are used to configure the GUI.
  // You can control whether or not the sliders and
  // buttons appear in the GUI, along with the contents of
  // various labels by changing the contents of the
  // following constants.

  //SLIDERS
  //Change the following boolean values to false to
  // selectively exclude sliders
  private final boolean sliderAPanelInclude = true;
  private final boolean sliderBPanelInclude = true;
  private final boolean sliderCPanelInclude = true;
  private final boolean sliderDPanelInclude = false;
  private final boolean sliderEPanelInclude = false;

  //Change the following int values to change the limits
  // and initial positions of the sliders.
  private final int sliderAMin = 0;//minimum
  private final int sliderAMax = 360;//maximum
  private final int sliderAInit = 0;//initial value

  private final int sliderBMin = 0;
  private final int sliderBMax = 400;
  private final int sliderBInit = 100;

  private final int sliderCMin = 0;
  private final int sliderCMax = 200;
  private final int sliderCInit = 100;

  //The following two sliders are not used.
  private final int sliderDMin = 0;
  private final int sliderDMax = 100;
  private final int sliderDInit = 100;

  private final int sliderEMin = 0;
  private final int sliderEMax = 100;
  private final int sliderEInit = 100;

  //Change the following int values to change the tick
  // spacing on the sliders.
  private final int sliderAMajorTickSpacing = 60;
  private final int sliderAMinorTickSpacing = 10;
  private final int sliderBMajorTickSpacing = 50;
  private final int sliderBMinorTickSpacing = 10;
  private final int sliderCMajorTickSpacing = 50;
  private final int sliderCMinorTickSpacing = 10;
  //The following sliders were not used.
  private final int sliderDMajorTickSpacing = 10;
  private final int sliderDMinorTickSpacing = 5;
  private final int sliderEMajorTickSpacing = 10;
  private final int sliderEMinorTickSpacing = 5;

  //Change these string values to change the labels
  // displayed to the left of the sliders.
  private final String sliderALabel = "Hue";
  private final String sliderBLabel = "Sat";
  private final String sliderCLabel = "Bright";
  //The following two sliders were not used
  private final String sliderDLabel = "sliderD";
  private final String sliderELabel = "sliderE";


  //BUTTONS
  //Change the following value to false to exclude all
  // three buttons as a group.
  //None of the three buttons were used.
  private final boolean buttonPanelInclude = false;

  //Change the following values to false to selectively
  // exclude individual buttons
  private final boolean buttonAInclude = true;
  private final boolean buttonBInclude = true;
  private final boolean buttonCInclude = true;

  //Change these string values to change the text on the
  // buttons
  private final String buttonALabel = "buttonA";
  private final String buttonBLabel = "buttonB";
  private final String buttonCLabel = "buttonC";


  //MISCELLANEOUS
  //Change this string to change the text to the left of
  // the text field.
  private final JLabel fileNameLabel =
                                new JLabel("File Name: ");

  //Change this string to change the path and name of the
  // default input file.
  private final String defaultFileName = "HsbEdit02.jpg";
  //----------------------------------------------------//

  //Components for construction of the GUI.
  private final JPanel mainPanel = new JPanel();

  private final JPanel northPanel = new JPanel();
  private final JPanel centerPanel = new JPanel();
  private final JPanel southPanel = new JPanel();

  private final JPanel sliderAPanel = new JPanel();
  private final JPanel sliderBPanel = new JPanel();
  private final JPanel sliderCPanel = new JPanel();
  private final JPanel sliderDPanel = new JPanel();
  private final JPanel sliderEPanel = new JPanel();

  private final JPanel buttonPanel = new JPanel();

  private final JButton writeButton =
                                     new JButton("Write");
  private final JButton buttonA =
                                new JButton(buttonALabel);
  private final JButton buttonB =
                                new JButton(buttonBLabel);
  private final JButton buttonC =
                                new JButton(buttonCLabel);

  //This text field is preloaded with the name of a test
  // file to make testing and debugging easier.
  private JTextField fileNameField =
                          new JTextField(defaultFileName);

  //Change the int values at the beginning of the program
  // to reconfigure these sliders.
  private final JSlider sliderA =
           new JSlider(sliderAMin,sliderAMax,sliderAInit);
  private final JSlider sliderB =
           new JSlider(sliderBMin,sliderBMax,sliderBInit);
  private final JSlider sliderC =
           new JSlider(sliderCMin,sliderCMax,sliderCInit);
  private final JSlider sliderD =
           new JSlider(sliderDMin,sliderDMax,sliderDInit);
  private final JSlider sliderE =
           new JSlider(sliderEMin,sliderEMax,sliderEInit);

  //A reference to the original Picture object will be
  // stored here.
  private Picture picture = null;
  //A reference to a modified copy of the original
  // Picture object will be stored here.
  private Picture display = null;

  //Miscellaneous working variables.
  private Image image = null;
  private Graphics graphics = null;

  private Pixel pixel = null;
  private int red = 0;
  private int green = 0;
  private int blue = 0;
  private int writeCounter = 0;

  private Pixel[] pixels = null;

  private String fileName = null;
  private String outputPath = null;
  private String extension = null;
  //----------------------------------------------------//

  public static void main(String[] args){
    new HsbEdit02();
  }//end main method
  //----------------------------------------------------//

  public HsbEdit02(){//constructor
    //All close operations are handled in a WindowListener
    // object.
    setDefaultCloseOperation(
                     WindowConstants.DO_NOTHING_ON_CLOSE);

    //Put decorations on the sliders. Change the constants
    // at the beginning of the program to control major
    // and minor tick spacing.
    sliderA.setMajorTickSpacing(sliderAMajorTickSpacing);
    sliderA.setMinorTickSpacing(sliderAMinorTickSpacing);
    sliderA.setPaintTicks(true);
    sliderA.setPaintLabels(true);

    sliderB.setMajorTickSpacing(sliderBMajorTickSpacing);
    sliderB.setMinorTickSpacing(sliderBMinorTickSpacing);
    sliderB.setPaintTicks(true);
    sliderB.setPaintLabels(true);

    sliderC.setMajorTickSpacing(sliderCMajorTickSpacing);
    sliderC.setMinorTickSpacing(sliderCMinorTickSpacing);
    sliderC.setPaintTicks(true);
    sliderC.setPaintLabels(true);

    sliderD.setMajorTickSpacing(sliderDMajorTickSpacing);
    sliderD.setMinorTickSpacing(sliderDMinorTickSpacing);
    sliderD.setPaintTicks(true);
    sliderD.setPaintLabels(true);

    sliderE.setMajorTickSpacing(sliderEMajorTickSpacing);
    sliderE.setMinorTickSpacing(sliderEMinorTickSpacing);
    sliderE.setPaintTicks(true);
    sliderE.setPaintLabels(true);

    //Construct the GUI working generally from the top
    // down.
    mainPanel.setLayout(new BorderLayout());

    mainPanel.add(northPanel,BorderLayout.NORTH);
    mainPanel.add(centerPanel,BorderLayout.CENTER);
    mainPanel.add(southPanel,BorderLayout.SOUTH);

    northPanel.setLayout(new BorderLayout());

    //Add sliders if the constants at the beginning of the
    // program are true.
    if(sliderAPanelInclude)
          northPanel.add(sliderAPanel,BorderLayout.NORTH);
    if(sliderBPanelInclude)
         northPanel.add(sliderBPanel,BorderLayout.CENTER);
    if(sliderCPanelInclude)
          northPanel.add(sliderCPanel,BorderLayout.SOUTH);

    centerPanel.setLayout(new BorderLayout());

    //Add more sliders if the constants at the beginning
    // of the program are true.
    if(sliderDPanelInclude)
         centerPanel.add(sliderDPanel,BorderLayout.NORTH);
    if(sliderEPanelInclude)
        centerPanel.add(sliderEPanel,BorderLayout.CENTER);

    //Add a panel containing from one to three buttons if
    // the constant at the beginning of the program is
    // true.
    if(buttonPanelInclude)
          centerPanel.add(buttonPanel,BorderLayout.SOUTH);

    //Add buttons if the constants at the beginning of the
    // program are true.
    if(buttonAInclude) buttonPanel.add(buttonA);
    if(buttonBInclude) buttonPanel.add(buttonB);
    if(buttonCInclude) buttonPanel.add(buttonC);

    //These components should always be added.
    southPanel.add(writeButton);
    southPanel.add(fileNameLabel);
    southPanel.add(fileNameField);

    sliderAPanel.add(new JLabel(sliderALabel));
    sliderAPanel.add(sliderA);

    sliderBPanel.add(new JLabel(sliderBLabel));
    sliderBPanel.add(sliderB);

    sliderCPanel.add(new JLabel(sliderCLabel));
    sliderCPanel.add(sliderC);

    sliderDPanel.add(new JLabel(sliderDLabel));
    sliderDPanel.add(sliderD);

    sliderEPanel.add(new JLabel(sliderELabel));
    sliderEPanel.add(sliderE);

    //Disable the sliders and the buttons until the
    // user enters the file name.
    sliderA.setEnabled(false);
    sliderB.setEnabled(false);
    sliderC.setEnabled(false);
    sliderD.setEnabled(false);
    sliderE.setEnabled(false);

    buttonA.setEnabled(false);
    buttonB.setEnabled(false);
    buttonC.setEnabled(false);
    writeButton.setEnabled(false);

    //Set the size of the GUI and display it in the upper-
    // left corner of the screen. It will be moved later
    // to a position immediately below the display of the
    // picture.
    getContentPane().add(mainPanel);
    pack();//Set to overall preferred size.
    setVisible(true);

    //Move the focus to the text field to make it easy
    // for the user to enter the name of the input file.
    fileNameField.requestFocus();
    //--------------------------------------------------//

    //Register a listener on the text field. When the user
    // enters the file name in the text field, set
    // everything up properly so that the program will
    // function as an event-driven picture-manipulation
    // program until the user clicks the large X in the
    // upper-right of the GUI.
    fileNameField.addActionListener(
      new ActionListener(){
        public void actionPerformed(ActionEvent e){
          //Disable the text field to prevent the user
          // from entering anything else in it.
          fileNameField.setEnabled(false);
          fileNameLabel.setEnabled(false);

          //Get the file name from the text field and use
          // it to create a new Picture object. Display my
          // name in the image.
          fileName = fileNameField.getText();
          picture = new Picture(fileName);
          picture.addMessage("Dick Baldwin",10,20);

          //Get information that will be used to write the
          // output files.
          String inputPath = new File(fileName).
                                        getAbsolutePath();
          int posDot = inputPath.lastIndexOf('.');
          outputPath = inputPath.substring(0,posDot);
          //Write the first copy of the output backup
          // file before any processing is done.
          picture.write(outputPath
                       + "BAK" + writeCounter++ + ".bmp");

          //Get filename extension. It will be used later
          // to write the final output file.
          extension = inputPath.substring(posDot);

          //Decorate the GUI.
          setTitle("Copyright 2009, R.G.Baldwin");

          //Create the picture that will be processed.
          // Note that the original image file is not
          // modified by this program.
          int pictureWidth = picture.getWidth();
          int pictureHeight = picture.getHeight();
          display = new Picture(
                              pictureWidth,pictureHeight);

          //Draw the initial display.
          graphics = display.getGraphics();
          graphics.drawImage(picture.getImage(),0,0,null);
          display.show();

          //Adjust the width of the GUI to match the width
          // of the display if possible. Then relocate the
          // GUI to a position immediately below the
          // display.
          //Establish the preferred size now that the
          // input file name has been entered.
          pack();
          int packedHeight = getHeight();
          int packedWidth = getWidth();
          if((pictureWidth + 7) >= packedWidth){
            //Make the width of the GUI the same as the
            // width of the display.
            setSize(pictureWidth + 7,packedHeight);
          }//Else, just leave the GUI at its current size.
          //Put the GUI in its new location immediately
          // below the display.
          setLocation(0,pictureHeight + 30);

          //Enable the sliders and the buttons.
          sliderA.setEnabled(true);
          sliderB.setEnabled(true);
          sliderC.setEnabled(true);
          sliderD.setEnabled(true);
          sliderE.setEnabled(true);

          buttonA.setEnabled(true);
          buttonB.setEnabled(true);
          buttonC.setEnabled(true);

          writeButton.setEnabled(true);

        }//end actionPerformed
      }//end new ActionListener
    );//end addActionListener
    //--------------------------------------------------//

    //Register an ActionListener on the writeButton.
    // Each time the user clicks the button, a backup bmp
    // file containing the current state of the display is
    // written into the directory from which the original
    // picture was read. The five most recent backup files
    // are saved. The names of the backup files are the
    // same as the name of the input file except that BAKn
    // is inserted immediately ahead of the extension
    // where n is a digit ranging from 0 to 4. The value
    // of n rolls over at 4 and starts back at 0.
    writeButton.addActionListener(
      new ActionListener(){
        public void actionPerformed(ActionEvent e){
          display.write(outputPath
                       + "BAK" + writeCounter++ + ".bmp");
          //Reset the writeCounter if it exceeds 4 to
          // conserve disk space.
          if(writeCounter > 4){
            writeCounter = 0;
          }//end if
        }//end action performed
      }//end newActionListener
    );//end addActionListener
    //--------------------------------------------------//

    //Register an ActionListener on buttonA. This button
    // and this listener are here for future expansion.
    // For demonstration purposes, make the computer beep
    // when the user clicks any of the three buttons.
    buttonA.addActionListener(
      new ActionListener(){
        public void actionPerformed(ActionEvent e){
          getToolkit().getDefaultToolkit().beep();
        }//end action performed
      }//end newActionListener
    );//end addActionListener
    //--------------------------------------------------//
    //Register an ActionListener on buttonB. This button
    // and this listener are here for future expansion.
    buttonB.addActionListener(
      new ActionListener(){
        public void actionPerformed(ActionEvent e){
          getToolkit().getDefaultToolkit().beep();
        }//end action performed
      }//end newActionListener
    );//end addActionListener
    //--------------------------------------------------//
    //Register an ActionListener on buttonC. This button
    // and this listener are here for future expansion.
    buttonC.addActionListener(
      new ActionListener(){
        public void actionPerformed(ActionEvent e){
          getToolkit().getDefaultToolkit().beep();
        }//end action performed
      }//end newActionListener
    );//end addActionListener
    //--------------------------------------------------//

    //Register a WindowListener that will respond when the
    // user clicks the large X in the upper-right corner
    // of the GUI. This event handler will write the final
    // state of the display into an output file of the
    // same type as the original input file. The name will
    // be the same except that the word FINAL will be
    // inserted immediately ahead of the extension.
    addWindowListener(
      new WindowAdapter(){
        public void windowClosing(WindowEvent e){
          display.write(outputPath + "FINAL" + extension);
          System.exit(0);
        }//end windowClosing
      }//end new WindowAdapter
    );//end addWindowListener
    //--------------------------------------------------//

    //Register a ChangeListener object on sliderA.
    //Each time sliderA fires a ChangeEvent, this event
    // handler creates a new display as a copy of the
    // original picture and calls a method named
    // handleSliderABandC. You can modify the code in this
    // listener, the listeners for the other sliders, and
    // the listeners for the buttons to customize the
    // behavior of the program to meet your needs.
    sliderA.addChangeListener(
      new ChangeListener(){
        public void stateChanged(ChangeEvent e){
          //Draw a new copy of the picture on the display.
          graphics = display.getGraphics();
          graphics.drawImage(picture.getImage(),0,0,null);
          handleSliderABandC();
        }//end stateChanged
      }//end new ChangeListener
    );//end addChangeListener
    //--------------------------------------------------//
    //Register a ChangeListener object on sliderB.
    //Each time sliderB fires a ChangeEvent, this event
    // handler creates a new display as a copy of the
    // original picture and calls a method named
    // handleSliderABandC.
    sliderB.addChangeListener(
      new ChangeListener(){
        public void stateChanged(ChangeEvent e){
          //Draw a new copy of the picture on the display.
          graphics = display.getGraphics();
          graphics.drawImage(picture.getImage(),0,0,null);
          handleSliderABandC();
        }//end stateChanged
      }//end new ChangeListener
    );//end addChangeListener
    //--------------------------------------------------//
    //Register a ChangeListener object on sliderC.
    //Each time sliderC fires a ChangeEvent, this event
    // handler creates a new display as a copy of the
    // original picture and calls a method named
    // handleSliderABandC.
    sliderC.addChangeListener(
      new ChangeListener(){
        public void stateChanged(ChangeEvent e){
          //Draw a new copy of the picture on the display.
          graphics = display.getGraphics();
          graphics.drawImage(picture.getImage(),0,0,null);
          handleSliderABandC();
        }//end stateChanged
      }//end new ChangeListener
    );//end addChangeListener
    //--------------------------------------------------//

    //This slider not used
    //Register a ChangeListener object on sliderD.
    //Each time sliderD fires a ChangeEvent, this event
    // handler creates a new display as a copy of the
    // original picture and calls a method named
    // handleSliderD. Note that this is a different
    // method than the method called by the three
    // previous listener objects.
    sliderD.addChangeListener(
      new ChangeListener(){
        public void stateChanged(ChangeEvent e){
          //Draw a new copy of the picture on the display.
          graphics = display.getGraphics();
          graphics.drawImage(picture.getImage(),0,0,null);
          getToolkit().getDefaultToolkit().beep();
        }//end stateChanged
      }//end new ChangeListener
    );//end addChangeListener
    //--------------------------------------------------//

    //This slider not used.
    //Register a ChangeListener object on sliderE.
    //Each time sliderE fires a ChangeEvent, this event
    // handler causes the computer to beep solely to
    // demonstrate that the slider is alive. Note that the
    // beep occurs at the end of the slider travel.
    sliderE.addChangeListener(
      new ChangeListener(){
        public void stateChanged(ChangeEvent e){
          getToolkit().getDefaultToolkit().beep();
        }//end stateChanged
      }//end new ChangeListener
    );//end addChangeListener
    //--------------------------------------------------//

  }//end constructor
  //----------------------------------------------------//

  /*
  This method makes it possible for the user to perform
  HSB color editing on a digital photo. The method is
  called each time any one of the the Hue, Sat, or Bright
  sliders fires a ChangeEvent. Events are fired when the
  user moves the sliders.

  Immediately before this method is called, a new
  display is created, which is a copy of the original
  picture. This method operates only on the display. It
  does not modify the original picture.

  Each time this method is called, it gets the value of
  each slider and uses that value to modify the
  corresponding hue, saturation, and brightness property
  for every pixel in the image currently residing in the
  display.

  Basically, for each pixel, the method does the
  following:
  1. Gets the red, green, and blue values from the native
  RGB color model data for the pixel.
  2. Converts the RGB values into HSB values.
  3. Modifies the HSB values independently of one another
  using the current slider values.
  4. Converts the modified HSB values back to RGB values.
  5. Uses the RGB values to set the modified color into
  the pixel.

  The method is synchronized to eliminate the possiblilty
  that it may be called on two threads concurrently.
  */
  private synchronized void handleSliderABandC(){
    pixels = display.getPixels();
    float[] hsbvals = new float[3];//HSB pixel values.

    //Process every pixel in the image using the same
    // algorithm.
    for(int cnt = 0;cnt < pixels.length;cnt++){
      //Get the red, green, and blue values for the
      // current pixel.
      red = pixels[cnt].getRed();
      green = pixels[cnt].getGreen();
      blue = pixels[cnt].getBlue();

      //Get the three HSB color model values that
      // correspond to the current pixel color expressed
      // in the RGB color model. When the method returns,
      // the three HSB values have been placed in the
      // three-element array referred to by hsbvals in the
      // order hue, saturation, and brightness.
      Color.RGBtoHSB(red,green,blue,hsbvals);

      //Modify the hue value for the pixel based on the
      // current value of the Hue slider. Note that this
      // statement performs addition instead of
      // multiplication.
      hsbvals[0] = (float)(hsbvals[0] +
                           sliderA.getValue()/360.0);//hue

      //Modify the saturation value for the pixel based
      // on the current value of the Sat slider. Note
      // that multiplication is used here.
      hsbvals[1] = (float)(hsbvals[1] *
                    sliderB.getValue()/100.0);//saturation
      //If the computed value is greter than 1.0, clip it
      // at 1.0.
      if(hsbvals[1] > 1.0) hsbvals[1] = (float)1.0;

      //Modify the brightness value for the pixel based
      // on the current value of the Bright slider. Once
      // again, multiplication is used here.
      hsbvals[2] = (float)(hsbvals[2] *
                    sliderC.getValue()/100.0);//brightness
      if(hsbvals[2] > 1.0) hsbvals[2] = (float)1.0;

      //Convert the HSB color values back into RGB color
      // values.
      int color = Color.HSBtoRGB(
                        hsbvals[0],hsbvals[1],hsbvals[2]);

      //Use the RGB color values to set the modified color
      // in the pixel.
      pixels[cnt].setColor(new Color(color));

    }//end for loop

    //Repaint the display.
    display.repaint();

  }//end handleSliderABandC
  //----------------------------------------------------//

}//end class HsbEdit02
|
Copyright 2009, Richard G. Baldwin. Reproduction in whole or in part in any form or medium without express written permission from Richard Baldwin is prohibited.
Richard has participated in numerous consulting projects and he frequently provides onsite training at the high-tech companies located in and around Austin, Texas. He is the author of Baldwin's Programming Tutorials, which have gained a worldwide following among experienced and aspiring programmers. He has also published articles in JavaPro magazine.
In addition to his programming expertise, Richard has many years of practical experience in Digital Signal Processing (DSP). His first job after he earned his Bachelor's degree was doing DSP in the Seismic Research Department of Texas Instruments. (TI is still a world leader in DSP.) In the following years, he applied his programming and DSP expertise to other interesting areas including sonar and underwater acoustics.
Richard holds an MSEE degree from Southern Methodist University and has many years of experience in the application of computer technology to real-world problems.
-end-