Published: March 19,
2009
By Richard G. Baldwin
Java Programming Notes # 358
This lesson is the next in a series (see Resources) designed to teach you how to write Java programs to do things like:
If you have ever wondered how to do these things, you've come to the right place.
If you have studied the earlier lessons in this series, you have learned about Turtle objects and their ability to move around in a world or a picture and to draw lines as they are moving. You have learned all about the World class and you are in the process of learning about the Picture class.
The class named SimplePicture, (which is the superclass of the Picture class), is a large and complex class that defines almost forty methods and several constructors. By learning about some of those constructors and methods, you have learned that objects of the Picture class are useful for much more than simply serving as living quarters for turtles. They are also useful for manipulating images in interesting and complex ways.
Near the end of the previous lesson, I told you that there remained thirteen methods and constructors of the SimplePicture class that were sufficiently interesting or complicated that you would do well to learn about them.
I will explain and illustrate the following three methods and one constructor from the SimplePicture class in this lesson:
The first two methods in the above list involve the application of affine transforms to Picture objects. I will also develop and explain two additional methods that are patterned after the scale method that apply rotation and translation transforms to Picture objects.
Source code listings
A complete listing of Ericson's Picture class is provided in Listing 22 and a listing of Ericson's SimplePicture class is provided in Listing 23. A listing of Ericson's DigitalPicture interface is provided in Listing 24. A listing of the main program that I will present and explain in this lesson is provided in Listing 25.
I recommend that you open another copy of this document in a separate browser window and use the following links to easily find and view the figures and listings while you are reading about them.
I recommend that you also study the other lessons in my extensive collection of online programming tutorials. You will find a consolidated index at www.DickBaldwin.com.
In this series of lessons, I will present and explain many of the classes in a multimedia class library that was developed and released under a Creative Commons Attribution 3.0 United States License (see Resources) by Mark Guzdial and Barbara Ericson at Georgia Institute of Technology. In doing this, I will also present some interesting sample programs that use the library.
I explained how to download, install, and test the multimedia class library in an earlier lesson titled Multimedia Programming with Java, Getting Started (see Resources).
As I mentioned earlier, I will explain and illustrate the following three methods and one constructor from the SimplePicture class in this lesson:
The first two methods in the above list involve the application of affine transforms to Picture objects. I will also develop and explain two additional methods that are patterned after the scale method that apply rotation and translation transforms to Picture objects.
A sample program
I will present and explain a sample program that illustrates the use of the four methods in the above list along with the two new affine-transform related methods that I have developed.
A scale method
We often think of affine transforms as being useful for:
scaling
translation
rotation
The SimplePicture class defines a method that can be used to create a new Picture object that is a scaled version of an existing Picture object. When the show method is called on the new object, the scaled image is displayed in a JFrame object that is the correct size for the size of the new Picture object.
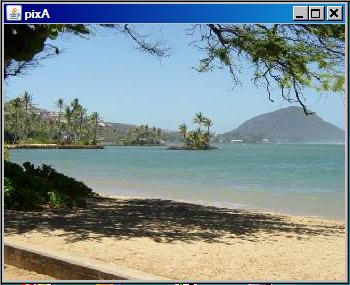
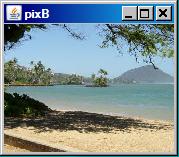
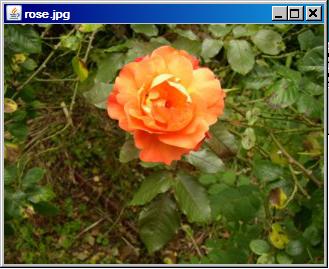
For example, the bottom image in Figure 1 shows a scaled version of the top image. In this case, the Picture object at the top was scaled by a factor of 0.5 in both dimensions to produce the scaled Picture object shown at the bottom.
Figure 1. Before and after the use of the scale method.
|
|
My new rotatePicture method
However, the SimplePicture class doesn't provide similar methods for translation and rotation. One of the new methods that I have developed makes it possible to create a new Picture object that contains a rotated version of an existing Picture object and correctly sizes the new object so that the entire rotated image will show in the picture.
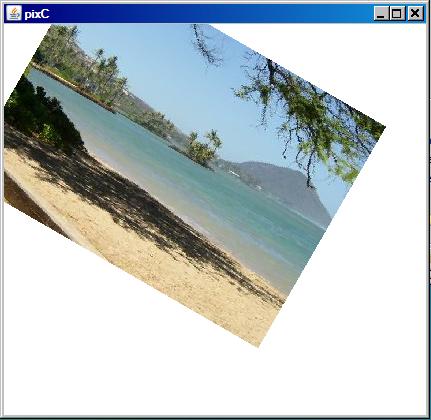
For example, the bottom picture in Figure 2 shows the result of calling the new rotatePicture method to rotate the top picture in Figure 2 clockwise by thirty degrees. (Note that the new rotatePicture method always rotates the source picture around its center point.)
Figure 2. Before and after the use of the rotatePicture method.
|
 |
My new translatePicture method
The other new method that I have developed makes it possible to create a new Picture object that contains a translated version of an existing Picture object and correctly sizes the new object so that the entire translated image will show in the picture. (Only translations in positive horizontal and vertical directions are supported.)
For example, the bottom picture in Figure 3 shows the result of calling the new translatePicture method to translate the top picture to the right by twenty pixels and down by thirty pixels.
Figure 3. Before and after the use of the translatePicture method.
|
 |
Reducing the confusion
Because I will be switching back and forth between code fragments extracted from Ericson's SimplePicture class and code fragments extracted from my sample program, things can get confusing.
In an attempt to reduce the confusion, I will present code fragments from Ericson's SimplePicture class against the background color shown in Listing 1.
Listing 1. Background color for the SimplePicture class.
I will present code fragments from the SimplePicture class against this background color. |
Similarly, I will present code fragments from my sample program against the background color shown in Listing 2.
Listing 2. Background color for the program named Java358a.
I will present code fragments from my sample program with this background color. |
The purpose of this program is to illustrate the use of the following methods of the SimplePicture class:
In addition, the program illustrates the use of the following constructor for the SimplePicture class:
SimplePicture(SimplePicture copyPicture)
Two new affine-transform related methods
The program also defines two new methods named rotatePicture and translatePicture that are patterned after the scale method of the SimplePicture class.
I will describe the behavior of these two methods later when I explain them.
Behavior of the program
The program begins by creating and showing a Picture object based on a specified image file in the current directory. (See the top picture in Figure 1.)
Then the program illustrates the use of the scale method of the SimplePicture class, the new rotatePicture method that is defined in this program, and the new translatePicture method that is also defined in this program.
The Picture object returned from the scale method is shown in the bottom picture of Figure 1. The Picture object returned by the rotatePicture method is shown in the bottom picture of Figure 2, and the Picture object returned by the translatePicture method is shown in the bottom picture of Figure 3. The original picture is shown in the top picture for comparison purposes in all three cases.
Beginning of the program named Java358a
A complete listing of the program named Java358a is provided in Listing 25 near the end of the lesson. I will explain the program in fragments. The program begins in the fragment shown in Listing 3. (Remember that the background color in Listing 3 indicates that the code fragment was extracted from my sample program named Java358a.)
Listing 3. Beginning of the program named Java358a.
import java.awt.Graphics2D;
import java.awt.geom.AffineTransform;
import java.awt.geom.Rectangle2D;

public class Main{
  public static void main(String[] args){
    new Runner().run();
  }//end main method
}//end class Main
|
Listing 3 simply defines an object of a new class named Runner and calls the run method on that object. When the run method returns, the main method will terminate causing the program to terminate.
Beginning of the run method of the Runner class
The beginning of the run method called in Listing 3 is shown in Listing 4.
Listing 4. Beginning of the run method of the Runner class.
class Runner{
  void run(){
    //Construct a new 341x256 Picture object by providing
    // the name of an image file as a parameter to the
    // Picture constructor. Note that the image file is
    // located in the current directory.
    Picture pixA = new Picture("ScaledBeach.jpg");
    pixA.setTitle("pixA");
    pixA.show();
|
You have seen code like this before, so no explanation beyond the embedded comments should be needed.
A reference to a new Picture object is stored in the reference variable named pixA. The screen output produced by Listing 4 is shown in the upper part of Figure 1.
Listing 5 calls the scale method of the SimplePicture class to scale the size of the picture by a factor of 0.5 in both dimensions.
Listing 5. Call the scale method on the Picture object.
    Picture pixB = pixA.scale(0.5,0.5);
    pixB.setTitle("pixB");
    pixB.show();
|
The scale method creates and returns a reference to a new Picture object that is a scaled replica of the Picture object on which the method is called. The reference to the new Picture object is saved in the reference variable named pixB. That reference is used to set a title on the new picture and to show it. The bottom picture in Figure 1 shows the scaled picture object.
Beginning of the scale method of the SimplePicture class
Listing 6 shows the beginning of the scale method of the SimplePicture class. (Remember that the background color in Listing 6 indicates that the code fragment was extracted from the SimplePicture class.)
Listing 6. Beginning of the scale method of the SimplePicture class.
 /**
   * Method to create a new picture by scaling the
   * current picture by the given x and y factors
   * @param xFactor the amount to scale in x
   * @param yFactor the amount to scale in y
   * @return the resulting picture
   */
  public Picture scale(double xFactor, double yFactor){
    // set up the scale tranform
    AffineTransform scaleTransform =
                                    new AffineTransform();
    scaleTransform.scale(xFactor,yFactor);
|
|
Create the scaling transform object
Listing 6 instantiates a new object of the AffineTransform class that will be used later to transform the picture when the image from the current Picture object is copied to a new Picture object.
Prepare the Affine Transform object for scaling
At this point, the new Affine Transform object could be used for a variety of different kinds of transformations. Listing 6 calls the scale method of the AffineTransform class to prepare the transform to be used for scaling. (Simply as a reminder, note that the scale method of the AffineTransform class is different from the scale method of the SimplePicture class.)
Scaling is the simplest of the transform types
While affine transforms can be somewhat difficult to understand, they aren't too difficult to use in Java. Of the three common uses of affine transforms, (scaling, translation, and rotation), scaling is probably the easiest to understand.
Using the terminology for the parameters in Listing 6, when the affine transform referred to by scaleTransform is applied to an existing picture, the position of every point in the picture will be moved to the left or to the right, depending on whether xFactor is less than or greater than 1.0. In other words, the x-coordinate value for the point is multiplied by xFactor. (If xFactor is 1.0, the point isn't moved.)
Similarly, when the scaling transform is applied to the picture, the position of every point will be moved up or down, depending on whether yFactor is less than or greater than 1.0. (The y-coordinate value is multiplied by yFactor.)
|
Scale the current picture by 0.5 in both dimensions
Listing 5 passes values of 0.5 in the call to the scale method for both scaling parameters. This causes every x-coordinate and every y-coordinate to be multiplied by 0.5 causing the bottom picture in Figure 1 to be half the size of the top picture.
Create a new Picture object of the correct size
While it would be possible for the scale method of the Picture class to simply modify the Picture object on which it is called (the current picture), that isn't how the method was designed to behave. Instead, the scale method creates and returns a reference to a new Picture object, which is a scaled replica of the current Picture object.
Listing 7 creates a new, all-white Picture object that will become the scaled replica of the current picture once the image from the current picture is drawn on it.
Listing 7. Create a new Picture object of the correct size.
    Picture result = new Picture(
                           (int) (getWidth() * xFactor),
                           (int) (getHeight() * yFactor));
|
I explained the constructor used in Listing 7 in an earlier lesson in this series.
Draw the current picture on the new Picture object
Listing 8 gets a reference to the graphics context of the new Picture object as type Graphics2D.
Listing 8. Draw the current picture on the new Picture object.
    // get the graphics 2d object to draw on the result
    Graphics graphics = result.getGraphics();
    Graphics2D g2 = (Graphics2D) graphics;

    // draw the current image onto the result image
    // scaled
    g2.drawImage(this.getImage(),scaleTransform,null);

    return result;
  }//end scale method
|
Then Listing 8 extracts the image from the current Picture object and draws it on the new Picture object, applying the affine transform in the process.
Then Listing 8 returns a reference to the new Picture object, which is shown as the bottom picture in Figure 1.
Listing 9 begins by creating a new all-white Picture object that is the same size as the original Picture object, shown as the top picture in Listing 2.
Listing 9. Make a copy of the original Picture object.
    Picture pixC = new Picture(
                        pixA.getWidth(),pixA.getHeight());
    pixC.copyPicture(pixA);
|
Then Listing 9 calls the copyPicture method of the SimplePicture class to copy the image from the original picture (referred to by pixA) into the new Picture object (referred to by pixC).
The copyPicture method of the SimplePicture class
The copyPicture method is shown in its entirety in Listing 10.
Listing 10. The copyPicture method of the SimplePicture class.
 /**
  * Method that will copy all of the passed source
  * picture into the current picture object
  * @param sourcePicture  the picture object to copy
  */
 public void copyPicture(SimplePicture sourcePicture){
   Pixel sourcePixel = null;
   Pixel targetPixel = null;

   // loop through the columns
   for (int sourceX = 0, targetX = 0;
        sourceX < sourcePicture.getWidth() &&
        targetX < this.getWidth();
        sourceX++, targetX++)
   {
     // loop through the rows
     for (int sourceY = 0, targetY = 0;
          sourceY < sourcePicture.getHeight() &&
          targetY < this.getHeight();
          sourceY++, targetY++)
     {
       sourcePixel =
                  sourcePicture.getPixel(sourceX,sourceY);
       targetPixel = this.getPixel(targetX,targetY);
       targetPixel.setColor(sourcePixel.getColor());
     }//end inner loop
   }//end outer loop
 }//end copyPicture method
|
Copy pixels from one picture to another
Using the terminology from Listing 10, the copyPicture method copies all of the pixels in the sourcePicture into the picture on which the method is called (the current picture) by aligning the two pictures at their upper-left corners and then copying the pixels.
The program named Java358b
Because all of the pictures used in the program named Java358a are the same size, that program doesn't provide a very good demonstration of the behavior of the copyPicture method. Therefore, I have provided very simple additional program named Java358b to demonstrate the behavior of the copyPicture method.
The program named Java358b is shown in its entirety in Listing 11.
Listing 11. The program named Java358b.
//Program Java358b
// Demonstrates the behavior of the copyPicture method.
import java.awt.*;
public class Main{
  public static void main(String[] args){
    new Runner().run();
  }//end main method
}//end class Main
//------------------------------------------------------//

class Runner{
  void run(){
    Picture beach = new Picture("ScaledBeach.jpg");
    Picture rose = new Picture("rose.jpg");
    beach.copyPicture(rose);
//    rose.copyPicture(beach);
    beach.show();
    rose.show();
  }//end run method
}//end Runner class
|
Two Picture objects of different sizes
This program creates two Picture objects and stores references to the two objects in the reference variables named beach and rose. The dimensions of the beach picture are larger than the dimensions of the rose picture.
Result of copying the rose picture into the beach picture
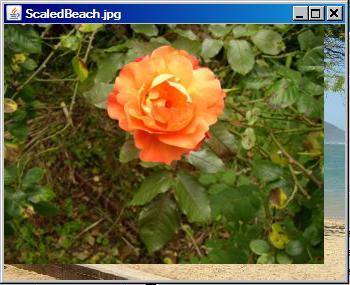
Then Listing 11 calls the copyPicture method of the SimplePicture class to copy the picture of the rose into the picture of the beach. The result is shown in Figure 4.
Figure 4. Result of copying the rose picture into the beach picture.
 |
 |
The sourcePicture and the current picture
Using the terminology from Listing 10, the sourcePicture in Listing 11 is the picture of the rose and the current picture is the picture of the beach.
As you can see in the bottom picture in Figure 4, the smaller picture of the rose is aligned with the upper-left corner of the larger picture of the beach. All of the pixels belonging to the picture of the beach that overlap the picture of the rose are replaced by pixels from the picture of the rose. However, the pixels from the beach picture that are outside the dimensions of the rose picture remain unchanged.
Result of copying the beach picture into the rose picture
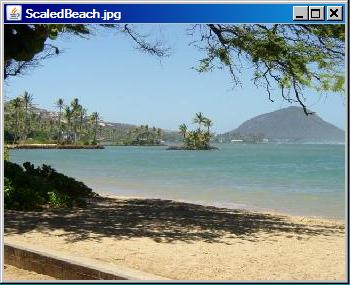
Note that the call to the copyPicture method is Listing 11 is followed immediately by a comment that contains another call to the copyPicture method. If the first call to the copyPicture method in Listing 11 is disabled and the comment that follows is enabled as a statement, the picture of the beach becomes the sourcePicture and the picture of the rose becomes the current picture. When this version of the program is compiled and executed, it produces the two output pictures shown in Figure 5.
Figure 5. Result of copying the beach picture into the rose picture.
 |
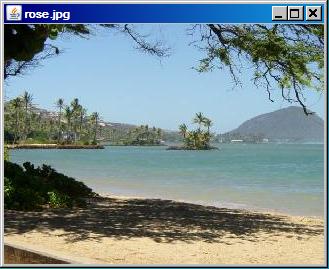 |
Beach picture replaces all pixels in the rose picture
In this case, the picture of the beach is the larger of the two pictures. However, the size of the rose picture is not changed. Therefore, pixels from the beach picture replace all of the pixels in the rose picture causing the bottom picture in Figure 5 to simply be a picture of a smaller area of the beach. Once again, the two pictures were aligned at their upper-left corner before the copy operation was performed.
Getting back to the source code for copyPicture...
Getting back to the source code for the copyPicture method in Listing 10, and knowing what you now know, you should have no difficulty understanding how the code in Listing 10 produces the behavior described above.
Getting back to the program named Java358a...
You should also have no difficulty understanding that the code in Listing 9 causes the Picture object referred to by pixC to be an exact replica of the original Picture object referred to by pixA, which is shown by the top picture in Figure 2.
Call the new rotatePicture method
Listing 12 calls the new rotatePicture method to create and return a new Picture object that contains the image from pixC rotated by 30-degrees clockwise around its center and translated to the center of the new Picture object. (In this case, the reference to the rotated picture is stored in the reference variable named pixC replacing the reference to the non-rotated version of pixC.)
Listing 12. Call the new rotatePicture method.
    pixC = rotatePicture(pixC,30.0);
    pixC.setTitle("pixC");
    pixC.show();
|
Listing 12 also sets a title on and displays the rotated picture, producing the screen output shown in the bottom picture of Figure 2.
The size of the new Picture object
As you can see in Figure 2, the size of the new Picture object is such that each corner of the rotated picture almost touches the edge of the new picture just inside the border of the JFrame. (See the earlier lesson titled The show Method and the PictureFrame Class: Multimedia Programming with Java, in Resources for information regarding the part that the JFrame object plays in Figure 2.)
Beginning of the rotatePicture method
Recall that the rotatePicture method is not defined in the SimplePicture class. Instead, this is a method that I have developed and patterned after the scale method of the SimplePicture class. Therefore, I will put the explanation of the run method in Listing 12 on the back burner while I explain the method named rotatePicture, which begins in Listing 13.
Listing 13. Beginning of the rotatePicture method.
  public Picture rotatePicture(Picture pix,double angle){

    //Set up the rotation transform
    AffineTransform rotateTransform =
                                    new AffineTransform();
    rotateTransform.rotate(Math.toRadians(angle),
                           pix.getWidth()/2,
                           pix.getHeight()/2);
|
The rotatePicture method accepts a reference to a Picture object, along with a rotation angle in degrees. It creates and returns a new Picture object that is of the correct size to contain and display the incoming picture after it has been rotated around its center by the specified rotation angle and translated to the center of the new Picture object.
A new AffineTransform object
Listing 13 begins by creating a new AffineTransform object. As mentioned earlier in conjunction with Listing 6, the transform object could be used to perform a variety of different types of transformations at this point.
Prepare for rotation
Then Listing 13 calls one of the overloaded rotate methods of the AffineTransform class to prepare the transform to be used to rotate a picture around a specified anchor point.
This version of the rotate method requires three parameters that define the angle of rotation in radians along with the horizontal and vertical coordinates of the point in the picture (anchor point) around which the picture will be rotated. Listing 13 specifies the anchor point to be located at the center of the picture.
Get the required dimensions
As you can see in Figure 2, the required dimensions of the picture that will contain the rotated picture will always be different from the dimensions of the original picture (unless the rotation angle is zero degrees or is ninety degrees for square pictures).
Listing 14 calls the getTransformEnclosingRect method of the SimplePicture class to get a reference to an object of the Rectangle2D class that is of the correct size to contain the rotated picture. Then Listing 14 calls the getWidth and getHeight methods on the rectangle to get and save the dimensions of the rectangle. These dimensions will be used later to create a new Picture object having the same dimensions.
Listing 14. Get the required dimensions.
    //Get the required dimensions of a rectangle that will
    // contain the rotated image.
    Rectangle2D rectangle2D =
           pix.getTransformEnclosingRect(rotateTransform);
    int resultWidth = (int)(rectangle2D.getWidth());
    int resultHeight = (int)(rectangle2D.getHeight());
|
The getTransformEnclosingRect method of the SimplePicture class
This method receives a reference to an AffineTransform object and returns a reference to a Rectangle2D object of sufficient size to contain the picture resulting from the application of the transform to the picture on which the method is called.
Listing 15. The getTransformEnclosingRect method of the SimplePicture class.
  /**
   * Method to get the coordinates of the enclosing
   * rectangle after this transformation is applied to
   * the current picture
   * @return the enclosing rectangle
   */
  public Rectangle2D getTransformEnclosingRect(
                                   AffineTransform trans){
    int width = getWidth();
    int height = getHeight();
    double maxX = width - 1;
    double maxY = height - 1;
    double minX, minY;
    Point2D.Double p1 = new Point2D.Double(0,0);
    Point2D.Double p2 = new Point2D.Double(maxX,0);
    Point2D.Double p3 = new Point2D.Double(maxX,maxY);
    Point2D.Double p4 = new Point2D.Double(0,maxY);
    Point2D.Double result = new Point2D.Double(0,0);
    Rectangle2D.Double rect = null;

    // get the new points and min x and y and max x and y
    trans.deltaTransform(p1,result);
    minX = result.getX();
    maxX = result.getX();
    minY = result.getY();
    maxY = result.getY();
    trans.deltaTransform(p2,result);
    minX = Math.min(minX,result.getX());
    maxX = Math.max(maxX,result.getX());
    minY = Math.min(minY,result.getY());
    maxY = Math.max(maxY,result.getY());
    trans.deltaTransform(p3,result);
    minX = Math.min(minX,result.getX());
    maxX = Math.max(maxX,result.getX());
    minY = Math.min(minY,result.getY());
    maxY = Math.max(maxY,result.getY());
    trans.deltaTransform(p4,result);
    minX = Math.min(minX,result.getX());
    maxX = Math.max(maxX,result.getX());
    minY = Math.min(minY,result.getY());
    maxY = Math.max(maxY,result.getY());

    // create the bounding rectangle to return
    rect = new Rectangle2D.Double(
              minX,minY,maxX - minX + 1, maxY - minY + 1);
    return rect;
  }//end getTransformEnclosingRect method
|
Will leave as an exercise for the student
The getTransformEnclosingRect method is long and complex, making heavy use of the deltaTransform method of the AffineTransform class. I am going to leave it as an exercise for the student to study the AffineTransform class in sufficient detail to understand how this method is able to determine the required size of the enclosing rectangle.
Result of rotation without translation
Simply rotating the picture around its center won't get the job done. If I were to take that approach without also translating the picture to the center of the new Picture object, the result would be as shown in Figure 6. (Compare Figure 6 with the bottom picture in Figure 2.)
Figure 6. Result of rotation without translation.
|
|
Therefore, in order to do the job correctly, it is also necessary to translate the picture an appropriate distance to the right and an appropriate distance down the screen to center it in the new Picture object.
Prepare a translation transform
Listing 16 begins by creating a new AffineTransform object.
Listing 16. Prepare a translation transform.
    //Set up the translation transform that will translate
    // the rotated image to the center of the new Picture
    // object.
    AffineTransform translateTransform =
                                    new AffineTransform();
    translateTransform.translate(
                      (resultWidth - pix.getWidth())/2,
                      (resultHeight - pix.getHeight())/2);
|
Then Listing 16 calls the translate method of the AffineTransform class on the transform object to prepare it for use in translating the picture.
The translate method requires two incoming parameters that specify the horizontal and vertical translation distances. In this case, the correct translation distances are computed using the width and the height of the picture along with the resultWidth and resultHeight values computed in Listing 14.
Create a concatenated AffineTransform object
This is where things get really interesting. One way to accomplish the desired result would be to first apply the rotation transform to the current picture and then to apply the translation transform to the rotated picture. However, that isn't the best way.
It is a characteristic of affine transforms that exactly the same result can be obtained by first concatenating the two transforms and then applying the resulting single AffineTransform to the picture. The combined transform object that I will apply to the picture is created in Listing 17.
Listing 17. Create a concatenated AffineTransform object.
translateTransform.concatenate(rotateTransform);
|
Listing 17 calls the concatenate method of the AffineTransform class to produce a new transform object in which the picture will first be rotated around its center and then translated to the center of the new Picture object.
Result of the wrong order of concatenation
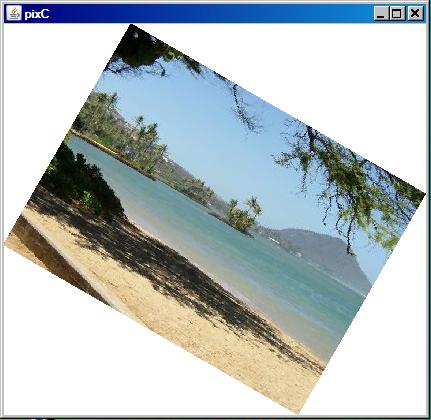
As simple as this sounds, it is very easy to get it wrong. The ability to get the correct results depends on getting the order of concatenation correct. For example, Figure 7 shows the result of concatenating the two transforms in the wrong order. (This result was produced by reversing the order of translateTransform and rotateTransform in Listing 17 and later applying rotateTransform to the picture in place of translateTransform.)
If you compare Figure 7 with Figure 2, you should be able to see why it isn't correct.
Figure 7. Result of the wrong order of concatenation.
|
|
Create a new picture and draw the rotated picture in it
Listing 18 begins by creating a new all-white Picture object of the correct size as determined by the code in Listing 14.
Listing 18. Create a new picture and draw the rotated picture in it.
    //Create a new Picture object to contain the results
    // of the transformation.
    Picture result = new Picture(
                                resultWidth,resultHeight);

    //Get the graphics context of the new Picture object,
    // apply the transform to the incoming picture and
    // draw the transformed picture on the new Picture
    // object.
    Graphics2D g2 = (Graphics2D)result.getGraphics();
    g2.drawImage(pix.getImage(),translateTransform,null);

    return result;
  }//end rotatePicture
|
Then Listing 18 draws the image from the current picture into the new Picture object, applying the combined transform object in the process. It returns a reference to the new rotated and translated Picture object. This produces the picture shown in the bottom of Figure 2.
Rotation is the most complicated
As you may have concluded, the use of an AffineTransform object to rotate a picture is much more complex than simply scaling a picture, particularly when translation is also involved. In that case, the correct order of rotation and translation is critical.
Returning now to the run method, Listing 19 calls the translatePicture method to create and return a new Picture object that contains the image from pixA translated by 20 pixels in the x-dimension and 30 pixels in the y-dimension
The size of the new Picture object is such that there is whitespace above and to the left of the translated image (as shown by the bottom picture in Figure 3) where the amount of whitespace equals the space that was vacated by translating the image to the right and down.
Listing 19. Call the translatePicture method.
    Picture pixD = translatePicture(pixA,20,30);
    pixD.setTitle("pixD");
    pixD.show();

  }//end run method
|
Then Listing 19 sets a title and displays the new translated picture as shown by the bottom picture in Figure 3.
The translatePicture method
The translatePicture method, shown in its entirety in Listing 20, receives a reference to a Picture object along with positive x and y translation values. (The method does not support translation in negative directions. If either translation value is negative, the method simply returns a reference to a copy of the original picture.)
The translatePicture method creates and returns a new Picture object that contains a translated version of the received picture with whitespace to the left of and/or above the translated image.
Listing 20. The translatePicture method.
  public Picture translatePicture(
                         Picture pix,double tx,double ty){
    if((tx < 0.0) || (ty < 0.0)){
      //Negative translation values are not supported.
      // Simply return a reference to a copy of the
      // incoming picture. Note that this constructor
      // creates a new picture by copying the image from
      // an existing picture.
      return new Picture(pix);
    }//end if

    //Set up the tranform
    AffineTransform translateTransform =
                                    new AffineTransform();
    translateTransform.translate(tx,ty);

    //Compute the size of a rectangle that is of
    // sufficient size to contain and display the
    // translated image.
    int pixWidth = pix.getWidth() + (int)tx;
    int pixHeight = pix.getHeight() + (int)ty;

    //Create a new picture object that is the correct
    // size.
    Picture result = new Picture(pixWidth,pixHeight);

    //Get the graphics2D object to draw on the result.
    Graphics2D g2 = (Graphics2D)result.getGraphics();

    //Draw the translated image from pix onto the new
    // Picture object, applying the transform in the
    // process.
    g2.drawImage(pix.getImage(),translateTransform,null);

    return result;
  }//end translatePicture
  //----------------------------------------------------//

}//end class Runner
|
Only the constructor is new
The only code in Listing 20 that is significantly different from code that I have explained before is the call to the Picture constructor passing a reference to a Picture object as a parameter. This constructor creates a new Picture object that is a replica of the Picture object received as a parameter.
An overloaded constructor of the SimplePicture class
This overloaded constructor for the Picture class is shown in Listing 21.
Listing 21. An overloaded constructor of the SimplePicture class.
 /**
  * A Constructor that takes a picture to copy
  * information from
  * @param copyPicture the picture to copy from
  */
 public SimplePicture(SimplePicture copyPicture){
   if (copyPicture.fileName != null){
      this.fileName = new String(copyPicture.fileName);
      this.extension = copyPicture.extension;
   }//end if
   if (copyPicture.title != null)
      this.title = new String(copyPicture.title);
   if (copyPicture.bufferedImage != null){
     this.bufferedImage =
                 new BufferedImage(copyPicture.getWidth(),
                                  copyPicture.getHeight(),
                              BufferedImage.TYPE_INT_RGB);
     this.copyPicture(copyPicture);
   }//end if
 }//end constructor
|
All of the code in Listing 21 is similar to code that I have previously explained. Therefore, no further explanation of Listing 21 should be required.
The end of the program
Listing 19 signals the end of the run method. Listing 20 signals the end of the Runner class, which in turn signals the end of the program.
I encourage you to copy the code from Listing 25, compile the code, and execute it. Experiment with the code, making changes, and observing the results of your changes. Make certain that you can explain why your changes behave as they do.
In this lesson, you learned how to use three different methods, which in turn use affine transforms, to scale, rotate, and translate Picture objects.
I explained and illustrated the following three methods and one overloaded constructor from the SimplePicture class in this lesson:
The first two methods in the above list involve the application of affine transforms to Picture objects.
I also developed and explained two additional methods that are patterned after the scale method. These two methods apply rotation and translation transforms to Picture objects.
In the next lesson, I will complete my explanation of the SimplePicture class by explaining and illustrating the following six methods:
You will learn how to cause two or more pictures to have the same width or the same height and otherwise maintain their individual aspect ratios, how to create composite pictures containing side-by-side images, how to draw text on a picture, and how to apply the same operation to every pixel in a Picture object.
Listing 22. Source code for Ericson's Picture class.
import java.awt.*;
import java.awt.font.*;
import java.awt.geom.*;
import java.awt.image.BufferedImage;
import java.text.*;

/**
 * A class that represents a picture.  This class inherits
 * from SimplePicture and allows the student to add
 * functionality to the Picture class.
 *
 * Copyright Georgia Institute of Technology 2004-2005
 * @author Barbara Ericson ericson@cc.gatech.edu
 */
public class Picture extends SimplePicture
{
  ///////////////////// constructors /////////////////////

  /**
   * Constructor that takes no arguments
   */
  public Picture ()
  {
    /* not needed but use it to show students the implicit
     * call to super()
     * child constructors always call a parent constructor
     */
    super();
  }

  /**
   * Constructor that takes a file name and creates the
   * picture
   * @param fileName the name of the file to create the
   * picture from
   */
  public Picture(String fileName)
  {
    // let the parent class handle this fileName
    super(fileName);
  }

  /**
   * Constructor that takes the width and height
   * @param width the width of the desired picture
   * @param height the height of the desired picture
   */
  public Picture(int width, int height)
  {
    // let the parent class handle this width and height
    super(width,height);
  }

  /**
   * Constructor that takes a picture and creates a
   * copy of that picture
   */
  public Picture(Picture copyPicture)
  {
    // let the parent class do the copy
    super(copyPicture);
  }

  /**
   * Constructor that takes a buffered image
   * @param image the buffered image to use
   */
  public Picture(BufferedImage image)
  {
    super(image);
  }

  ////////////////////// methods /////////////////////////

  /**
   * Method to return a string with information about this
   * picture.
   * @return a string with information about the picture
   * such as fileName, height and width.
   */
  public String toString()
  {
    String output =
      "Picture, filename " + getFileName() +
      " height " + getHeight()
      + " width " + getWidth();
    return output;

  }

} // this } is the end of class Picture, put all new
  // methods before this
|
Listing 23. Source code for Ericson's SimplePicture class.
import javax.imageio.ImageIO;
import java.awt.image.BufferedImage;
import javax.swing.ImageIcon;
import java.awt.*;
import java.io.*;
import java.awt.geom.*;

/**
 * A class that represents a simple picture.  A simple
 * picture may have an associated file name and a title.
 * A simple picture has pixels, width, and height.  A
 * simple picture uses a BufferedImage to hold the pixels.
 * You can show a simple picture in a PictureFrame (a
 * JFrame).
 *
 * Copyright Georgia Institute of Technology 2004
 * @author Barb Ericson ericson@cc.gatech.edu
 */
public class SimplePicture implements DigitalPicture
{

  /////////////////////// Fields /////////////////////////

  /**
   * the file name associated with the simple picture
   */
  private String fileName;

  /**
   * the title of the simple picture
   */
  private String title;

  /**
   * buffered image to hold pixels for the simple picture
   */
  private BufferedImage bufferedImage;

  /**
   * frame used to display the simple picture
   */
  private PictureFrame pictureFrame;

  /**
   * extension for this file (jpg or bmp)
   */
  private String extension;


 /////////////////////// Constructors ////////////////////

 /**
  * A Constructor that takes no arguments.  All fields
  * will be null. A no-argument constructor must be given
  * in order for a class to be able to be subclassed.  By
  * default all subclasses will implicitly call this in
  * their parent's no argument constructor unless a
  * different call to super() is explicitly made as the
  * first line of code in a constructor.
  */
 public SimplePicture()
 {this(200,100);}

 /**
  * A Constructor that takes a file name and uses the
  * file to create a picture
  * @param fileName the file name to use in creating the
  * picture
  */
 public SimplePicture(String fileName)
 {

   // load the picture into the buffered image
   load(fileName);

 }

 /**
  * A constructor that takes the width and height desired
  * for a picture and creates a buffered image of that
  * size.  This constructor doesn't  show the picture.
  * @param width the desired width
  * @param height the desired height
  */
 public  SimplePicture(int width, int height)
 {
   bufferedImage = new BufferedImage(
               width, height, BufferedImage.TYPE_INT_RGB);
   title = "None";
   fileName = "None";
   extension = "jpg";
   setAllPixelsToAColor(Color.white);
 }

 /**
  * A constructor that takes the width and height desired
  * for a picture and creates a buffered image of that
  * size.  It also takes the color to use for the
  * background of the picture.
  * @param width the desired width
  * @param height the desired height
  * @param theColor the background color for the picture
  */
 public  SimplePicture(
                    int width, int height, Color theColor)
 {
   this(width,height);
   setAllPixelsToAColor(theColor);
 }

 /**
  * A Constructor that takes a picture to copy
  * information from
  * @param copyPicture the picture to copy from
  */
 public SimplePicture(SimplePicture copyPicture)
 {
   if (copyPicture.fileName != null)
   {
      this.fileName = new String(copyPicture.fileName);
      this.extension = copyPicture.extension;
   }
   if (copyPicture.title != null)
      this.title = new String(copyPicture.title);
   if (copyPicture.bufferedImage != null)
   {
     this.bufferedImage =
                 new BufferedImage(copyPicture.getWidth(),
                                  copyPicture.getHeight(),
                              BufferedImage.TYPE_INT_RGB);
     this.copyPicture(copyPicture);
   }
 }

 /**
  * A constructor that takes a buffered image
  * @param image the buffered image
  */
 public SimplePicture(BufferedImage image)
 {
   this.bufferedImage = image;
   title = "None";
   fileName = "None";
   extension = "jpg";
 }

 ////////////////////////// Methods //////////////////////

 /**
  * Method to get the extension for this picture
  * @return the extendsion (jpg or bmp)
  */
 public String getExtension() { return extension; }


 /**
  * Method that will copy all of the passed source
  * picture into the current picture object
  * @param sourcePicture  the picture object to copy
  */
 public void copyPicture(SimplePicture sourcePicture)
 {
   Pixel sourcePixel = null;
   Pixel targetPixel = null;

   // loop through the columns
   for (int sourceX = 0, targetX = 0;
        sourceX < sourcePicture.getWidth() &&
        targetX < this.getWidth();
        sourceX++, targetX++)
   {
     // loop through the rows
     for (int sourceY = 0, targetY = 0;
          sourceY < sourcePicture.getHeight() &&
          targetY < this.getHeight();
          sourceY++, targetY++)
     {
       sourcePixel =
                  sourcePicture.getPixel(sourceX,sourceY);
       targetPixel = this.getPixel(targetX,targetY);
       targetPixel.setColor(sourcePixel.getColor());
     }
   }

 }

 /**
  * Method to set the color in the picture to the passed
  * color
  * @param color the color to set to
  */
 public void setAllPixelsToAColor(Color color)
 {
   // loop through all x
   for (int x = 0; x < this.getWidth(); x++)
   {
     // loop through all y
     for (int y = 0; y < this.getHeight(); y++)
     {
       getPixel(x,y).setColor(color);
     }
   }
 }

 /**
  * Method to get the buffered image
  * @return the buffered image
  */
 public BufferedImage getBufferedImage()
 {
    return bufferedImage;
 }

 /**
  * Method to get a graphics object for this picture to
  * use to draw on
  * @return a graphics object to use for drawing
  */
 public Graphics getGraphics()
 {
   return bufferedImage.getGraphics();
 }

 /**
  * Method to get a Graphics2D object for this picture
  * which can be used to do 2D drawing on the picture
  */
 public Graphics2D createGraphics()
 {
   return bufferedImage.createGraphics();
 }

 /**
  * Method to get the file name associated with the
  * picture
  * @return  the file name associated with the picture
  */
 public String getFileName() { return fileName; }

 /**
  * Method to set the file name
  * @param name the full pathname of the file
  */
 public void setFileName(String name)
 {
   fileName = name;
 }

 /**
  * Method to get the title of the picture
  * @return the title of the picture
  */
 public String getTitle()
 { return title; }

 /**
  * Method to set the title for the picture
  * @param title the title to use for the picture
  */
 public void setTitle(String title)
 {
   this.title = title;
   if (pictureFrame != null)
       pictureFrame.setTitle(title);
 }

 /**
  * Method to get the width of the picture in pixels
  * @return the width of the picture in pixels
  */
 public int getWidth(){ return bufferedImage.getWidth(); }

 /**
  * Method to get the height of the picture in pixels
  * @return  the height of the picture in pixels
  */
 public int getHeight(){
  return bufferedImage.getHeight();
 }

 /**
  * Method to get the picture frame for the picture
  * @return the picture frame associated with this
  * picture (it may be null)
  */
 public PictureFrame getPictureFrame()
                                  { return pictureFrame; }

 /**
  * Method to set the picture frame for this picture
  * @param pictureFrame the picture frame to use
  */
 public void setPictureFrame(PictureFrame pictureFrame)
 {
   // set this picture objects' picture frame to the
   // passed one
   this.pictureFrame = pictureFrame;
 }

 /**
  * Method to get an image from the picture
  * @return  the buffered image since it is an image
  */
 public Image getImage()
 {
   return bufferedImage;
 }

 /**
  * Method to return the pixel value as an int for the
  * given x and y location
  * @param x the x coordinate of the pixel
  * @param y the y coordinate of the pixel
  * @return the pixel value as an integer (alpha, red,
  * green, blue)
  */
 public int getBasicPixel(int x, int y)
 {
    return bufferedImage.getRGB(x,y);
 }

 /**
  * Method to set the value of a pixel in the picture
  * from an int
  * @param x the x coordinate of the pixel
  * @param y the y coordinate of the pixel
  * @param rgb the new rgb value of the pixel (alpha, red,
  * green, blue)
  */
 public void setBasicPixel(int x, int y, int rgb)
 {
   bufferedImage.setRGB(x,y,rgb);
 }

 /**
  * Method to get a pixel object for the given x and y
  * location
  * @param x  the x location of the pixel in the picture
  * @param y  the y location of the pixel in the picture
  * @return a Pixel object for this location
  */
 public Pixel getPixel(int x, int y)
 {
   // create the pixel object for this picture and the
   // given x and y location
   Pixel pixel = new Pixel(this,x,y);
   return pixel;
 }

 /**
  * Method to get a one-dimensional array of Pixels for
  * this simple picture
  * @return a one-dimensional array of Pixel objects
  * starting with y=0
  * to y=height-1 and x=0 to x=width-1.
  */
 public Pixel[] getPixels()
 {
   int width = getWidth();
   int height = getHeight();
   Pixel[] pixelArray = new Pixel[width * height];

   // loop through height rows from top to bottom
   for (int row = 0; row < height; row++)
     for (int col = 0; col < width; col++)
       pixelArray[row * width + col] =
                                  new Pixel(this,col,row);

   return pixelArray;
 }


 /**
  * Method to load the buffered image with the passed
  * image
  * @param image  the image to use
  */
 public void load(Image image)
 {
   // get a graphics context to use to draw on the
   // buffered image
   Graphics2D graphics2d = bufferedImage.createGraphics();

   // draw the image on the buffered image starting
   // at 0,0
   graphics2d.drawImage(image,0,0,null);

   // show the new image
   show();
 }

 /**
  * Method to show the picture in a picture frame
  */
 public void show()
 {
    // if there is a current picture frame then use it
   if (pictureFrame != null)
     pictureFrame.updateImageAndShowIt();

   // else create a new picture frame with this picture
   else
     pictureFrame = new PictureFrame(this);
 }

 /**
  * Method to hide the picture
  */
 public void hide()
 {
   if (pictureFrame != null)
     pictureFrame.setVisible(false);
 }

 /**
  * Method to make this picture visible or not
  * @param flag true if you want it visible else false
  */
 public void setVisible(boolean flag)
 {
   if (flag)
     this.show();
   else
     this.hide();
 }

 /**
  * Method to open a picture explorer on a copy of this
  * simple picture
  */
 public void explore()
 {
   // create a copy of the current picture and explore it
   new PictureExplorer(new SimplePicture(this));
 }

 /**
  * Method to force the picture to redraw itself.  This is
  * very useful after you have changed the pixels in a
  * picture.
  */
 public void repaint()
 {
   // if there is a picture frame tell it to repaint
   if (pictureFrame != null)
     pictureFrame.repaint();

   // else create a new picture frame
   else
     pictureFrame = new PictureFrame(this);
 }

 /**
  * Method to load the picture from the passed file name
  * @param fileName the file name to use to load the
  * picture from
  */
 public void loadOrFail(
                       String fileName) throws IOException
 {
    // set the current picture's file name
   this.fileName = fileName;

   // set the extension
   int posDot = fileName.indexOf('.');
   if (posDot >= 0)
     this.extension = fileName.substring(posDot + 1);

   // if the current title is null use the file name
   if (title == null)
     title = fileName;

   File file = new File(this.fileName);

   if (!file.canRead())
   {
     // try adding the media path
     file = new File(
                 FileChooser.getMediaPath(this.fileName));
     if (!file.canRead())
     {
       throw new IOException(this.fileName + " could not"
       + " be opened. Check that you specified the path");
     }
   }

   bufferedImage = ImageIO.read(file);
 }


 /**
  * Method to write the contents of the picture to a file
  * with the passed name without throwing errors
  * (THIS MAY NOT BE A VALID DESCRIPTION - RGB)
  * @param fileName the name of the file to write the
  * picture to
  * @return true if success else false
  */
 public boolean load(String fileName)
 {
     try {
         this.loadOrFail(fileName);
         return true;

     } catch (Exception ex) {
         System.out.println("There was an error trying"
                                + " to open " + fileName);
         bufferedImage = new BufferedImage(600,200,
                              BufferedImage.TYPE_INT_RGB);
         addMessage("Couldn't load " + fileName,5,100);
         return false;
     }

 }


 /**
  * Method to load the picture from the passed file name
  * this just calls load(fileName) and is for name
  * compatibility
  * @param fileName the file name to use to load the
  * picture from
  * @return true if success else false
  */
 public boolean loadImage(String fileName)
 {
     return load(fileName);
}

 /**
  * Method to draw a message as a string on the buffered
  * image
  * @param message the message to draw on the buffered
  * image
  * @param xPos  the leftmost point of the string in x
  * @param yPos  the bottom of the string in y
  */
 public void addMessage(
                       String message, int xPos, int yPos)
 {
   // get a graphics context to use to draw on the
   // buffered image
   Graphics2D graphics2d = bufferedImage.createGraphics();

   // set the color to white
   graphics2d.setPaint(Color.white);

   // set the font to Helvetica bold style and size 16
   graphics2d.setFont(new Font("Helvetica",Font.BOLD,16));

   // draw the message
   graphics2d.drawString(message,xPos,yPos);

 }

 /**
  * Method to draw a string at the given location on the
  * picture
  * @param text the text to draw
  * @param xPos the left x for the text
  * @param yPos the top y for the text
  */
 public void drawString(String text, int xPos, int yPos)
 {
   addMessage(text,xPos,yPos);
 }

 /**
   * Method to create a new picture by scaling the
   * current picture by the given x and y factors
   * @param xFactor the amount to scale in x
   * @param yFactor the amount to scale in y
   * @return the resulting picture
   */
  public Picture scale(double xFactor, double yFactor)
  {
    // set up the scale tranform
    AffineTransform scaleTransform =
                                    new AffineTransform();
    scaleTransform.scale(xFactor,yFactor);

    // create a new picture object that is the right size
    Picture result = new Picture(
                           (int) (getWidth() * xFactor),
                           (int) (getHeight() * yFactor));

    // get the graphics 2d object to draw on the result
    Graphics graphics = result.getGraphics();
    Graphics2D g2 = (Graphics2D) graphics;

    // draw the current image onto the result image
    // scaled
    g2.drawImage(this.getImage(),scaleTransform,null);

    return result;
  }

  /**
   * Method to create a new picture of the passed width.
   * The aspect ratio of the width and height will stay
   * the same.
   * @param width the desired width
   * @return the resulting picture
   */
  public Picture getPictureWithWidth(int width)
  {
    // set up the scale tranform
    double xFactor = (double) width / this.getWidth();
    Picture result = scale(xFactor,xFactor);
    return result;
  }

  /**
   * Method to create a new picture of the passed height.
   * The aspect ratio of the width and height will stay
   * the same.
   * @param height the desired height
   * @return the resulting picture
   */
  public Picture getPictureWithHeight(int height)
  {
    // set up the scale tranform
    double yFactor = (double) height / this.getHeight();
    Picture result = scale(yFactor,yFactor);
    return result;
  }

 /**
  * Method to load a picture from a file name and show it
  * in a picture frame
  * @param fileName the file name to load the picture
  * from
  * @return true if success else false
  */
 public boolean loadPictureAndShowIt(String fileName)
 {
   boolean result = true;// the default is that it worked

   // try to load the picture into the buffered image from
   // the file name
   result = load(fileName);

   // show the picture in a picture frame
   show();

   return result;
 }

 /**
  * Method to write the contents of the picture to a file
  * with the passed name
  * @param fileName the name of the file to write the
  * picture to
  */
 public void writeOrFail(String fileName)
                                        throws IOException
 {
   //the default is current
   String extension = this.extension;

   // create the file object
   File file = new File(fileName);
   File fileLoc = file.getParentFile();

   // canWrite is true only when the file exists
   // already! (alexr)
   if (!fileLoc.canWrite()) {
       // System.err.println(
       // "can't write the file but trying anyway? ...");
        throw new IOException(fileName +
        " could not be opened. Check to see if you can"
        + " write to the directory.");
   }

   // get the extension
   int posDot = fileName.indexOf('.');
   if (posDot >= 0)
       extension = fileName.substring(posDot + 1);

   //write the contents of the buffered image to the file
   // as jpeg
   ImageIO.write(bufferedImage, extension, file);

 }

 /**
  * Method to write the contents of the picture to a file
  * with the passed name without throwing errors
  * @param fileName the name of the file to write the
  * picture to
  * @return true if success else false
  */
 public boolean write(String fileName)
 {
     try {
         this.writeOrFail(fileName);
         return true;
     } catch (Exception ex) {
         System.out.println(
                     "There was an error trying to write "
                     + fileName);
         return false;
     }

 }

 /**
  * Method to set the media path by setting the directory
  * to use
  * @param directory the directory to use for the media
  * path
  */
 public static void setMediaPath(String directory) {
   FileChooser.setMediaPath(directory);
 }

 /**
  * Method to get the directory for the media
  * @param fileName the base file name to use
  * @return the full path name by appending
  * the file name to the media directory
  */
 public static String getMediaPath(String fileName) {
   return FileChooser.getMediaPath(fileName);
 }

  /**
   * Method to get the coordinates of the enclosing
   * rectangle after this transformation is applied to
   * the current picture
   * @return the enclosing rectangle
   */
  public Rectangle2D getTransformEnclosingRect(
                                    AffineTransform trans)
  {
    int width = getWidth();
    int height = getHeight();
    double maxX = width - 1;
    double maxY = height - 1;
    double minX, minY;
    Point2D.Double p1 = new Point2D.Double(0,0);
    Point2D.Double p2 = new Point2D.Double(maxX,0);
    Point2D.Double p3 = new Point2D.Double(maxX,maxY);
    Point2D.Double p4 = new Point2D.Double(0,maxY);
    Point2D.Double result = new Point2D.Double(0,0);
    Rectangle2D.Double rect = null;

    // get the new points and min x and y and max x and y
    trans.deltaTransform(p1,result);
    minX = result.getX();
    maxX = result.getX();
    minY = result.getY();
    maxY = result.getY();
    trans.deltaTransform(p2,result);
    minX = Math.min(minX,result.getX());
    maxX = Math.max(maxX,result.getX());
    minY = Math.min(minY,result.getY());
    maxY = Math.max(maxY,result.getY());
    trans.deltaTransform(p3,result);
    minX = Math.min(minX,result.getX());
    maxX = Math.max(maxX,result.getX());
    minY = Math.min(minY,result.getY());
    maxY = Math.max(maxY,result.getY());
    trans.deltaTransform(p4,result);
    minX = Math.min(minX,result.getX());
    maxX = Math.max(maxX,result.getX());
    minY = Math.min(minY,result.getY());
    maxY = Math.max(maxY,result.getY());

    // create the bounding rectangle to return
    rect = new Rectangle2D.Double(
              minX,minY,maxX - minX + 1, maxY - minY + 1);
    return rect;
  }

 /**
  * Method to return a string with information about this
  * picture
  * @return a string with information about the picture
  */
 public String toString()
 {
   String output =
     "Simple Picture, filename " + fileName +
     " height " + getHeight() + " width " + getWidth();
   return output;
 }

} // end of SimplePicture class
|
Listing 24. Source code for Ericson's DigitalPicture interface.
import java.awt.Image;
import java.awt.image.BufferedImage;

/**
 * Interface to describe a digital picture.  A digital
 * picture can have a associated file name.  It can have
 * a title.  It has pixels associated with it and you can
 * get and set the pixels.  You can get an Image from a
 * picture or a BufferedImage.  You can load it from a
 * file name or image.  You can show a picture.  You can
 * create a new image for it.
 *
 * Copyright Georgia Institute of Technology 2004
 * @author Barb Ericson ericson@cc.gatech.edu
 */
public interface DigitalPicture
{
 // get the file name that the picture came from
 public String getFileName();

 // get the title of the picture
 public String getTitle();

 // set the title of the picture
 public void setTitle(String title);

 // get the width of the picture in pixels
 public int getWidth();

 // get the height of the picture in pixels
 public int getHeight();

 // get the image from the picture
 public Image getImage();

 // get the buffered image
 public BufferedImage getBufferedImage();

 // get the pixel information as an int
 public int getBasicPixel(int x, int y);

 // set the pixel information
 public void setBasicPixel(int x, int y, int rgb);

 // get the pixel information as an object
 public Pixel getPixel(int x, int y);

 // load the image into the picture
 public void load(Image image);

 // load the picture from a file
 public boolean load(String fileName);

 // show the picture
 public void show();
}
|
Listing 25. Source code for the program named Java358a.
/*Program Java358a
Copyright R.G.Baldwin 2009

The purpose of this program is to illustrate the use of
the following methods of the Picture class:

Picture scale(double xFactor, double yFactor)
Rectangle2D getTransformEnclosingRect(
                                    AffineTransform trans)
void copyPicture(SimplePicture sourcePicture)

In addition, the program illustrates the following
constructor for the Picture class:

SimplePicture(SimplePicture copyPicture)

The program defines two methods named rotatePicture and
translatePicture that are patterned after the scale method
of the picture class. Descriptions of the two methods are
provided with comments at the beginning of the method.

The program begins by creating and showing a Picture
object based on a specified image file in the current
directory.

Then the program illustrates the use of the scale method,
the rotatePicture method, and the translatePicture
method in that order. The Picture object returned from
each of these methods is displayed.

Tested using Windows Vista Premium Home edition and
Ericson's multimedia library.
*********************************************************/
import java.awt.Graphics2D;
import java.awt.geom.AffineTransform;
import java.awt.geom.Rectangle2D;

public class Main{
  public static void main(String[] args){
    new Runner().run();
  }//end main method
}//end class Main
//------------------------------------------------------//

class Runner{
  void run(){
    //Construct a new 341x256 Picture object by providing
    // the name of an image file as a parameter to the
    // Picture constructor. Note that the image file is
    // located in the current directory.
    Picture pixA = new Picture("ScaledBeach.jpg");
    pixA.setTitle("pixA");
    pixA.show();

    //Call the scale method on pixA to create a new
    // Picture object that contains a scaled version of
    // pixA, scaled by 0.5 in both dimensions. Show the
    // new scaled picture.
    Picture pixB = pixA.scale(0.5,0.5);
    pixB.setTitle("pixB");
    pixB.show();

    //Create a new Picture object that is a copy of pixA.
    Picture pixC = new Picture(
                        pixA.getWidth(),pixA.getHeight());
    pixC.copyPicture(pixA);
    //Call the rotatePicture method to create and return a
    // new Picture object that contains the image from
    // pixC rotated by 30-degrees clockwise around its
    // center and translated to the center of the new
    // Picture object.
    //The size of the new Picture object is such that each
    // corner of the rotated picture touches the edge of
    // the new Picture just inside the border of the
    // JFrame.
    pixC = rotatePicture(pixC,30.0);
    pixC.setTitle("pixC");
    pixC.show();

    //Call the translatePicture method to create and
    // return a new Picture object that contains the
    // image from pixA translated by 20 pixels in the
    // x-dimension and 30 pixels in the y-dimension.
    // The size of the new Picture object is such that
    // there is white space above and to the left of the
    // translated image where the amount of whitespace
    // equals the space that was vacated by translating
    // the image to the right and down.
    Picture pixD = translatePicture(pixA,20,30);
    pixD.setTitle("pixD");
    pixD.show();

  }//end run method
  //----------------------------------------------------//

  //This method accepts a reference to a Picture object
  // along with a rotation angle in degrees. It creates
  // and returns a new Picture object that is of the
  // correct size to contain and display the incoming
  // picture after it has been rotated around its center
  // by the specified rotation angle and translated to the
  // center of the new Picture object.
  public Picture rotatePicture(Picture pix,double angle){

    //Set up the rotation transform
    AffineTransform rotateTransform =
                                    new AffineTransform();
    rotateTransform.rotate(Math.toRadians(angle),
                           pix.getWidth()/2,
                           pix.getHeight()/2);

    //Get the required dimensions of a rectangle that will
    // contain the rotated image.
    Rectangle2D rectangle2D =
           pix.getTransformEnclosingRect(rotateTransform);
    int resultWidth = (int)(rectangle2D.getWidth());
    int resultHeight = (int)(rectangle2D.getHeight());

    //Set up the translation transform that will translate
    // the rotated image to the center of the new Picture
    // object.
    AffineTransform translateTransform =
                                    new AffineTransform();
    translateTransform.translate(
                      (resultWidth - pix.getWidth())/2,
                      (resultHeight - pix.getHeight())/2);

    //Concatenate the two transforms so that the image
    // will first be rotated around its center and then
    // translated to the center of the new Picture object.
    translateTransform.concatenate(rotateTransform);
    //Create a new Picture object to contain the results
    // of the transformation.
    Picture result = new Picture(
                                resultWidth,resultHeight);

    //Get the graphics context of the new Picture object,
    // apply the transform to the incoming picture and
    // draw the transformed picture on the new Picture
    // object.
    Graphics2D g2 = (Graphics2D)result.getGraphics();
    g2.drawImage(pix.getImage(),translateTransform,null);

    return result;
  }//end rotatePicture
  //----------------------------------------------------//

  //The following method accepts a reference to a Picture
  // object along with positive x and y translation
  // values. It creates and returns a new Picture object
  // that contains a translated version of the original
  // image with whitespace to the left of and/or above the
  // translated image. If either translation value is
  // negative, the method simply returns a reference to a
  // copy of the original picture.
  public Picture translatePicture(
                         Picture pix,double tx,double ty){
    if((tx < 0.0) || (ty < 0.0)){
      //Negative translation values are not supported.
      // Simply return a reference to a copy of the
      // incoming picture. Note that this constructor
      // creates a new picture by copying the image from
      // an existing picture.
      return new Picture(pix);
    }//end if

    //Set up the tranform
    AffineTransform translateTransform =
                                    new AffineTransform();
    translateTransform.translate(tx,ty);

    //Compute the size of a rectangle that is of
    // sufficient size to contain and display the
    // translated image.
    int pixWidth = pix.getWidth() + (int)tx;
    int pixHeight = pix.getHeight() + (int)ty;

    //Create a new picture object that is the correct
    // size.
    Picture result = new Picture(pixWidth,pixHeight);

    //Get the graphics2D object to draw on the result.
    Graphics2D g2 = (Graphics2D)result.getGraphics();

    //Draw the translated image from pix onto the new
    // Picture object, applying the transform in the
    // process.
    g2.drawImage(pix.getImage(),translateTransform,null);

    return result;
  }//end translatePicture
  //----------------------------------------------------//

}//end class Runner
|
Copyright 2009, Richard G. Baldwin. Reproduction in whole or in part in any form or medium without express written permission from Richard Baldwin is prohibited.
Richard has participated in numerous consulting projects and he frequently provides onsite training at the high-tech companies located in and around Austin, Texas. He is the author of Baldwin's Programming Tutorials, which have gained a worldwide following among experienced and aspiring programmers. He has also published articles in JavaPro magazine.
In addition to his programming expertise, Richard has many years of practical experience in Digital Signal Processing (DSP). His first job after he earned his Bachelor's degree was doing DSP in the Seismic Research Department of Texas Instruments. (TI is still a world leader in DSP.) In the following years, he applied his programming and DSP expertise to other interesting areas including sonar and underwater acoustics.
Richard holds an MSEE degree from Southern Methodist University and has many years of experience in the application of computer technology to real-world problems.
-end-