Published:
March 19, 2009
By Richard G. Baldwin
Java Programming Notes # 359
This lesson is the next in a series (see Resources) designed to teach you how to write Java programs to do things like:
If you have ever wondered how to do these things, you've come to the right place.
If you have studied the earlier lessons in this series, you have learned:
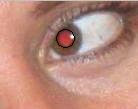
You will learn how to write the code to create a circular lasso to isolate a group of pixels as shown by the black circle around the red pupil in the eyeball in Figure 1. Having written the code to create the lasso, you will learn how to write the code required to process the pixels isolated by the lasso.
Figure 1. A circular lasso surrounding the red pupil of an eyeball.
|
|
A rectangular lasso
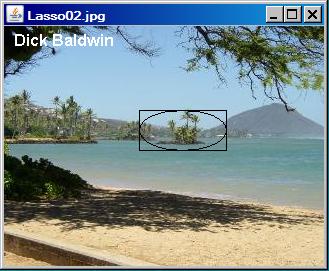
You will also learn how to write the code to create a rectangular lasso with an inscribed ellipse as shown in Figure 2.
Figure 2. A rectangular lasso with an inscribed ellipse.
|
|
In this case, you can write code to process the pixels isolated by the rectangle, the pixels isolated by the ellipse, or some combination of the two.
Being able to create a lasso to isolate a group of pixels for subsequent processing is a critical aspect of editing digital photos.
I recommend that you open another copy of this document in a separate browser window and use the following links to easily find and view the figures and listings while you are reading about them.
I recommend that you also study the other lessons in my extensive collection of online programming tutorials. You will find a consolidated index at www.DickBaldwin.com.
In this series of lessons, I will present and explain many of the classes in a multimedia class library that was developed and released under a Creative Commons Attribution 3.0 United States License (see Resources) by Mark Guzdial and Barbara Ericson at Georgia Institute of Technology. In doing this, I will also present some interesting sample programs that use the library.
I explained how to download, install, and test the multimedia class library in an earlier lesson titled Multimedia Programming with Java, Getting Started (see Resources).
Several weeks ago, I needed to write the code to create a circular lasso to isolate a group of pixels for subsequent processing. My initial reaction was that although I had never written such code, it would be a simple matter to find a tutorial somewhere on the web that would show me how to do it.
I couldn't have been more wrong. Despite hours of searching the web, I couldn't find a website where the requirement was even discussed in the context of Java programming, much less a website that showed how to do it. Therefore, I concluded that I would have to figure out how to do it on my own. This tutorial is based on the fruits of that effort.
In this lesson, I will explain a program named Lasso02 that was used to produce the images with the lassos in Figure 1 and Figure 2. In addition to showing you how to write the code to create the lassos, I will also show you how to write code to process the pixels isolated by the lassos. For example, Figure 3 shows an image similar to Figure 1 where all of the red color has been removed from the pixels that were isolated by the circular lasso.
Figure 3. The eyeball with all of the red removed from the pupil.
|
|
Not very attractive
Figure 3 isn't the most attractive look around, but it does illustrate the use of a circular lasso. (I will explain a proper redeye correction program in a future lesson.)
Processed pixels in the rectangular, elliptical lasso
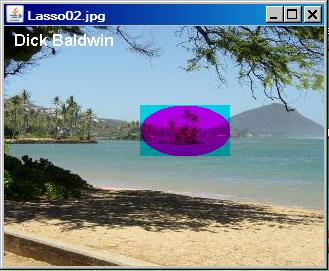
The image in Figure 4 is similar to the one shown in Figure 2. However, in Figure 4, all of the green color was removed from the pixels isolated by the ellipse and all of the red color was removed from the pixels that were isolated by the rectangle, but were outside the ellipse.
Figure 4. Processed pixels in the rectangular, elliptical lasso.
|
|
This is a demonstration program that shows how to create two different lasso styles by dragging a mouse across an image in a Picture object.
The graphical user interface (GUI)
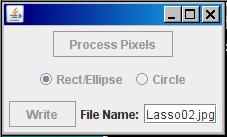
The program begins by displaying a GUI in the upper left corner of the screen as shown in Figure 5.
Figure 5. Program GUI at startup.
|
|
At startup, the GUI contains a text field for entry of the name of the image file to be processed and some other user-input components, which are disabled. (A default image file name is automatically entered into the text field to assist in testing and debugging the program.)
Required location of image file
If the image file is in the current directory, only the file name and extension must be entered. Otherwise, the full path, name, and extension for the file must be entered. Files of types jpg, bmp, and png are supported.
The image is loaded and the GUI is relocated
When the user enters the name of the image file into the text field, the image file is loaded into a Picture object. The Picture object is displayed in the upper left corner of the screen and the GUI is moved to a location immediately below the Picture object.
Disable and enable components
At this point, the text field and its label are disabled. The two JButton objects and the two JRadioButton objects are enabled. One button is labeled Process Pixels and the other button is labeled Write. One of the radio buttons is labeled Rect/Ellipse and the other radio button is labeled Circle. The Rect/Lasso button is initially selected by default.
Creating a rectangular lasso
When the Rect/Ellipse button selected, the user can drag the mouse in the image to create a lasso consisting of a rectangle with an inscribed ellipse as shown in Figure 2.
The rectangle containing the ellipse can be created in any quadrant relative to the anchor point, which is the location at which the drag operation begins. One corner of the rectangle will always touch the anchor point. The diagonal length of the rectangle is equal to the distance from the anchor point to the mouse pointer.
Creating a circular lasso
When the Circle button is selected, the user can drag the mouse in the image to create a circular lasso as shown by the black circle surrounding the red pupil in the eyeball in Figure 1. The circle can be created in any direction relative to the anchor point. The diameter of the circular lasso is equal to the distance from the anchor point to the mouse pointer.
Dragging outside the picture
Dragging the mouse outside the bounds of the picture causes the size of the either lasso to continue to grow until the mouse reaches the edge of the desktop.
Setting the shape and size
Creation of the lasso ends and the shape and size of the lasso becomes fixed when the user releases the mouse button. At this point, the lasso remains on the screen until the user clicks the image with the mouse, clicks the Process Pixels button, or does something else to cause the image to be repainted, (such as minimizing and then restoring the JFrame object that contains the picture).
Processing the pixels isolated by the lasso
After the lasso has been drawn, the button labeled Process Pixels can be clicked to call a method to process the pixels that are isolated by the lasso. Different methods are called for the two different styles of lasso in this program. The method is selected on the basis of which radio button is selected when the Process Pixels button is clicked. You can modify either or both of these methods to satisfy your own pixel-processing needs.
For the Rect/Ellipse lasso, the method can be written to process all of the pixels that are isolated by the rectangle, the ellipse, or a combination of the two. For the Circle lasso, the method can be written to process all of the pixels that are isolated by the circle. Another alternative would be to write methods to process all of the pixels that are not contained in the lasso.
Refreshing the display
Clicking anywhere in the image will erase an existing lasso and allow the user to start over with a clean image to create a new lasso. Clicking the image also erases the effects of having previously clicked the Process Pixels button.
Backup files
Clicking the Write button causes a backup file of type bmp to be written into the directory from which the image file was read. The five most recent backup files are saved. The names of the backup files are the same as the name of the original image file except that the characters BAKn are inserted immediately before the extension. The character n is replaced by a digit from 0 through 4.
Terminating the program
Clicking the large X in the upper-right corner of the JFrame object that contains the image does nothing. The button is disabled. The program is terminated by clicking the large X in the upper-right corner of the GUI.
Before terminating, the program writes an output file containing the final state of the display in the same format as the input file. The name of the output file is the same as the name of the input file except that the word FINAL is inserted immediately before the extension.
This program does not modify the contents of the original input file.
Will explain in fragments
As is my practice, I will explain this program by breaking it down into code fragments. A complete listing of the program is provided in Listing 26 near the end of the lesson.
Beginning of the class named Lasso02
The program begins in Listing 1. Many different instance variables are declared at the beginning of the program. I deleted most of them from Listing 1 for brevity. You can view them in Listing 26.
Listing 1. Beginning of the class named Lasso02.
public class Lasso02 extends JFrame{
  //Create the components that are used to construct the
  // GUI.
  private JPanel mainPanel = new JPanel();

  //Instance variables deleted for brevity.

  private final double pi = Math.PI;//convenience constant
  //----------------------------------------------------//

  public static void main(String[] args){
    new Lasso02();
  }//end main method
|
The main method
The main method is shown in Listing 1. This is a totally event-driven program. The main method simply instantiates a new object of the class named Lasso02.
The constructor creates the GUI, loads the image file into the display frame, and registers a variety of event handlers on different components. Then the program essentially goes idle waiting for the user to cause events to be fired. The event handlers control the behavior of the program when events are fired as a result of user activity.
Beginning of the constructor
The constructor begins in Listing 2. Much of the code in the early part of the constructor is required simply to build up the GUI as a series of panels, buttons, etc. I assumed that you are familiar with such code and deleted most of it from Listing 2 for brevity. You can view this code in Listing 26.
Listing 2. Beginning of the constructor.
  public Lasso02(){//constructor

    //All close operations are handled in a WindowListener
    // object.
    setDefaultCloseOperation(
                     WindowConstants.DO_NOTHING_ON_CLOSE);

    //Construct the GUI.
    mainPanel.setLayout(new BorderLayout());

    //Code deleted for brevity.

    //Disable the buttons until the user enters the file
    // name.
    writeButton.setEnabled(false);
    processButton.setEnabled(false);
    rectButton.setEnabled(false);
    circleButton.setEnabled(false);

    //Set the size of the GUI and display it in the upper-
    // left corner of the screen. It will be moved later
    // to a position immediately below the display of the
    // picture.
    getContentPane().add(mainPanel);
    pack();
    setVisible(true);

    //Request that the focus move to the text field where
    // the file name is to be entered.
    fileNameField.requestFocus();
|
Disable buttons and radio buttons
Once the physical aspects of the GUI are constructed, the code in Listing 2 disables the two JButton objects and the two JRadioButton objects to prevent them from firing events before the image file has been loaded. They are subsequently enabled by the event handler that is executed as a result of the user entering the name of the image file into the text field shown in Figure 5.
Miscellaneous housekeeping details
Then Listing 2 adds the GUI to the content pane, calls the pack method to cause the overall size to be set consistent with the preferred sizes of the components, and calls the setVisible method to cause the GUI to become visible on the screen.
Finally Listing 2 requests that the focus be moved to the text field to make it easier to enter the image file name in the text field.
This is where things start to get a little more interesting. The remaining code in the constructor registers listener objects on the JFrame object that contains the image and various GUI components.
Beginning of an ActionListener registered on the text field
Listing 3 shows the beginning of an anonymous ActionListener that is registered on the text field. When the user enters the file name in the text field, the code in the event handler sets everything up properly so that the program will continue to function as an event-driven picture-manipulation program until the user clicks the large X in the upper-right corner of the GUI to terminate the program.
Listing 3. Beginning of an ActionListener registered on the text field.
    fileNameField.addActionListener(
      new ActionListener(){
        public void actionPerformed(ActionEvent e){

          fileNameField.setEnabled(false);
          fileNameLabel.setEnabled(false);
|
Listing 3 disables the text field and its label to prevent the user from entering anything else into it and causing it to fire another event.
Load the image file
Listing 4 gets the file name from the text field and uses it to read the file and create a new Picture object using the image contained in the file. Listing 4 also displays my name in the image as a quick and easy way to create a watermark.
Listing 4. Load the image file.
          fileName = fileNameField.getText();
          picture = new Picture(fileName);
          picture.addMessage("Dick Baldwin",10,20);
|
Get the information required to write the output files
Listing 5 gets and saves all of the information that will be required later to write the output files.
Listing 5. Get the information required to write the output files.
          String inputPath = new File(fileName).
                                        getAbsolutePath();
          int posDot = inputPath.lastIndexOf('.');
          outputPath = inputPath.substring(0,posDot);
          //Write the first copy of the output backup
          // file.
          picture.write(outputPath
                       + "BAK" + writeCounter++ + ".bmp");

          //Get filename extension. It will be used later
          // to write the final output file.
          extension = inputPath.substring(posDot);

          //Decorate the GUI.
          setTitle("Copyright 2009, R.G.Baldwin");
|
While the code in Listing 5 is a little tedious, it is not complicated and should not require an explanation beyond the embedded comments.
Listing 5 also sets the title in the GUI; an operation that is unrelated to the output files but needs to be done somewhere.
Create a separate Picture object that will used for processing
Other than adding the watermark, the Picture object that is created in Listing 5 is not modified by the program. Instead, a separate Picture object is created in Listing 6 and this is the object that is modified as a result of user actions. It also contains the image that is written into the output files.
Listing 6. Create a separate Picture object that will be used for processing.
          display = new Picture(picture);

          //Display the picture.
          display.show();
|
The original image is held in reserve in memory and is used to refresh the display with a clean image whenever the user clicks the mouse in the display. This makes it possible for the user to undo the most recent action and start fresh with a clean image.
Listing 6 also calls the show method to cause the image to be displayed in the upper-left corner of the screen.
Get and save several useful references
Listing 7 gets and saves several references that will be used later in the program for a variety of purposes.
Listing 7. Get and save several useful references.
          //Save a reference to the image. Also save the
          // width and height of the picture.
          theImage = (BufferedImage)(picture.getImage());
          pictureWidth = picture.getWidth();
          pictureHeight = picture.getHeight();

          //Get and save a reference to the JFrame object
          // that contains the image.
          theFrame = display.getPictureFrame().frame;

          //Get the graphics context on which to draw a
          // lasso.
          g2 = (Graphics2D)(theFrame.getGraphics());
|
Adjust the width and location of the GUI
Strictly for cosmetic purposes, Listing 8 adjusts the width of the GUI to match the width of the display if possible. Then Listing 8 relocates the GUI to a position immediately below the display.
Listing 8. Adjust the width and location of the GUI.
          pack();
          int packedHeight = getHeight();
          int packedWidth = getWidth();
          if((pictureWidth + 7) >= packedWidth){
            //Make the width of the GUI the same as the
            // width of the display.
            setSize(pictureWidth + 7,packedHeight);
          }//Else, just leave the GUI at its current size.
          //Put the GUI in its new location immediately
          // below the display.
          setLocation(0,pictureHeight + 30);
|
Enable and disable components
Listing 9 enables the user input components to make the program operational. Listing 9 also disables the large X in the upper-right corner of the JFrame object that contains the image. The program can be terminated by clicking the large X in the upper-right corner of the GUI.
Listing 9. Enable and disable components.
          //Enable the user input controls.
          writeButton.setEnabled(true);
          processButton.setEnabled(true);
          rectButton.setEnabled(true);
          circleButton.setEnabled(true);

          //Disable the X-button on the display.
          theFrame.setDefaultCloseOperation(
WindowConstants.DO_NOTHING_ON_CLOSE); |
Register a MouseListener and a MouseMotionListener
Now that an image has been loaded, a MouseListener object and a MouseMotionListener object can be registered on the JFrame object that contains the image.
Note that the registration code for these two listener objects is actually inside the code for the ActionListener object that is registered on the text field. This code can't be executed when the GUI is first constructed because a Picture object does not exist at that point in time. Instead, this code is executed after the user enters the image filename, the file has been read, and the Picture object referred to by display has been constructed.
Register a MouseListener object on the JFrame containing the image
Listing 10 registers a MouseListener object on the JFrame object that contains the image. This is the JFrame object shown in Figure 2.
Listing 10. Register a MouseListener object on the JFrame containing the image.
          theFrame.addMouseListener(
            new MouseAdapter(){
              public void mousePressed(MouseEvent e){
                //Draw a new copy of the image on the
                // display each time the user clicks the
                // image with the mouse.
                graphics = display.getGraphics();
                graphics.drawImage(
                             picture.getImage(),0,0,null);
                display.repaint();

                //Prepare the variables...
                anchorX = e.getX();
                anchorY = e.getY();
                deltaX = 0;
                deltaY = 0;
              }//end mousePressed
            }//end new MouseAdapter
);//end addMouseListener |
Draw a new copy of the image
Listing 10 begins by drawing a new copy of the image on the display shown in Figure 2 each time the user clicks the image with the mouse. This makes it possible to erase an existing lasso simply by clicking anywhere in the image. This also erases the effect of having previously clicked the Process Pixels button to process pixels isolated by the lasso.
Prepare the variables...
Then Listing 10 prepares several variables so that the mouseDragged event handler method can lasso and isolate a group of pixels.
A possible point of confusion
Note that the reported coordinates for a mouse press on the upper-left corner of the image will not be reported as 0,0 due to the top and left insets of the JFrame. This can lead to some confusion when analyzing the code.
Listing 10 also signals the end of the code that registers a MouseListener object on the JFrame object that contains the image.
Register a MouseMotionListener object on the JFrame containing the image
Listing 11 registers a MouseMotionListener object on the JFrame object containing the image. This listener object calls one of two different methods to draw a lasso on the image when the user drags the mouse on the image.
Listing 11. Register a MouseMotionListener object on the JFrame containing the image.
          theFrame.addMouseMotionListener(
            new MouseMotionAdapter(){
              public void mouseDragged(MouseEvent e){
                //Call the method to draw the lasso on the
                // basis of which radio button has been
                // selected.
                if(rectButton.isSelected()){
                  makeRectLasso(e.getX(),e.getY());
                }else if(circleButton.isSelected()){
                  makeCircleLasso(e.getX(),e.getY());
                }//end else
              }//end mouseDragged
            }//end new MouseMotionAdapter
);//end addMouseMotionListener |
Deciding which method to call
The decision as to which of the two methods to call is made on the basis of which radio button in Figure 5 has been selected by the user. One of the methods, named makeCircleLasso draws a circular lasso as shown by the black circle surrounding the red pupil of the eyeball in Figure 1.
The other method named makeRectLasso draws a rectangular lasso with an inscribed ellipse as shown in Figure 2. These two methods are the heart of this program. I will explain both methods later.
Finish defining the ActionListener on the text field
As I mentioned earlier, the code shown in Listing 10 and Listing 11 is actually inside the definition of an anonymous class that registers an ActionListener object on the text field. Listing 7 contains the code required to complete the definition of that anonymous class.
Listing 12. Finish defining the ActionListener on the text field.
        }//end actionPerformed
      }//end new ActionListener
);//end addActionListener |
Register an ActionListener object on the Write button
Listing 13 registers an ActionListener object on the Write button shown in Figure 5.
Each time the user clicks the button, a backup image file of type bmp containing the current state of the display is written into the directory from which the original picture was read.
Listing 13. Register an ActionListener object on the Write button.
    writeButton.addActionListener(
      new ActionListener(){
        public void actionPerformed(ActionEvent e){
          display.write(outputPath
                       + "BAK" + writeCounter++ + ".bmp");
          //Reset the writeCounter if it exceeds 4 to
          // conserve disk space.
          if(writeCounter > 4){
            writeCounter = 0;
          }//end if
        }//end action performed
      }//end new ActionListener
);//end addActionListener |
Five most recent backup files are saved
The five most recent backup files are saved. The names of the backup files are the same as the name of the input file except that BAKn is inserted immediately ahead of the extension where n is a digit ranging from 0 to 4.The value of n rolls over at 4 and starts back at 0.
Register a WindowListener object on the GUI
Listing 14 registers a WindowListener object that responds when the user clicks the large X in the upper-right corner of the GUI. This event handler writes the final display image into an output file of the same type as the original input file. The name of the output file is the same as the name of the input file except that the word FINAL is inserted immediately ahead of the extension.
Listing 14. Register a WindowListener object on the GUI.
    addWindowListener(
      new WindowAdapter(){
        public void windowClosing(WindowEvent e){
          display.write(outputPath + "FINAL" + extension);
          System.exit(0);
        }//end windowClosing
      }//end new WindowAdapter
);//end addWindowListener |
Register an ActionListener object on the Process Pixels button
Listing 15 registers an ActionListener object on the Process Pixels button.
Listing 15 begins by drawing a clean copy of the image to get rid of the black pixels that constitute the lasso. Note that this does not destroy the underlying Rectangle2D.Double and Ellipse2D.Double objects that define the lasso. (I will have more to say about these objects later.)
Listing 15. Register an ActionListener object on the Process Pixels button.
    processButton.addActionListener(
      new ActionListener(){
        public void actionPerformed(ActionEvent e){
          //Get rid of the black lasso pixels
          graphics = display.getGraphics();
          graphics.drawImage(picture.getImage(),0,0,null);
          display.repaint();
          //Call a method to process the pixels on the
          // basis of which radio button is selected.
          if(rectButton.isSelected()){
            processRectPixels();
          }else if(circleButton.isSelected()){
            processCirclePixels();
          }//end else
        }//end action performed
      }//end new ActionListener
    );//end addActionListener
    //--------------------------------------------------//

}//end constructor |
Call a method to process the pixels
Then Listing 15 calls one of two methods to process the pixels that have been isolated inside of the lasso. The decision as to which method to call is made on the basis of which radio button is selected at the time the button is clicked.
If the Rect/Ellipse button is selected, the method named processRectPixels is called to process a lasso of the type shown in Figure 2. If the Circle button is selected, the method named processCirclePixels is called to process a lasso of the type shown in Figure 1.
Simple demo methods
I have provided simple demo versions of each of these methods, which I will explain later. However, my expectation is that you will modify the methods to process the isolated pixels in whatever way meets your specific needs.
The end of the constructor
Listing 15 also signals the end of the constructor. As mentioned earlier, when the constructor terminates, the program goes into an idle state waiting for the user to do something that causes an event to be fired, (for which a listener object has been registered). When such an event is fired, the program handles the event and then returns to the idle state waiting for the next event to be fired.
That brings us to the methods that are called when the user drags the mouse in the image to create a lasso. The method named makeRectLasso is conceptually the simpler of the two so I will begin with that method.
This method is called each time the mouse fires a mouseDragged event if the radio button labeled Rect/Ellipse is selected.
A rectangular lasso with an inscribed ellipse
This version of the method draws a lasso consisting of a rectangle with an inscribed ellipse as shown in Figure 2. An anchor point is established when the user presses a mouse button to drag the mouse across the image. A corner of the rectangle touches the anchor point at all times.
Size and shape of the rectangle
The sides of the rectangle are always parallel with the top and the sides of the JFrame object containing the image. The dimensions of the rectangle are determined by the distance from the anchor point to the mouse pointer. That distance defines the length of a line from the anchor point to a diagonal corner of the rectangle.
Location of the rectangle
The location of the rectangle is determined by the angle that an imaginary line going through the anchor point and the mouse pointer makes with an imaginary horizontal line going through the anchor point.
Assuming the anchor point to be the origin of an imaginary Cartesian coordinate system, the rectangle can be drawn in any quadrant of that coordinate system with one corner of the rectangle touching the anchor point. The rectangle can be drawn with any size, even if the mouse pointer goes outside the bounds of the image.
Processing the isolated pixels
Pixels isolated by the rectangle and pixels isolated by the inscribed ellipse can be process separately or in combination.
When the user releases the mouse button, the rectangle and the inscribed ellipse remain on the screen until the user clicks the image with the mouse, clicks the Process Pixels button, or does something else to cause the image to be repainted.
Beginning of the method named makeRectLasso
The method named makeRectLasso begins in Listing 16.
Listing 16. Beginning of the method named makeRectLasso.
  private void makeRectLasso(int x,int y){

    //Update the width and height of the rectangular
    // lasso.
    deltaX = x - anchorX;
    deltaY = y - anchorY;

    //Copy the entire image from the backup picture.
    g2.drawImage(theImage,
                 theFrame.getInsets().left,
                 theFrame.getInsets().top,null);
|
The parameters x and y contain the coordinates of the mouse pointer when the event was fired.
Update two instance variables
Listing 16 begins by updating the variables named deltaX and deltaY, which will be used to establish the width and the height of the rectangular lasso.
These two variables are updated to contain the horizontal and vertical components of a vector that extends from the anchor point to the current location of the mouse pointer. In effect, they contain the horizontal and vertical components of an imaginary line that extends from the anchor point to the diagonally opposite corner of the rectangle.
Refresh the display
Then Listing 16 copies the entire image from the backup picture stored in memory onto the picture referred to by display. This erases any lassos drawn earlier and also erases the effects of earlier clicks on the Process Pixels button. (The user could have saved this information in a disk file by clicking the Write button and copying the backup file to a more permanent file.)
Caution, trigonometry ahead
In order to understand the remaining code in this method, you must understand trigonometry. If you don't, you will simply have to take my word for it that trigonometry was used correctly.
|
Get the angle of the diagonal line
Listing 17 calls the atan2 method of the Math class to get and save the angle in radians that a line joining the anchor point and the current mouse location makes with a horizontal line going through the anchor point. This angle that will be used in the computations that are required to draw the rectangle in the correct quadrant relative to the anchor point.
Listing 17. Get the angle of the diagonal line.
angle = Math.atan2((double)deltaY,(double)deltaX);
|
Create the rectangle and the ellipse in the correct quadrant
The objective is to draw a rectangle with an inscribed ellipse with one corner touching the anchor point regardless of the direction that the user drags the mouse pointer relative to the anchor point.
Listing 18 uses the angle produced by the code in Listing 17 to determine the quadrant, (relative to the anchor point as the origin in a Cartesian coordinate system), in which to draw the rectangle.
Then Listing 18 executes one of four alternative blocks of code to construct a Rectangle2D.Double object and an inscribed Ellipse2D.Double object in the correct quadrant positioned with one corner of the rectangle touching the anchor point at all times.
Listing 18. Create the rectangle and the ellipse in the correct quadrant.
    if((angle >= 0) && (angle < pi/2)){
      //Create the rectangle in the lower-right quadrant.
      rectangle = new Rectangle2D.Double(
          //Compute and specify the coordinates of the
          // upper-left corner of the rectangle.
          anchorX,
          anchorY,
          //Specify the width and the height of the
          // rectangle.
          deltaX,
          deltaY);
      //Now inscribe an ellipse in the rectangle.
      ellipse = new Ellipse2D.Double(anchorX,
                                     anchorY,
                                     deltaX,
                                     deltaY);
    }else if((angle >= pi/2) && (angle < pi)){
      //Create the rectangle in the lower-left quadrant.
      rectangle = new Rectangle2D.Double(anchorX + deltaX,
                                         anchorY,
                                         -deltaX,
                                         deltaY);
      ellipse = new Ellipse2D.Double(anchorX + deltaX,
                                     anchorY,
                                     -deltaX,
                                     deltaY);
    }else if((angle >= -pi/2) && (angle < 0)){
      //Create the rectangle in the upper-right quadrant.
      rectangle = new Rectangle2D.Double(anchorX,
                                         anchorY + deltaY,
                                         deltaX,
                                         -deltaY);
      ellipse = new Ellipse2D.Double(anchorX,
                                     anchorY + deltaY,
                                     deltaX,
                                     -deltaY);
    }else{
      //Create the rectangle in the upper-left quadrant.
      rectangle = new Rectangle2D.Double(anchorX + deltaX,
                                         anchorY + deltaY,
                                         -deltaX,
                                         -deltaY);
      ellipse = new Ellipse2D.Double(anchorX + deltaX,
                                     anchorY + deltaY,
                                     -deltaX,
                                     -deltaY);
    }//end else
|
The code is straightforward
You should be able to understand the code in each of the alternative code blocks in Listing 18 without a requirement for an explanation beyond the embedded comments. When interpreting the comments, however, you need to remember that the positive direction for an angle is clockwise.
Draw the rectangle and the ellipse
The two objects constructed in Listing 18 exist regardless of whether or not they are physically drawn on the screen. Listing 19 draws them on the screen.
Listing 19. Draw the rectangle and the ellipse.
    g2.draw(rectangle);
    g2.draw(ellipse);
}//end makeRectLasso |
Listing 19 also signals the end of the method named makeRectLasso that began in Listing 16.
Before I get into the method that is called to draw a circular lasso, I will explain a demonstration method that shows how to process the pixels isolated in the rectangular lasso shown in Figure 2.
This method is called by the ActionListener object registered on the Process Pixels button in Listing 15 whenever the user clicks the Process Pixels button while the radio button labeled Rect/Ellipse is selected.
A very simple pixel-processing algorithm
This method implements a very simple pixel-processing algorithm and is provided for demonstration purposes only. My expectation is that you will modify this method to suit your specific pixel-processing needs.
Modify isolated pixels
This demo method eliminates red from all pixels inside the rectangle but outside the ellipse. Then it eliminates green from all pixels inside the ellipse. This produces the results shown in Figure 4.
Beginning of the method named processRectPixels
The processRectPixels method begins in Listing 20.
Listing 20. Beginning of the method named processRectPixels.
  private void processRectPixels(){
    //Protect against clicking the button before drawing
    // a lasso.
    if(rectangle == null) return;
|
Confirm the existence of the Rectangle2D.Double object
The pixel-processing code in the processRectPixels method expects that a Rectangle2D.Double object and an Ellipse2D.Double object have been created. However, that would not be the case if the user were to click the Process Pixels button while the Rect/Ellipse radio button is selected before dragging the mouse to create a rectangular lasso. Therefore, Listing 20 tests to confirm that the Rectangle2D.Double object has been created, and if not, the method simply returns quietly.
Change the colors of the pixels
The key to this entire program hinges on the behavior of the contains method belonging to objects of the Rectangle2D.Double and Ellipse2D.Double classes.
The contains method accepts a pair of incoming coordinate values and return true if the coordinates are inside the boundary of the shape, and false otherwise.
Cycle and test all pixels
Listing 21 uses a pair of nested for loops to cycle through all of the coordinate pairs contained in the image being processed, calling the contains methods of the rectangle and ellipse objects for each coordinate pair, to identify those pixels that are inside the boundary of the object.
Listing 21. Change the colors of the pixels.
    for(int col = 0;col < pictureWidth;col++){
      for(int row = 0;row < pictureHeight;row++){

        //Change the color of the pixels inside the
        // rectangle and outside the ellipse.
        //Note: It is necessary to compensate for the top
        // and left insets of the JFrame.
        if((rectangle.contains(
                       col + theFrame.getInsets().left,
                       row + theFrame.getInsets().top)) &&
           !((ellipse.contains(
                       col + theFrame.getInsets().left,
                       row + theFrame.getInsets().top)))){
          pixel = display.getPixel(col,row);
          pixel.setRed(0);
        }//end if

        //Change the color of the pixels inside the
        // ellipse.
        if(ellipse.contains(
                         col + theFrame.getInsets().left,
                         row + theFrame.getInsets().top)){
          Pixel pixel = display.getPixel(col,row);
          pixel.setGreen(0);
        }//end if

      }//end inner loop
    }//end outer loop

    display.repaint();

}//end processRectPixels |
Modify the contained pixels
Once a pixel is determined to be contained in either or both objects, the red or green color value is set to zero to produce the result shown in Figure 4.
When all coordinate pairs in the image have been tested, and the color values in selected pixels have been modified, Listing 21 calls the repaint method on the display object to cause the display to be repainted on the screen.
Listing 21 also signals the end of the method named processRectPixels.
This method is called each time the mouse fires a mouseDragged event while the radio button labeled Circle is selected.
This method constructs and draws a lasso consisting of a circular ellipse that touches the anchor point at all times.
The diameter of the circle is determined by the distance of the mouse from the anchor point. The location of the circle is determined by the angle that a line going through the anchor point and the mouse pointer makes with a horizontal line going through the anchor point.
The circle can be drawn at any angle, and with any diameter, even if the mouse goes outside the bounds of the image.
When the user releases the mouse button, the circle remains on the screen until the user clicks the image with the mouse, clicks the Process Pixels button, or does something else to cause the image to be repainted.
Beginning of the method named makeCircleLasso
The method named makeCircleLasso begins in Listing 22.
Listing 22. Beginning of the method named makeCircleLasso.
  private void makeCircleLasso(int x,int y){

    //The parameters x and y contain the coordinates of
    // the mouse pointer when the event was fired. Update
    // the diameter of the circular lasso.
    deltaX = x - anchorX;
    deltaY = y - anchorY;
    diameter = (int)Math.hypot(deltaX,deltaY);

    //Copy the entire image from the backup picture stored
    // in memory to erase any lassos drawn earlier. Also
    // erases the effects of prior clicks on the Process
    // Pixels button.
    g2.drawImage(theImage,
                 theFrame.getInsets().left,
                 theFrame.getInsets().top,null);
|
As before, the parameters x and y contain the coordinates of the mouse pointer when the event was fired. Listing 22 begins by updating the variables named deltaX and deltaY, which are used to establish the diameter of the circular lasso in this method.
Also as before, these two variables are updated to contain the horizontal and vertical components of a vector that extends from the anchor point to the current location of the mouse pointer.
Get the length of the vector
Unlike before, the hypot method of the Math class is called to get the length of the vector. The hypot method treats the horizontal and vertical components of the vector as the sides of a right triangle and returns the length of the hypotenuse of that triangle. This value defines the diameter of the circular lasso.
Refresh the display
As before, Listing 22 also refreshes the display by copying the backup image that is stored in memory into the display.
Compute the angle
Listing 23 calls the atan2 method to compute the same angle that was computed earlier in Listing 17. However, in this case, the angle is used for a somewhat different purpose than before.
Listing 23. Compute the angle.
    //Get the angle in radians that a line joining the
    // anchor point and the current mouse location makes
    // with a horizontal line going through the anchor
    // point. This is the angle that will be used in the
    // computations required to rotate the circular
    // ellipse around the anchor point while continually
    // touching the anchor point.
    angle = Math.atan2((double)deltaY,(double)deltaX);
|
Construct and draw a circular ellipse
Listing 24 constructs and then draws a circular version of an Ellipse2D.Double object that touches the anchor point at all times.
Listing 24. Construct and draw a circular ellipse.
    ellipse = new Ellipse2D.Double(
          //Compute and specify the coordinates of the
          // upper left corner of a box that will contain
          // the circular ellipse.
          anchorX-(diameter/2-Math.cos(angle)*diameter/2),
          anchorY-(diameter/2-Math.sin(angle)*diameter/2),
          //Specify the width and the height of the box.
          diameter,
          diameter);

    //Draw the ellipse.
    g2.draw(ellipse);

}//end makeCircleLasso |
Conceptually complex code
Although the code in Listing 24 is much shorter than the code in Listing 18, the code in Listing 24 is conceptually more complex than the code in Listing 18.
In Listing 18, all that was required to was to select among, construct, and draw one of four alternatives rectangles in which one corner of the rectangle touched the anchor point at all times.
In Listing 24, however, the requirement is to construct and then draw any one of an infinite number of circles such that the perimeter of the circle touches the anchor point at all times.
Use an Ellipse2D.Double object for the circle
The circle is constructed by constructing an Ellipse2D.Double object that is inscribed in a square (not a general rectangle). Beyond that, about all that I can tell you is that if you really understand trigonometry (and perhaps vectors as well), you should be able to understand the code in Listing 24 without an explanation beyond the embedded comments. If you don't understand trigonometry, the code in Listing 24 probably won't make any sense to you at all.
Listing 24 also signals the end of the method named makeCircleLasso.
Listing 25 is a demonstration that shows how to process the pixels contained in a circular elliptical lasso, producing results similar to those shown in Figure 3.
Listing 25. The method named processCirclePixels.
  private void processCirclePixels(){
    //Protect against clicking the button before drawing
    // a lasso.
    if(ellipse == null) return;

    for(int col = 0;col < pictureWidth;col++){
      for(int row = 0;row < pictureHeight;row++){
        //Change the color of the pixels inside the
        // ellipse.
        //Note: It is necessary to compensate for the top
        // and left insets of the JFrame.
        if(ellipse.contains(
                         col + theFrame.getInsets().left,
                         row + theFrame.getInsets().top)){
          //The pixel is inside the lasso. Change its
          // color.
          Pixel pixel = display.getPixel(col,row);
          pixel.setRed(0);
        }//end if

      }//end inner loop
    }//end outer loop
    display.repaint();
}//end processCirclePixels |
If you understood the method named processRectPixels that began in Listing 20, you should have no difficulty understanding Listing 25.
As before, this method implements a very simple pixel-processing algorithm to eliminate green from all of the pixels isolated by the lasso, and is provided for demonstration purposes only. My expectation is that you will modify this method to suit your specific pixel-processing needs.
I encourage you to copy the code from Listing 26, compile the code, and execute it. Experiment with the code, making changes, and observing the results of your changes. Make certain that you can explain why your changes behave as they do.
In this lesson, I showed you how to write the code to create a circular lasso that isolates a group of pixels as shown by the black circle around the red pupil in the eyeball in Figure 1.
I also showed you how to write the code to create a rectangular lasso with an inscribed ellipse as shown in Figure 2.
Finally, I provided demo methods that illustrate a methodology for processing the pixels isolated by the lasso.
In the next lesson, you will learn how to cause two or more pictures to have the same width or the same height and otherwise maintain their individual aspect ratios, how to create composite pictures containing side-by-side images, how to draw text on a picture, and how to apply the same operation to every pixel in a Picture object.
Listing 26. Source code for the program named Lasso02.
/*File Lasso02 Copyright 2009 R.G.Baldwin

This is a demonstration program that shows how to create
two different lasso styles by dragging a mouse in an image
in a Picture object.

The program begins by displaying a GUI in the upper left
corner of the screen. At that point, the GUI contains a
text field for entry of the name of the image file to be
processed and some other user-input components, which are
disabled.  If the file is in the current directory, only
the file name and extension must be entered. Otherwise,
the full path and name and extension for the file must be
entered. Files of types jpg, bmp, and png are supported.

When the user enters the name of the image file into the
text field, the file is loaded into a Picture object. The
Picture object is displayed in the upper left corner of
the screen and the GUI is moved to a location immediately
below the Picture object.  At this point, the text field
is disabled.  Two buttons and two radio buttons are
enabled.

One button is labeled Process Pixels and the other button
is labeled Write. One radio button is labeled Rect/Ellipse
and the other radio button is labeled Circle. The
Rect/Lasso button is initially selected by the program.

At this point with the Rect/Ellipse button selected, the
user can drag the mouse in the image to create a lasso
consisting of a rectangle with an inscribed ellipse.  The
rectangle and the ellipse can be created in any quadrant
relative to the anchor point. The anchor point is the
location at which the drag operation begins. One corner
of the rectangle will always touch the anchor point.

When the Circle button is selected, the user can drag the
mouse in the image to create a circular lasso. It can be
created in any direction from the anchor point.  The
diameter of the circular lasso is equal to the distance of
the mouse pointer from the anchor point.

Dragging the mouse outside the bounds of the picture
causes the size of the either lasso to continue to grow.
The lasso ends when the user releases the mouse button.

The lasso remains on the screen until the user clicks the
image with the mouse, clicks the Process Pixels button, or
does something else to cause the image to be repainted.

After the lasso has been drawn, the button labeled Process
Pixels can be clicked to cause a method to be called to
process the pixels in the image relative to the position
and size of the lasso. Different methods are called for
the two styles of lasso.

You can modify either or both of these methods to satisfy
your own pixel-processing needs.

For the Rect/Ellipse lasso, the method can be written to
process all of the pixels that are contained in the
rectangle, the ellipse, or a combination of the two. For
the Circle lasso, the method can be written to process
all of the pixels that are contained in the circle.
Another alternative would be to write methods to process
all of the pixels that are not contained in the lasso.

Clicking anywhere in the image will erase an existing
lasso and allow the user to start over with a clean image
to create a new lasso. Clicking the image also erases the
effects of having clicked the Process Pixels button.

Clicking the Write button causes a backup bmp file to be
written into the same directory from which the image file
was read. The five most recent backup files are saved.
The names of the backup file are the same as the name of
the original image file except that the characters BAKn
are inserted immediately before the extension. The
character n is replaced by a digit from 0 through 4.

Clicking the large X in the upper-right corner of the
image display does nothing. The button is disabled.

The program is terminated by clicking the large X in the
upper-right corner of the GUI. Before terminating, the
program writes an output file containing the final state
of the display in the same format as the input file. The
name of the output file is the same as the name of the
input file except that the word FINAL is inserted
immediately before the extension.

This program does not modify the contents of the original
input file.

Tested using Windows Vista Home Premium Edition,
Java 1.6x, and the version of Ericson's multimedia library
contained in bookClasses10-1-07.zip.
*********************************************************/

import java.awt.Graphics;
import java.awt.Image;
import java.awt.BorderLayout;
import java.awt.Graphics2D;
import java.awt.event.ActionListener;
import java.awt.event.ActionEvent;
import java.awt.event.WindowAdapter;
import java.awt.event.WindowEvent;
import java.awt.event.MouseEvent;
import java.awt.event.MouseAdapter;
import java.awt.event.MouseMotionListener;
import java.awt.event.MouseMotionAdapter;

import java.awt.geom.Ellipse2D;
import java.awt.geom.Ellipse2D.Double;
import java.awt.geom.Rectangle2D;

import java.awt.image.BufferedImage;

import javax.swing.JFrame;
import javax.swing.JPanel;
import javax.swing.JLabel;
import javax.swing.JButton;
import javax.swing.JTextField;
import javax.swing.JRadioButton;
import javax.swing.ButtonGroup;
import javax.swing.WindowConstants;

import java.io.File;

public class Lasso02 extends JFrame{
  //Create the components that are used to construct the
  // GUI.
  private JPanel mainPanel = new JPanel();
  private JPanel northPanel = new JPanel();
  private JPanel centerPanel = new JPanel();
  private JPanel southPanel = new JPanel();

  private JButton processButton =
                            new JButton("Process Pixels");
  private JButton writeButton = new JButton("Write");
  private JTextField fileNameField =
                            new JTextField("Lasso02.jpg");
  private JLabel fileNameLabel = new JLabel("File Name:");

  private JRadioButton rectButton =
                    new JRadioButton("Rect/Ellipse",true);
  private JRadioButton circleButton =
                               new JRadioButton("Circle");
  private ButtonGroup buttonGroup = new ButtonGroup();

  //A reference to the original Picture object will be
  // stored here.
  private Picture picture = null;

  //A reference to a modified copy of the original
  // Picture object will be stored here.
  private Picture display = null;

  //Miscellaneous working variables. Many variables were
  // made instance variables instead of local variables
  // to improve responsiveness during a mouse drag
  // operation.
  private Graphics graphics = null;

  private Pixel pixel = null;
  private int writeCounter = 0;

  private String fileName = "NONE";
  private String outputPath = null;
  private String extension = null;

  private int pictureWidth = 0;
  private int pictureHeight = 0;

  private int anchorX = 0;
  private int anchorY = 0;

  private int deltaX = 0;
  private int deltaY = 0;

  private int diameter = 0;
  private double angle = 0;

  private BufferedImage theImage = null;
  private JFrame theFrame = null;

  private Rectangle2D.Double rectangle = null;
  private Ellipse2D.Double ellipse = null;

  private Graphics2D g2 = null;

  private final double pi = Math.PI;//convenience constant
  //----------------------------------------------------//

  public static void main(String[] args){
    new Lasso02();
  }//end main method
  //----------------------------------------------------//

  public Lasso02(){//constructor

    //All close operations are handled in a WindowListener
    // object.
    setDefaultCloseOperation(
                     WindowConstants.DO_NOTHING_ON_CLOSE);

    //Construct the GUI.
    mainPanel.setLayout(new BorderLayout());
    mainPanel.add(northPanel,BorderLayout.NORTH);
    mainPanel.add(centerPanel,BorderLayout.CENTER);
    mainPanel.add(southPanel,BorderLayout.SOUTH);

    northPanel.add(processButton);

    //Add radio buttons to the center panel and make them
    // mutually exclusive.
    centerPanel.add(rectButton);
    buttonGroup.add(rectButton);
    centerPanel.add(circleButton);
    buttonGroup.add(circleButton);

    //Add a button, a label, and a text field to the south
    // panel.
    southPanel.add(writeButton);
    southPanel.add(fileNameLabel);
    southPanel.add(fileNameField);

    //Disable the buttons until the user enters the file
    // name.
    writeButton.setEnabled(false);
    processButton.setEnabled(false);
    rectButton.setEnabled(false);
    circleButton.setEnabled(false);

    //Set the size of the GUI and display it in the upper-
    // left corner of the screen. It will be moved later
    // to a position immediately below the display of the
    // picture.
    getContentPane().add(mainPanel);
    pack();
    setVisible(true);

    //Request that the focus move to the text field where
    // the file name is to be entered.
    fileNameField.requestFocus();
    //--------------------------------------------------//

    //Register a listener on the text field. When the user
    // enters the file name in the text field, set
    // everything up properly so that the program will
    // function as an event-driven picture-manipulation
    // program until the user clicks the large X in the
    // upper-right of the GUI.
    fileNameField.addActionListener(
      new ActionListener(){
        public void actionPerformed(ActionEvent e){
          //Disable the text field and its label to
          // prevent the user from entering anything else
          // into it and causing it to fire another event.
          fileNameField.setEnabled(false);
          fileNameLabel.setEnabled(false);

          //Get the file name from the text field and use
          // it to create a new Picture object. Display my
          // name in the image.
          fileName = fileNameField.getText();
          picture = new Picture(fileName);
          picture.addMessage("Dick Baldwin",10,20);

          //Get information that will be used to write the
          // output files.
          String inputPath = new File(fileName).
                                        getAbsolutePath();
          int posDot = inputPath.lastIndexOf('.');
          outputPath = inputPath.substring(0,posDot);
          //Write the first copy of the output backup
          // file.
          picture.write(outputPath
                       + "BAK" + writeCounter++ + ".bmp");

          //Get filename extension. It will be used later
          // to write the final output file.
          extension = inputPath.substring(posDot);

          //Decorate the GUI.
          setTitle("Copyright 2009, R.G.Baldwin");

          //Create the picture that will be used for
          // processing.
          //Note that the original image file is not
          // modified by this program.
          display = new Picture(picture);

          //Display the picture.
          display.show();

          //Save a reference to the image. Also save the
          // width and height of the picture.
          theImage = (BufferedImage)(picture.getImage());
          pictureWidth = picture.getWidth();
          pictureHeight = picture.getHeight();

          //Get and save a reference to the JFrame object
          // that contains the image.
          theFrame = display.getPictureFrame().frame;

          //Get the graphics context on which to draw a
          // lasso.
          g2 = (Graphics2D)(theFrame.getGraphics());

          //Adjust the width of the GUI to match the width
          // of the display if possible. Then relocate the
          // GUI to a position immediately below the
          // display.
          //Establish the preferred size now that the
          // input file name has been entered.
          pack();
          int packedHeight = getHeight();
          int packedWidth = getWidth();
          if((pictureWidth + 7) >= packedWidth){
            //Make the width of the GUI the same as the
            // width of the display.
            setSize(pictureWidth + 7,packedHeight);
          }//Else, just leave the GUI at its current size.
          //Put the GUI in its new location immediately
          // below the display.
          setLocation(0,pictureHeight + 30);

          //Enable the user input controls.
          writeButton.setEnabled(true);
          processButton.setEnabled(true);
          rectButton.setEnabled(true);
          circleButton.setEnabled(true);

          //Disable the X-button on the display.
          theFrame.setDefaultCloseOperation(
                     WindowConstants.DO_NOTHING_ON_CLOSE);

          //--------------------------------------------//
          /*
          Note that the following two anonymous listener
          registrations are actually inside the action
          listener that is registered on the text field.
          The code in these two listener registration
          blocks can't be executed when the GUI is first
          constructed because a Picture object does not
          exist at that point in time. This code is
          executed after the user enters the image file
          name, the file has been read, and the Picture
          object referred to by display has been
          constructed.

          Now that an image has been loaded, a mouse
          listener can be registered on the JFrame object
          that contains the image.
          */
          theFrame.addMouseListener(
            new MouseAdapter(){
              public void mousePressed(MouseEvent e){
                //Draw a new copy of the image on the
                // display each time the user clicks the
                // image with the mouse. This makes it
                // possible to erase an existing lasso
                // simply by clicking anywhere in the
                // image regardless of whether or not it
                // is intended to drag a new lasso.
                graphics = display.getGraphics();
                graphics.drawImage(
                             picture.getImage(),0,0,null);
                display.repaint();

                //Prepare the variables so that the
                // mouseDragged event handler can lasso an
                // area.
                //Note that the reported coordinates for
                // a mouse press on the upper-left corner
                // of the image will not be reported
                // as 0,0 due to the top and left insets
                // of the JFrame. This can lead to some
                // confusion when analyzing the code.
                anchorX = e.getX();
                anchorY = e.getY();
                deltaX = 0;
                deltaY = 0;
              }//end mousePressed
            }//end new MouseAdapter
          );//end addMouseListener
          //--------------------------------------------//

          //Register a MouseMotionListener object that
          // will call a method to draw a lasso when the
           // mouse is dragged in the image.
          theFrame.addMouseMotionListener(
            new MouseMotionAdapter(){
              public void mouseDragged(MouseEvent e){
                //Call the method to draw the lasso on the
                // basis of which radio button has been
                // selected.
                if(rectButton.isSelected()){
                  makeRectLasso(e.getX(),e.getY());
                }else if(circleButton.isSelected()){
                  makeCircleLasso(e.getX(),e.getY());
                }//end else
              }//end mouseDragged
            }//end new MouseMotionAdapter
          );//end addMouseMotionListener
          //--------------------------------------------//
        //Now finish the action listener that is
        // registered on the text field.
        }//end actionPerformed
      }//end new ActionListener
    );//end addActionListener
    //--------------------------------------------------//

    //Register an ActionListener on the writeButton.
    // Each time the user clicks the button, a backup bmp
    // file containing the current state of the display is
    // written into the directory from which the original
    // picture was read. The five most recent backup files
    // are saved. The names of the backup files are the
    // same as the name of the input file except that BAKn
    // is inserted immediately ahead of the extension
    // where n is a digit ranging from 0 to 4. The value
    // of n rolls over at 4 and starts back at 0.
    writeButton.addActionListener(
      new ActionListener(){
        public void actionPerformed(ActionEvent e){
          display.write(outputPath
                       + "BAK" + writeCounter++ + ".bmp");
          //Reset the writeCounter if it exceeds 4 to
          // conserve disk space.
          if(writeCounter > 4){
            writeCounter = 0;
          }//end if
        }//end action performed
      }//end newActionListener
    );//end addActionListener
    //--------------------------------------------------//

    //Register a WindowListener that will respond when the
    // user clicks the large X in the upper-right corner
    // of the GUI. This event handler will write the final
    // state of the display into an output file of the
    // same type as the original input file. The name will
    // be the same except that the word FINAL will be
    // inserted immediately ahead of the extension.
    addWindowListener(
      new WindowAdapter(){
        public void windowClosing(WindowEvent e){
          display.write(outputPath + "FINAL" + extension);
          System.exit(0);
        }//end windowClosing
      }//end new WindowAdapter
    );//end addWindowListener
    //--------------------------------------------------//

    //Register an action listener on the processButton
    // that calls a method to process the lasso.
    processButton.addActionListener(
      new ActionListener(){
        public void actionPerformed(ActionEvent e){
          //Get rid of the black lasso pixels
          graphics = display.getGraphics();
          graphics.drawImage(picture.getImage(),0,0,null);
          display.repaint();
          //Call a method to process the pixels on the
          // basis of which radio button is selected.
          if(rectButton.isSelected()){
            processRectPixels();
          }else if(circleButton.isSelected()){
            processCirclePixels();
          }//end else
        }//end action performed
      }//end newActionListener
    );//end addActionListener
    //--------------------------------------------------//

  }//end constructor
  //----------------------------------------------------//

  /*
  This method is called each time the mouse fires a
  mouseDragged event if the radio button labeled Circle
  is selected.

  This version of the method draws a lasso consisting of a
  circular ellipse that touches the anchor point at all
  times. The diameter of the circle is determined by the
  distance of the mouse from the anchor point. The
  location of the circle is determined by the angle that a
  line going through the anchor point and the mouse
  pointer location makes with a horizontal line going
  through the anchor point. The circle can be drawn at any
  angle, and with any diameter, even if the mouse goes
  outside the bounds of the image.

  The circle remains on the screen until the user
  clicks the image with the mouse, clicks the
  Process Pixels button, or does something else to cause
  the image to be repainted.
  */
  private void makeCircleLasso(int x,int y){

    //The parameters x and y contain the coordinates of
    // the mouse pointer when the event was fired. Update
    // the diameter of the circular lasso.
    deltaX = x - anchorX;
    deltaY = y - anchorY;
    diameter = (int)Math.hypot(deltaX,deltaY);

    //Copy the entire image from the backup picture stored
    // in memory to erase any lassos drawn earlier. Also
    // erases the effects of prior clicks on the Process
    // Pixels button.
    g2.drawImage(theImage,
                 theFrame.getInsets().left,
                 theFrame.getInsets().top,null);

    //Get the angle in radians that a line joining the
    // anchor point and the current mouse location makes
    // with a horizontal line going through the anchor
    // point. This is the angle that will be used in the
    // computations required to rotate the circular
    // ellipse around the anchor point while continually
    // touching the anchor point.
    angle = Math.atan2((double)deltaY,(double)deltaX);

    //Create and draw a circular ellipse that touches the
    // anchor point at all times.
    ellipse = new Ellipse2D.Double(
          //Compute and specify the coordinates of the
          // upper left corner of a box that will contain
          // the circular ellipse.
          anchorX-(diameter/2-Math.cos(angle)*diameter/2),
          anchorY-(diameter/2-Math.sin(angle)*diameter/2),
          //Specify the width and the height of the box.
          diameter,
          diameter);
    //Draw the ellipse.
    g2.draw(ellipse);

  }//end makeCircleLasso
  //----------------------------------------------------//

  //This is a demo method that shows how to process pixels
  // contained in a circular elliptical lasso. You can
  // modify this method to meet your own needs.
  //This demo method eliminates green from all pixels
  // inside the circle.
  private void processCirclePixels(){
    //Protect against clicking the button before drawing
    // a lasso.
    if(ellipse == null) return;

    for(int col = 0;col < pictureWidth;col++){
      for(int row = 0;row < pictureHeight;row++){
        //Change the color of the pixels inside the
        // ellipse.
        //Note: It is necessary to compensate for the top
        // and left insets of the JFrame.
        if(ellipse.contains(
                         col + theFrame.getInsets().left,
                         row + theFrame.getInsets().top)){
          //The pixel is inside the lasso. Change its
          // color.
          Pixel pixel = display.getPixel(col,row);
          pixel.setRed(0);
        }//end if

      }//end inner loop
    }//end outer loop
    display.repaint();
  }//end processCirclePixels
  //----------------------------------------------------//

  /*
  This method is called each time the mouse fires a
  mouseDragged event if the radio button labeled
  Rect/Ellipse is selected.

  This version of the method draws a lasso consisting of a
  rectangle with an inscribed ellipse. A corner of the
  rectangle touches the anchor point at all times.

  The dimensions of the rectangle are determined by the
  distance of the mouse from the anchor point. That
  distance is the diagonal length of the rectangle.

  The location of the rectangle is determined by the angle
  that a line going through the anchor point and the mouse
  pointer location makes with a horizontal line going
  through the anchor point.

  The rectangle can be drawn in any quadrant, and with any
  size, even if the mouse goes outside the bounds of the
  image.

  Pixels contained in the rectangle and pixels contained
  in the inscribed ellipse can be process separately or in
  combination.

  The rectangle remains on the screen until the user
  clicks the image with the mouse, clicks the
  Process Pixels button, or does something else to cause
  the image to be repainted.
  */
  private void makeRectLasso(int x,int y){

    //The parameters x and y contain the coordinates of
    // the mouse pointer when the event was fired. Update
    // the width and height of the rectangular lasso.
    deltaX = x - anchorX;
    deltaY = y - anchorY;

    //Copy the entire image from the backup picture stored
    // in memory to erase any lassos drawn earlier. This
    // also erases the effects of earlier clicks on the
    // Process Pixels button.
    g2.drawImage(theImage,
                 theFrame.getInsets().left,
                 theFrame.getInsets().top,null);

    //Get the angle in radians that a line joining the
    // anchor point and the current mouse location makes
    // with a horizontal line going through the anchor
    // point. This is the angle that will be used in the
    // computations required to draw the rectangle in the
    // correct quadrant.
    angle = Math.atan2((double)deltaY,(double)deltaX);

    //Create and draw a rectangle such that one of its
    // corners touches the anchor point at all times.
    if((angle >= 0) && (angle < pi/2)){
      //Create the rectangle in the lower-right quadrant.
      rectangle = new Rectangle2D.Double(
          //Compute and specify the coordinates of the
          // upper-left corner of the rectangle.
          anchorX,
          anchorY,
          //Specify the width and the height of the
          // rectangle.
          deltaX,
          deltaY);
      //Now inscribe an ellipse in the rectangle.
      ellipse = new Ellipse2D.Double(anchorX,
                                     anchorY,
                                     deltaX,
                                     deltaY);
    }else if((angle >= pi/2) && (angle < pi)){
      //Create the rectangle in the lower-left quadrant.
      rectangle = new Rectangle2D.Double(anchorX + deltaX,
                                         anchorY,
                                         -deltaX,
                                         deltaY);
      ellipse = new Ellipse2D.Double(anchorX + deltaX,
                                     anchorY,
                                     -deltaX,
                                     deltaY);
    }else if((angle >= -pi/2) && (angle < 0)){
      //Create the rectangle in the upper-right quadrant.
      rectangle = new Rectangle2D.Double(anchorX,
                                         anchorY + deltaY,
                                         deltaX,
                                         -deltaY);
      ellipse = new Ellipse2D.Double(anchorX,
                                     anchorY + deltaY,
                                     deltaX,
                                     -deltaY);
    }else{
      //Create the rectangle in the upper-left quadrant.
      rectangle = new Rectangle2D.Double(anchorX + deltaX,
                                         anchorY + deltaY,
                                         -deltaX,
                                         -deltaY);
      ellipse = new Ellipse2D.Double(anchorX + deltaX,
                                     anchorY + deltaY,
                                     -deltaX,
                                     -deltaY);
    }//end else

    //Draw the rectangle and the ellipse.
    g2.draw(rectangle);
    g2.draw(ellipse);
  }//end makeRectLasso
  //----------------------------------------------------//

  //This is a demo method that shows how to process pixels
  // contained in a rectangular lasso and an elliptical
  // lasso. You can modify this method to meet your own
  // needs.
  //This demo method eliminates red from all pixels inside
  // the rectangle but outside the ellipse. It eliminates
  // green from all pixels inside the ellipse.
  private void processRectPixels(){
    //Protect against clicking the button before drawing
    // a lasso.
    if(rectangle == null)return;

    for(int col = 0;col < pictureWidth;col++){
      for(int row = 0;row < pictureHeight;row++){

        //Change the color of the pixels inside the
        // rectangle and outside the ellipse.
        //Note: It is necessary to compensate for the top
        // and left insets of the JFrame.
        if((rectangle.contains(
                       col + theFrame.getInsets().left,
                       row + theFrame.getInsets().top)) &&
           !((ellipse.contains(
                       col + theFrame.getInsets().left,
                       row + theFrame.getInsets().top)))){
          pixel = display.getPixel(col,row);
          pixel.setRed(0);
        }//end if

        //Change the color of the pixels inside the
        // ellipse.
        if(ellipse.contains(
                         col + theFrame.getInsets().left,
                         row + theFrame.getInsets().top)){
          Pixel pixel = display.getPixel(col,row);
          pixel.setGreen(0);
        }//end if

      }//end inner loop
    }//end outer loop
    display.repaint();
  }//end processRectPixels
  //----------------------------------------------------//
}//end class Lasso02 |
Copyright 2009, Richard G. Baldwin. Reproduction in whole or in part in any form or medium without express written permission from Richard Baldwin is prohibited.
Richard has participated in numerous consulting projects and he frequently provides onsite training at the high-tech companies located in and around Austin, Texas. He is the author of Baldwin's Programming Tutorials, which have gained a worldwide following among experienced and aspiring programmers. He has also published articles in JavaPro magazine.
In addition to his programming expertise, Richard has many years of practical experience in Digital Signal Processing (DSP). His first job after he earned his Bachelor's degree was doing DSP in the Seismic Research Department of Texas Instruments. (TI is still a world leader in DSP.) In the following years, he applied his programming and DSP expertise to other interesting areas including sonar and underwater acoustics.
Richard holds an MSEE degree from Southern Methodist University and has many years of experience in the application of computer technology to real-world problems.
-end-