Published: March 19, 2009
By Richard G. Baldwin
Java Programming Notes # 364
This lesson is the next in a series (see Resources) designed to teach you how to write Java programs to do things like:
If you have ever wondered how to do these things, you've come to the right place.
If you have studied the earlier lessons in this series, you have learned about turtles, worlds, and pictures. You have learned that objects of the Picture class are useful for much more than simply serving as living quarters for turtles. They are also useful for manipulating images in interesting and complex ways.
|
The PictureExplorer class
In the previous lesson, you learned that an object of the PictureExplorer class (see Figure 2) is a GUI that allows you to determine the numeric color values for any pixel in a picture by placing a cursor on the pixel.
The pixel position is controlled by clicking or dragging the mouse within the picture, clicking buttons in the upper panel, or typing coordinate values into text fields. You can zoom in and out to view the pixels in more or less detail and you can see the actual color of the pixel displayed in a small colored square.
You learned how the GUI is constructed from a big-picture viewpoint. The GUI window is the visual manifestation of a JFrame object. You learned how the JFrame object is configured, how the Zoom menu is constructed, and how an ActionListener object is registered on the items in that menu.
In this lesson, you will learn how to construct the infoPanel in the NORTH location of the GUI in Figure 2. You will also learn how to register event listener objects on the components in that panel making use of objects of anonymous classes.
Along the way, you will learn about some other interesting topics including:
Source code listings
A complete listing of Ericson's PictureExplorer class is provided in Listing 31 near the end of the lesson. A complete listing of a very simple program named Java362a that I will use to illustrate the behavior of the PictureExplorer class is provided in Listing 32.
I recommend that you open another copy of this document in a separate browser window and use the following links to easily find and view the figures and listings while you are reading about them.
I recommend that you also study the other lessons in my extensive collection of online programming tutorials. You will find a consolidated index at www.DickBaldwin.com.
In this series of lessons, I will present and explain many of the classes in a multimedia class library that was developed and released under a Creative Commons Attribution 3.0 United States License (see Resources) by Mark Guzdial and Barbara Ericson at Georgia Institute of Technology. In doing this, I will also present some interesting sample programs that use the library.
I explained how to download, install, and test the multimedia class library in an earlier lesson titled Multimedia Programming with Java, Getting Started (see Resources).
I will use a very simple program to illustrate the creation of an object of the PictureExplorer class.
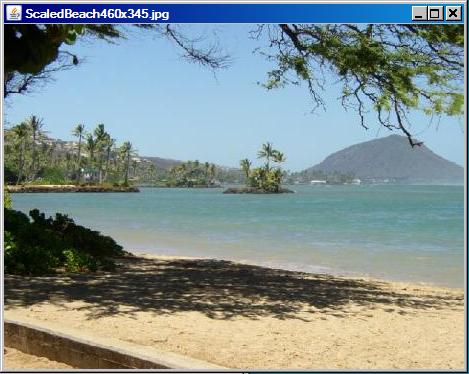
The sample program (named Java362a) begins by creating a new Picture object with known dimensions using input from an image file in the current directory. Then it calls the show method on the object to produce the screen output shown in Figure 1.
Figure 1. Screen output produced by the show method.
|
|
Call the explore method
After that, the program calls the explore method on the Picture object to produce the screen output shown in Figure 2.
Figure 2. Screen output produced by the explore method.
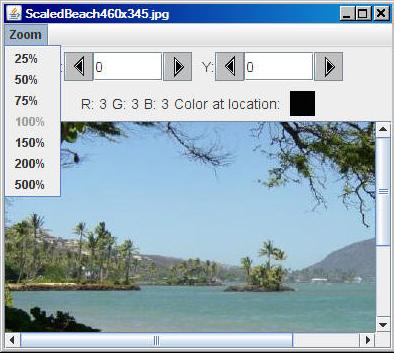 |
(Note that in the screen shot in Figure 2, the GUI has been manually resized to make it smaller and the Zoom menu has been opened.)
You learned all about the show method of the SimplePicture class in earlier lessons. You began learning about the explore method and the PictureExplorer class in the previous lesson (see Resources).
The explore method
The explore method of the SimplePicture class contains a single statement, which instantiates an object of the PictureExplorer class. As soon as that object is instantiated, the GUI shown in Figure 2 appears on the screen and it remains on the screen until the program is terminated or the user clicks the X-button in the upper-right corner of the GUI.
Methods in the PictureExplorer class often call other methods that belong to the class. Those methods, in turn, often call other methods. Because I will be switching back and forth among code fragments extracted from different methods, things can get confusing. I will use color in an attempt to reduce the confusion. That is, when one method calls another and I need to put the explanation of the first method on hold while I explain the code in the second method, I will change the background color against which the code fragments are displayed.
Background color for first-level classes, methods and/or constructors
For example, I will present code fragments extracted from Ericson's PictureExplorer class against the background color shown in Listing 1.
Listing 1. Background color for first-level code.
Color = #FFFFBB |
Background color for second-level methods
Similarly, I will present code fragments extracted from second-level methods against the background color shown in Listing 2.
Listing 2. Background color for second-level code.
Color = #FFEEFF |
Background color for third and lower-level methods
Finally, I will present code fragments extracted from third-level and lower-level code (if any) against the background colors, going from left to right, in Listing 3.
Listing 3. Background color for third and lower-level code.
3-#DDFFFF |
4-#C1C100 |
5-#FFCC66 |
6-#B1C2BD |
7-#EEEEEE |
In the event that I need to distinguish among more than seven levels at the same time, I will come up with another color and explain its use at the time.
The purpose of this program is to support an explanation of the PictureExplorer class.
Normally, I break programs down and explain them in fragments. However, this program is short and simple and I explained it in detail in the previous lesson (see Resources). You can view a complete listing of the program in Listing 32 near the end of the lesson.
Create a Picture object and display it with the explore method
A Picture object having dimensions of 450x345 pixels is created by reading an image file from the current directory. The explore method is called on the Picture object producing the screen output GUI shown in Figure 2.
As you learned in the previous lesson, the explore method simply creates a new object of the PictureExplorer class. The GUI shown in Figure 2 appears on the screen as soon as that object is created. (Again, note that the GUI in Figure 2 has been manually resized to make it smaller and the Zoom menu has been opened.)
You also learned in the previous lesson that the onscreen GUI window that you see in Figure 2 is the visual manifestation of a JFrame object. Basically, a JFrame object consists of the following parts:
The content area
I explained the menu area in some depth in the previous lesson. We will be primarily concerned with the content area in this lesson.
The content area (immediately below the menu area) has a default BorderLayout object as the layout manager. This layout manager makes it possible to place one component in the CENTER and four additional components in the NORTH, SOUTH, EAST, and WEST locations.
In the GUI produced by the PictureExplorer class, there is one component in the CENTER and one component in the NORTH location. There are no components in the EAST, SOUTH, and WEST locations. (Keep in mind that each of the five allowable components can themselves contain other components.)
A JScrollPane object in the CENTER location
As I explained in the previous lesson, the component in the CENTER is an object of the JScrollPane class. I will have a great deal more to say about this in the next lesson.
A JPanel object in the NORTH location
The component in the NORTH location of the JFrame object's content area is a JPanel object with the layout manager on the panel also set to BorderLayout. This JPanel object is referred to by a local variable named infoPanel.
The infoPanel contains two smaller JPanel objects, one in its NORTH location and one in its SOUTH location. There are no components in the CENTER, EAST, or WEST locations of this JPanel object.
A JPanel object is also a container that can contain other components. However, there is no "content pane" associated with a JPanel object. Other components are added directly to the JPanel object.
The locationPanel and the colorInfoPanel
The JPanel object in the NORTH location of the infoPanel is referred to in this class as the locationPanel. The construction of the locationPanel is very complex with various registered listener objects, instantiated from anonymous classes.
The JPanel object in the SOUTH location of the infoPanel is referred to as the colorInfoPanel. The construction of the colorInfoPanel is less complex than the construction of the locationPanel. Among other things, this panel is completely passive with no registered listener objects. Its sole purpose is to display pixel-color information.
The layout manager for the locationPanel
The layout manager for the locationPanel is an object of the FlowLayout class. With this layout manager, you can add any number of components to the JPanel object and they will position themselves in horizontal rows. If there are too many components to fit on one row, some will spill over to the next row. You can cause the components on the rows to be aligned to the left, the right, or the center.
The population of the locationPanel
The locationPanel is populated with the following components:
There are numerous event handlers registered on various components in the locationPanel.
You will learn how all of the components are put together, how the event handlers are defined, and how they behave later in this lesson.
The colorInfoPanel
The colorInfoPanel is also a JPanel object, and the layout manager for the colorInfoPanel is also an object of the FlowLayout class.
As I mentioned earlier, the colorInfoPanel is much simpler than the locationPanel and is primarily populated with the following components:
There are no listener objects registered on components on the colorInfoPanel.
You will also learn how these components are put together later in this lesson.
A complete listing of the PictureExplorer class is provided in Listing 31 near the end of the lesson. I will break the class down and explain it in fragments. I explained part of the PictureExplorer class in the previous lesson. In this lesson, I will begin with a code fragment containing the declaration of instance variables, which is shown in Listing 4.
Private instance variables of the PictureExplorer class
The PictureExplorer class declares a large number of private instance variables and initializes some of them. They are shown in Listing 4 for easy reference.
Listing 4. Private instance variables of the PictureExplorer class.
// current x and y index private int xIndex = 0; private int yIndex = 0; //Main gui variables private JFrame pictureFrame; private JScrollPane scrollPane; //information bar variables private JLabel xLabel; private JButton xPrevButton; private JButton yPrevButton; private JButton xNextButton; private JButton yNextButton; private JLabel yLabel; private JTextField xValue; private JTextField yValue; private JLabel rValue; private JLabel gValue; private JLabel bValue; private JLabel colorLabel; private JPanel colorPanel; // menu components private JMenuBar menuBar; private JMenu zoomMenu; private JMenuItem twentyFive; private JMenuItem fifty; private JMenuItem seventyFive; private JMenuItem hundred; private JMenuItem hundredFifty; private JMenuItem twoHundred; private JMenuItem fiveHundred; /** The picture being explored */ private DigitalPicture picture; /** The image icon used to display the picture */ private ImageIcon scrollImageIcon; /** The image display */ private ImageDisplay imageDisplay; /** the zoom factor (amount to zoom) */ private double zoomFactor; /** the number system to use, 0 means starting at 0, * 1 means starting at 1 */ private int numberBase=0; |
There's not much to be said about the instance variables at this point. We will be referring back to them as the explanation of the PictureExplorer class progresses.
I explained the constructor for the PictureExplorer class in the previous lesson, but I have shown it again in Listing 5 for easy reference.
Listing 5. The constructor for the PictureExplorer class.
 /**
  * Public constructor
  * @param picture the picture to explore
  */
 public PictureExplorer(DigitalPicture picture){
   // set the fields
   this.picture = picture;
   zoomFactor = 1;

   // create the window and set things up
   createWindow();
 }//end constructor
|
Call the createWindow method
The constructor saves the incoming parameter, (which refers to the picture to be displayed in the content area of the GUI) and sets a value of 1 into the instance variable named zoomFactor. Then it calls the createWindow method where the completion of construction is accomplished.
When the createWindow method returns, the constructor returns the new PictureExplorer object's reference to the explore method of the SimplePicture class (or perhaps from a method in a class of your own design) from which the constructor was called. However, the explore method doesn't save the reference in a named reference variable. Therefore, the PictureExplorer object is an anonymous object that remains on the screen until the user clicks the X-button in the upper-right corner of Figure 2.
The createWindow method of the PictureExplorer class is shown in its entirety in Listing 6.
Listing 6. The createWindow method.
 /**
  * Creates the JFrame and sets everything up
  */
 private void createWindow(){
   // create the picture frame and initialize it
   createAndInitPictureFrame();

   // set up the menu bar
   setUpMenuBar();

   //create the information panel
   createInfoPanel();

   //creates the scrollpane for the picture
   createAndInitScrollingImage();

   // show the picture in the frame at the size it needs
   // to be
   pictureFrame.pack();
   pictureFrame.setVisible(true);
 }//end createWindow method
|
A sequence of method calls
As you learned in the previous lesson, the createWindow method consists of:
I explained the following two methods in the previous lesson:
I will explain the createInfoPanel method in this lesson and will explain the createAndInitScrollingImage method in the next lesson.
The beginning of the createInfoPanel method is shown in the code fragment in Listing 7. (Note the change in background color, indicating that the discussion has moved down one level in the method call stack.)
Listing 7. Beginning of the createInfoPanel method.
 /**
  * Creates the North JPanel with all the pixel location
  * and color information
  */
 private void createInfoPanel(){
   // create the info panel and set the layout
   JPanel infoPanel = new JPanel();
   infoPanel.setLayout(new BorderLayout());

   // create the font
   Font largerFont =
                   new Font(infoPanel.getFont().getName(),
                       infoPanel.getFont().getStyle(),14);
|
A new JPanel object
Listing 7 begins by instantiating a new JPanel object, saving its reference in infoPanel, and setting the layout manager to BorderLayout. This is all very straightforward code for those who are familiar with Swing GUI programming.
A new Font object
Then Listing 7 instantiates a new Font object and saves its reference in largerFont. This is a little more complicated. This overloaded version of the Font constructor requires the following parameters:
Rather than coming up with a specific font name and a specific font style, Ericson simply used a series of method calls to get the name and the style of the default font. Then she specified that the font size should be 14 points, and passed these values to the constructor for the new Font object. That way, she was assured that the specified name and style would be compatible with the current operating environment.
Call the createLocationPanel method
Then the createInfoPanel method calls the createLocationPanel method and saves the returned value in the variable named locationPanel.
Listing 8. Call the createLocationPanel method.
JPanel locationPanel = createLocationPanel(largerFont); |
This is one of those occasions where we need to put the explanation of the current method on hold and explain another method. As mentioned earlier, I will also change the background color against which the code fragments are displayed to indicate that the discussion is moving one step further down the method call stack.
The createLocationPanel method, which is a long and complex method, begins in Listing 9.
Listing 9. Beginning of the createLocationPanel method.
 /**
  * Create the pixel location panel
  * @param labelFont the font for the labels
  * @return the location panel
  */
 public JPanel createLocationPanel(Font labelFont){

   // create a location panel
   JPanel locationPanel = new JPanel();
   locationPanel.setLayout(new FlowLayout());

   Box hBox = Box.createHorizontalBox();
|
The method starts out easy enough by instantiating a new JPanel object, saving its reference in the variable named locationPanel, and setting the layout manager to FlowLayout.
The FlowLayout manager
Briefly, FlowLayout arranges components in a row. When there isn't enough room for all the components on the current row, the components on the right wrap (much like text in a word processor) and move down to the next row.
By default, this layout manager has a centered alignment causing the components on each row to be centered in the row. (Other alignments such as right and left alignment are available.)
|
BoxLayout
Then the code in Listing 9 becomes somewhat more complicated when a new object of the Box class is instantiated and its reference is stored in hBox. Sun describes the Box class as "A lightweight container that uses a BoxLayout object as its layout manager."
Sun partially describes BoxLayout as "A layout manager that allows multiple components to be laid out either vertically or horizontally. The components will not wrap so, for example, a vertical arrangement of components will stay vertically arranged when the frame is resized."
Rather than trying to explain all of this, I will simply refer you to the sidebar. I will also provide a screen shot that shows the effect of using BoxLayout.
The effect of BoxLayout
Compare the screen shot of the GUI in Figure 3 with the screen shot in Figure 2. In Figure 3, the GUI has been resized to make it narrower than in Figure 2.
Pay particular attention to the positions of the components in the locationPanel and the colorInfoPanel below the menu area. (The locationPanel is the one that shows the text fields. It is above the colorInfoPanel that shows the RGB color values.)
Figure 3. Illustration of the effect of a BoxLayout manager.
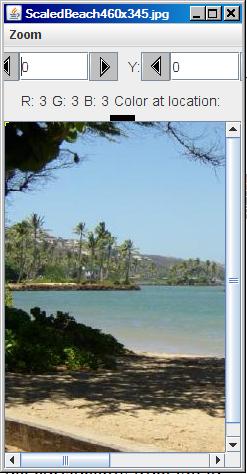 |
The colorInfoPanel has wrapped
In Figure 2, the black square is at the right end of the text in the colorInfoPanel. However, in Figure 3, after I resized the GUI and there was no longer room for the black square on the same row with the RGB text, the black square wrapped and moved down to the center of the next row. This is a characteristic of the FlowLayout manager.
No wrapping for the locationPanel
However, when there was no longer room for the JButton on the right side of the rightmost text field in the locationPanel, it simply allowed itself to be clipped by the right edge of the GUI. It refused to wrap and drop down to the next row. This is one of the characteristics of the BoxLayout manager. (Note that when the code in Listing 9 finishes executing, the Box object has been instantiated but it still hasn't been put to work.)
Create two JLabel objects and one JTextField object
Although it doesn't show in either Figure 2 or Figure 3 (for different reasons), there is an upper-case "X:" at the left end of the left text field in the locationPanel. (It is the counterpart to the upper-case Y that you see in Figure 2 and Figure 3 and it is visible in Figure 6.)
Listing 10 begins by constructing two JLabel objects containing the text strings "X:" and "Y:". They will be positioned to the left of the two JButton objects (with triangular arrows that point to the left) later. Each label serves as the label for the two buttons and the text field to its right.
Listing 10. Create two JLabel objects and one JTextField object.
   // create the labels
   xLabel = new JLabel("X:");
   yLabel = new JLabel("Y:");

   // create the text fields
   xValue = new JTextField(
                 Integer.toString(xIndex + numberBase),6);
|
A single JTextField object
Then Listing 10 instantiates a single JTextField object and saves its reference in the variable named xValue.
A JTextField object only knows how to deal with String data. It doesn't know how to deal with any of the numeric types. Therefore, if you are going to use a JTextField object to display or receive numeric data, you must convert between String and numeric data on the way in or on the way out.
The JTextField constructor that is called in Listing 10 requires a String and an integer as incoming parameters. The String specifies the initial text that will be displayed in the text field. The integer (6 in this case) specifies the width of the text field in characters.
Converting an int value to a String value
The static toString method of the Integer class shown in Listing 10 converts an int value into a String value. The variable xIndex contains the current x-coordinate of the cursor (initially 0).
The variable numberBase contains either a 0 or a 1 (initially 0). The JTextField object that is instantiated in Listing 10 is initialized to show the text character "0".
Compiled class file names
Sometimes when analyzing a Java program it is useful to examine the names of the class files produced when the program is compiled. Figure 4 shows the class files produced by compiling the PictureExplorer class.
Figure 4. Class files produced by compiling the PictureExplorer class.
PictureExplorer.class PictureExplorer$PictureExplorerFocusTraversalPolicy.class PictureExplorer$1.class PictureExplorer$2.class PictureExplorer$3.class PictureExplorer$4.class PictureExplorer$5.class PictureExplorer$6.class |
|
Top-level and inner classes
If you know the class file naming scheme, you can often tell a lot about how a program is organized by examining the names of the class files. For example, every class definition produces an output file with an extension of .class when the program is compiled. This not only includes top-level classes, it also includes inner classes as well.
Top-level class file names
For example, we know that the Java compiler does not insert dollar sign ($) characters into class file names for top-level classes. There is only one file name in Figure 4 that doesn't include a $. Therefore, that class (PictureExplorer) must be a top-level class. (We know that it is because that is the name of the top-level class that we are analyzing: PictureExplorer.)
Inner class file names
We also know that the compiler does insert $ characters into the class file names for all inner classes.
There are several kinds of inner classes:
Member classes
A member class is a class that is defined inside a class but not inside a method of the class. Every member class must have a name, and the name is reflected in the class file name following the $ character.
There is only one such class file in Figure 4 and the name following the $ is PictureExplorerFocusTraversalPolicy. Therefore, this must be a member class, and we know that it is from a discussion in the previous lesson. It is a private member class, which is the only way that a class definition can be declared private.
Class file names for local classes and anonymous classes
The water gets a little murkier when we talk about the class file names for local classes and anonymous classes. We know that the file names will always contain a $ followed by a number for both local classes and anonymous classes. However, for local classes, the class file name will also contain another $ followed by a class name.
There are no file names in Figure 4 meeting that description, so the remaining six class files in Figure 4 must have been created by the compilation of six different anonymous classes.
An object of an anonymous class
This is where things get really interesting. The source code for one of the anonymous classes identified in Figure 4 is shown in Listing 11. (Recall that we are still discussing the method named CreateLocationPanel.)
Listing 11. An object of an anonymous class.
   xValue.addActionListener(new ActionListener() {
     public void actionPerformed(ActionEvent e) {
       displayPixelInformation(
                       xValue.getText(),yValue.getText());
     }
   });
|
The syntax for instantiating objects of anonymous classes is extremely ugly but I will try to explain the meaning of the code in Listing 11.
Register an ActionListener object
To begin with, Listing 11 calls the addActionListener method on a reference to the JTextField object that was instantiated in Listing 10. The purpose of this method call is to register an ActionListener object on the text field to respond to action events fired by the text field. (For example, a JTextField object will fire an action event when the user presses the Enter key while the text field has the focus.)
A valid ActionListener object must be an object instantiated from a class that implements the ActionListener interface.
Listing 11 defines an anonymous class and instantiates an object of that class in the parameter list of the addActionListener method.
How to interpret this code - an unnamed class
You can interpret the code in Listing 11 in the following way. A new object is instantiated from an unnamed class that implements the ActionListener interface. That object's reference is passed as a parameter to the addActionListener method.
|
Must define the actionPerformed method
Because the unnamed class implements the ActionListener interface, it must provide a concrete definition of the action Performed method, which it does.
The definition of the actionPerformed method is embedded in the middle of the code in Listing 11. The body of the method consists of a single statement, which is a call to another method named displayPixelInformation.
It's time to change background colors again so that I can put the createLocationPanel method on hold while I explain the call to the displayPixelInformation method.
The PictureExplorer class defines three overloaded versions of methods named displayPixelInformation. The basic purpose of all three methods is to get and display red, green, and blue color data in the colorInfoPanel shown below the two text fields in Figure 2.
The version of the displayPixelInformation method that is called in Listing 11 is shown in its entirety in Listing 12.
Listing 12. The displayPixelInformation method
 /**
  * Method to display the pixel information from the
  * passed x and y but also converts x and y from strings
  * @param xString the x value as a string from the user
  * @param yString the y value as a string from the user
  */
 public void displayPixelInformation(
                          String xString, String yString){
   int x = -1;
   int y = -1;
   try {
     x = Integer.parseInt(xString);
     x = x - numberBase;
     y = Integer.parseInt(yString);
     y = y - numberBase;
   } catch (Exception ex) {
   }

   if (x >= 0 && y >= 0) {
     displayPixelInformation(x,y);
   }
 }//end displayPixelInformation method
|
Called when the text field fires an action event
The actionPerformed method in Listing 11 is called when the user presses the Enter key while the left text field in Figure 2 has the focus.
The displayPixelInformation method in Listing 12 is called by the actionPerformed method.
This version of the method requires two String references as incoming parameters. The actionPerformed method passes the text contents of both text fields when this method is called.
This makes it possible for the user to type a coordinate value into the text field, press the Enter key, and cause the displayPixelInformation method to be called to act on that data.
Convert the two strings to numeric coordinates
The purpose of the code in Listing 12 is to:
Complicated by numberBase considerations
The code in Listing 12 is complicated by the fact that the class is written to support the use of coordinate values that begin with 0, or coordinate values that begin with 1. (However, the numberBase variable, which distinguishes between the two alternatives, is set to 0 when an object of the PictureExplorer class is instantiated.)
Other than the complication attributable to the number base, you should have no difficulty understanding the code in Listing 12 that converts the String values in the two text fields into coordinate values of type int and passes those coordinate values in a call to another overloaded version of the displayPixelInformation method.
Once again, it's time to change colors as I put the displayPixelInformation method in Listing 12 on hold while I explain the call to another overloaded version of the displayPixelInformation method.
This version begins in Listing 13. This version is considerably more complex than the one in Listing 12, so I will break it down and explain it in fragments.
Listing 13. Beginning of another overloaded version of the displayPixelInformation method
 /**
  * Method to display pixel information for the passed x
  * and y
  * @param pictureX the x value in the picture
  * @param pictureY the y value in the picture
  */
 private void displayPixelInformation(
                              int pictureX, int pictureY){
   // check that this x and y is in range
   if (isLocationInPicture(pictureX, pictureY)){
     // save the current x and y index
     xIndex = pictureX;
     yIndex = pictureY;

     // get the pixel at the x and y
     Pixel pixel = new Pixel(picture,xIndex,yIndex);
|
Confirm that the coordinates are in the picture
The method begins by calling a method named isLocationInPicture to confirm that the incoming coordinate values are actually within the height and width of the picture. The code in this method is so simple that I'm not going to show it here. You can view the method in Listing 31 near the end of the lesson. If the coordinate values are in the picture, the method returns true, and returns false otherwise.
When the coordinates are in the picture...
When the method returns true, the remaining code in Listing 13 is executed.
Listing 13 saves the coordinate values in a pair of instance variables named xIndex and yIndex. (If they are not in the picture, they are not saved.)
Get and save a reference to a Pixel object
Then Listing 13 calls the getPixel method to get and save a reference to a Pixel object that contains the red, green, and blue color values in the pixel at that location in the picture. The values will be used later, (but not in the next code fragment).
Set the coordinate values in the text fields
This overloaded version of the displayPixelInformation method is not only called when the user presses the Enter key while the text field has the focus, it is also called when the user moves the cursor within the picture using some other method, such as clicking the picture with the mouse, for example.
The text fields serve a dual purpose
In all cases, the text fields are updated to display the new coordinate values. Hence they serve a dual purpose:
Update the contents of the text fields
The contents of the text fields are updated by the code in Listing 14, which converts the current coordinate values to String objects and uses those objects to set the text in the text fields.
Listing 14. Set the coordinate values in the text fields.
     // set the values based on the pixel
     xValue.setText(Integer.toString(
                                   xIndex  + numberBase));
     yValue.setText(Integer.toString(
                                    yIndex + numberBase));
|
Use the color information from the Pixel object
The code in Listing saved a reference to a Pixel object containing color information for the pixel at the location of the current coordinate values. Listing 15 uses that information for two different purposes.
Listing 15. Use the color information from the Pixel object.
     rValue.setText("R: " + pixel.getRed());
     gValue.setText("G: " + pixel.getGreen());
     bValue.setText("B: " + pixel.getBlue());

     colorPanel.setBackground(new Color(pixel.getRed(),
                                        pixel.getGreen(),
                                        pixel.getBlue()));
   }//end if
|
Construct the String color values
The first purpose is to:
These three strings will be used to display the red, green, and blue color values later when the colorInfoPanel, shown below the text fields in Figure 2, is updated.
Color the small square
The second purpose is to set the background color for the small colored square, shown beneath the right-most text field in Figure 2. The color of the square is set to match the color of the pixel at the current coordinates.
The end of the if statement
Listing 15 signals the end of the if statement that began in Listing 13. All of the code in the if clause is executed if the current coordinates are within the bounds of the picture.
Code executed when coordinates are not in the picture
Listing 16 shows the else clause that is executed when the current coordinates are not within the bounds of the picture.
Listing 16. Code executed when coordinates are not in the picture.
   else{
     clearInformation();
   }//end else
|
Listing 16 calls a method named clearInformation. This is another method that is too simple to warrant showing here. Once again, you can view the code for the clearInformation method in Listing 31 near the end of the lesson.
The clearInformation method sets the string "N/A" into both text fields and causes that same string to be set in all three color values the next time the colorInfoPanel is updated.
It sets the color of the colored square in Figure 2 to black and resets the current coordinate values to 0,0.
Notify the image display of the current coordinates
Finally, Listing 17 calls two set methods on the image display in the CENTER of the JFrame, passing the product of the current coordinate values and the zoomFactor. You will see how that information is used in a future lesson when we examine the ImageDisplay class.
Listing 17. Notify the image display of the current x and y coordinate values.
imageDisplay.setCurrentX((int) (xIndex * zoomFactor)); imageDisplay.setCurrentY((int) (yIndex * zoomFactor)); }//end displayPixelInformation method |
The end of the displayPixelInformation method
Listing 17 also signals the end of this version of the displayPixelInformation method. This causes control to return to the other version of the displayPixelInformation method shown in Listing 12 from which this method is called.
Terminate immediately
The displayPixelInformation method shown in Listing 12 has nothing more to do, so it terminates immediately returning control to the actionPerformed method in the anonymous ActionEvent handler in Listing 11.
The action event handler has completed its task
The actionPerformed method also has nothing more to do, so it also terminates immediately.
Wait for the next event
When the actionPerformed method has been called and then terminates, the GUI essentially goes into a quiescent state, waiting for the next event to be fired by some component and handled by some event handler that is registered on that component.
Register an anonymous ActionListener on the other text field
That brings us back to the createLocationPanel method, (see Listing 11) which continues in Listing 18.
Listing 18. Register an anonymous ActionListener on the other text field.
   yValue = new JTextField(
                 Integer.toString(yIndex + numberBase),6);
   yValue.addActionListener(new ActionListener() {
     public void actionPerformed(ActionEvent e) {
      displayPixelInformation(
                       xValue.getText(),yValue.getText());
     }
   });
|
Listing 18 instantiates and registers an anonymous ActionListener object on the right-most JTextField object shown in Figure 2.
Behavior almost same as before
The behavior of this listener object is essentially the same as the behavior of the listener object registered on the leftmost JTextField object, except that in this case, we are talking about entering a y coordinate value into the text field instead of an x coordinate value.
Note that the single statement in the actionPerformed method in Listing 18 is identical to the corresponding statement in the actionPerformed method in Listing 11. Therefore, it doesn't matter which JTextField object fires an action event, the behavior is the same from the point where the displayPixelInformation method is called.
Recall that we are still discussing the createLocationPanel method. Listing 19 makes a call to a method named setUpNextAndPreviousButtons to prepare the four buttons located on either side of the two text fields in Figure 2 for use.
Listing 19. Call the setUpNextAndPreviousButtons method.
setUpNextAndPreviousButtons(); |
The setUpNextAndPreviousButtons method is a huge and complex method, so it's time to change colors again, put the createLocationPanel method back on hold, and begin explaining the method named setUpNextAndPreviousButtons.
Beginning of the setUpNextAndPreviousButtons method
The setUpNextAndPreviousButtons method begins in Listing 20.
Listing 20. Beginning of the setUpNextAndPreviousButtons method.
 /**
  * Method to set up the next and previous buttons for the
  * pixel location information
  */
 private void setUpNextAndPreviousButtons()
 {
   // create the image icons for the buttons
   Icon prevIcon = new ImageIcon(
         SoundExplorer.class.getResource("leftArrow.gif"),
                                        "previous index");
   Icon nextIcon = new ImageIcon(
        SoundExplorer.class.getResource("rightArrow.gif"),
                                            "next index");
|
|
The class named Class
There is a class named Class, which provides methods for doing a number of interesting things.
The code in Listing 20 gets complicated very quickly with the call to the getResources method of the class named Class.
|
We need two ImageIcon objects
All four of the buttons in the locationPanel in Figure 2 have triangular images on them that serve as arrows. To cause an image to be displayed on a JButton object, you need for the image to be encapsulated in an object of a class that implements the Icon interface. One such class is the ImageIcon class.
What we are going to do here is to get references to two ImageIcon objects to place on the JButton objects that you see on either side of the JTextField objects in Figure 2. The ImageIcon objects should encapsulate images of arrows that point to the left and to the right.
Image files containing the required images
A pair of image files named leftArrow.gif and rightArrow.gif, containing the required images, are included in Ericson's multimedia class library. Screen shots of the two images are shown in Figure 5.
Figure 5. Image files in Ericson's class library.
Our challenge is to find a (hopefully) reliable way to instantiate ImageIcon objects containing those two images.
The ImageIcon class
The ImageIcon class contains nine overloaded constructors as of Java version 1.6.
One of those constructors requires the name of an image file as a parameter. It extracts the image from the file and encapsulates it in the ImageIcon object. At first blush, this seems like a reasonable approach. However, the problem with this approach for the current objective is that the program must know the location of the image file on the disk.
The image files may be anywhere
In our case, the two image files are located in Ericson's class library and the location of the class library on any particular computer is not known at the time the program is being written. All the programmer knows is that the class library must be somewhere on the classpath in order for other things to work properly.
Solution: to find image files on the classpath
What we need then, is a programming solution that can find the two image files on the classpath and then use them to create the required ImageIcon objects. The code in Listing 20 provides such a solution.
A different ImageIcon constructor
The ImageIcon constructor that is called twice in Listing 20 requires two incoming parameters:
Our objective is clear
Our objective is to specify the locations (in the form of references to URL objects) for each of the two files listed above and to pass the two URL references to the constructor for the ImageIcon class, once for each ImageIcon object being constructed.
The class named Class to the rescue
Fortunately, the class named Class provides a static method named getResources that we can use for that purpose. The getResources method will search for a resource file with a specified name and return the location of that file as type URL.
The search procedure
Exactly how the getResources method goes about conducting the search is a complex issue. For the purposes of this lesson, suffice it to say that by default, directories on the classpath are included in the search and they are searched in the order that they appear in the classpath.
|
The URL for the first file that is found with the matching name will be returned by the getResources method, even if it is not the correct file. Therefore, you must be careful not to have two or more resource files with the same name on the classpath, or at least the order of directories in the classpath must be such that the correct resource file will be found first.
For whatever its worth - the URL toString method output
In case you are interested, the overridden toString method of the URL class returns the following string when I use the getResources method to get the URL of the file named leftArrow.gif.
file:/M:/Ericson/bookClasses/leftArrow.gif
However, I have always thought of the URL as looking more like the following:
file:///M:/Ericson/bookClasses/leftArrow.gif
Why reference the SoundExplorer.class
Although I have explained the general concepts behind the code in Listing 20, I still haven't explained the strange syntax used in the code in Listing 20. An interesting question is, "Why did Ericson make a reference to the class named SoundExplorer in the PictureExplorer class, which has nothing to do with sound?"
A speculative answer
My guess is that the SoundExplorer class was probably developed first and the PictureExplorer class was developed using the source code from the SoundExplorer class as a starting point. The reference to the SoundExplorer class may simply have been left over in that process.
Any Class object will do the job
The code works equally well if the reference to the SoundExplorer class in Listing 20 is replaced by a reference to the PictureExplorer class. It also works if the reference is replaced by a reference to the Picture class, and there are many other possibilities as well.
|
The reality is that the getResources method can be called on a reference to any object of the Class class. There are several approaches to creating such a reference, and each approach works best in some particular circumstance.
Append .class to the end of a file name
One way to create such a reference is to call out the name of an accessible class and append ".class" onto the end of the name. This is the approach used in Listing 20, which references SoundExplorer.class.
This approach requires that the name of the accessible class is known when the program is written.
Use the getClass method
Another approach is to call the getClass method on any existing object. For example, a reference to this.getClass() could be used in Listing 20 in place of the reference to the SoundExplorer class.
This approach requires that the name of the reference to an existing object be known when the program is written.
Use the forName method
A third approach is to use a static method of the Class class named forName. I will leave it as an exercise for the student to follow up on this approach. However, I will mention that this approach uses the name of a class specified as type String. This makes it possible to identify the target class at runtime using input data of type String.
Advantages of the overall approach
This overall approach, which is based on calling the getResources method of the Class class, is very useful for cases where a specific resource, (such as a specific image file) or a resource within a specific group of resources (such as a group of sound files) will always be required by the class.
Using this approach, the resource file or files can be packaged along with the compiled class file and will always be available to the program, unless, of course, duplicate file names on the classpath cause the problems described earlier.
Use long, complex, and hopefully unique resource file names
The problems that result from having duplicate file names on the classpath might cause the programmer to consider using long, complex, and (hopefully) unique file names for the required resource files that are packaged with the class files. (The filename "leftArrow.gif" is not a long, complex, and unique file name.)
Summary of the code in listing 20
In summary, each of the statements in Listing 20:
And that is probably more than you ever wanted to know about instantiating ImageIcon objects and the Class class.
Create the arrow buttons with tooltips
Listing 21 instantiates four new JButton objects, passing the reference to the appropriate ImageIcon object to the constructor in each case. This creates the four buttons with the arrows that appear on both sides of each of the text fields in Figure 2.
Listing 21. Create the arrow buttons with tooltips.
   // create the arrow buttons
   xPrevButton = new JButton(prevIcon);
   xNextButton = new JButton(nextIcon);
   yPrevButton = new JButton(prevIcon);
   yNextButton = new JButton(nextIcon);

   // set the tool tip text
   xNextButton.setToolTipText(
                       "Click to go to the next x value");
   xPrevButton.setToolTipText(
                   "Click to go to the previous x value");
   yNextButton.setToolTipText(
                       "Click to go to the next y value");
   yPrevButton.setToolTipText(
                   "Click to go to the previous y value");
|
Then Listing 21 calls the setToolTipText four times in succession to set tool tips on each of the buttons. If you run the program and allow the mouse pointer to hover over the buttons, the text shown in Listing 21 will be displayed in the tool tip format.
Match the button size to the icon size
Listing 22 gets the width and height of the images in the ImageIcon objects (see Figure 5) and uses that information to set the preferred size of each of the buttons to the size of the icons.
Listing 22. Match the button size to the icon size.
   // set the sizes of the buttons
   int prevWidth = prevIcon.getIconWidth() + 2;
   int nextWidth = nextIcon.getIconWidth() + 2;
   int prevHeight = prevIcon.getIconHeight() + 2;
   int nextHeight = nextIcon.getIconHeight() + 2;

   Dimension prevDimension =
                      new Dimension(prevWidth,prevHeight);
   Dimension nextDimension =
                     new Dimension(nextWidth, nextHeight);
   xPrevButton.setPreferredSize(prevDimension);
   yPrevButton.setPreferredSize(prevDimension);
   xNextButton.setPreferredSize(nextDimension);
   yNextButton.setPreferredSize(nextDimension);
|
When the pack method is called at the end of Listing 6, an attempt will be made to accommodate the preferred size of each button when computing the required size for the JFrame object to contain all of its components.
Register ActionListener objects on all four buttons
Listing 23 instantiates four ActionListener objects from anonymous classes and registers them on the four buttons.
Listing 23. Register ActionListener objects on all four buttons.
   // handle previous x button press
   xPrevButton.addActionListener(new ActionListener() {
     public void actionPerformed(ActionEvent evt) {
       xIndex--;
       if (xIndex < 0)
         xIndex = 0;
       displayPixelInformation(xIndex,yIndex);
     }
   });

   // handle previous y button press
   yPrevButton.addActionListener(new ActionListener() {
     public void actionPerformed(ActionEvent evt) {
       yIndex--;
       if (yIndex < 0)
         yIndex = 0;
       displayPixelInformation(xIndex,yIndex);
     }
   });

   // handle next x button press
   xNextButton.addActionListener(new ActionListener() {
     public void actionPerformed(ActionEvent evt) {
       xIndex++;
       if (xIndex >= picture.getWidth())
         xIndex = picture.getWidth() - 1;
       displayPixelInformation(xIndex,yIndex);
     }
   });

   // handle next y button press
   yNextButton.addActionListener(new ActionListener() {
     public void actionPerformed(ActionEvent evt) {
       yIndex++;
       if (yIndex >= picture.getHeight())
         yIndex = picture.getHeight() - 1;
       displayPixelInformation(xIndex,yIndex);
     }
   });
 }//end setUpNextAndPreviousButtons method
|
You should have no difficulty with Listing 23
Given what you have learned about the instantiation of ActionListener objects from anonymous classes and the registration of the action listeners on the text fields earlier in this lesson, you should have no difficulty with the code in Listing 23.
The overall structure is the same in this case and the last. Of course, the behavior of the actionPerformed event handler methods that get called when the buttons fire action events is different from the behavior of the same methods when the text fields fire action events.
Behavior of the actionPerformed methods
The purpose of each of the buttons in Figure 2 is to either increment or decrement the x or the y coordinate value each time the button fires an action event.
Each of the actionPerformed methods in Listing 23 increments or decrements a coordinate value, being careful to make certain that the modified coordinate value that results is still within the bounds of the image.
Then the actionPerformed method calls the same method named displayPixelInformation that I explained in conjunction with Listing 13.
Firing an action event
A JButton object will fire an action event:
As you will learn in a future lesson, however, the focus traversal policy that is defined for the PictureExplorer class doesn't allow the buttons to gain the focus when the user presses the tab key. Repeated pressing of the tab key simply causes the focus to ping-pong back and forth between the two text fields. Therefore, in this program, the buttons are allowed to fire action events only when they are clicked by the mouse.
End of the setUpNextAndPreviousButtons method
Listing 23 also signals the end of the method named setUpNextAndPreviousButtons.
When all of the code in Listing 23 has been executed, the buttons are set up and ready for action. Note, however, that they still haven't been placed in their container.
When the method terminates, control returns to the statement immediately following the statement in Listing 19, which is contained in the method named createLocationPanel. Therefore, it is time to change background colors again and resume the explanation of that method.
Set the font for the labels on locationPanel
The code in Listing 7 instantiates a new Font object having the default name, the default style, and a size of 14 points. The reference to that Font object is saved in an instance variable named largerFont.
The code in Listing 8 calls the createLocationPanel method to create the location panel as an object of type JPanel. The call passes largerFont as a parameter. Listing 9 shows that the createLocationPanel method refers locally to the Font object as labelFont.
Listing 24 uses that reference to call the setFont method on both JLabel objects and both JTextField objects. This sets the font property for all four objects to the 14-point font created in Listing 7.
Listing 24. Set the font for the labels on the locationPanel.
// set up the font for the labels xLabel.setFont(labelFont); yLabel.setFont(labelFont); xValue.setFont(labelFont); yValue.setFont(labelFont); |
Create the physical layout of the locationPanel
At this point, all of the components required for the locationPanel have been constructed and conditioned to do their jobs. However, they are still floating around in cyberspace and haven't been placed in the panel. The code in Listing 25 places each of the components in the locationPanel and arranges their physical layout at the same time.
Listing 25. Create the physical layout of the locationPanel.
//Prepare the box hBox.add(Box.createHorizontalGlue()); //Add the components to the box hBox.add(xLabel);// X: hBox.add(xPrevButton);// a button with left arrow hBox.add(xValue);// leftmost text field hBox.add(xNextButton);// a button with right arrow hBox.add(Box.createHorizontalStrut(10));// a spacer hBox.add(yLabel);// Y: hBox.add(yPrevButton);// a button with left arrow hBox.add(yValue);// rightmost text field hBox.add(yNextButton);// button with right arrow //Add the box to the panel locationPanel.add(hBox); hBox.add(Box.createHorizontalGlue()); return locationPanel; }//end createLocationPanel method |
Rather than explaining each statement in Listing 25, I am going to provide a verbal description of what Listing 25 accomplishes. (At this point, I recommend that you take a look at what I have previously written about the use of BoxLayout.)
Visual aids needed
In order to provide this explanation, I will need some visual aids.
Figure 6 provides another view of the GUI at the normal size of the picture and without the Zoom menu having been opened.
Figure 6. Another view of the GUI.
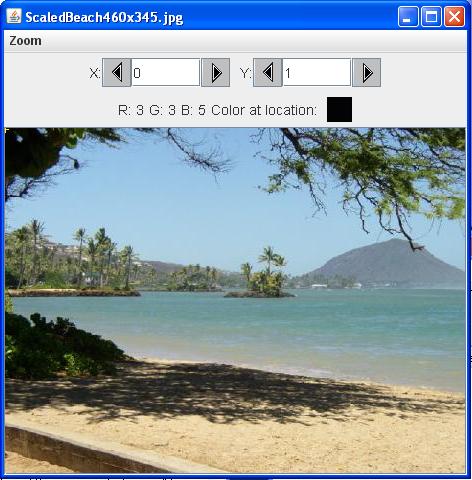 |
Eight components on the locationPanel
Going from left to right, you should be able to identify the following eight components in the locationPanel near the top of Figure 6.
A JPanel object with center-aligned FlowLayout
The locationPanel is actually a JPanel object with a FlowLayout manager, center aligned. Instead of placing the components directly in the JPanel, (which would have some serious drawbacks), Listing 25 places all eight components in a horizontal Box object with a very careful arrangement and then places the box in the JPanel object
In addition to the eight components, Listing 25 also places two blobs of glue in the box along with one strut.
The box is centered in the panel
The box is centered in the JPanel, and can be though of as taking up all of the available horizontal space. In some cases, as in Figure 3, the box is too wide to fit in the available space.
What is the purpose of the strut?
Think of the strut as an invisible, incompressible, non-stretchable horizontal rod ten pixels in length. It is placed in the center of the box with four of the eight components on its left side and the other four on its right side. The JLabel on the right end of the strut and the JButton on the left end of the strut are effectively attached to the two ends of the strut.
No matter how hard the user may try, (by resizing the JFrame), she cannot cause the JLabel on the right end of the strut and the JButton on the left end of the strut to move any closer together than ten pixels.
Similarly, she cannot cause those two components to move any further apart than the length of the strut (ten pixels).
If you examine Figure 2, Figure 3, and Figure 6, you will see that the space between the two components at the ends of the strut are always separated by the same distance regardless of the size of the JFrame.
What about the glue?
I like to think of the glue as being more like a coil spring, or a piece of elastic than a blob of sticky stuff. Think of the left end of such a piece of elastic being attached to the right side of the rightmost JButton object and think of the other end of that piece of elastic being attached to the rightmost end of the box.
Now think of the left end of another piece of elastic as being attached to the leftmost end of the box, and think of the other end of the elastic being attached to the leftmost side of the leftmost JLabel object.
The order of display
Listing 25 adds the eight components to the box in the order listed earlier. They are subsequently displayed from left to right in the order that they are added.
Objects touch one another unless...
When objects are added to a horizontal box, they will touch one another unless they are separated by a strut. Furthermore, their relative positions are fixed unless some glue is added in between the components.
Where is the glue?
In this case, no glue was added in between the components but the ten-pixel strut was added between the four components on the left and the four components on the right. Because of the strut, the two groups may not move closer together than ten pixels and may not move further apart than ten pixels. Due to the lack of glue between the components, the four components on the left must remain touching and the four components on the right must also remain touching.
However, glue was added before the components were added and again after the components were added. Therefore a blob of glue (a piece of elastic material) exists between the rightmost and leftmost components and the corresponding end of the box.
And the bottom line is...
If the width of the box is increased, the group of eight components will remain centered as shown in Figure 2 and Figure 6.
On the other hand, glue does nothing to prevent components from moving closer together or from moving closer to the ends of the box. Therefore, as the box is made narrower, the space between the ends of the box and the components on the ends of each group eventually goes to zero. Any further narrowing of the GUI will simply cause the components on the left and right ends of the groups to disappear from view. This is demonstrated in Figure 3 where the rightmost button has disappeared and the leftmost label and part of the leftmost button has disappeared.
Also, as mentioned earlier, the use of the BoxLayout doesn't allow the components to wrap down to the next line as is the case with simple FlowLayout.
The end of the createLocationPanel method
Listing 25 signals the end of the createLocationPanel method. When this method terminates, control is returned to the statement immediately following the statement in Listing 8, which is contained in the method named createInfoPanel.
Create the colorInfoPanel
The next statement in the createInfoPanel method is a call to the createColorInfoPanel method for the purpose of creating the colorInfoPanel. This statement is shown in Listing 26.
Listing 26. Create the colorInfoPanel.
   // create the color information panel
   JPanel colorInfoPanel =
                         createColorInfoPanel(largerFont);
|
Recall that the colorInfoPanel appears below the text fields in Figure 6 and displays the color values for red, green, and blue along with the actual color in a square JPanel object.
The createColorInfoPanel method begins in Listing 27.
Listing 27. Beginning of the createColorInfoPanel method.
 /**
  * Create the color information panel
  * @param labelFont the font to use for labels
  * @return the color information panel
  */
 private JPanel createColorInfoPanel(Font labelFont){
   // create a color info panel
   JPanel colorInfoPanel = new JPanel();
   colorInfoPanel.setLayout(new FlowLayout());

   // get the pixel at the x and y
   Pixel pixel = new Pixel(picture,xIndex,yIndex);

   // create the labels
   rValue = new JLabel("R: " + pixel.getRed());
   gValue = new JLabel("G: " + pixel.getGreen());
   bValue = new JLabel("B: " + pixel.getBlue());
|
A walk in the park
Compared to what you have just been through with the locationPanel, understanding the code in the createColorInfoPanell method will be like a "walk in the park." For example, all of the components in the panel are passive in the sense that they don't fire any events.
There is no BoxLayout. The layout manager is FlowLayout with default center alignment.
A new JPanel object
Listing 27 begins by instantiating a new JPanel object and setting its layout manager to FlowLayout.
Then Listing 27 gets a reference to a new Pixel object at the location specified by the current x and y coordinate values.
The red, green, and blue values are extracted from the Pixel object and used to construct three String objects that are displayed (later) immediately below the leftmost text field in Figure 6.
Construct the color display panel and its label
The code in Listing 28 constructs the small square JPanel object that appears below the rightmost text field in Figure 6 along with the label immediately to the left of the colored square.
Listing 28. Construct the color display panel and its label.
   // create the sample color panel and label
   colorLabel = new JLabel("Color at location: ");
   colorPanel = new JPanel();
   colorPanel.setBorder(new LineBorder(Color.black,1));

   // set the color sample to the pixel color
   colorPanel.setBackground(pixel.getColor());
|
If you have done any Swing programming at all, you shouldn't have any problem with the code in Listing 28. Note that at this point, the dimensions of the small square panel have not yet been established. The dimensions will be established near the middle of Listing 29.
Set fonts
Listing 29 uses a reference to a Font object that was received as an incoming parameter to set the font for all of the text that is displayed on the colorInfoPanel.
Listing 29. Set fonts, add components to colorInfoPanel, and return.
// set the font rValue.setFont(labelFont); gValue.setFont(labelFont); bValue.setFont(labelFont); colorLabel.setFont(labelFont); colorPanel.setPreferredSize(new Dimension(25,25)); // add items to the color information panel colorInfoPanel.add(rValue); colorInfoPanel.add(gValue); colorInfoPanel.add(bValue); colorInfoPanel.add(colorLabel); colorInfoPanel.add(colorPanel); return colorInfoPanel; }//end createColorInfoPanel method |
Set the preferred size
Then Listing 29 sets the preferred size for the small colored square shown in Figure 6 to be 25 pixels on each side.
Add the components to the colorInfoPanel and return it
Finally, Listing 29 adds the five components to the JPanel object. Because the layout manager is FlowLayout with center alignment, the components appear centered in the panel from left to right in the order that they are added to the panel.
Although it is possible to insert a gap of a specified width between the components, that wasn't done in this class. JLabel objects will, by default insert a reasonable amount of space on each end of the label to serve as margins. An extra space character was inserted in the JLabel object in Listing 28 to separate the label from the colored square immediately to its right.
The end of the createColorInfoPanel method
Listing 28 signals the end of the createColorInfoPanel method. When the object's reference is returned and the method terminates, control is returned to the next statement in the createInfoPanel method immediately following the statement shown in Listing 26. That next statement is the first statement in Listing 30.
Complete the createInfoPanel method
The code in Listing 30 completes the method named createInfoPanel. (Recall that this is the method that creates and populates the JPanel object shown in the NORTH position in Figure 6.)
Listing 30. Complete the createInfoPanel method.
   // add the panels to the info panel
   infoPanel.add(BorderLayout.NORTH,locationPanel);
   infoPanel.add(BorderLayout.SOUTH,colorInfoPanel);

   // add the info panel
    pictureFrame.getContentPane().add(
                            BorderLayout.NORTH,infoPanel);
 }//end createInfoPanel method
|
Listing 30 begins by adding the two sub-panels (locationPanel and colorInfoPanel) to the JPanel object (infoPanel).
Then Listing 30 adds the infoPanel to the NORTH position of the JFrame object's content pane. This causes the infoPanel to be visible in the frame when the JFrame object is visible on the screen.
The end of the lesson
When the createInfoPanel method terminates, control is returned to the createWindow method shown in Listing 6. This causes the method named createAndInitScrollingImage to be called in order to continue the construction of the GUI shown in Figure 6. The createAndInitScrollingImage method is the topic for the next lesson.
You still have a long way to go before you can fully understand the PictureExplorer class. Once again, however, you have been working hard if you have made it to this point. It's time for you to take a break and mull over what you have learned in this lesson and maybe do some experimenting as well.
I encourage you to make a copy of the source code file for the PictureExplorer class. Put it in your current directory along with your program files and then open the file in your IDE. (Make certain that the current directory appears in the classpath to the left of Ericson's media library.)
Experiment with the PictureExplorer code, making changes, and observing the results of your changes. Make certain that you can explain why your changes behave as they do.
Also experiment with the picture explorer onscreen GUI. Try some different image files and see if the color values reported by the GUI make sense to you.
In the previous lesson, you learned about the overall construction of the PictureExplorer GUI shown in Figure 2. You also learned how to construct the Zoom menu and how to register event listener objects on the items in the menu.
In this lesson, you learned how to construct the infoPanel in the NORTH location of the GUI in Figure 2. You also learned how to register event listener objects on the components in that panel making use of objects of anonymous classes.
Along the way, you also learned about some other interesting topics including:
The next lesson will show you how to do flood fill using Java.
Listing 31. Source code for Ericson's PictureExplorer class.
import java.awt.*;
import java.awt.event.*;
import javax.swing.*;
import java.awt.image.*;
import javax.swing.border.*;
/**
 * Displays a picture and lets you explore the picture by
 * displaying the x, y, red, green, and blue values of the
 * pixel at the cursor when you click a mouse button or
 * press and hold a mouse button while moving the cursor.
 * It also lets you zoom in or out.  You can also type in
 * a x and y value to see the color at that location.
 *
 * Originally created for the Jython Environment for
 * Students (JES).
 * Modified to work with DrJava by Barbara Ericson
 *
 * Copyright Georgia Institute of Technology 2004
 * @author Keith McDermottt, gte047w@cc.gatech.edu
 * @author Barb Ericson ericson@cc.gatech.edu
 */
public class PictureExplorer implements
       MouseMotionListener, ActionListener, MouseListener{

 // current x and y index
 private int xIndex = 0;
 private int yIndex = 0;

 //Main gui variables
 private JFrame pictureFrame;
 private JScrollPane scrollPane;

 //information bar variables
 private JLabel xLabel;
 private JButton xPrevButton;
 private JButton yPrevButton;
 private JButton xNextButton;
 private JButton yNextButton;
 private JLabel yLabel;
 private JTextField xValue;
 private JTextField yValue;
 private JLabel rValue;
 private JLabel gValue;
 private JLabel bValue;
 private JLabel colorLabel;
 private JPanel colorPanel;

 // menu components
 private JMenuBar menuBar;
 private JMenu zoomMenu;
 private JMenuItem twentyFive;
 private JMenuItem fifty;
 private JMenuItem seventyFive;
 private JMenuItem hundred;
 private JMenuItem hundredFifty;
 private JMenuItem twoHundred;
 private JMenuItem fiveHundred;

 /** The picture being explored */
 private DigitalPicture picture;

 /** The image icon used to display the picture */
 private ImageIcon scrollImageIcon;

 /** The image display */
 private ImageDisplay imageDisplay;

 /** the zoom factor (amount to zoom) */
 private double zoomFactor;

 /** the number system to use, 0 means starting at 0,
  *  1 means starting at 1 */
 private int numberBase=0;

 /**
  * Public constructor
  * @param picture the picture to explore
  */
 public PictureExplorer(DigitalPicture picture)
 {
   // set the fields
   this.picture=picture;
   zoomFactor=1;

   // create the window and set things up
   createWindow();
 }

 /**
  * Changes the number system to start at one
  */
 public void changeToBaseOne()
 {
   numberBase=1;
 }

 /**
  * Set the title of the frame
  *@param title the title to use in the JFrame
  */
 public void setTitle(String title)
 {
   pictureFrame.setTitle(title);
 }

 /**
  * Method to create and initialize the picture frame
  */
 private void createAndInitPictureFrame()
 {
   pictureFrame = new JFrame(); // create the JFrame
   //allow the user to resize it
   pictureFrame.setResizable(true);
    // use border layout
   pictureFrame.getContentPane().setLayout(
                                      new BorderLayout());
    // when close stop
   pictureFrame.setDefaultCloseOperation(
                                 JFrame.DISPOSE_ON_CLOSE);
   pictureFrame.setTitle(picture.getTitle());
   PictureExplorerFocusTraversalPolicy newPolicy =
                new PictureExplorerFocusTraversalPolicy();
   pictureFrame.setFocusTraversalPolicy(newPolicy);

 }

 /**
  * Method to create the menu bar, menus, and menu items
  */
 private void setUpMenuBar()
 {
   //create menu
   menuBar = new JMenuBar();
   zoomMenu = new JMenu("Zoom");
   twentyFive = new JMenuItem("25%");
   fifty = new JMenuItem("50%");
   seventyFive = new JMenuItem("75%");
   hundred = new JMenuItem("100%");
   hundred.setEnabled(false);
   hundredFifty = new JMenuItem("150%");
   twoHundred = new JMenuItem("200%");
   fiveHundred = new JMenuItem("500%");

   // add the action listeners
   twentyFive.addActionListener(this);
   fifty.addActionListener(this);
   seventyFive.addActionListener(this);
   hundred.addActionListener(this);
   hundredFifty.addActionListener(this);
   twoHundred.addActionListener(this);
   fiveHundred.addActionListener(this);

   // add the menu items to the menus
   zoomMenu.add(twentyFive);
   zoomMenu.add(fifty);
   zoomMenu.add(seventyFive);
   zoomMenu.add(hundred);
   zoomMenu.add(hundredFifty);
   zoomMenu.add(twoHundred);
   zoomMenu.add(fiveHundred);
   menuBar.add(zoomMenu);

   // set the menu bar to this menu
   pictureFrame.setJMenuBar(menuBar);
 }

 /**
  * Create and initialize the scrolling image
  */
 private void createAndInitScrollingImage()
 {
   scrollPane = new JScrollPane();

   BufferedImage bimg = picture.getBufferedImage();
   imageDisplay = new ImageDisplay(bimg);
   imageDisplay.addMouseMotionListener(this);
   imageDisplay.addMouseListener(this);
   imageDisplay.setToolTipText("Click a mouse button on "
                + "a pixel to see the pixel information");
   scrollPane.setViewportView(imageDisplay);
   pictureFrame.getContentPane().add(
                         scrollPane, BorderLayout.CENTER);
 }

 /**
  * Creates the JFrame and sets everything up
  */
 private void createWindow()
 {
   // create the picture frame and initialize it
   createAndInitPictureFrame();

   // set up the menu bar
   setUpMenuBar();

   //create the information panel
   createInfoPanel();

   //creates the scrollpane for the picture
   createAndInitScrollingImage();

   // show the picture in the frame at the size it needs
   // to be
   pictureFrame.pack();
   pictureFrame.setVisible(true);
 }

 /**
  * Method to set up the next and previous buttons for the
  * pixel location information
  */
 private void setUpNextAndPreviousButtons()
 {
   // create the image icons for the buttons
   Icon prevIcon = new ImageIcon(
         SoundExplorer.class.getResource("leftArrow.gif"),
                                        "previous index");
   Icon nextIcon = new ImageIcon(
        SoundExplorer.class.getResource("rightArrow.gif"),
                                            "next index");
   // create the arrow buttons
   xPrevButton = new JButton(prevIcon);
   xNextButton = new JButton(nextIcon);
   yPrevButton = new JButton(prevIcon);
   yNextButton = new JButton(nextIcon);

   // set the tool tip text
   xNextButton.setToolTipText(
                       "Click to go to the next x value");
   xPrevButton.setToolTipText(
                   "Click to go to the previous x value");
   yNextButton.setToolTipText(
                       "Click to go to the next y value");
   yPrevButton.setToolTipText(
                   "Click to go to the previous y value");

   // set the sizes of the buttons
   int prevWidth = prevIcon.getIconWidth() + 2;
   int nextWidth = nextIcon.getIconWidth() + 2;
   int prevHeight = prevIcon.getIconHeight() + 2;
   int nextHeight = nextIcon.getIconHeight() + 2;
   Dimension prevDimension =
                      new Dimension(prevWidth,prevHeight);
   Dimension nextDimension =
                     new Dimension(nextWidth, nextHeight);
   xPrevButton.setPreferredSize(prevDimension);
   yPrevButton.setPreferredSize(prevDimension);
   xNextButton.setPreferredSize(nextDimension);
   yNextButton.setPreferredSize(nextDimension);

   // handle previous x button press
   xPrevButton.addActionListener(new ActionListener() {
     public void actionPerformed(ActionEvent evt) {
       xIndex--;
       if (xIndex < 0)
         xIndex = 0;
       displayPixelInformation(xIndex,yIndex);
     }
   });

   // handle previous y button press
   yPrevButton.addActionListener(new ActionListener() {
     public void actionPerformed(ActionEvent evt) {
       yIndex--;
       if (yIndex < 0)
         yIndex = 0;
       displayPixelInformation(xIndex,yIndex);
     }
   });

   // handle next x button press
   xNextButton.addActionListener(new ActionListener() {
     public void actionPerformed(ActionEvent evt) {
       xIndex++;
       if (xIndex >= picture.getWidth())
         xIndex = picture.getWidth() - 1;
       displayPixelInformation(xIndex,yIndex);
     }
   });

   // handle next y button press
   yNextButton.addActionListener(new ActionListener() {
     public void actionPerformed(ActionEvent evt) {
       yIndex++;
       if (yIndex >= picture.getHeight())
         yIndex = picture.getHeight() - 1;
       displayPixelInformation(xIndex,yIndex);
     }
   });
 }

 /**
  * Create the pixel location panel
  * @param labelFont the font for the labels
  * @return the location panel
  */
 public JPanel createLocationPanel(Font labelFont) {

   // create a location panel
   JPanel locationPanel = new JPanel();
   locationPanel.setLayout(new FlowLayout());
   Box hBox = Box.createHorizontalBox();

   // create the labels
   xLabel = new JLabel("X:");
   yLabel = new JLabel("Y:");

   // create the text fields
   xValue = new JTextField(
                 Integer.toString(xIndex + numberBase),6);
   xValue.addActionListener(new ActionListener() {
     public void actionPerformed(ActionEvent e) {
       displayPixelInformation(
                       xValue.getText(),yValue.getText());
     }
   });
   yValue = new JTextField(
                 Integer.toString(yIndex + numberBase),6);
   yValue.addActionListener(new ActionListener() {
     public void actionPerformed(ActionEvent e) {
      displayPixelInformation(
                       xValue.getText(),yValue.getText());
     }
   });

   // set up the next and previous buttons
   setUpNextAndPreviousButtons();

   // set up the font for the labels
   xLabel.setFont(labelFont);
   yLabel.setFont(labelFont);
   xValue.setFont(labelFont);
   yValue.setFont(labelFont);

   // add the items to the vertical box and the box to
   // the panel
   hBox.add(Box.createHorizontalGlue());
   hBox.add(xLabel);
   hBox.add(xPrevButton);
   hBox.add(xValue);
   hBox.add(xNextButton);
   hBox.add(Box.createHorizontalStrut(10));
   hBox.add(yLabel);
   hBox.add(yPrevButton);
   hBox.add(yValue);
   hBox.add(yNextButton);
   locationPanel.add(hBox);
   hBox.add(Box.createHorizontalGlue());

   return locationPanel;
 }

 /**
  * Create the color information panel
  * @param labelFont the font to use for labels
  * @return the color information panel
  */
 private JPanel createColorInfoPanel(Font labelFont)
 {
   // create a color info panel
   JPanel colorInfoPanel = new JPanel();
   colorInfoPanel.setLayout(new FlowLayout());

   // get the pixel at the x and y
   Pixel pixel = new Pixel(picture,xIndex,yIndex);

   // create the labels
   rValue = new JLabel("R: " + pixel.getRed());
   gValue = new JLabel("G: " + pixel.getGreen());
   bValue = new JLabel("B: " + pixel.getBlue());

   // create the sample color panel and label
   colorLabel = new JLabel("Color at location: ");
   colorPanel = new JPanel();
   colorPanel.setBorder(new LineBorder(Color.black,1));

   // set the color sample to the pixel color
   colorPanel.setBackground(pixel.getColor());

   // set the font
   rValue.setFont(labelFont);
   gValue.setFont(labelFont);
   bValue.setFont(labelFont);
   colorLabel.setFont(labelFont);
   colorPanel.setPreferredSize(new Dimension(25,25));

   // add items to the color information panel
   colorInfoPanel.add(rValue);
   colorInfoPanel.add(gValue);
   colorInfoPanel.add(bValue);
   colorInfoPanel.add(colorLabel);
   colorInfoPanel.add(colorPanel);

   return colorInfoPanel;
 }

 /**
  * Creates the North JPanel with all the pixel location
  * and color information
  */
 private void createInfoPanel()
 {
   // create the info panel and set the layout
   JPanel infoPanel = new JPanel();
   infoPanel.setLayout(new BorderLayout());

   // create the font
   Font largerFont =
                   new Font(infoPanel.getFont().getName(),
                       infoPanel.getFont().getStyle(),14);

   // create the pixel location panel
   JPanel locationPanel = createLocationPanel(largerFont);

   // create the color informaiton panel
   JPanel colorInfoPanel =
                         createColorInfoPanel(largerFont);

   // add the panels to the info panel
   infoPanel.add(BorderLayout.NORTH,locationPanel);
   infoPanel.add(BorderLayout.SOUTH,colorInfoPanel);

   // add the info panel
   pictureFrame.getContentPane().add(
                            BorderLayout.NORTH,infoPanel);
 }

 /**
  * Method to check that the current position is in the
  * viewing area and if not scroll to center the current
  * position if possible
  */
 public void checkScroll()
 {
   // get the x and y position in pixels
   int xPos = (int) (xIndex * zoomFactor);
   int yPos = (int) (yIndex * zoomFactor);

   // only do this if the image is larger than normal
   if (zoomFactor > 1) {

     // get the rectangle that defines the current view
     JViewport viewport = scrollPane.getViewport();
     Rectangle rect = viewport.getViewRect();
     int rectMinX = (int) rect.getX();
     int rectWidth = (int) rect.getWidth();
     int rectMaxX = rectMinX + rectWidth - 1;
     int rectMinY = (int) rect.getY();
     int rectHeight = (int) rect.getHeight();
     int rectMaxY = rectMinY + rectHeight - 1;

     // get the maximum possible x and y index
     int maxIndexX = (int)(picture.getWidth()*zoomFactor)
                           - rectWidth - 1;
     int maxIndexY = (int)(picture.getHeight()*zoomFactor)
                           - rectHeight - 1;

     // calculate how to position the current position in
     // the middle of the viewing area
     int viewX = xPos - (int) (rectWidth / 2);
     int viewY = yPos - (int) (rectHeight / 2);

     // reposition the viewX and viewY if outside allowed
     // values
     if (viewX < 0)
       viewX = 0;
     else if (viewX > maxIndexX)
       viewX = maxIndexX;
     if (viewY < 0)
       viewY = 0;
     else if (viewY > maxIndexY)
       viewY = maxIndexY;

     // move the viewport upper left point
     viewport.scrollRectToVisible(
         new Rectangle(viewX,viewY,rectWidth,rectHeight));
   }
 }

 /**
  * Zooms in the on picture by scaling the image.
  * It is extremely memory intensive.
  * @param factor the amount to zoom by
  */
 public void zoom(double factor)
 {
   // save the current zoom factor
   zoomFactor = factor;

   // calculate the new width and height and get an image
   // that size
   int width = (int) (picture.getWidth()*zoomFactor);
   int height = (int) (picture.getHeight()*zoomFactor);
   BufferedImage bimg = picture.getBufferedImage();

   // set the scroll image icon to the new image
   imageDisplay.setImage(bimg.getScaledInstance(width,
                           height, Image.SCALE_DEFAULT));
   imageDisplay.setCurrentX((int) (xIndex * zoomFactor));
   imageDisplay.setCurrentY((int) (yIndex * zoomFactor));
   imageDisplay.revalidate();
   checkScroll();  // check if need to reposition scroll
 }

 /**
  * Repaints the image on the scrollpane.
  */
 public void repaint()
 {
   pictureFrame.repaint();
 }

 //****************************************//
 //               Event Listeners          //
 //****************************************//

 /**
  * Called when the mouse is dragged (button held down and
  * moved)
  * @param e the mouse event
  */
 public void mouseDragged(MouseEvent e)
 {
   displayPixelInformation(e);
 }

 /**
  * Method to check if the given x and y are in the
  * picture
  * @param x the horiztonal value
  * @param y the vertical value
  * @return true if the x and y are in the picture and
  * false otherwise
  */
 private boolean isLocationInPicture(int x, int y)
 {
   boolean result = false; // the default is false
   if (x >= 0 && x < picture.getWidth() &&
       y >= 0 && y < picture.getHeight())
     result = true;

   return result;
 }

 /**
  * Method to display the pixel information from the
  * passed x and y but also converts x and y from strings
  * @param xString the x value as a string from the user
  * @param yString the y value as a string from the user
  */
 public void displayPixelInformation(
                           String xString, String yString)
 {
   int x = -1;
   int y = -1;
   try {
     x = Integer.parseInt(xString);
     x = x - numberBase;
     y = Integer.parseInt(yString);
     y = y - numberBase;
   } catch (Exception ex) {
   }

   if (x >= 0 && y >= 0) {
     displayPixelInformation(x,y);
   }
 }

 /**
  * Method to display pixel information for the passed x
  * and y
  * @param pictureX the x value in the picture
  * @param pictureY the y value in the picture
  */
 private void displayPixelInformation(
                               int pictureX, int pictureY)
 {
   // check that this x and y is in range
   if (isLocationInPicture(pictureX, pictureY))
   {
     // save the current x and y index
     xIndex = pictureX;
     yIndex = pictureY;

     // get the pixel at the x and y
     Pixel pixel = new Pixel(picture,xIndex,yIndex);

     // set the values based on the pixel
     xValue.setText(Integer.toString(
                                   xIndex  + numberBase));
     yValue.setText(Integer.toString(
                                    yIndex + numberBase));
     rValue.setText("R: " + pixel.getRed());
     gValue.setText("G: " + pixel.getGreen());
     bValue.setText("B: " + pixel.getBlue());
     colorPanel.setBackground(new Color(pixel.getRed(),
                                        pixel.getGreen(),
                                        pixel.getBlue()));

   }
   else
   {
     clearInformation();
   }

   // notify the image display of the current x and y
   imageDisplay.setCurrentX((int) (xIndex * zoomFactor));
   imageDisplay.setCurrentY((int) (yIndex * zoomFactor));
 }

 /**
  * Method to display pixel information based on a mouse
  * event
  * @param e a mouse event
  */
 private void displayPixelInformation(MouseEvent e)
 {

   // get the cursor x and y
   int cursorX = e.getX();
   int cursorY = e.getY();

   // get the x and y in the original (not scaled image)
   int pictureX = (int)(cursorX/zoomFactor + numberBase);
   int pictureY = (int)(cursorY/zoomFactor + numberBase);

   // display the information for this x and y
   displayPixelInformation(pictureX,pictureY);

 }

 /**
  * Method to clear the labels and current color and
  * reset the  current index to -1
  */
 private void clearInformation()
 {
   xValue.setText("N/A");
   yValue.setText("N/A");
   rValue.setText("R: N/A");
   gValue.setText("G: N/A");
   bValue.setText("B: N/A");
   colorPanel.setBackground(Color.black);
   xIndex = -1;
   yIndex = -1;
 }

 /**
  * Method called when the mouse is moved with no buttons
  * down
  * @param e the mouse event
  */
 public void mouseMoved(MouseEvent e)
 {}

 /**
  * Method called when the mouse is clicked
  * @param e the mouse event
  */
 public void mouseClicked(MouseEvent e)
 {
   displayPixelInformation(e);
 }

 /**
  * Method called when the mouse button is pushed down
  * @param e the mouse event
  */
 public void mousePressed(MouseEvent e)
 {
   displayPixelInformation(e);
 }

 /**
  * Method called when the mouse button is released
  * @param e the mouse event
  */
 public void mouseReleased(MouseEvent e)
 {
 }

 /**
  * Method called when the component is entered (mouse
  * moves over it)
  * @param e the mouse event
  */
 public void mouseEntered(MouseEvent e)
 {
 }

 /**
  * Method called when the mouse moves over the component
  * @param e the mouse event
  */
 public void mouseExited(MouseEvent e)
 {
 }

 /**
  * Method to enable all menu commands
  */
 private void enableZoomItems()
 {
   twentyFive.setEnabled(true);
   fifty.setEnabled(true);
   seventyFive.setEnabled(true);
   hundred.setEnabled(true);
   hundredFifty.setEnabled(true);
   twoHundred.setEnabled(true);
   fiveHundred.setEnabled(true);
 }

 /**
  * Controls the zoom menu bar
  *
  * @param a the ActionEvent
  */
 public void actionPerformed(ActionEvent a)
 {

   if(a.getActionCommand().equals("Update"))
   {
     this.repaint();
   }

   if(a.getActionCommand().equals("25%"))
   {
     this.zoom(.25);
     enableZoomItems();
     twentyFive.setEnabled(false);
   }

   if(a.getActionCommand().equals("50%"))
   {
     this.zoom(.50);
     enableZoomItems();
     fifty.setEnabled(false);
   }

   if(a.getActionCommand().equals("75%"))
   {
     this.zoom(.75);
     enableZoomItems();
     seventyFive.setEnabled(false);
   }

   if(a.getActionCommand().equals("100%"))
   {
     this.zoom(1.0);
     enableZoomItems();
     hundred.setEnabled(false);
   }

   if(a.getActionCommand().equals("150%"))
   {
     this.zoom(1.5);
     enableZoomItems();
     hundredFifty.setEnabled(false);
   }

   if(a.getActionCommand().equals("200%"))
   {
     this.zoom(2.0);
     enableZoomItems();
     twoHundred.setEnabled(false);
   }

   if(a.getActionCommand().equals("500%"))
   {
     this.zoom(5.0);
     enableZoomItems();
     fiveHundred.setEnabled(false);
   }
 }

 /**
  * Test Main.  It will ask you to pick a file and then
  * show it
  */
 public static void main( String args[])
 {
   Picture p = new Picture(FileChooser.pickAFile());
   PictureExplorer test = new PictureExplorer(p);

 }

 /**
  * Class for establishing the focus for the textfields
  */
 private class PictureExplorerFocusTraversalPolicy
                 extends FocusTraversalPolicy {

        /**
         * Method to get the next component for focus
         */
        public Component getComponentAfter(
                                 Container focusCycleRoot,
                                 Component aComponent) {
            if (aComponent.equals(xValue))
              return yValue;
            else
              return xValue;
        }

        /**
         * Method to get the previous component for focus
         */
         public Component getComponentBefore(
                                 Container focusCycleRoot,
                                 Component aComponent) {
            if (aComponent.equals(xValue))
              return yValue;
            else
              return xValue;
         }

         public Component getDefaultComponent(
                               Container focusCycleRoot) {
            return xValue;
        }

        public Component getLastComponent(
                               Container focusCycleRoot) {
            return yValue;
        }

        public Component getFirstComponent(
                               Container focusCycleRoot) {
            return xValue;
        }
    }//end PictureExplorerFocusTraversalPolicy inner class

}//end PictureExplorer class
|
Listing 32. Source code for program named Java362a.
/*Program Java362a
Copyright R.G.Baldwin 2009

The purpose of this program is to support an explanation
of the PictureExplorer class.

A Picture object having dimensions of 450x345 pixels is
created. The the show method and the explore method are
called on the object to produce two different screen
displays of the picture.

The explore method simply creates a new object of the
PictureExplorer class.

Tested using Windows Vista Premium Home edition and
Ericso's multimedia library.
*********************************************************/

public class Main{
  public static void main(String[] args){
    //Construct a new 460x345 Picture object.
    Picture pix1 = new Picture("ScaledBeach460x345.jpg");
    pix1.show();//display the picture in the show format
    //Display the picture again in the explore format.
    pix1.explore();
  }//end main method
}//end class Main
|
Copyright 2009, Richard G. Baldwin. Reproduction in whole or in part in any form or medium without express written permission from Richard Baldwin is prohibited.
Richard has participated in numerous consulting projects and he frequently provides onsite training at the high-tech companies located in and around Austin, Texas. He is the author of Baldwin's Programming Tutorials, which have gained a worldwide following among experienced and aspiring programmers. He has also published articles in JavaPro magazine.
In addition to his programming expertise, Richard has many years of practical experience in Digital Signal Processing (DSP). His first job after he earned his Bachelor's degree was doing DSP in the Seismic Research Department of Texas Instruments. (TI is still a world leader in DSP.) In the following years, he applied his programming and DSP expertise to other interesting areas including sonar and underwater acoustics.
Richard holds an MSEE degree from Southern Methodist University and has many years of experience in the application of computer technology to real-world problems.
-end-