Published:
March 19, 2009
By Richard G. Baldwin
Java Programming Notes # 366
This lesson is the next in a series (see Resources) designed to teach you how to write Java programs to do things like:
If you have ever wondered how to do these things, you've come to the right place.
If you have studied the earlier lessons in this series, you have learned about turtles, worlds, and pictures. You have learned that objects of the Picture class are useful for much more than simply serving as living quarters for turtles. They are also useful for manipulating images in interesting and complex ways.
|
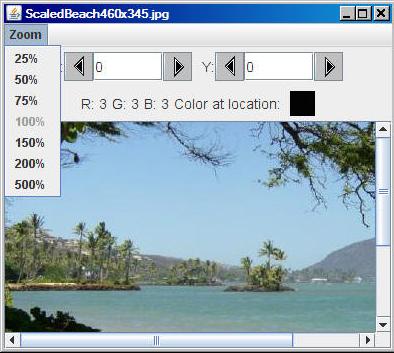
A PictureExplorer object
You learned that an object of the PictureExplorer class (see Figure 1) is a GUI that allows you to determine the numeric color values for any pixel in a picture by placing a cursor on the pixel.
Figure 1. Reduced screen output produced by the explore method.
|
|
(Note that in the screen shot in Figure 1, the GUI was manually resized to make it smaller and the Zoom menu was opened to display its contents.)
A PictureExplorer object has a cursor
The position of the cursor is controlled by clicking or dragging the mouse within the picture, clicking buttons in the upper panel, or typing coordinate values into text fields in the upper panel.
Zoom
You can zoom in and out to view the pixels in more or less detail and you can see the actual color of the pixel displayed in a small colored square.
A JFrame with a menu
You have learned how the GUI is constructed from a big-picture viewpoint. You learned that the GUI window is the visual manifestation of a JFrame object. You learned how the JFrame object is configured, how the Zoom menu is constructed, and how an ActionListener object is registered on each item in that menu.
A panel with user controls
In the previous lesson, you learned how to construct the panel containing the user controls (the infoPanel) in the upper portion of the GUI as shown in Figure 1. You also learned how to register event listener objects on the components in that panel making use of anonymous objects of anonymous classes.
Other interesting topics
Along the way, you learned about some other interesting topics including:
So far, everything that you have learned is peripheral to the display of the picture itself in a scrollable window. Displaying the picture in a scrollable window is the main topic of this lesson.
Source code listings
A complete listing of Ericson's PictureExplorer class is provided in Listing 23 near the end of the lesson. A complete listing of a very simple program named Java362a that I will use to illustrate the behavior of the PictureExplorer class is provided in Listing 24. Finally, a complete listing of an associated class named ImageDisplay is provided in Listing 25.
I recommend that you open another copy of this document in a separate browser window and use the following links to easily find and view the figures and listings while you are reading about them.
I recommend that you also study the other lessons in my extensive collection of online programming tutorials. You will find a consolidated index at www.DickBaldwin.com.
In this series of lessons, I will present and explain many of the classes in a multimedia class library that was developed and released under a Creative Commons Attribution 3.0 United States License (see Resources) by Mark Guzdial and Barbara Ericson at Georgia Institute of Technology. In doing this, I will also present some interesting sample programs that use the library.
I explained how to download, install, and test the multimedia class library in an earlier lesson titled Multimedia Programming with Java, Getting Started (see Resources).
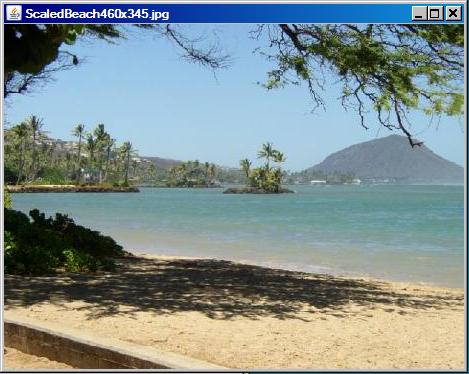
I will use a very simple program to illustrate the creation of an object of the PictureExplorer class.
The sample program (named Java362a) begins by creating a new Picture object using input from an image file in the current directory. Then it calls the show method on the object to produce the screen output shown in Figure 2.
Figure 2. Screen output produced by the show method.
 |
Call the explore method
After that, the program calls the explore method on the Picture object to produce the screen output shown earlier in Figure 1.
You learned all about the show method of the SimplePicture class in earlier lessons. You began learning about the explore method and the PictureExplorer class in the earlier lesson titled Getting Started with the PictureExplorer Class: Multimedia Programming with Java (see Resources).
The explore method
The explore method of the SimplePicture class contains a single statement, which instantiates an object of the PictureExplorer class. As soon as that object is instantiated, the GUI shown in Figure 1 appears on the screen and it remains on the screen until the program is terminated or the user clicks the X-button in the upper-right corner of the GUI.
Methods in the PictureExplorer class often call other methods that belong to the class. Those methods, in turn, often call other methods. Because I will be switching back and forth among code fragments extracted from different methods, things can get confusing. I will use color in an attempt to reduce the confusion. That is, when one method calls another and I need to put the explanation of the first method on hold while I explain the code in the second method, I will change the background color against which the code fragments are displayed.
Background color for first-level classes, methods and/or constructors
For example, I will present code fragments extracted from Ericson's PictureExplorer class against the background color shown in Listing 1.
Listing 1. Background color for first-level code.
Color = #FFFFBB |
Background color for second-level methods
Similarly, I will present code fragments extracted from second-level methods against the background color shown in Listing 2.
Listing 2. Background color for second-level code.
Color = #FFEEFF |
Background color for third and lower-level methods
Finally, I will present code fragments extracted from third-level and lower-level code (if any) against the background colors, going from left to right, in Listing 3.
Listing 3. Background color for third and lower-level code.
3-#DDFFFF |
4-#C1C100 |
5-#FFCC66 |
6-#B1C2BD |
7-#EEEEEE |
In the unlikely event that I need to distinguish among more than seven levels at the same time, I will come up with another color and explain its use at the time.
The purpose of this program is to support an explanation of the PictureExplorer class.
Normally, I break programs down and explain them in fragments. However, this program is short and simple and I explained it in detail in previous lessons (see Resources). You can view a complete listing of the program in Listing 24 near the end of the lesson.
Create a Picture object and display it with the explore method
A Picture object having dimensions of 450x345 pixels is created by reading an image file from the current directory. The show method is called on the Picture object producing the screen output shown in Figure 2. Then the explore method is called on the Picture object producing the screen output GUI shown in Figure 1.
Displays a copy of the original Picture object
As you learned in the earlier lessons, the explore method creates a copy of the original Picture object and passes its reference to the constructor for a new object of the PictureExplorer class. The new PictureExplorer object displays the copy of the original picture in the format shown in Figure 1. (Once again, note that the GUI in Figure 1 was manually resized to make it smaller and the Zoom menu was opened to display its contents.)
You also learned in the previous lessons that the onscreen GUI window that you see in Figure 1 is the visual manifestation of a JFrame object. Basically, a JFrame object consists of the following parts:
The content area
I explained the menu area in some depth in an earlier lesson. We will be primarily concerned with the content area in this lesson.
The content area (immediately below the menu area) has a default BorderLayout object as the layout manager. This layout manager makes it possible to place one component in the CENTER and four additional components in the NORTH, SOUTH, EAST, and WEST locations.
In the GUI produced by the PictureExplorer class, there is one component in the CENTER and one component in the NORTH location. There are no components in the EAST, SOUTH, and WEST locations. (Keep in mind that each of the five allowable components can themselves contain other components.)
A JPanel object in the NORTH location
The component in the NORTH location of the JFrame object's content area is a JPanel object. This JPanel object, which contains all of the buttons and text fields shown in Figure 1, was the primary focus of the previous lesson.
A JScrollPane object in the CENTER location
The component in the CENTER is an object of the JScrollPane class. This component will be the main focus of this lesson.
A complete listing of the PictureExplorer class is provided in Listing 23 near the end of the lesson. I will break the class down and explain it in fragments. (I explained part of the PictureExplorer class in the previous two lessons.)
Private instance variables of the PictureExplorer class
The PictureExplorer class declares a large number of private instance variables and initializes some of them. They are shown in Listing 4 for easy reference.
Listing 4. Private instance variables of the PictureExplorer class.
// current x and y index private int xIndex = 0; private int yIndex = 0; //Main gui variables private JFrame pictureFrame; private JScrollPane scrollPane; //information bar variables private JLabel xLabel; private JButton xPrevButton; private JButton yPrevButton; private JButton xNextButton; private JButton yNextButton; private JLabel yLabel; private JTextField xValue; private JTextField yValue; private JLabel rValue; private JLabel gValue; private JLabel bValue; private JLabel colorLabel; private JPanel colorPanel; // menu components private JMenuBar menuBar; private JMenu zoomMenu; private JMenuItem twentyFive; private JMenuItem fifty; private JMenuItem seventyFive; private JMenuItem hundred; private JMenuItem hundredFifty; private JMenuItem twoHundred; private JMenuItem fiveHundred; /** The picture being explored */ private DigitalPicture picture; /** The image icon used to display the picture */ private ImageIcon scrollImageIcon; /** The image display */ private ImageDisplay imageDisplay; /** the zoom factor (amount to zoom) */ private double zoomFactor; /** the number system to use, 0 means starting at 0, * 1 means starting at 1 */ private int numberBase=0; |
There's not much to be said about the instance variables at this point. We will be referring back to them as the explanation of the PictureExplorer class progresses.
I explained the constructor in the previous two lessons. However, I have shown it again in Listing 5 for easy reference.
Listing 5. The constructor for the PictureExplorer class.
 /**
  * Public constructor
  * @param picture the picture to explore
  */
 public PictureExplorer(DigitalPicture picture){
   // set the fields
   this.picture = picture;
   zoomFactor = 1;

   // create the window and set things up
   createWindow();
 }//end constructor
|
Call the createWindow method
The constructor saves the incoming parameter, (which refers to the picture to be displayed in the content area of the GUI) and sets a value of 1 into the instance variable named zoomFactor. Then it calls the createWindow method where the completion of construction is accomplished.
When the createWindow method returns, the constructor returns the new PictureExplorer object's reference to the explore method of the SimplePicture class (or perhaps to a method in a class of your own design) from which the constructor was called.
An anonymous object
The explore method doesn't save the PictureExplorer object's reference in a named reference variable. Therefore, the PictureExplorer object is an anonymous object that remains on the screen until the user clicks the X-button in the upper-right corner of Figure 1 or the program terminates.
The createWindow method of the PictureExplorer class is shown in its entirety in Listing 6.
Listing 6. The createWindow method.
 /**
  * Creates the JFrame and sets everything up
  */
 private void createWindow(){
   // create the picture frame and initialize it
   createAndInitPictureFrame();

   // set up the menu bar
   setUpMenuBar();

   //create the information panel
   createInfoPanel();

   //creates the scrollpane for the picture
   createAndInitScrollingImage();

   // show the picture in the frame at the size it needs
   // to be
   pictureFrame.pack();
   pictureFrame.setVisible(true);
 }//end createWindow method
|
A sequence of method calls
As you learned in the earlier lessons, the createWindow method consists of:
I explained the following three methods in the earlier lessons:
I will explain the createAndInitScrollingImage method in this lesson.
The beginning of the createAndInitScrollingImage method is shown in the code fragment in Listing 7. (Note the change in background color, indicating that the discussion has moved down by one level in the method call stack.)
Listing 7. Beginning of the createAndInitScrollingImage method.
 /**
  * Create and initialize the scrolling image
  */
 private void createAndInitScrollingImage(){
   scrollPane = new JScrollPane();

   BufferedImage bimg = picture.getBufferedImage();
   imageDisplay = new ImageDisplay(bimg);
|
A new JScrollPane object
Listing 7 begins by instantiating a new object of the JScrollPane class, which will be added to the GUI later as the top-level container for the image. I will have more to say about this later.
Get a reference to the BufferedImage object
Then Listing 7 calls the getBufferedImage method on the Picture object to get a reference to the BufferedImage object that belongs to the picture. (This is the Picture object that was received as a parameter when the PictureExplorer object was instantiated.)
To make a long story short, the BufferedImage object encapsulates the actual image that we see when we look at a display of a Picture object.
Instantiate an ImageDisplay object
Then things get really interesting. Listing 7 passes the BufferedImage object's reference to the constructor for a class that we haven't touched on yet: the ImageDisplay class.
A complete listing of the source code for the ImageDisplay class is shown in Listing 25.
The beginning of the ImageDisplay class is shown in the code fragment in Listing 8. (Note the change of background color as we put the createAndInitScrollingImage method of the PictureExplorer class on the back burner while we discuss the ImageDisplay class.)
Listing 8. Beginning of the ImageDisplay class.
import javax.swing.*;
import java.awt.*;
import java.awt.image.*;

/**
 * Class to display an image and the current location with
 * a + sign
 *
 * Copyright Georgia Institute of Technology 2004
 * @author Barb Ericson ericson@cc.gatech.edu
 */
public class ImageDisplay extends JPanel
                          implements Scrollable{

  //////////// fields (attributes ////////////////////////
  private Image image;       //the image to draw
  private Dimension prefSize;//preferred size of  display
  private int currentX = 0;  //the current x index
  private int currentY = 0;  //the current y index
|
Listing 8 simply declares four instance variables and initializes some of them. That's not too exciting, so we won't dwell on that.
Extends JPanel and implements Scrollable
It is important to note that an object of the ImageDisplay class extends the JPanel class and implements the Scrollable interface.
Implementation of the Scrollable interface makes the object suitable for being displayed in a JScrollPane window later.
The fact that the ImageDisplay class extends JPanel makes an object of the class a container into which other components can be placed.
Can fire mouse events and display tool tips
Perhaps more important, as a subclass of JPanel, the ImageDisplay object has the ability to fire mouse events and can register MouseListener and MouseMotionListener objects to handle those events.
Finally, being a subclass of JPanel gives the object to ability to display tool tip text when the mouse pointer lingers over the object.
The first overloaded constructor
Listing 9 shows the first of two overloaded constructors for the ImageDisplay class. This is the constructor that was called by the last statement in Listing 7.
Listing 9. The first overloaded constructor.
  /**
   * Constructor that takes the image to display
   * @param theImage the image to display
   */
  public ImageDisplay(Image theImage){
    image = theImage;
    prefSize = new Dimension(
              image.getWidth(this),image.getHeight(this));
    setPreferredSize(prefSize);
    revalidate();
  }
|
|
Except for the last statement, the code in Listing 9 is straightforward. That code saves a reference to the incoming BufferedImage object as the superclass Image type and sets the preferred size of the new object to the width and the height of the image.
The call to the revalidate method
The typical explanation for a need to call the revalidate method is that the call causes the layout manager to re-layout the component and all of its children. However, since this component doesn't yet contain any children, I can't explain why the author chose to call revalidate at this point. I will leave this as an exercise for the student to ponder.
The second overloaded constructor
The second of two overloaded constructors is shown in Listing 10.
Listing 10. The second overloaded constructor.
  /**
   * Constructor that takes the image and current x and y
   * @param theImage the image to display
   * @param x the current x value to use
   * @param y the current y value to use
   */
  public ImageDisplay(Image theImage, int x, int y)
  {
    this(theImage);
    currentX = x;
    currentY = y;
  }
|
This constructor begins by using the this keyword to call the constructor shown in Listing 9. When that constructor returns, this constructor saves two coordinate values received as incoming parameters in two of the instance variables shown in Listing 8. By default, these two variables have a value of zero, and the constructor shown in Listing 9 doesn't change those values.
Methods of the ImageDisplay class
There are several methods defined in the ImageDisplay class, which I will subdivide into three categories:
Accessor methods
The code in the accessor methods is very straightforward. The accessor methods provide access for getting or setting the values in three of the instance variables shown in Listing 8. The name of each method indicates its purpose.
The accessor methods are:
Scrollable methods
The scrollable methods consist of five methods that are declared in the Scrollable interface and provide for communication between the ImageDisplay object and its container, which is an object of the JScrollPane class.
These methods are also accessor methods of the get variety, and the code in the methods is not complex. Two of the methods return an int value having to do with the scroll-bar movement increments.
Two other methods return a boolean value having to do with how the size of the object is to be taken into account when the ImageDisplay object is displayed in the JScrollPane object.
One method returns a reference to an object of the class Dimension, which is the preferred display size of the ImageDisplay object.
The paintComponent method
The paintComponent method is called when it is time to actually render the image encapsulated in the ImageDisplay object on the screen. This is a fairly long and fairly complex method.
I'm not going to try to explain this method in this document. It is full of computations based on locations, measurements, and dimensions. It is almost necessary to sit down with the code, a pencil, and a sheet of graph paper to make sense out of the code.
Once again, I will leave it as an exercise for the student to
analyze and understand this method.
Back to the createAndInitScrollingImage method
That brings us back to the createAndInitScrollingImage method where we
left off in Listing 7.
The code in Listing 11 causes the PictureExplorer object to be registered
as a listener object for mouse events fired by the ImageDisplay object.
In other words, whenever the user clicks or drags the mouse in the image, code
belonging to the PictureExplorer object will be executed to handle events
fired by the ImageDisplay object.
Listing 11. Register PictureExplorer object as a listener object.
imageDisplay.addMouseMotionListener(this); imageDisplay.addMouseListener(this); |
To understand what is going on here, we need to examine several methods that are defined in the PictureExplorer class, so I will once again change background colors for the code fragments.
PictureExplorer class implements listener interfaces
If you examine Listing 23, you will see that the PictureExplorer class implements the following listener interfaces:
At this point in the lesson, we are interested only in the last two items in the above list. (We will get to the ActionListener interface later in this lesson.)
Must define concrete event-handler methods
Because the class implements the MouseListener interface, it must provide concrete definitions for the following event-handler methods. (Recall that concrete method definitions may be empty methods.)
Also, because the class implements the MouseMotionListener interface, it must provide concrete definitions for the following event-handler methods:
The mouseClicked and mousePressed event handlers
I will begin with the methods of the MouseListener interface. Of the five methods declared in that interface, only the two shown in Listing 12 contain any code. The bodies of the other three are completely empty, meaning that when a matching event is fired and the method is called, control returns silently to the calling method with no action being taken.
Listing 12. The mouseClicked and mousePressed event handlers.
 /**
  * Method called when the mouse is clicked
  * @param e the mouse event
  */
 public void mouseClicked(MouseEvent e){
   displayPixelInformation(e);
 }//end mouseClicked method

 /**
  * Method called when the mouse button is pushed down
  * @param e the mouse event
  */
 public void mousePressed(MouseEvent e){
   displayPixelInformation(e);
 }//end mousePressed method
|
Common behavior
The behavior of both event-handler methods in Listing 12 is the same. In both cases, the displayPixelInformation method is called, passing a reference to the MouseEvent object received as a parameter by the event handler to the method.
Before getting into the code in the displayPixelInformation method, however, let's take a look at the event handlers for the MouseMotionListener interface.
The mouseDragged event handler
One of the two methods declared in the MouseMotionListener interface (mouseMoved) has an empty body. The other method, which is not empty, is shown in Listing 13.
Listing 13. The mouseDragged event handler.
 /**
  * Called when the mouse is dragged (button held down and
  * moved)
  * @param e the mouse event
  */
 public void mouseDragged(MouseEvent e){
   displayPixelInformation(e);
 }//end mouseDragged method
|
More common behavior
As you can see, the behavior of the event handler in Listing 13 is identical to the behavior of the two event handlers in Listing 12. Therefore, it is time for us to take a look at the method named displayPixelInformation.
The displayPixelInformation method
There are three overloaded versions of methods named displayPixelInformation defined in the PictureExplorer class. The version of the displayPixelInformation method that is called by the three event handlers discussed above is shown in Listing 14.
Listing 14. The displayPixelInformation method.
 /**
  * Method to display pixel information based on a mouse
  * event
  * @param e a mouse event
  */
 private void displayPixelInformation(MouseEvent e)
 {

   // get the cursor x and y
   int cursorX = e.getX();
   int cursorY = e.getY();

   // get the x and y in the original (not scaled image)
   int pictureX = (int)(cursorX/zoomFactor + numberBase);
   int pictureY = (int)(cursorY/zoomFactor + numberBase);

   // display the information for this x and y
   displayPixelInformation(pictureX,pictureY);

 }
|
Three overloaded displayPixelInformation methods
As mentioned above, there are three overloaded methods named displayPixelInformation defined in the PictureExplorer class. Two of the methods receive coordinate information as incoming parameters.
Of these two, one receives the coordinate information as type int while the other receives the coordinate information as type String.
Purpose of the overloaded displayPixelInformation methods
The purpose of these methods is to display the coordinate and color information in the top panel in Figure 1 whenever that information changes.
I explained two overloaded versions of the method in the earlier lesson titled Building the Information Panel for the PictureExplorer GUI: Multimedia Programming with Java, (See Resources.)
An incoming parameter of type MouseEvent
The version of the method that is called in Listing 12 and Listing 13 doesn't receive coordinate information directly as incoming parameters. Instead, this version of the method receives a reference to a MouseEvent object and must extract the coordinate information from that object.
Get the coordinate values for the mouse pointer
Listing 14 begins by calling the getX and getY methods on the incoming MouseEvent object to get the coordinate values of the mouse pointer when the event was fired. (Note that these two methods return the coordinates of the mouse pointer relative to the upper-left corner of the component (JPanel) that fired the event even when that corner of the component is outside the visible limits of the JScrollPane.)
|
Compensate for the zoomFactor
If the zoomFactor has previously been used to zoom in or out on the image, the effective size of the JPanel has been increased or decreased accordingly.
Listing 14 divides the coordinate values returned by the getX and getY methods by the zoomFactor to remove the effects of zooming and convert the coordinates back to the actual coordinates of the pixel at the location of the mouse pointer when the event was fired.
Call another overloaded displayPixelInformation method
Then Listing 14 passes the coordinate values in a call to one of the other overloaded versions of the displayPixelInformation method to cause the coordinate and color information to be displayed as shown in the upper portion of Figure 1.
Remainder of the createAndInitScrollingImage method
Returning once more to where we left off in the createAndInitScrollingImage method in Listing 11, the remaining code in the method is shown in Listing 15.
Listing 15. Remainder of the createAndInitScrollingImage method.
    imageDisplay.setToolTipText("Click a mouse button on "
                + "a pixel to see the pixel information");

    scrollPane.setViewportView(imageDisplay);
    pictureFrame.getContentPane().add(
                         scrollPane, BorderLayout.CENTER);
    }
|
Set text for a toolTip
Listing 15 begins by calling the setToolTipText method on the ImageDisplay object to establish the text that is displayed when "the mouse pointer lingers over the image" in Figure 1.
Put the ImageDisplay object in the scroll pane
Following this, Listing 15 calls the setViewportView method on the JScrollPane object, passing a reference to the ImageDisplay as a parameter. Then Listing 15 adds the JScrollPane object to the center of the content pane on the JFrame object.
The combination of these two method calls causes the ImageDisplay object to be displayed in the CENTER location (with or without scroll bars) in the JFrame object as shown in Figure 1.
Manually resizing the JFrame object
The JFrame object can be manually resized. The scroll bars appear only when the size of the image is greater than the current size of the viewable area of the JFrame.
The end of the createAndInitScrollingImage method
That signals the end of the createAndInitScrollingImage method. Hopefully you understand by how just how the image is displayed in a scrollable window in a PictureExplorer object.
It may seem to you that we have been working on the PictureExplorer class for a long time. Believe it or not, however, we aren't finished with the PictureExplorer class yet. There are several more methods that I need to explain.
In the earlier lesson titled Getting Started with the PictureExplorer Class: Multimedia Programming with Java (see Resources), I explained that the PictureExplorer class implements the ActionListener interface and registers and object of itself as an action listener on every item in the Zoom menu shown in Figure 1.
I also explained that this means that whenever an item on the Zoom menu is selected, the actionPerformed method defined in the PictureExplorer class is called. However, I didn't explain the behavior of the actionPerformed method.
That time to explain the actionPerformed has come. The method is shown in its entirety in Listing 16.
Listing 16. The actionPerformed method.
 /**
  * Controls the zoom menu bar
  *
  * @param a the ActionEvent
  */
 public void actionPerformed(ActionEvent a){

   if(a.getActionCommand().equals("Update")){
     this.repaint();
   }

   if(a.getActionCommand().equals("25%")){
     this.zoom(.25);
     enableZoomItems();
     twentyFive.setEnabled(false);
   }

   if(a.getActionCommand().equals("50%")){
     this.zoom(.50);
     enableZoomItems();
     fifty.setEnabled(false);
   }

   if(a.getActionCommand().equals("75%")){
     this.zoom(.75);
     enableZoomItems();
     seventyFive.setEnabled(false);
   }

   if(a.getActionCommand().equals("100%")){
     this.zoom(1.0);
     enableZoomItems();
     hundred.setEnabled(false);
   }

   if(a.getActionCommand().equals("150%")){
     this.zoom(1.5);
     enableZoomItems();
     hundredFifty.setEnabled(false);
   }

   if(a.getActionCommand().equals("200%")){
     this.zoom(2.0);
     enableZoomItems();
     twoHundred.setEnabled(false);
   }

   if(a.getActionCommand().equals("500%")){
     this.zoom(5.0);
     enableZoomItems();
     fiveHundred.setEnabled(false);
   }
 }
|
The actionPerformed method is long, but it isn't complicated.
An ActionEvent object
Whenever a component fires an action event, it instantiates a new object of the ActionEvent class and passes that object's reference in a call to the actionPerformed methods of every ActionListener object that has been registered to be notified of the event.
The action command string
Among other things, the ActionEvent object encapsulates a reference to a String object that can be retrieved by calling the getActionCommand method on the reference to the ActionEvent object.
Eight if statements
The code in the actionPerformed method (see Listing 16) consists of eight if statements. Code in the body of each if statement extracts the string from the incoming ActionEvent object. The value of the string is tested against eight different literal string values to determine what action, if any, to take.
Seven of the eight if statements test for string values that identify one of the seven items on the Zoom menu shown in Figure 1.
The other if statement tests for the string value "Update". When it is determined that the ActionEvent object encapsulates this string value, the repaint method is called, causing the entire PictureExplorer object to be repainted on the computer screen. I will dispose of that case first.
A string value of "update"
There isn't any code in the PictureExplorer class that instantiates an ActionEvent object and encapsulates the string "Update" in the object. That means that this capability is provided for the benefit of other programs that may use of an object of the PictureExplorer class and may have a need to cause the object to repaint itself on the screen.
The cases of the seven Zoom menu items
You saw the code fragment shown in Listing 17 in the earlier lesson titled Getting Started with the PictureExplorer Class: Multimedia Programming with Java (see Resources).
Listing 17. Register the PictureExplorer object as an ActionListener on each menu item.
// add the action listeners twentyFive.addActionListener(this); fifty.addActionListener(this); seventyFive.addActionListener(this); hundred.addActionListener(this); hundredFifty.addActionListener(this); twoHundred.addActionListener(this); fiveHundred.addActionListener(this); |
The purpose of this code was to register the PictureExplorer object as an ActionListener on each of the seven menu items shown in the Zoom menu in Figure 1.
The default string values
By default, when a menu item fires an ActionEvent, the string that describes the menu item is encapsulated in the ActionEvent object that is passed to the actionPerformed method of each registered action listener.
Therefore, when the menu items shown in Figure 1 fire action events, the strings "25%", "50%", "75%", etc., are encapsulated in the ActionEvent objects. This is exactly what seven of the eight if statements in Listing 16 are testing for.
The code for a true condition
If any one of those seven if statements in Listing 16 returns true, very similar code is executed. That code:
I will explain these three actions in reverse order, which is generally the order of increasing complexity.
Calling the setEnabled method
The last of the three actions is to call the setEnabled method on the item that fired the event, passing false as a parameter.
This disables that particular menu item, making it incapable of being selected again until it has been enabled. For example, the menu item labeled "100%" has been disabled in Figure 1, because that is the current zoom level. (There is no point in being able to select a Zoom menu item that matches the current zoom level.)
The enableZoomItems method
Immediately prior to making the call to the setEnabled method, the code in Listing 16 calls the enableZoomItems method. This method is shown in Listing 18.
Listing 18. The enableZoomItems method.
 /**
  * Method to enable all menu commands
  */
 private void enableZoomItems(){
   twentyFive.setEnabled(true);
   fifty.setEnabled(true);
   seventyFive.setEnabled(true);
   hundred.setEnabled(true);
   hundredFifty.setEnabled(true);
   twoHundred.setEnabled(true);
   fiveHundred.setEnabled(true);
 }
|
The code in Listing 18 enables all seven menu items. The effect of the last two statements inside the body of each of the last seven if statements in Listing 16 is to enable all seven menu items, and then disable the one that fired the event.
That is the easy part. The more complex part of handling the action event is the call to the zoom method as the first statement in the body of each of the last seven if statements in Listing 16.
The beginning of the zoom method
The zoom method begins in Listing 19.
Note first that each call to the zoom method in Listing 16 passes the zoom factor (ranging from 0.25 to 5.0) as a parameter to the zoom method. As you will see, this factor is used to scale the size of the displayed image in the PictureExplorer object.
Listing 19. The beginning of the zoom method.
 /**
  * Zooms in the on picture by scaling the image.
  * It is extremely memory intensive.
  * @param factor the amount to zoom by
  */
 public void zoom(double factor)
 {
   // save the current zoom factor
   zoomFactor = factor;

   // calculate the new width and height and get an image
   // that size
   int width = (int) (picture.getWidth()*zoomFactor);
   int height = (int) (picture.getHeight()*zoomFactor);
   BufferedImage bimg = picture.getBufferedImage();
|
Save the new zoom state
Listing 19 begins by saving the incoming parameter in the instance variable named zoomFactor. From that point forward, the contents of that variable can be queried by other methods that need to know the current zoom state.
Calculate the zoomed size
Then Listing 19 calculates the required width and height of the displayed image by multiplying the raw dimensions of the picture by the zoomFactor.
Get a reference to the buffered image
Finally Listing 19 gets a reference to the BufferedImage object that actually contains the image in the Picture object.
Replace the current image with a scaled image
Listing 20 calls the setImage method on the ImageDisplay object to cause the image being displayed to be replaced with a new scaled image.
Listing 20. Replace the current image with a scaled image.
   // set the scroll image icon to the new image
   imageDisplay.setImage(bimg.getScaledInstance(width,
                           height, Image.SCALE_DEFAULT));
|
The interesting code is in the parameter list
The interesting code in Listing 20 is the code in the parameter list when the setImage method is called. This code calls the getScaledInstance method on the BufferedImage object, passing the width, height, and a constant named SCALE_DEFAULT as parameters.
What does Sun have to say about this?
Figure 3 contains some of what Sun has to say about the getScaledInstance method.
Figure 3. Partial description of the getScaledInstance method.
|
Creates a scaled version of this image. A new Image object is returned which will render the image at the specified width and height by default. |
In other words, a new scaled Image object is created and passed to the setImage method of the ImageDisplay object to be displayed in place of the image currently being displayed.
What about the constant named SCALE_DEFAULT
The constant named SCALE_DEFAULT that is passed to the getScaledInstance method tells the method to use a default algorithm to scale the image. Several other optional constants are available that generally trade off speed against the smoothness of the scaled image.
The remainder of the zoom method
The first three statements in Listing 21 take care of some housekeeping chores insofar as the ImageDisplay object is concerned.
Listing 21. The remainder of the zoom method.
imageDisplay.setCurrentX((int) (xIndex * zoomFactor)); imageDisplay.setCurrentY((int) (yIndex * zoomFactor)); imageDisplay.revalidate(); checkScroll(); // check if need to reposition scroll } |
Not a housekeeping matter
The last statement in Listing 21 is another matter. This statement calls the checkScroll method for the purpose of checking to determine if the current position is in the viewing area and if not, to scroll to center the current position if possible.
Partial listing of the checkScroll method
A partial listing of the checkScroll method is shown in Listing 22. (You can view the method in its entirety in Listing 23 near the end of the lesson.)
Listing 22. Partial listing of the checkScroll method.
 /**
  * Method to check that the current position is in the
  * viewing area and if not scroll to center the current
  * position if possible
  */
 public void checkScroll()
 {
   // get the x and y position in pixels
   int xPos = (int) (xIndex * zoomFactor);
   int yPos = (int) (yIndex * zoomFactor);

   // only do this if the image is larger than normal
   if (zoomFactor > 1) {

     // get the rectangle that defines the current view
     JViewport viewport = scrollPane.getViewport();
     Rectangle rect = viewport.getViewRect();
//code deleted for brevity

     // move the viewport upper left point
     viewport.scrollRectToVisible(
         new Rectangle(viewX,viewY,rectWidth,rectHeight));
   }
 }
|
Wanted: source code, pencil, and graph paper
This is another one of those cases where you almost need to sit down with the source code, a pencil, and a sheet of graph paper to sketch and figure out what is going on. I decided to leave that as an exercise for the student and deleted the tedious parts of the code in Listing 22, keeping the code that wraps around that tedious code.
Scrolling the image programatically
The main thing that I wanted to show you is that it is possible to:
In other words, you can write code that will emulate a user manually scrolling the view by using the scrollbars shown in Figure 1.
The end of the zoom method
As shown in Listing 21, the call to the checkScroll method signals the end of the zoom method, which began in Listing 19.
Remaining methods of the PictureExplorer class
That leaves the following methods of the PictureExplorer class that I haven't explained yet.
Generally speaking, the names of the methods in the above list indicate their purpose. (The main method is provided so that the class can be tested as a stand-alone application.)
The code in each of these methods is straightforward. Therefore, I won't bore you with an explanation. You can view the code for all of the methods in Listing 23.
A FocusTraversalPolicy Class
In addition, the PictureExplorer class defines a private member class named PictureExplorerFocusTraversalPolicy, which extends the class named FocusTraversalPolicy.
You learned in the earlier lesson titled Getting Started with the PictureExplorer Class: Multimedia Programming with Java (see Resources) that an object of the PictureExplorerFocusTraversalPolicy class is used to set the focus traversal policy of the PictureExplorer object.
There is nothing trivial about the code in the definition of this member class. However, focus traversal policy is a major topic and one which probably deserves one or two lessons in its own right. Therefore, I will simply have to leave the explanation of this class for a future lesson.
That concludes the explanation of the PictureExplorer class.
I encourage you to make a copy of the source code for the PictureExplorer class. Put it in your current directory along with your program files and then open the file in your IDE. (Make certain that the current directory appears in the classpath to the left of Ericson's media library.)
Experiment with the PictureExplorer code, making changes, and observing the results of your changes. Make certain that you can explain why your changes behave as they do.
Also experiment with the PictureExplorer onscreen GUI. Try some different image files and see if the color values reported by the GUI make sense to you.
In the previous two lessons, you learned about the overall construction of the PictureExplorer GUI shown in Figure 1. You also learned how to construct the Zoom menu and how to register event listener objects on the items in the menu.
You learned how to construct the infoPanel in the NORTH location of the GUI in Figure 1. You also learned how to register event listener objects on the components in that panel making use of objects of anonymous classes.
Along the way, you also learned about some other interesting topics including:
In this lesson, you learned:
You also learned about a class named ImageDisplay, which you may find useful in programs of your own design.
By now you should have a pretty good handle on the PictureExplorer class and should be able to incorporate it into programs of your own.
Future lesssons will explain a variety of topics including:
Listing 23. Source code for Ericson's PictureExplorer class.
import java.awt.*;
import java.awt.event.*;
import javax.swing.*;
import java.awt.image.*;
import javax.swing.border.*;
/**
 * Displays a picture and lets you explore the picture by
 * displaying the x, y, red, green, and blue values of the
 * pixel at the cursor when you click a mouse button or
 * press and hold a mouse button while moving the cursor.
 * It also lets you zoom in or out.  You can also type in
 * a x and y value to see the color at that location.
 *
 * Originally created for the Jython Environment for
 * Students (JES).
 * Modified to work with DrJava by Barbara Ericson
 *
 * Copyright Georgia Institute of Technology 2004
 * @author Keith McDermottt, gte047w@cc.gatech.edu
 * @author Barb Ericson ericson@cc.gatech.edu
 */
public class PictureExplorer implements
       MouseMotionListener, ActionListener, MouseListener{

 // current x and y index
 private int xIndex = 0;
 private int yIndex = 0;

 //Main gui variables
 private JFrame pictureFrame;
 private JScrollPane scrollPane;

 //information bar variables
 private JLabel xLabel;
 private JButton xPrevButton;
 private JButton yPrevButton;
 private JButton xNextButton;
 private JButton yNextButton;
 private JLabel yLabel;
 private JTextField xValue;
 private JTextField yValue;
 private JLabel rValue;
 private JLabel gValue;
 private JLabel bValue;
 private JLabel colorLabel;
 private JPanel colorPanel;

 // menu components
 private JMenuBar menuBar;
 private JMenu zoomMenu;
 private JMenuItem twentyFive;
 private JMenuItem fifty;
 private JMenuItem seventyFive;
 private JMenuItem hundred;
 private JMenuItem hundredFifty;
 private JMenuItem twoHundred;
 private JMenuItem fiveHundred;

 /** The picture being explored */
 private DigitalPicture picture;

 /** The image icon used to display the picture */
 private ImageIcon scrollImageIcon;

 /** The image display */
 private ImageDisplay imageDisplay;

 /** the zoom factor (amount to zoom) */
 private double zoomFactor;

 /** the number system to use, 0 means starting at 0,
  *  1 means starting at 1 */
 private int numberBase=0;

 /**
  * Public constructor
  * @param picture the picture to explore
  */
 public PictureExplorer(DigitalPicture picture)
 {
   // set the fields
   this.picture=picture;
   zoomFactor=1;

   // create the window and set things up
   createWindow();
 }

 /**
  * Changes the number system to start at one
  */
 public void changeToBaseOne()
 {
   numberBase=1;
 }

 /**
  * Set the title of the frame
  *@param title the title to use in the JFrame
  */
 public void setTitle(String title)
 {
   pictureFrame.setTitle(title);
 }

 /**
  * Method to create and initialize the picture frame
  */
 private void createAndInitPictureFrame()
 {
   pictureFrame = new JFrame(); // create the JFrame
   //allow the user to resize it
   pictureFrame.setResizable(true);
    // use border layout
   pictureFrame.getContentPane().setLayout(
                                      new BorderLayout());
    // when close stop
   pictureFrame.setDefaultCloseOperation(
                                 JFrame.DISPOSE_ON_CLOSE);
   pictureFrame.setTitle(picture.getTitle());
   PictureExplorerFocusTraversalPolicy newPolicy =
                new PictureExplorerFocusTraversalPolicy();
   pictureFrame.setFocusTraversalPolicy(newPolicy);

 }

 /**
  * Method to create the menu bar, menus, and menu items
  */
 private void setUpMenuBar()
 {
   //create menu
   menuBar = new JMenuBar();
   zoomMenu = new JMenu("Zoom");
   twentyFive = new JMenuItem("25%");
   fifty = new JMenuItem("50%");
   seventyFive = new JMenuItem("75%");
   hundred = new JMenuItem("100%");
   hundred.setEnabled(false);
   hundredFifty = new JMenuItem("150%");
   twoHundred = new JMenuItem("200%");
   fiveHundred = new JMenuItem("500%");

   // add the action listeners
   twentyFive.addActionListener(this);
   fifty.addActionListener(this);
   seventyFive.addActionListener(this);
   hundred.addActionListener(this);
   hundredFifty.addActionListener(this);
   twoHundred.addActionListener(this);
   fiveHundred.addActionListener(this);

   // add the menu items to the menus
   zoomMenu.add(twentyFive);
   zoomMenu.add(fifty);
   zoomMenu.add(seventyFive);
   zoomMenu.add(hundred);
   zoomMenu.add(hundredFifty);
   zoomMenu.add(twoHundred);
   zoomMenu.add(fiveHundred);
   menuBar.add(zoomMenu);

   // set the menu bar to this menu
   pictureFrame.setJMenuBar(menuBar);
 }

 /**
  * Create and initialize the scrolling image
  */
 private void createAndInitScrollingImage()
 {
   scrollPane = new JScrollPane();

   BufferedImage bimg = picture.getBufferedImage();
   imageDisplay = new ImageDisplay(bimg);
   imageDisplay.addMouseMotionListener(this);
   imageDisplay.addMouseListener(this);
   imageDisplay.setToolTipText("Click a mouse button on "
                + "a pixel to see the pixel information");
   scrollPane.setViewportView(imageDisplay);
   pictureFrame.getContentPane().add(
                         scrollPane, BorderLayout.CENTER);
 }

 /**
  * Creates the JFrame and sets everything up
  */
 private void createWindow()
 {
   // create the picture frame and initialize it
   createAndInitPictureFrame();

   // set up the menu bar
   setUpMenuBar();

   //create the information panel
   createInfoPanel();

   //creates the scrollpane for the picture
   createAndInitScrollingImage();

   // show the picture in the frame at the size it needs
   // to be
   pictureFrame.pack();
   pictureFrame.setVisible(true);
 }

 /**
  * Method to set up the next and previous buttons for the
  * pixel location information
  */
 private void setUpNextAndPreviousButtons()
 {
   // create the image icons for the buttons
   Icon prevIcon = new ImageIcon(
         SoundExplorer.class.getResource("leftArrow.gif"),
                                        "previous index");
   Icon nextIcon = new ImageIcon(
        SoundExplorer.class.getResource("rightArrow.gif"),
                                            "next index");
   // create the arrow buttons
   xPrevButton = new JButton(prevIcon);
   xNextButton = new JButton(nextIcon);
   yPrevButton = new JButton(prevIcon);
   yNextButton = new JButton(nextIcon);

   // set the tool tip text
   xNextButton.setToolTipText(
                       "Click to go to the next x value");
   xPrevButton.setToolTipText(
                   "Click to go to the previous x value");
   yNextButton.setToolTipText(
                       "Click to go to the next y value");
   yPrevButton.setToolTipText(
                   "Click to go to the previous y value");

   // set the sizes of the buttons
   int prevWidth = prevIcon.getIconWidth() + 2;
   int nextWidth = nextIcon.getIconWidth() + 2;
   int prevHeight = prevIcon.getIconHeight() + 2;
   int nextHeight = nextIcon.getIconHeight() + 2;
   Dimension prevDimension =
                      new Dimension(prevWidth,prevHeight);
   Dimension nextDimension =
                     new Dimension(nextWidth, nextHeight);
   xPrevButton.setPreferredSize(prevDimension);
   yPrevButton.setPreferredSize(prevDimension);
   xNextButton.setPreferredSize(nextDimension);
   yNextButton.setPreferredSize(nextDimension);

   // handle previous x button press
   xPrevButton.addActionListener(new ActionListener() {
     public void actionPerformed(ActionEvent evt) {
       xIndex--;
       if (xIndex < 0)
         xIndex = 0;
       displayPixelInformation(xIndex,yIndex);
     }
   });

   // handle previous y button press
   yPrevButton.addActionListener(new ActionListener() {
     public void actionPerformed(ActionEvent evt) {
       yIndex--;
       if (yIndex < 0)
         yIndex = 0;
       displayPixelInformation(xIndex,yIndex);
     }
   });

   // handle next x button press
   xNextButton.addActionListener(new ActionListener() {
     public void actionPerformed(ActionEvent evt) {
       xIndex++;
       if (xIndex >= picture.getWidth())
         xIndex = picture.getWidth() - 1;
       displayPixelInformation(xIndex,yIndex);
     }
   });

   // handle next y button press
   yNextButton.addActionListener(new ActionListener() {
     public void actionPerformed(ActionEvent evt) {
       yIndex++;
       if (yIndex >= picture.getHeight())
         yIndex = picture.getHeight() - 1;
       displayPixelInformation(xIndex,yIndex);
     }
   });
 }

 /**
  * Create the pixel location panel
  * @param labelFont the font for the labels
  * @return the location panel
  */
 public JPanel createLocationPanel(Font labelFont) {

   // create a location panel
   JPanel locationPanel = new JPanel();
   locationPanel.setLayout(new FlowLayout());
   Box hBox = Box.createHorizontalBox();

   // create the labels
   xLabel = new JLabel("X:");
   yLabel = new JLabel("Y:");

   // create the text fields
   xValue = new JTextField(
                 Integer.toString(xIndex + numberBase),6);
   xValue.addActionListener(new ActionListener() {
     public void actionPerformed(ActionEvent e) {
       displayPixelInformation(
                       xValue.getText(),yValue.getText());
     }
   });
   yValue = new JTextField(
                 Integer.toString(yIndex + numberBase),6);
   yValue.addActionListener(new ActionListener() {
     public void actionPerformed(ActionEvent e) {
      displayPixelInformation(
                       xValue.getText(),yValue.getText());
     }
   });

   // set up the next and previous buttons
   setUpNextAndPreviousButtons();

   // set up the font for the labels
   xLabel.setFont(labelFont);
   yLabel.setFont(labelFont);
   xValue.setFont(labelFont);
   yValue.setFont(labelFont);

   // add the items to the vertical box and the box to
   // the panel
   hBox.add(Box.createHorizontalGlue());
   hBox.add(xLabel);
   hBox.add(xPrevButton);
   hBox.add(xValue);
   hBox.add(xNextButton);
   hBox.add(Box.createHorizontalStrut(10));
   hBox.add(yLabel);
   hBox.add(yPrevButton);
   hBox.add(yValue);
   hBox.add(yNextButton);
   locationPanel.add(hBox);
   hBox.add(Box.createHorizontalGlue());

   return locationPanel;
 }

 /**
  * Create the color information panel
  * @param labelFont the font to use for labels
  * @return the color information panel
  */
 private JPanel createColorInfoPanel(Font labelFont)
 {
   // create a color info panel
   JPanel colorInfoPanel = new JPanel();
   colorInfoPanel.setLayout(new FlowLayout());

   // get the pixel at the x and y
   Pixel pixel = new Pixel(picture,xIndex,yIndex);

   // create the labels
   rValue = new JLabel("R: " + pixel.getRed());
   gValue = new JLabel("G: " + pixel.getGreen());
   bValue = new JLabel("B: " + pixel.getBlue());

   // create the sample color panel and label
   colorLabel = new JLabel("Color at location: ");
   colorPanel = new JPanel();
   colorPanel.setBorder(new LineBorder(Color.black,1));

   // set the color sample to the pixel color
   colorPanel.setBackground(pixel.getColor());

   // set the font
   rValue.setFont(labelFont);
   gValue.setFont(labelFont);
   bValue.setFont(labelFont);
   colorLabel.setFont(labelFont);
   colorPanel.setPreferredSize(new Dimension(25,25));

   // add items to the color information panel
   colorInfoPanel.add(rValue);
   colorInfoPanel.add(gValue);
   colorInfoPanel.add(bValue);
   colorInfoPanel.add(colorLabel);
   colorInfoPanel.add(colorPanel);

   return colorInfoPanel;
 }

 /**
  * Creates the North JPanel with all the pixel location
  * and color information
  */
 private void createInfoPanel()
 {
   // create the info panel and set the layout
   JPanel infoPanel = new JPanel();
   infoPanel.setLayout(new BorderLayout());

   // create the font
   Font largerFont =
                   new Font(infoPanel.getFont().getName(),
                       infoPanel.getFont().getStyle(),14);

   // create the pixel location panel
   JPanel locationPanel = createLocationPanel(largerFont);

   // create the color informaiton panel
   JPanel colorInfoPanel =
                         createColorInfoPanel(largerFont);

   // add the panels to the info panel
   infoPanel.add(BorderLayout.NORTH,locationPanel);
   infoPanel.add(BorderLayout.SOUTH,colorInfoPanel);

   // add the info panel
   pictureFrame.getContentPane().add(
                            BorderLayout.NORTH,infoPanel);
 }

 /**
  * Method to check that the current position is in the
  * viewing area and if not scroll to center the current
  * position if possible
  */
 public void checkScroll()
 {
   // get the x and y position in pixels
   int xPos = (int) (xIndex * zoomFactor);
   int yPos = (int) (yIndex * zoomFactor);

   // only do this if the image is larger than normal
   if (zoomFactor > 1) {

     // get the rectangle that defines the current view
     JViewport viewport = scrollPane.getViewport();
     Rectangle rect = viewport.getViewRect();
     int rectMinX = (int) rect.getX();
     int rectWidth = (int) rect.getWidth();
     int rectMaxX = rectMinX + rectWidth - 1;
     int rectMinY = (int) rect.getY();
     int rectHeight = (int) rect.getHeight();
     int rectMaxY = rectMinY + rectHeight - 1;

     // get the maximum possible x and y index
     int maxIndexX = (int)(picture.getWidth()*zoomFactor)
                           - rectWidth - 1;
     int maxIndexY = (int)(picture.getHeight()*zoomFactor)
                           - rectHeight - 1;

     // calculate how to position the current position in
     // the middle of the viewing area
     int viewX = xPos - (int) (rectWidth / 2);
     int viewY = yPos - (int) (rectHeight / 2);

     // reposition the viewX and viewY if outside allowed
     // values
     if (viewX < 0)
       viewX = 0;
     else if (viewX > maxIndexX)
       viewX = maxIndexX;
     if (viewY < 0)
       viewY = 0;
     else if (viewY > maxIndexY)
       viewY = maxIndexY;

     // move the viewport upper left point
     viewport.scrollRectToVisible(
         new Rectangle(viewX,viewY,rectWidth,rectHeight));
   }
 }

 /**
  * Zooms in the on picture by scaling the image.
  * It is extremely memory intensive.
  * @param factor the amount to zoom by
  */
 public void zoom(double factor)
 {
   // save the current zoom factor
   zoomFactor = factor;

   // calculate the new width and height and get an image
   // that size
   int width = (int) (picture.getWidth()*zoomFactor);
   int height = (int) (picture.getHeight()*zoomFactor);
   BufferedImage bimg = picture.getBufferedImage();

   // set the scroll image icon to the new image
   imageDisplay.setImage(bimg.getScaledInstance(width,
                           height, Image.SCALE_DEFAULT));
   imageDisplay.setCurrentX((int) (xIndex * zoomFactor));
   imageDisplay.setCurrentY((int) (yIndex * zoomFactor));
   imageDisplay.revalidate();
   checkScroll();  // check if need to reposition scroll
 }

 /**
  * Repaints the image on the scrollpane.
  */
 public void repaint()
 {
   pictureFrame.repaint();
 }

 //****************************************//
 //               Event Listeners          //
 //****************************************//

 /**
  * Called when the mouse is dragged (button held down and
  * moved)
  * @param e the mouse event
  */
 public void mouseDragged(MouseEvent e)
 {
   displayPixelInformation(e);
 }

 /**
  * Method to check if the given x and y are in the
  * picture
  * @param x the horiztonal value
  * @param y the vertical value
  * @return true if the x and y are in the picture and
  * false otherwise
  */
 private boolean isLocationInPicture(int x, int y)
 {
   boolean result = false; // the default is false
   if (x >= 0 && x < picture.getWidth() &&
       y >= 0 && y < picture.getHeight())
     result = true;

   return result;
 }

 /**
  * Method to display the pixel information from the
  * passed x and y but also converts x and y from strings
  * @param xString the x value as a string from the user
  * @param yString the y value as a string from the user
  */
 public void displayPixelInformation(
                           String xString, String yString)
 {
   int x = -1;
   int y = -1;
   try {
     x = Integer.parseInt(xString);
     x = x - numberBase;
     y = Integer.parseInt(yString);
     y = y - numberBase;
   } catch (Exception ex) {
   }

   if (x >= 0 && y >= 0) {
     displayPixelInformation(x,y);
   }
 }

 /**
  * Method to display pixel information for the passed x
  * and y
  * @param pictureX the x value in the picture
  * @param pictureY the y value in the picture
  */
 private void displayPixelInformation(
                               int pictureX, int pictureY)
 {
   // check that this x and y is in range
   if (isLocationInPicture(pictureX, pictureY))
   {
     // save the current x and y index
     xIndex = pictureX;
     yIndex = pictureY;

     // get the pixel at the x and y
     Pixel pixel = new Pixel(picture,xIndex,yIndex);

     // set the values based on the pixel
     xValue.setText(Integer.toString(
                                   xIndex  + numberBase));
     yValue.setText(Integer.toString(
                                    yIndex + numberBase));
     rValue.setText("R: " + pixel.getRed());
     gValue.setText("G: " + pixel.getGreen());
     bValue.setText("B: " + pixel.getBlue());
     colorPanel.setBackground(new Color(pixel.getRed(),
                                        pixel.getGreen(),
                                        pixel.getBlue()));

   }
   else
   {
     clearInformation();
   }

   // notify the image display of the current x and y
   imageDisplay.setCurrentX((int) (xIndex * zoomFactor));
   imageDisplay.setCurrentY((int) (yIndex * zoomFactor));
 }

 /**
  * Method to display pixel information based on a mouse
  * event
  * @param e a mouse event
  */
 private void displayPixelInformation(MouseEvent e)
 {

   // get the cursor x and y
   int cursorX = e.getX();
   int cursorY = e.getY();

   // get the x and y in the original (not scaled image)
   int pictureX = (int)(cursorX/zoomFactor + numberBase);
   int pictureY = (int)(cursorY/zoomFactor + numberBase);

   // display the information for this x and y
   displayPixelInformation(pictureX,pictureY);

 }

 /**
  * Method to clear the labels and current color and
  * reset the  current index to -1
  */
 private void clearInformation()
 {
   xValue.setText("N/A");
   yValue.setText("N/A");
   rValue.setText("R: N/A");
   gValue.setText("G: N/A");
   bValue.setText("B: N/A");
   colorPanel.setBackground(Color.black);
   xIndex = -1;
   yIndex = -1;
 }

 /**
  * Method called when the mouse is moved with no buttons
  * down
  * @param e the mouse event
  */
 public void mouseMoved(MouseEvent e)
 {}

 /**
  * Method called when the mouse is clicked
  * @param e the mouse event
  */
 public void mouseClicked(MouseEvent e)
 {
   displayPixelInformation(e);
 }

 /**
  * Method called when the mouse button is pushed down
  * @param e the mouse event
  */
 public void mousePressed(MouseEvent e)
 {
   displayPixelInformation(e);
 }

 /**
  * Method called when the mouse button is released
  * @param e the mouse event
  */
 public void mouseReleased(MouseEvent e)
 {
 }

 /**
  * Method called when the component is entered (mouse
  * moves over it)
  * @param e the mouse event
  */
 public void mouseEntered(MouseEvent e)
 {
 }

 /**
  * Method called when the mouse moves over the component
  * @param e the mouse event
  */
 public void mouseExited(MouseEvent e)
 {
 }

 /**
  * Method to enable all menu commands
  */
 private void enableZoomItems()
 {
   twentyFive.setEnabled(true);
   fifty.setEnabled(true);
   seventyFive.setEnabled(true);
   hundred.setEnabled(true);
   hundredFifty.setEnabled(true);
   twoHundred.setEnabled(true);
   fiveHundred.setEnabled(true);
 }

 /**
  * Controls the zoom menu bar
  *
  * @param a the ActionEvent
  */
 public void actionPerformed(ActionEvent a)
 {

   if(a.getActionCommand().equals("Update"))
   {
     this.repaint();
   }

   if(a.getActionCommand().equals("25%"))
   {
     this.zoom(.25);
     enableZoomItems();
     twentyFive.setEnabled(false);
   }

   if(a.getActionCommand().equals("50%"))
   {
     this.zoom(.50);
     enableZoomItems();
     fifty.setEnabled(false);
   }

   if(a.getActionCommand().equals("75%"))
   {
     this.zoom(.75);
     enableZoomItems();
     seventyFive.setEnabled(false);
   }

   if(a.getActionCommand().equals("100%"))
   {
     this.zoom(1.0);
     enableZoomItems();
     hundred.setEnabled(false);
   }

   if(a.getActionCommand().equals("150%"))
   {
     this.zoom(1.5);
     enableZoomItems();
     hundredFifty.setEnabled(false);
   }

   if(a.getActionCommand().equals("200%"))
   {
     this.zoom(2.0);
     enableZoomItems();
     twoHundred.setEnabled(false);
   }

   if(a.getActionCommand().equals("500%"))
   {
     this.zoom(5.0);
     enableZoomItems();
     fiveHundred.setEnabled(false);
   }
 }

 /**
  * Test Main.  It will ask you to pick a file and then
  * show it
  */
 public static void main( String args[])
 {
   Picture p = new Picture(FileChooser.pickAFile());
   PictureExplorer test = new PictureExplorer(p);

 }

 /**
  * Class for establishing the focus for the textfields
  */
 private class PictureExplorerFocusTraversalPolicy
                 extends FocusTraversalPolicy {

        /**
         * Method to get the next component for focus
         */
        public Component getComponentAfter(
                                 Container focusCycleRoot,
                                 Component aComponent) {
            if (aComponent.equals(xValue))
              return yValue;
            else
              return xValue;
        }

        /**
         * Method to get the previous component for focus
         */
         public Component getComponentBefore(
                                 Container focusCycleRoot,
                                 Component aComponent) {
            if (aComponent.equals(xValue))
              return yValue;
            else
              return xValue;
         }

         public Component getDefaultComponent(
                               Container focusCycleRoot) {
            return xValue;
        }

        public Component getLastComponent(
                               Container focusCycleRoot) {
            return yValue;
        }

        public Component getFirstComponent(
                               Container focusCycleRoot) {
            return xValue;
        }
    }//end PictureExplorerFocusTraversalPolicy inner class

}//end PictureExplorer class
|
Listing 24. Source code for the program named Java362a.
/*Program Java362a
Copyright R.G.Baldwin 2009

The purpose of this program is to support an explanation
of the PictureExplorer class.

A Picture object having dimensions of 450x345 pixels is
created. The the show method and the explore method are
called on the object to produce two different screen
displays of the picture.

The explore method simply creates a new object of the
PictureExplorer class.

Tested using Windows Vista Premium Home edition and
Ericso's multimedia library.
*********************************************************/

public class Main{
  public static void main(String[] args){
    //Construct a new 460x345 Picture object.
    Picture pix1 = new Picture("ScaledBeach460x345.jpg");
    pix1.show();//display the picture in the show format
    //Display the picture again in the explore format.
    pix1.explore();
  }//end main method
}//end class Main
|
Listing 25. Source code for the ImageDisplay class.
import javax.swing.*;
import java.awt.*;
import java.awt.image.*;

/**
 * Class to display an image and the current location with
 * a + sign
 *
 * Copyright Georgia Institute of Technology 2004
 * @author Barb Ericson ericson@cc.gatech.edu
 */
public class ImageDisplay extends JPanel
                          implements Scrollable{

  //////////// fields (attributes ////////////////////////
  private Image image;       //the image to draw
  private Dimension prefSize;//preferred size of  display
  private int currentX = 0;  //the current x index
  private int currentY = 0;  //the current y index

  //////////// constructors //////////////////////////////

  /**
   * Constructor that takes the image to display
   * @param theImage the image to display
   */
  public ImageDisplay(Image theImage){
    image = theImage;
    prefSize = new Dimension(
              image.getWidth(this),image.getHeight(this));
    setPreferredSize(prefSize);
    revalidate();
  }

  /**
   * Constructor that takes the image and current x and y
   * @param theImage the image to display
   * @param x the current x value to use
   * @param y the current y value to use
   */
  public ImageDisplay(Image theImage, int x, int y)
  {
    this(theImage);
    currentX = x;
    currentY = y;
  }

  ///////////////// methods //////////////////////////////

  /**
   * Method to get the image
   * @return the image
   */
  public Image getImage() { return image; }

  /**
   * Method to get the current x
   * @return the current x value
   */
  public int getCurrentX() { return currentX; }

  /**
   * Method to get the current y
   * @return the current y value
   */
  public int getCurrentY() { return currentY; }

  /**
   * Method to set the current x
   * @param x the x value to use
   */
  public void setCurrentX(int x)
  {
    currentX = x;
    repaint();
  }

  /**
   * Method to set the current y
   * @param y the y value to use
   */
  public void setCurrentY(int y)
  {
    currentY = y;
    repaint();
  }

  /**
   * Method to set the image
   * @param theImage the new image to use
   */
  public void setImage(Image theImage){
    image = theImage;
    setPreferredSize(new Dimension(
             image.getWidth(this),image.getHeight(this)));
    repaint();
  }

  /**
   * Method to return the preferred size
   * @return the preferred size of this component
   */
  public Dimension getPreferredScrollableViewportSize()
  {
    return prefSize;
  }

  /**
   * Method to return the unit increment for scrolling
   * @param visibleRect the visible rectangle
   * @param orientation vertical or horizontal
   * @param direction neg is up or left and pos is right
   * or down
   * @return the unit increment for arrow clicks
   */
  public int getScrollableUnitIncrement(
                                    Rectangle visibleRect,
                                    int orientation,
                                    int direction)
  { return 1; }

  /**
   * Method to return the block increment for scrolling
   * @param visibleRect the visible rectangle
   * @param orientation vertical or horizontal
   * @param direction neg is up or left and pos is right
   * or down
   * @return the block increment for clicking in scroll
   * area
   */
  public int getScrollableBlockIncrement(
                                    Rectangle visibleRect,
                                    int orientation,
                                    int direction){
    return 10;
  }

  /**
   * Method to check if the viewport width is the source
   * width
   * @return true if viewport and source have same width
   */
  public boolean getScrollableTracksViewportWidth()
  { return false; }

  /**
   * Method to check if the viewport height is the source
   * height
   * @return true if viewport and soure have same height
   */
  public boolean getScrollableTracksViewportHeight()
  { return false; }

  /**
   * Method to handle displaying this object
   * @param g the graphics object for drawing with
   */
  public void paintComponent(Graphics g)
  {
    super.paintComponent(g);
    int num = 3;
    int xStart = currentX - num;
    int xEnd = currentX + num;
    int yStart = currentY - num;
    int yEnd = currentY + num;
    int width = image.getWidth(this);
    int maxX = width - 1;
    int height = image.getHeight(this);
    int maxY = height - 1;

    // draw the image
    g.drawImage(image,0,0,this);

    // check if the current index is in the image
    if (currentX >= 0 && currentX < width &&
        currentY >= 0 && currentY < height)
    {

      // check that the start and end values are visible
      if (xStart < 0)
        xStart = 0;
      if (xEnd > maxX)
        xEnd = maxX;
      if (yStart < 0)
        yStart = 0;
      if (yEnd > maxY)
        yEnd = maxY;

      // draw a small cross at the current x and y in
      // yellow
      g.setColor(Color.yellow);
      g.drawLine(xStart,currentY,xEnd,currentY);
      g.drawLine(currentX,yStart,currentX,yEnd);
      g.setColor(Color.black);

      // outline the cross in black so that it shows up
      // better
      int leftX = currentX - 1;
      int rightX = currentX + 1;
      int upY = currentY - 1;
      int downY = currentY + 1;
      if (xStart <= leftX && upY >= 0)
        g.drawLine(xStart,upY,leftX,upY);
      if (yStart <= upY && leftX >= 0)
        g.drawLine(leftX,yStart,leftX,upY);
      if (yStart <= upY && rightX <= maxX)
        g.drawLine(rightX,yStart,rightX,upY);
      if (upY >= 0 && rightX <= xEnd)
        g.drawLine(rightX,upY,xEnd,upY);
      if (downY < height && rightX <= xEnd)
        g.drawLine(rightX,downY,xEnd,downY);
      if (downY <= yEnd && rightX < width)
        g.drawLine(rightX,downY,rightX,yEnd);
      if (xStart <= leftX && downY < height)
        g.drawLine(xStart,downY,leftX,downY);
      if (leftX >= 0 && downY <= yEnd)
        g.drawLine(leftX,downY,leftX,yEnd);

    }
  }
}
|
Copyright 2009, Richard G. Baldwin. Reproduction in whole or in part in any form or medium without express written permission from Richard Baldwin is prohibited.
Richard has participated in numerous consulting projects and he frequently provides onsite training at the high-tech companies located in and around Austin, Texas. He is the author of Baldwin's Programming Tutorials, which have gained a worldwide following among experienced and aspiring programmers. He has also published articles in JavaPro magazine.
In addition to his programming expertise, Richard has many years of practical experience in Digital Signal Processing (DSP). His first job after he earned his Bachelor's degree was doing DSP in the Seismic Research Department of Texas Instruments. (TI is still a world leader in DSP.) In the following years, he applied his programming and DSP expertise to other interesting areas including sonar and underwater acoustics.
Richard holds an MSEE degree from Southern Methodist University and has many years of experience in the application of computer technology to real-world problems.
-end-